
python操作RabbitMQ
介紹
RabbitMQ是一個在AMQP基礎上完整的,可復用的企業消息系統。他遵循Mozilla Public License開源協議。
MQ全稱為Message Queue, 消息隊列(MQ)是一種應用程序對應用程序的通信方法。應用程序通過讀寫出入隊列的消息(針對應用程序的數據)來通信,而無需專用連接來鏈接它們。消 息傳遞指的是程序之間通過在消息中發送數據進行通信,而不是通過直接調用彼此來通信,直接調用通常是用於諸如遠程過程調用的技術。排隊指的是應用程序通過 隊列來通信。隊列的使用除去了接收和發送應用程序同時執行的要求。
安裝
RabbitMQ 下載地址:http://www.rabbitmq.com/install-standalone-mac.html
安裝配置epel源
   $ rpm -ivh http://dl.fedoraproject.org/pub/epel/6/i386/epel-release-6-8.noarch.rpm

安裝erlang
   $ yum -y install erlang

安裝RabbitMQ
   $ yum -y install rabbitmq-server
使用
官方使用文檔:http://www.rabbitmq.com/getstarted.html
1.實現最簡單的隊列通信
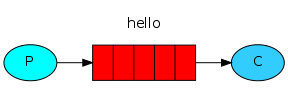
#!/usr/bin/env python #一個簡單的發數據send端,一對一模式(生產者) import pika connection = pika.BlockingConnection(pika.ConnectionParameters(host=‘localhost‘)) #初始化連接,連接到RabbitMQ channel = connection.channel() #生成一個連接管道 channel.queue_declare(queue=‘hello‘) #聲明一個隊列名#生產消息 channel.basic_publish(exchange=‘‘, routing_key=‘hello‘, #要發送到那個隊列中 body=‘Hello World!‘ #發送的內容 ) print(" [x] Sent ‘Hello World!‘") connection.close() #關閉RabbitMQ的連接
#!/usr/bin/env python
#一個簡單的recvive端,一對一模式(消費者)
import pika

connection = pika.BlockingConnection(pika.ConnectionParameters(host=‘localhost‘))	#初始化連接,連接到RabbitMQ
channel = connection.channel()	#生成一個連接管道

channel.queue_declare(queue=‘hello‘)	#這裏也要聲明一下隊列的名稱,如果客戶端啟動,服務端沒有啟動,沒有聲明會報錯

def callback(ch, method, properties, body):	#定義一個接收到消息之後的回調函數
    print(" [x] Received %r" % body)

#消費消息
channel.basic_consume(callback,		#當接收到一個消息之後回調CALLBACk函數處理
                      queue=‘hello‘,	#定義那個隊列中去取,消息
                      no_ack=True	#這個意思是不返回確認,消息處理完成之後返回確認,RabbitMQ從隊列中刪除,一般不用
					  )

print(‘ [*] Waiting for messages. To exit press CTRL+C‘)

channel.start_consuming()	#啟動連接,如果沒有數據接收就會一直等待,不會停止
2. Work Queues
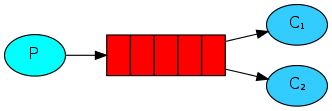
在這種模式下,RabbitMQ會默認把p發的消息依次分發給各個消費者(c),跟負載均衡差不多
RabbitMQ持久化與公平分發
1)acknowledgment 消息不丟失的方法
生效方法:channel.basic_consume(consumer_callback, queue, no_ack=False, exclusive=False, consumer_tag=None, arguments=None)
即no_ack=False(默認為False,即必須有確認標識),在回調函數consumer_callback中,未收到確認標識,那麽,RabbitMQ會重新將該任務添加到隊列中。(消費者端)
2) 消息持久化
雖然有了消息反饋機制,但是如果rabbitmq自身掛掉的話,那麽任務還是會丟失。所以需要將任務持久化存儲起來。聲明持久化存儲
channel.queue_declare(queue=‘hello‘, durable=True) # 聲明隊列持久化
Ps: 但是這樣程序會執行錯誤,因為‘hello’這個隊列已經存在,並且是非持久化的,rabbitmq不允許使用不同的參數來重新定義存在的隊列。因此需要重新定義一個隊列
channel.queue_declare(queue=‘test_queue‘, durable=True) # 聲明隊列持久化
註意:如果僅僅是設置了隊列的持久化,僅隊列本身可以在rabbit-server宕機後保留,隊列中的信息依然會丟失,如果想讓隊列中的信息或者任務保留,還需要做以下設置:
channel.basic_publish(exchange=‘‘,
                      routing_key="test_queue",
                      body=message,
                      properties=pika.BasicProperties(
                         delivery_mode = 2, # 使消息或任務也持久化存儲
                      ))

消息隊列持久化包括3個部分:
    (1)exchange持久化,在聲明時指定durable => 1
    (2)queue持久化,在聲明時指定durable => 1
    (3)消息持久化,在投遞時指定delivery_mode=> 2(1是非持久化)

    如果exchange和queue都是持久化的,那麽它們之間的binding也是持久化的。如果exchange和queue兩者之間有一個持久化,一個非持久化,就不允許建立綁定。
3) 消息公平分發
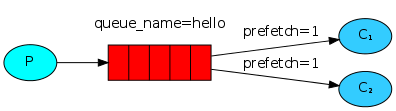
如果Rabbit只管按順序把消息發到各個消費者身上,不考慮消費者負載的話,很可能出現,一個機器配置不高的消費者那裏堆積了很多消息處理不完,同時配置高的消費者卻一直很輕松。為解決此問題,可以在各個消費者端,配置perfetch=1,意思就是告訴RabbitMQ在我這個消費者當前消息還沒處理完的時候就不要再給
channel.basic_qos(prefetch_count=1) 表示誰來誰取,不再按照奇偶數排列
帶消息持久化+公平分發的完整代碼
生產者端:
#!/usr/bin/env python
import pika
import sys

connection = pika.BlockingConnection(pika.ConnectionParameters(
        host=‘localhost‘))
channel = connection.channel()

channel.queue_declare(queue=‘task_queue‘, durable=True)

message = ‘ ‘.join(sys.argv[1:]) or "Hello World!"
channel.basic_publish(exchange=‘‘,
                      routing_key=‘task_queue‘,
                      body=message,
                      properties=pika.BasicProperties(
                         delivery_mode = 2, # make message persistent
                      ))
print(" [x] Sent %r" % message)
connection.close()
消費者端:
#!/usr/bin/env python
import pika
import time

connection = pika.BlockingConnection(pika.ConnectionParameters(
        host=‘localhost‘))
channel = connection.channel()

channel.queue_declare(queue=‘task_queue‘, durable=True)
print(‘ [*] Waiting for messages. To exit press CTRL+C‘)

def callback(ch, method, properties, body):
    print(" [x] Received %r" % body)
    time.sleep(body.count(b‘.‘))	#模擬處理操作
    print(" [x] Done")
    ch.basic_ack(delivery_tag = method.delivery_tag)

channel.basic_qos(prefetch_count=1)	#消息公平分發,配置perfetch=1,意思就是告訴RabbitMQ在我這個消費者當前消息還沒處理完的時候就不要再給我發新消息了
channel.basic_consume(callback,
                      queue=‘task_queue‘)

channel.start_consuming()
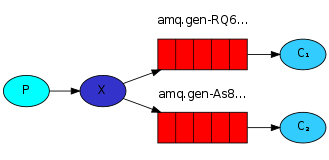
3. 發布訂閱
發布訂閱和簡單的消息隊列區別在於,發布訂閱會將消息發送給所有的訂閱者,而消息隊列中的數據被消費一次便消失。所以,RabbitMQ實現發布和訂閱時,會為每一個訂閱者創建一個隊列,而發布者發布消息時,會將消息放置在所有相關隊列中。
exchange_type = fanout
發布者:
#!/usr/bin/env python
import pika
import sys

connection = pika.BlockingConnection(pika.ConnectionParameters(
        host=‘localhost‘))
channel = connection.channel()

channel.exchange_declare(exchange=‘logs‘,
                         exchange_type=‘fanout‘)

message = ‘ ‘.join(sys.argv[1:]) or "info: Hello World!"
channel.basic_publish(exchange=‘logs‘,
                      routing_key=‘‘,
                      body=message)
print(" [x] Sent %r" % message)
connection.close()
訂閱者:
import pika

connection = pika.BlockingConnection(pika.ConnectionParameters(host=‘localhost‘))

channel = connection.channel()

channel.exchange_declare(exchange=‘logs‘,
                         exchange_type=‘fanout‘)

result = channel.queue_declare(exclusive = True)    #不指定queue名字,rabbit會隨機分配一個名字,exclusive=True會在使用此queue的消費者斷開後,自動將queue刪除

queue_name = result.method.queue

channel.queue_bind(exchange = ‘logs‘,       #綁定
                   queue = queue_name)

print(‘ [*] Waiting for logs. To exit press CTRL+C‘)

print(‘randome queuename:‘,queue_name)

def callback(ch, method, properties, body):
    print(" [x] %r" % body)

channel.basic_consume(callback,
                      queue = queue_name,
                      no_ack = True
                      )

channel.start_consuming()
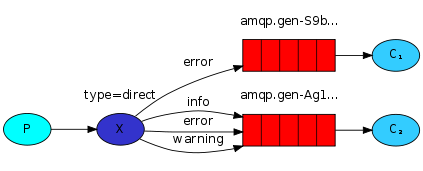
4. 有選擇的接受消息(關鍵字發送)
RabbitMQ還支持根據關鍵字發送,即:隊列綁定關鍵字,發送者將數據根據關鍵字發送到消息exchange,exchange根據 關鍵字 判定應該將數據發送至指定隊列。
exchange_type = direct
publisher:
import pika
import sys

connection = pika.BlockingConnection(pika.ConnectionParameters(
                                                    host = ‘localhost‘))

channel = connection.channel()

channel.exchange_declare(exchange = ‘direct_logs‘,
                         exchange_type = ‘direct‘)

severity = sys.argv[1] if len(sys.argv) > 1 else ‘info‘

message = ‘ ‘.join(sys.argv[2:]) or ‘Hello World!‘

channel.basic_publish(exchange = ‘direct_logs‘,
                      routing_key = severity,
                      body = message)

print(" [x] Sent %r:%r" % (severity, message))

connection.close()
subscriber:
import pika
import sys

connection = pika.BlockingConnection(pika.ConnectionParameters(
                                                        host = ‘localhost‘))

channel = connection.channel()

channel.exchange_declare(exchange = ‘direct_logs‘,
                         exchange_type = ‘direct‘)

result = channel.queue_declare(exclusive = True)

queue_name = result.method.queue

severities = sys.argv[1:]

if not severities:
    sys.stderr.write("Usage: %s [info] [warning] [error]\n" % sys.argv[0])
    sys.exit(1)

for severity in severities:
    channel.queue_bind(exchange = ‘direct_logs‘,
                       queue = queue_name,
                       routing_key = severity)

print(‘ [*] Waiting for logs. To exit press CTRL+C‘)


def callback(ch, method, properties, body):
    print(" [x] %r:%r" % (method.routing_key, body))


channel.basic_consume(callback,
                      queue = queue_name,
                      no_ack = True)

channel.start_consuming()
5. 更細致的消息過濾(模糊匹配)

exchange_type = topic
在topic類型下,可以讓隊列綁定幾個模糊的關鍵字,之後發送者將數據發送到exchange,exchange將傳入”路由值“和 ”關鍵字“進行匹配,匹配成功,則將數據發送到指定隊列。
- # 表示可以匹配 0 個 或 多個 單詞
- * 表示只能匹配 一個 單詞
發送者路由值              隊列中
error.info.warning    error.*    //不匹配
error.info.warning    error.#    //匹配
消費者:
import pika
import sys

connection = pika.BlockingConnection(pika.ConnectionParameters(
                                                        host = ‘localhost‘))
channel = connection.channel()

channel.exchange_declare(exchange = ‘topic_logs‘,
                         exchange_type = ‘topic‘)

result = channel.queue_declare(exclusive = True)

queue_name = result.method.queue

binding_keys = sys.argv[1:]

if not binding_keys:
    sys.stderr.write("Usage: %s [binding_key]...\n" % sys.argv[0])
    sys.exit(1)

for binding_key in binding_keys:
    channel.queue_bind(exchange = ‘topic_logs‘,
                       queue = queue_name,
                       routing_key = binding_key)

print(‘ [*] Waiting for logs. To exit press CTRL+C‘)


def callback(ch, method, properties, body):
    print(" [x] %r:%r" % (method.routing_key, body))


channel.basic_consume(callback,
                      queue = queue_name,
                      no_ack = True)

channel.start_consuming()
生產者:
import pika
import sys

connection = pika.BlockingConnection(pika.ConnectionParameters(
                                                    host = ‘localhost‘))
channel = connection.channel()

channel.exchange_declare(exchange = ‘topic_logs‘,
                         exchange_type = ‘topic‘)

routing_key = sys.argv[1] if len(sys.argv) > 1 else ‘anonymous.info‘

message = ‘ ‘.join(sys.argv[2:]) or ‘Hello World!‘

channel.basic_publish(exchange = ‘topic_logs‘,
                      routing_key = routing_key,
                      body = message)

print(" [x] Sent %r:%r" % (routing_key, message))

connection.close()
其他


#添加賬戶
sudo rabbitmqctl add_user musker 123.com
# 設置用戶為administrator角色
sudo rabbitmqctl set_user_tags musker administrator
# 設置權限
sudo rabbitmqctl set_permissions -p "/" musker‘.‘‘.‘‘.‘

# 然後重啟rabbiMQ服務
sudo /etc/init.d/rabbitmq-server restart

# 可以使用的用戶遠程連接rabbitmq server了。

credentials = pika.PlainCredentials("musker","123.com")

connection = pika.BlockingConnection(pika.ConnectionParameters(‘192.168.14.47‘,credentials=credentials))

#查看隊列和消息數量
rabbitmqctl list_queues
View Code
python操作RabbitMQ