
MediaRecorder錄制音頻及代碼的抽取封裝
1、背景
android提供了MediaRecorder類,通過MediaRecorder錄制音頻的過程很簡單,按步驟進行即可;在很多開發項目中,我們見到代碼的封裝很好;常常感覺這才是大牛寫出的代碼,其實我們也是可以寫出來的,今天就通過一個MediaRecorder錄制音頻的實例,進行代碼的抽取實現封裝;
2、MediaRecorder錄制音頻的步驟(來自瘋狂Androud講義)
1:創建MediaRecorder對象;
2:調用MediaRecorder對象的setAudioSource()方法設置聲音來源,一般傳入MediaRecorder.AudioSource.MIC參數,指定錄制來自麥克風的聲音;
3:調用MediaRecorder對象的setOutputFormat()設置所錄制的音頻文件的格式;
4:調用MediaRecorder對象的setAudioEncoder()、setAudioEncodingBitRate(int bitRate)、setAudioSamplingRate(int samplingRate)設置所錄制的聲音的編碼格式、編碼位率、采樣率等;這些參數將控制所錄制音頻的頻率,文件的大小;一般來說,聲音品質越好,文件越大;
5:調用MediaRedorder的setOutputFile(String path)方法,設置錄制的音頻文件的保存位置;
6:調用MediaRecorder的prepare()方法,準備錄制;
7:調用MdiaRecorder的start()方法,開始錄制;
8:錄制完成,調用MediaRecorder對象的stop()方法停止錄制,並調用release()方法釋放資源;
註意:上面的第3 和第4 兩個步驟,千萬不能搞反;否則程序將會拋出 IllegalStateException 異常;
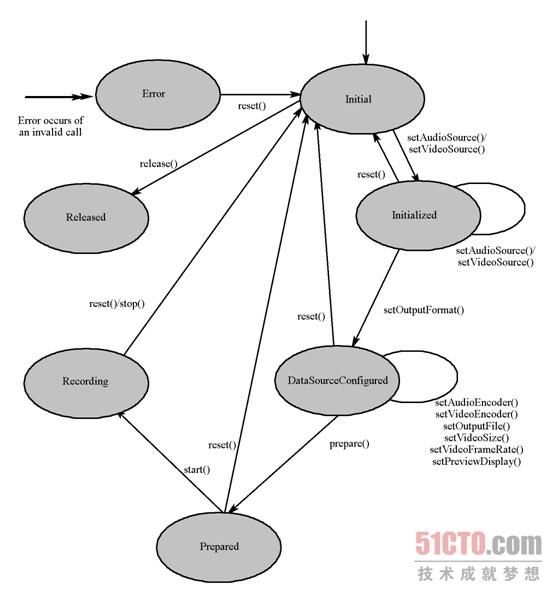
3、MediaPlayer的狀態圖
我們參考MediaRecorder的狀態圖就可以明白MediaRecorder錄制音頻的步驟:
4、實例代碼:
沒抽取MediaRecorder之前的代碼:
1、布局文件
<LinearLayout xmlns:android="http://schemas.android.com/apk/res/android"
    xmlns:tools="http://schemas.android.com/tools"
    android:layout_width="match_parent"
    android:layout_height="match_parent"
    android:orientation="vertical"
    tools:context=".MainActivity" >
    <Button
        android:id="@+id/openRecord"
        android:layout_width="match_parent"
        android:layout_height="wrap_content"
        android:text="Open Record"
        android:textSize="20sp"
        />
    <Button
        android:id="@+id/closeRecord"
        android:layout_width="match_parent"
        android:layout_height="wrap_content"
        android:text="Close Record"
        android:textSize="20sp"
        />
    <Button
        android:id="@+id/playSound"
        android:layout_width="match_parent"
        android:layout_height="wrap_content"
        android:text="Play Sound"
        android:textSize="20sp"
        />
    <Button
        android:id="@+id/stopSound"
        android:layout_width="match_parent"
        android:layout_height="wrap_content"
        android:text="Stop Sound"
        android:textSize="20sp"
        />
</LinearLayout>
- 1
- 2
- 3
- 4
- 5
- 6
- 7
- 8
- 9
- 10
- 11
- 12
- 13
- 14
- 15
- 16
- 17
- 18
- 19
- 20
- 21
- 22
- 23
- 24
- 25
- 26
- 27
- 28
- 29
- 30
- 31
- 32
- 33
- 34
- 35
- 36
四個按鈕作用分別是:開始錄制音頻、停止錄制音頻、開始播放音頻、停止播放音頻
2、MainActivity代碼:
public class MyActivity extends Activity implements OnClickListener{

    private Button bt_start;
    private Button bt_stop;
    private Button bt_play;
    private Button bt_stopSound;
    private MediaRecorder mRecorder;
    private MediaPlayer mPlayer;
    private File soundFile;
    @Override
    protected void onCreate(Bundle savedInstanceState) {
        super.onCreate(savedInstanceState);
        setContentView(R.layout.activity_main);
        initView();
    }

    private void initView() {
        bt_start = (Button) this.findViewById(R.id.openRecord);
        bt_stop = (Button) this.findViewById(R.id.closeRecord);
        bt_play = (Button) this.findViewById(R.id.playSound);
        bt_stopSound = (Button) this.findViewById(R.id.stopSound);
        bt_start.setOnClickListener(this);
        bt_stop.setOnClickListener(this);
        bt_play.setOnClickListener(this);
        bt_stopSound.setOnClickListener(this);
        bt_play.setEnabled(false);
        bt_stopSound.setEnabled(false);

        mRecorder = new MediaRecorder();
    }

    @Override
    public void onClick(View v) {
        switch (v.getId()) {
        case R.id.openRecord:
            startRecord();
            break;
        case R.id.closeRecord:
            stopRecord();
            break;
        case R.id.playSound:
            playSound();
            break;
        case R.id.stopSound:
            stopSound();
            break;
        default:

            break;
        }
    }

    private void stopSound() {
        if(mPlayer.isPlaying()){
            mPlayer.stop();
            mPlayer.release();
            mPlayer = null;
        }
    }

    private void stopRecord() {
        if(null != mRecorder){
            mRecorder.stop();
            mRecorder.release();
            bt_play.setEnabled(true);
            bt_stopSound.setEnabled(true);
        }
    }

    private void playSound() {
        if(soundFile != null && soundFile.exists()){
            try {
                mPlayer = new MediaPlayer();
                mPlayer.reset();
                mPlayer.setDataSource(soundFile.getAbsolutePath());
                mPlayer.prepare();
                mPlayer.start();
            } catch (Exception e) {
                e.printStackTrace();
            }
        }
    }

    private void startRecord() {
        if(!Environment.getExternalStorageState().equals(Environment.MEDIA_MOUNTED)){
            //Toast.makeText(MainActivity.this, "SD卡不存在,請插入SD卡!", Toast.LENGTH_LONG).show();
            return;
        }
        try {
            //創建保存錄制音頻的文件
            soundFile = new File(Environment.getExternalStorageDirectory().getCanonicalFile(),"/sound.amr");
            mRecorder.reset();
            mRecorder.setAudioSource(MediaRecorder.AudioSource.MIC);
            mRecorder.setOutputFormat(MediaRecorder.OutputFormat.THREE_GPP);
            mRecorder.setAudioEncoder(MediaRecorder.AudioEncoder.AMR_NB);
            mRecorder.setOutputFile(soundFile.getAbsolutePath());
            mRecorder.prepare();
            mRecorder.start();
        } catch (Exception e) {
            e.printStackTrace();
        }

    }

    @Override
    protected void onDestroy() {
        if(null != mRecorder){
            mRecorder.stop();
            mRecorder.release();
            mRecorder = null;
        }
        if(mPlayer != null){
            mPlayer.stop();
            mPlayer.release();
            mPlayer = null;
        }
        super.onDestroy();
    }
} - 1
- 2
- 3
- 4
- 5
- 6
- 7
- 8
- 9
- 10
- 11
- 12
- 13
- 14
- 15
- 16
- 17
- 18
- 19
- 20
- 21
- 22
- 23
- 24
- 25
- 26
- 27
- 28
- 29
- 30
- 31
- 32
- 33
- 34
- 35
- 36
- 37
- 38
- 39
- 40
- 41
- 42
- 43
- 44
- 45
- 46
- 47
- 48
- 49
- 50
- 51
- 52
- 53
- 54
- 55
- 56
- 57
- 58
- 59
- 60
- 61
- 62
- 63
- 64
- 65
- 66
- 67
- 68
- 69
- 70
- 71
- 72
- 73
- 74
- 75
- 76
- 77
- 78
- 79
- 80
- 81
- 82
- 83
- 84
- 85
- 86
- 87
- 88
- 89
- 90
- 91
- 92
- 93
- 94
- 95
- 96
- 97
- 98
- 99
- 100
- 101
- 102
- 103
- 104
- 105
- 106
- 107
- 108
- 109
- 110
- 111
- 112
- 113
- 114
- 115
- 116
- 117
- 118
- 119
在上面的MainActivity代碼中,我們可以看到雖然我們對代碼進行了很好的模塊化,但感覺如果我們把MediaRecorder 重新封裝,MainActivity的代碼量會更簡介;好了,現在我們就開始通過自定義一個MyMediaRecorder來封裝MediaRecorder,在MainActivity中我們只需通過MyMediaRecorder的封裝來調用MediaRecorder,可以簡化MainActivity中的代碼量;
3、MediaRecorder的封裝
public class MyMediaRecorder {
    private MediaRecorder mRecorder;
    private Context context;
    public MyMediaRecorder(Context context){
        mRecorder = new MediaRecorder();
        this.context = context;
    }

    public void startRecord(File soundFile){
        if(!Environment.getExternalStorageState().equals(Environment.MEDIA_MOUNTED)){
            Toast.makeText(context, "SD卡不存在,請插入SD卡!", Toast.LENGTH_LONG).show();
            return;
        }
        try {
            mRecorder.reset();
            mRecorder.setAudioSource(MediaRecorder.AudioSource.MIC);
            mRecorder.setOutputFormat(MediaRecorder.OutputFormat.THREE_GPP);
            mRecorder.setAudioEncoder(MediaRecorder.AudioEncoder.AMR_NB);
            mRecorder.setOutputFile(soundFile.getAbsolutePath());
            mRecorder.prepare();
            mRecorder.start();
        } catch (Exception e) {
            e.printStackTrace();
        }
    }

    public void stopRecord(){
        if(null != mRecorder){
            mRecorder.stop();
            mRecorder.release();
        }
    }

    public void onDestroy(){
        if(null != mRecorder){
            mRecorder.stop();
            mRecorder.release();
            mRecorder = null;
        }
    }
}- 1
- 2
- 3
- 4
- 5
- 6
- 7
- 8
- 9
- 10
- 11
- 12
- 13
- 14
- 15
- 16
- 17
- 18
- 19
- 20
- 21
- 22
- 23
- 24
- 25
- 26
- 27
- 28
- 29
- 30
- 31
- 32
- 33
- 34
- 35
- 36
- 37
- 38
- 39
- 40
- 41
4、MediaPlayer的封裝
同樣我們也可以把MediaPlayer進行封裝:
public class MyMediaPlayer {
    private MediaPlayer mPlayer;

    public MyMediaPlayer(){
        mPlayer = new MediaPlayer();
    }

    public void playSound(File soundFile){
        try {
            mPlayer.reset();
            mPlayer.setDataSource(soundFile.getAbsolutePath());
            mPlayer.prepare();
            mPlayer.start();
        } catch (Exception e) {
            e.printStackTrace();
        }
    }

    public void stopSound(){
        if(mPlayer.isPlaying()){
            mPlayer.stop();
            mPlayer.release();
            mPlayer = null;
        }
    }

    public void onDestroy(){
        if(mPlayer != null){
            mPlayer.stop();
            mPlayer.release();
            mPlayer = null;
        }
    }
}- 1
- 2
- 3
- 4
- 5
- 6
- 7
- 8
- 9
- 10
- 11
- 12
- 13
- 14
- 15
- 16
- 17
- 18
- 19
- 20
- 21
- 22
- 23
- 24
- 25
- 26
- 27
- 28
- 29
- 30
- 31
- 32
- 33
- 34
5、封裝之後的MainActivity 代碼:
public class MyActivity02 extends Activity implements OnClickListener{

    private Button bt_start;
    private Button bt_stop;
    private Button bt_play;
    private Button bt_stopSound;
    private MyMediaRecorder myMediaRecorder;
    private MyMediaPlayer myMediaPlayer;
    private File soundFile;
    @Override
    protected void onCreate(Bundle savedInstanceState) {
        super.onCreate(savedInstanceState);
        setContentView(R.layout.activity_main);
        initView();
    }

    private void initView() {
        bt_start = (Button) this.findViewById(R.id.openRecord);
        bt_stop = (Button) this.findViewById(R.id.closeRecord);
        bt_play = (Button) this.findViewById(R.id.playSound);
        bt_stopSound = (Button) this.findViewById(R.id.stopSound);
        bt_start.setOnClickListener(this);
        bt_stop.setOnClickListener(this);
        bt_play.setOnClickListener(this);
        bt_stopSound.setOnClickListener(this);
        bt_play.setEnabled(false);
        bt_stopSound.setEnabled(false);

        //myMediaRecorder = new MyMediaRecorder(MainActivity.this);
    }

    @Override
    public void onClick(View v) {
        switch (v.getId()) {
        case R.id.openRecord:
            startRecord();
            break;
        case R.id.closeRecord:
            stopRecord();
            break;
        case R.id.playSound:
            playSound();
            break;
        case R.id.stopSound:
            stopSound();
            break;
        default:

            break;
        }
    }

    public void stopSound() {
        myMediaPlayer.stopSound();
    }


    public void playSound() {
        if(soundFile != null && soundFile.exists()){
            myMediaPlayer = new MyMediaPlayer();
            myMediaPlayer.playSound(soundFile);
        }
    }

    public void stopRecord() {
        myMediaRecorder.stopRecord();
        bt_play.setEnabled(true);
        bt_stopSound.setEnabled(true);
    }

    public void startRecord() {
        try {
            soundFile = new File(Environment.getExternalStorageDirectory().getCanonicalFile(),"/sound.amr");
            if(soundFile != null && soundFile.exists()){
                myMediaRecorder.startRecord(soundFile);
            }
        } catch (IOException e) {
            // TODO Auto-generated catch block
            e.printStackTrace();
        }

    }

    public void onDestroy() {
        myMediaRecorder.onDestroy();
        myMediaPlayer.onDestroy();
    }
}- 1
- 2
- 3
- 4
- 5
- 6
- 7
- 8
- 9
- 10
- 11
- 12
- 13
- 14
- 15
- 16
- 17
- 18
- 19
- 20
- 21
- 22
- 23
- 24
- 25
- 26
- 27
- 28
- 29
- 30
- 31
- 32
- 33
- 34
- 35
- 36
- 37
- 38
- 39
- 40
- 41
- 42
- 43
- 44
- 45
- 46
- 47
- 48
- 49
- 50
- 51
- 52
- 53
- 54
- 55
- 56
- 57
- 58
- 59
- 60
- 61
- 62
- 63
- 64
- 65
- 66
- 67
- 68
- 69
- 70
- 71
- 72
- 73
- 74
- 75
- 76
- 77
- 78
- 79
- 80
- 81
- 82
- 83
- 84
- 85
- 86
- 87
- 88
現在,我們在MainActivity中只需要通過封裝好的MyMediaRecorder、MyMediaPlayer可以實現音頻的錄制;復雜的代碼都被我們封裝起來了,所以在我們的MainActivity中,代碼看上去更精煉;
現在我們看一下我們的MainActivity 還能更進一步封裝嗎?
其實代碼的封裝就是把有共性的給抽取出來,放到另一個類中;現在我們可以看到在我們的MainActivity中,各種視圖控件看上去占據了大部分代碼量,很繁瑣;由於視圖控件是一個界面,主要是與用戶進行交互的;看到他們的共性點,所以我們也是可以進行抽取的;
6、MainActivity的進一步抽取視圖控件
我把所有在MainActivity中出現的視圖控件,去不都抽取到MyManager中:
public class MyManager implements OnClickListener{
    private Button bt_start;
    private Button bt_stop;
    private Button bt_play;
    private Button bt_stopSound;
    private MyMediaRecorder myMediaRecorder;
    private MyMediaPlayer myMediaPlayer;
    private File soundFile;
    private MainActivity context;

    public MyManager(Context context){
        this.context = (MainActivity) context;
    }

    public void initView(){
        bt_start = (Button) context.findViewById(R.id.openRecord);
        bt_stop = (Button) context.findViewById(R.id.closeRecord);
        bt_play = (Button) context.findViewById(R.id.playSound);
        bt_stopSound = (Button) context.findViewById(R.id.stopSound);
        bt_start.setOnClickListener(this);
        bt_stop.setOnClickListener(this);
        bt_play.setOnClickListener(this);
        bt_stopSound.setOnClickListener(this);
        bt_play.setEnabled(false);
        bt_stopSound.setEnabled(false);

        myMediaRecorder = new MyMediaRecorder(context);
    }

    @Override
    public void onClick(View v) {
        switch (v.getId()) {
        case R.id.openRecord:
            startRecord();
            break;
        case R.id.closeRecord:
            stopRecord();
            break;
        case R.id.playSound:
            playSound();
            break;
        case R.id.stopSound:
            stopSound();
            break;
        default:

            break;
        }
    }

    public void stopSound() {
        myMediaPlayer.stopSound();
    }


    public void playSound() {
        if(soundFile != null && soundFile.exists()){
            mhuachengj1980.comyMediaPlayer = new MyMediaPlayer();
            myMediaPlayer.playSound(soundFile);
        }
    }

    public vo078881.cnid stopRecord() {
        myMediaRecorder.stopRecord();
        bt_play.setEnabled(true);
        bt_sto2636666.cnpSound.setEnabled(true);
    }

    public void startRecord() {
        try {
            soundFile = new File(Environment.getExternalStorageDirectory().getCanonicalFile(),"/sound.amr");
            if(soundFile != null && soundFile.exists()){
                myMediaRecorder.startRecord(soundFile);
            }
        } catch (IOException e) {
            //mhylpt.com TODO Auto-generated catch block
            e.printStackTrace();
        }

    }

    public void onDestroy() {
        myMediaRecorder.onDestroy();
        myMediaPlayer.onDestroy();
    }
}- 1
- 2
- 3
- 4
- 5
- 6
- 7
- 8
- 9
- 10
- 11
- 12
- 13
- 14
- 15
- 16
- 17
- 18
- 19
- 20
- 21
- 22
- 23
- 24
- 25
- 26
- 27
- 28
- 29
- 30
- 31
- 32
- 33
- 34
- 35
- 36
- 37
- 38
- 39
- 40
- 41
- 42
- 43
- 44
- 45
- 46
- 47
- 48
- 49
- 50
- 51
- 52
- 53
- 54
- 55
- 56
- 57
- 58
- 59
- 60
- 61
- 62
- 63
- 64
- 65
- 66
- 67
- 68
- 69
- 70
- 71
- 72
- 73
- 74
- 75
- 76
- 77
- 78
- 79
- 80
- 81
- 82
- 83
- 84
- 85
- 86
現在讓我們再看一下MainActivity 的代碼:
public class MainActivity extends Activity {

    private MyManager manager;
    @Override
    protected void onCreate(Bundle savedInstanceState) {
        super.onCreate(savedInstanceState);
        setContentView(R.layout.activity_main);
        initView();
    }

    private void initView() {
        manager = new MyManager(MainActivity.this);
        manager.initView();
    }

    @Override
    protected void onDestroy() {
        manager.onDestroy();
    }

}
- 1
- 2
- 3
- 4
- 5
- 6
- 7
- 8
- 9
- 10
- 11
- 12
- 13
- 14
- 15
- 16
- 17
- 18
- 19
- 20
- 21
- 22
是不是很驚訝,簡簡單單的4行代碼;對!!!這就是抽取、封裝的重要性,它能把我們的代碼進行提煉,讓代碼更精煉,更方便閱讀;
MediaRecorder錄制音頻及代碼的抽取封裝