
iOS開發—呼叫第三方地圖導航
專案裡面要求點擊發送的位置, 需要導航, 導航兩種實現方式 (整合第三方SDK、URL跳轉第三方應用) 專案要求實現直接跳轉 所以接下來做的是實現URL跳轉第三方地圖來導航了
專案實現如下的效果:

思路:傳入的目的地經緯度,再呼叫第三方的導航
第三方導航是指以URL跳轉的方式(在iOS中就是以URL Scheme的方式),直接跳到對應的地圖APP中,直接利用對方的功能來導航。這樣的優點,一是接入方便,二是不增加自己APP的開銷。缺點就是如果使用者沒有裝這個地圖,應用就沒辦法使用這個地圖的服務。但是蘋果有個自帶的高德地圖,像流氓軟體一樣,刪也刪不掉,所以說這個跳轉是能實現的。
實現跳轉首先想到的肯定是配置URL Scheme 和白名單了
常用的4個地圖的 URL Scheme:
1.蘋果自帶地圖(不需要檢測,所以不需要URL Scheme)
2.百度地圖 :baidumap://
3.高德地圖 :iosamap://
4.谷歌地圖 :comgooglemaps://
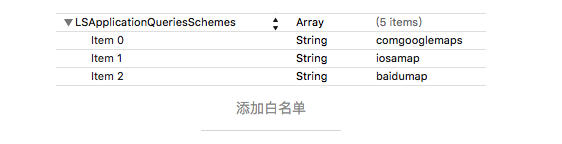
注意:在 iOS 9 之後我們做跳轉是需要有個白名單的,新增白名單的方法就是在 info.plist 檔案裡面,新增一個欄位LSApplicationQueriesSchemes 型別為陣列,然後在這個數組裡面再新增我們所需要的地圖 URL Scheme :
配置好白名單之後就要敲程式碼了 如果沒有安裝某個地圖App 那麼對應的選項就不應該出現
想要檢測手機是否安裝了某個地圖APP,只要呼叫下面這個方法就可以了:
[[UIApplication sharedApplication] canOpenURL:[NSURL URLWithString:@"XXX://"]];
下面開始擼程式碼:
第一:蘋果自帶地圖
蘋果提供了一種方式:MKMapItem(要使用記得匯入#import <MapKit/MapKit.h> 標頭檔案)
程式設計程式碼:
//蘋果地圖
- (void)navAppleMap
{
    CLLocationCoordinate2D gps = _currentLocationCoordinate;

    MKMapItem *currentLoc = [MKMapItem mapItemForCurrentLocation];
    MKMapItem *toLocation = [[MKMapItem alloc] initWithPlacemark:[[MKPlacemark alloc] initWithCoordinate:gps addressDictionary:nil]];
    NSArray *items = @[currentLoc,toLocation];
    NSDictionary *dic = @{
                          MKLaunchOptionsDirectionsModeKey : MKLaunchOptionsDirectionsModeWalking,
                          MKLaunchOptionsMapTypeKey : @(MKMapTypeStandard),
                          MKLaunchOptionsShowsTrafficKey : @(YES)
                          };

    [MKMapItem openMapsWithItems:items launchOptions:dic];
}
其他第三方地圖,需要傳入經緯度:
Demo如下:
#pragma mark ----導航方法-----------

- (NSArray *)getInstalledMapAppWithEndLocation:(CLLocationCoordinate2D)endLocation
{
    NSDictionary *infoDictionary = [[NSBundle mainBundle] infoDictionary];
    NSString *appName = [infoDictionary objectForKey:(NSString *)kCFBundleExecutableKey]; //獲取專案名稱
    NSMutableArray *maps = [NSMutableArray array];

    //蘋果地圖
    NSMutableDictionary *iosMapDic = [NSMutableDictionary dictionary];
    iosMapDic[@"title"] = @"蘋果地圖";
    [maps addObject:iosMapDic];

    //百度地圖
    if ([[UIApplication sharedApplication] canOpenURL:[NSURL URLWithString:@"baidumap://"]]) {
        NSMutableDictionary *baiduMapDic = [NSMutableDictionary dictionary];
        baiduMapDic[@"title"] = @"百度地圖";
        NSString *urlString = [[NSString stringWithFormat:@"baidumap://map/direction?origin={{我的位置}}&destination=latlng:%f,%f|name=目的地&mode=walking&coord_type=gcj02",endLocation.latitude,endLocation.longitude] stringByAddingPercentEscapesUsingEncoding:NSUTF8StringEncoding];
        baiduMapDic[@"url"] = urlString;
        [maps addObject:baiduMapDic];
    }
       //高德地圖
    if ([[UIApplication sharedApplication] canOpenURL:[NSURL URLWithString:@"iosamap://"]]) {
        NSMutableDictionary *gaodeMapDic = [NSMutableDictionary dictionary];
        gaodeMapDic[@"title"] = @"高德地圖";
        NSString *urlString = [[NSString stringWithFormat:@"iosamap://navi?sourceApplication=%@&backScheme=%@&lat=%f&lon=%f&dev=0&style=2",appName,APP_SCHEMES,endLocation.latitude,endLocation.longitude] stringByAddingPercentEscapesUsingEncoding:NSUTF8StringEncoding];
        gaodeMapDic[@"url"] = urlString;
        [maps addObject:gaodeMapDic];
    }

    //谷歌地圖
    if ([[UIApplication sharedApplication] canOpenURL:[NSURL URLWithString:@"comgooglemaps://"]]) {
        NSMutableDictionary *googleMapDic = [NSMutableDictionary dictionary];
        googleMapDic[@"title"] = @"谷歌地圖";
        NSString *urlString = [[NSString stringWithFormat:@"comgooglemaps://?x-source=%@&x-success=%@&saddr=&daddr=%f,%f&directionsmode=walking",appName,@"nav123456",endLocation.latitude, endLocation.longitude] stringByAddingPercentEscapesUsingEncoding:NSUTF8StringEncoding];
        googleMapDic[@"url"] = urlString;
        [maps addObject:googleMapDic];
    }

    //騰訊地圖
    if ([[UIApplication sharedApplication] canOpenURL:[NSURL URLWithString:@"qqmap://"]]) {
        NSMutableDictionary *qqMapDic = [NSMutableDictionary dictionary];
        qqMapDic[@"title"] = @"騰訊地圖";
        NSString *urlString = [[NSString stringWithFormat:@"qqmap://map/routeplan?from=我的位置&type=walk&tocoord=%f,%f&to=終點&coord_type=1&policy=0",endLocation.latitude, endLocation.longitude] stringByAddingPercentEscapesUsingEncoding:NSUTF8StringEncoding];
        qqMapDic[@"url"] = urlString;
        [maps addObject:qqMapDic];
    }

    return maps;
}
接著在點選導航呼叫的方法裡面,彈出提示框,設定代理方法:
- (void)navgationSender:(id)sender
{
    self.maps = [self getInstalledMapAppWithEndLocation:_currentLocationCoordinate];
    UIActionSheet *action = [[UIActionSheet alloc] init];
    for (NSDictionary *dic in self.maps) {
        [action addButtonWithTitle:[NSString stringWithFormat:@"%@", dic[@"title"]]];
    }
    [action addButtonWithTitle:@"取消"];
    action.cancelButtonIndex = self.maps.count;
    action.delegate = self;
    [action showInView:self.view];

}
#pragma mark UIActionSheetDelegate
-(void)actionSheet:(UIActionSheet *)actionSheet clickedButtonAtIndex:(NSInteger)buttonIndex
{
    if (buttonIndex != -1 && buttonIndex < self.maps.count) {
        if (buttonIndex == 0) {
            [self navAppleMap];
            return;
        }
        NSDictionary *dic = self.maps[buttonIndex];
        NSString *urlString = dic[@"url"];
        [[UIApplication sharedApplication] openURL:[NSURL URLWithString:urlString]];
    }
}
OK,可以呼叫第三方地圖啦!!!!!!!!
說一下注意事項:
1.引入標頭檔案
#import <CoreLocation/CoreLocation.h>
#import <MapKit/MapKit.h>
2.傳參
一:百度地圖
NSString *urlString = [[NSString stringWithFormat:@"baidumap://map/direction?origin={{我的位置}}&destination=latlng:%f,%f|name=目的地&mode=walking&coord_type=gcj02",endLocation.latitude,endLocation.longitude] stringByAddingPercentEscapesUsingEncoding:NSUTF8StringEncoding];
這裡面要注意幾點:
1,origin={{我的位置}}, 這個是不能被修改的,不然無法把出發位置設定為當前位置
2,destination = latlng:%f,%f|name = 目的地
這裡面的 name 的欄位不能省略,否則導航會失敗,而後面的文字則可以隨意
3,coord_type = gcj02
coord_type 允許的值為 bd09ll、gcj02、wgs84,如果你 APP 的地圖 SDK 用的是百度地圖 SDK,請填 bd09ll,否則就填gcj02,wgs84的話基本是用不上了(需要涉及到地圖加密)
二:高德地圖
NSString *urlString = [[NSString stringWithFormat:@"iosamap://navi?sourceApplication=%@&backScheme=%@&lat=%f&lon=%f&dev=0&style=2",appName,APP_SCHEMES,endLocation.latitude,endLocation.longitude] stringByAddingPercentEscapesUsingEncoding:NSUTF8StringEncoding];
要注意幾點:
- sourceApplication=%@&backScheme=%@
sourceApplication代表你自己APP的名稱,會在之後跳回的時候顯示出來,所以必須填寫。backScheme是你APP的URL Scheme,不填是跳不回來的 - dev=0
這裡填0就行了,跟上面的gcj02一個意思 ,1代表wgs84, 也用不上。