
使用 Nginx的Lua 擴充套件 功能
1、Nginx 簡介
轉自 :https://blog.csdn.net/ygm_linux/article/details/53534933
Nginx 作為一款面向效能設計的HTTP伺服器,相較於Apache、lighttpd具有佔有記憶體少,穩定性高等優勢。其流行度越來越高,應用也越來越廣泛,常見的應用有:網頁伺服器、反向代理伺服器以及電子郵件(IMAP/POP3)代理伺服器,高併發大流量站點常用來做接入層的負載均衡,還有非常常見的用法是作為日誌採集伺服器等。
Nginx 整體採用模組化設計,有豐富的模組庫和第三方模組庫,配置靈活。其中模組化設計是nginx的一大賣點,甚至http伺服器核心功能也是一個模組。要注意的是:nginx的模組是靜態的,新增和刪除模組都要對nginx進行重新編譯,這一點與Apache的動態模組完全不同。不過後來淘寶做了二次開發開源的 tengine 是支援 官方所有的 HTTP 模組動態載入而不必重新編譯 Nginx,除非是第三方模組才需要重新編譯。因此,在生產環境中,推薦用淘寶開源的 tengine,本文也以 tengine 作為示例。
雖然 Nginx 有如此強大的效能以及眾多的三方模組支援,但每次重新編譯以及尋找三方模組對生產環境來說還是不可接受的,幸運的是,Nginx 它是支援客戶自己 Lua 指令碼程式設計擴充套件相應的功能的,而且可以熱載入,這就給生產環境帶來了無限可能。比如我現在想要直接用Nginx + redis 做反爬蟲和頻率限制,Nginx + Kafka 做日誌的實時流處理等等。
注:lvs 和 nginx 的負載均衡區別:
LVS:Linux Virtual Server,基於IP的負載均衡和反向代理技術,所以它幾乎可以對所有應用做負載均衡,包括http、資料庫、線上聊天室等等,LVS工作在4層,在Linux核心中作四層交換,只花128個位元組記錄一個連線資訊,不涉及到檔案控制代碼操作,故沒有65535最大檔案控制代碼數的限制。LVS效能很高,可以支援100~400萬條併發連線。抗負載能力強、是工作在網路4層之上僅作分發之用,沒有流量的產生
Nginx:基於HTTP的負載均衡和反向代理伺服器,Nginx工作在網路的7層,所以它可以針對http應用本身來做分流策略,比如針對域名、URL、目錄結構等,相比之下LVS並不具備這樣的功能,能夠很好地支援虛擬主機,可配置性很強,大約能支援3~5萬條併發連線。
2、Lua 簡介
Lua 是一個簡潔、輕量、可擴充套件的指令碼語言,也是號稱效能最高的指令碼語言,用在很多需要效能的地方,比如:遊戲指令碼,nginx,wireshark的指令碼,當你把他的原始碼下下來編譯後,你會發現直譯器居然不到200k,非常變態。。。很多應用程式使用Lua作為自己的嵌入式指令碼語言,以此來實現可配置性、可擴充套件性。
Lua原生支援的資料型別非常之少,它只提供了nil、數字(預設是雙精度浮點數,可配置)、布林量、字串、表、子程式、協程(coroutine)以及使用者自定義資料這8種。但是其處理表和字串的效率非常之高,加上元表的支援,開發者可以高效的模擬出需要的複雜資料型別(比如集合、陣列等)。Lua是一個動態弱型別語言,支援增量式垃圾收集策略。有內建的,與作業系統無關的協作式多執行緒(coroutine)支援。它還可以用於嵌入式硬體,不僅可以嵌入其他程式語言,而且可以嵌入微處理器中。
3、nginx執行步驟
nginx在處理每一個使用者請求時,都是按照若干個不同的階段依次處理的,與配置檔案上的順序沒有關係,詳細內容可以閱讀《深入理解nginx:模組開發與架構解析》這本書,這裡只做簡單介紹;
(1)post-read
讀取請求內容階段,nginx讀取並解析完請求頭之後就立即開始執行;
(2)server-rewrite
server請求地址重寫階段;
(3)find-config
配置查詢階段,用來完成當前請求與location配重塊之間的配對工作;
(4)rewrite
location請求地址重寫階段,當ngx_rewrite指令用於location中,就是再這個階段執行的;
(5)post-rewrite
請求地址重寫提交階段,當nginx完成rewrite階段所要求的內部跳轉動作,如果rewrite階段有這個要求的話;
(6)preaccess
訪問許可權檢查準備階段,ngx_limit_req和ngx_limit_zone在這個階段執行,ngx_limit_req可以控制請求的訪問頻率,ngx_limit_zone可以控制訪問的併發度;
(7)access
許可權檢查階段,ngx_access在這個階段執行,配置指令多是執行訪問控制相關的任務,如檢查使用者的訪問許可權,檢查使用者的來源IP是否合法;
(8)post-access
訪問許可權檢查提交階段;
(9)try-files
配置項try_files處理階段;
(10)content
內容產生階段,是所有請求處理階段中最為重要的階段,因為這個階段的指令通常是用來生成HTTP響應內容的;
(11)log
日誌模組處理階段;

圖:Nginx 模組執行順序與階段
4、ngx_lua 執行指令
ngx_lua屬於nginx的一部分,它的執行指令都包含在nginx的11個步驟之中了,相應的處理階段可以做插入式處理,即可插拔式架構,不過ngx_lua並不是所有階段都會執行的;另外指令可以在http、server、server if、location、location if幾個範圍進行配置:
| 指令 |
所處處理階段 |
使用範圍 |
解釋 |
| init_by_lua init_by_lua_file |
loading-config |
http |
nginx Master程序載入配置時執行; 通常用於初始化全域性配置/預載入Lua模組 |
| init_worker_by_lua init_worker_by_lua_file |
starting-worker |
http |
每個Nginx Worker程序啟動時呼叫的計時器,如果Master程序不允許則只會在init_by_lua之後呼叫; 通常用於定時拉取配置/資料,或者後端服務的健康檢查 |
| set_by_lua set_by_lua_file |
rewrite |
server,server if,location,location if |
設定nginx變數,可以實現複雜的賦值邏輯;此處是阻塞的,Lua程式碼要做到非常快; |
| rewrite_by_lua rewrite_by_lua_file |
rewrite tail |
http,server,location,location if |
rrewrite階段處理,可以實現複雜的轉發/重定向邏輯; |
| access_by_lua access_by_lua_file |
access tail |
http,server,location,location if |
請求訪問階段處理,用於訪問控制 |
| content_by_lua content_by_lua_file |
content |
location,location if |
內容處理器,接收請求處理並輸出響應 |
| header_filter_by_lua header_filter_by_lua_file |
output-header-filter |
http,server,location,location if |
設定header和cookie |
| body_filter_by_lua body_filter_by_lua_file |
output-body-filter |
http,server,location,location if |
對響應資料進行過濾,比如截斷、替換。 |
| log_by_lua log_by_lua_file |
log |
http,server,location,location if |
log階段處理,比如記錄訪問量/統計平均響應時間 |
關於這部分詳細可以參考這篇:
Refer [4] nginx與lua的執行順序和步驟說明
Refer [5] ngx_lua用例說明
5、安裝 tengine 以及 Lua 擴充套件
(1)先安裝Nginx需要的一些類庫:
yum install gcc
yum install gcc-c++
注:此步驟只是在你的系統沒有安裝 gcc/gcc-c++ 的情況下才需要自行編譯安裝。
(2)編譯安裝庫LuaJit-2.0.3:
./configure --prefix=/usr/local/luajit
make PREFIX=/usr/local/luajit
make install PREFIX=/usr/local/luajit
在/etc/profile檔案中增加環境變數,並執行 source /etc/profile 使之生效(非必須):
export LUAJIT_LIB=/usr/install/luajit/lib
export LUAJIT_INC=/usr/install/luajit/include/luajit-2.0
注:此步驟只是在你的系統沒有安裝 LuaJIT 的情況下才需要自行編譯安裝。
(3)下載模組依賴 pcre-8.34、zlib-1.2.8、ngx_devel_kit 和 lua-nginx-module,最後編譯Nginx:
完整的引數可能這樣:
nginx -V
Tengine version: Tengine/2.1.0 (nginx/1.6.2)
built by gcc 4.4.7 20120313 (Red Hat 4.4.7-4) (GCC)
TLS SNI support enabled
configure arguments: --prefix=/etc/nginx/ --sbin-path=/usr/sbin/nginx --conf-path=/etc/nginx/nginx.conf --error-log-path=/var/log/nginx/error.log --http-log-path=/var/log/nginx/access.log --pid-path=/var/run/nginx.pid --lock-path=/var/run/nginx.lock --http-client-body-temp-path=/var/cache/nginx/client_temp --http-proxy-temp-path=/var/cache/nginx/proxy_temp --http-fastcgi-temp-path=/var/cache/nginx/fastcgi_temp --http-uwsgi-temp-path=/var/cache/nginx/uwsgi_temp --http-scgi-temp-path=/var/cache/nginx/scgi_temp --user=nginx --group=nginx --with-http_ssl_module --with-http_realip_module --with-http_addition_module --with-http_sub_module --with-http_dav_module --with-http_flv_module --with-http_mp4_module --with-http_gzip_static_module --with-http_random_index_module --with-http_secure_link_module --with-http_stub_status_module --with-mail --with-mail_ssl_module --with-file-aio --with-ipv6 --with-cc-opt='-O2 -g -m64 -mtune=generic' --with-pcre=../pcre-8.33 --with-zlib=../zlib-1.2.8 --with-openssl=../openssl-1.0.1l
先 ./configure 各種配置引數以及模組路徑,但我這裡只是用來測試就精簡了不少引數:
./configure --prefix=/opt/soft/nginx --with-pcre=/root/soft/pcre-8.37 --with-zlib=/root/soft/zlib-1.2.8 --with-openssl=/root/soft/openssl-1.0.1p --add-module=/root/soft/lua-nginx-module-master --add-module=/root/soft/ngx_devel_kit-master --sbin-path=/usr/sbin/nginx --conf-path=/etc/nginx/nginx.conf --error-log-path=/var/log/nginx/error.log --http-log-path=/var/log/nginx/access.log --pid-path=/var/run/nginx.pid --lock-path=/var/run/nginx.lock --http-client-body-temp-path=/var/cache/nginx/client_temp --http-proxy-temp-path=/var/cache/nginx/proxy_temp --http-fastcgi-temp-path=/var/cache/nginx/fastcgi_temp --http-uwsgi-temp-path=/var/cache/nginx/uwsgi_temp --http-scgi-temp-path=/var/cache/nginx/scgi_temp然後 make、make install 即可。
(5)啟動Nginx sbin/nginx,瀏覽器輸入http://localhost測試
需要注意的是:
(1)--with-pcre=/root/soft/pcre-8.37 --with-zlib=/root/soft/zlib-1.2.8 指向的是原始碼路徑,而非編譯後的路徑,否則 make 會報:
-
cd /usr/local/pcre \ -
&& if [ -f Makefile ]; then make distclean; fi \ -
&& CC="gcc" CFLAGS="-O2 -fomit-frame-pointer -pipe " \ -
./configure --disable-shared -
/bin/sh: ./configure: No such file or directory -
make[1]: *** [/usr/local/pcre/Makefile] Error 127 -
make[1]: Leaving directory `/software/nginx-0.8.53' -
make: *** [build] Error 2
因為 ./configure --help 看一下幫助說明:
--with-pcre=DIR set path to PCRE library sources
set path to PCRE library sources 是讓你設定到原始碼目錄,而不是編譯安裝後的目錄
(2)pcre、zlib、openssl 等系統庫如果系統沒有整合自帶,一定要單獨編譯安裝,而 lua-nginx-module、ngx_devel_kit 等外掛模組只需要指原始碼路徑給 nginx 一起編譯即可,不需要單獨編譯。
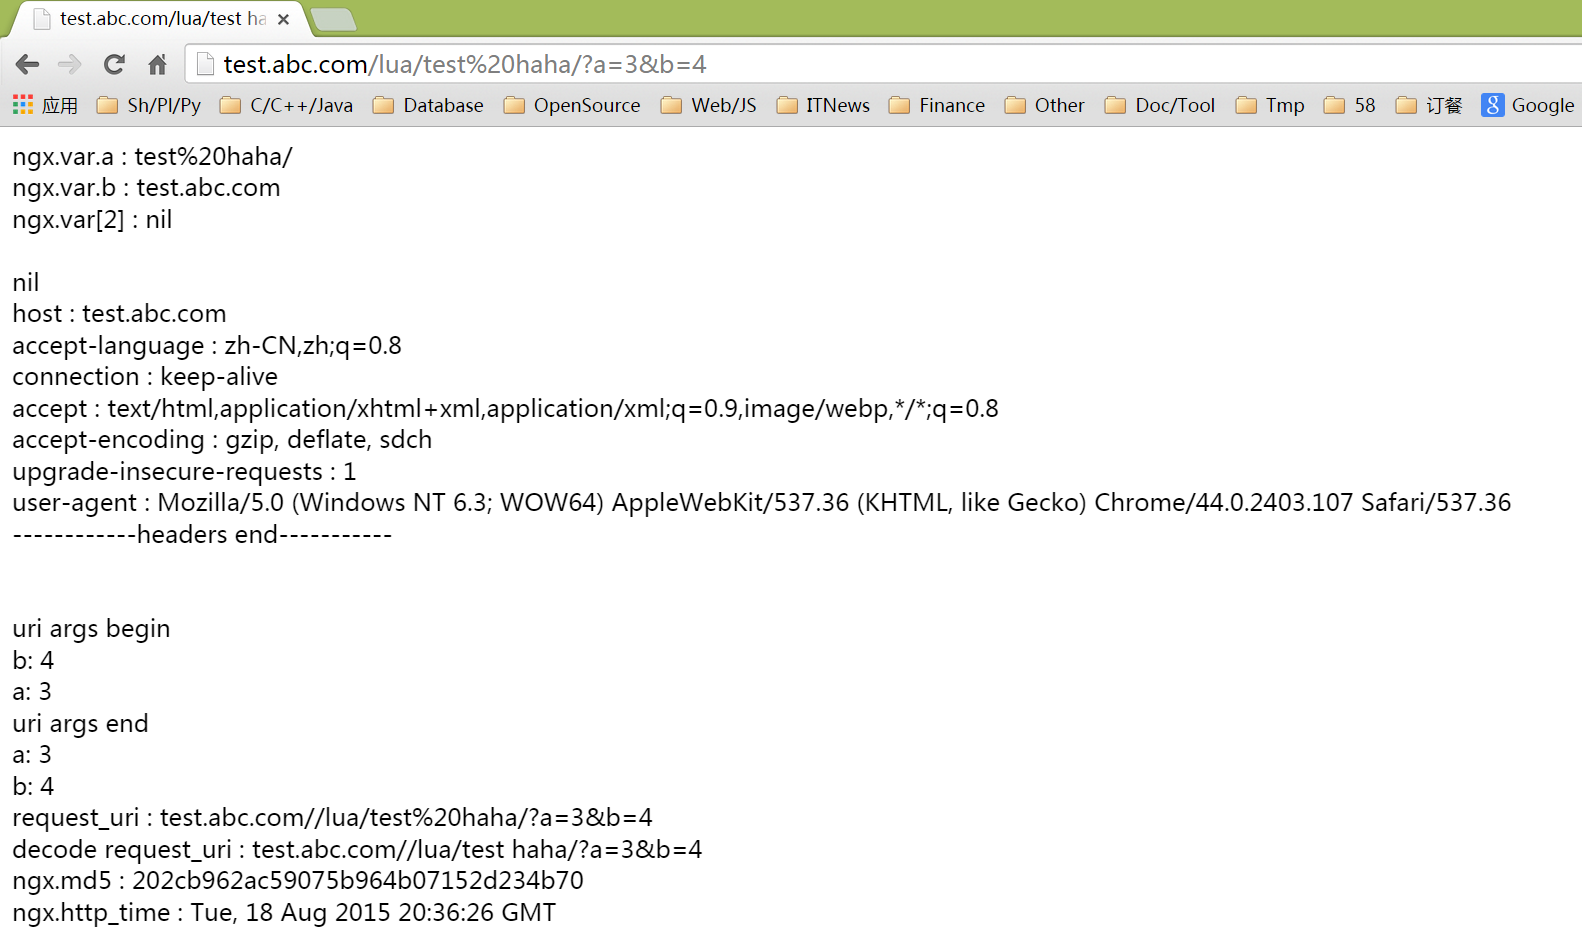
6、一個 Nginx + Lua 測試的例子
-
user work work; -
worker_processes 7; -
error_log /opt/data1/logs/nginx/error.log; -
pid /var/run/nginx.pid; -
worker_rlimit_nofile 800000; -
events { -
use epoll; -
worker_connections 65535; -
} -
http { -
server { -
listen 80; -
set $idTest "idTest_11111111111" ; -
log_format tracklog '$idTest $msec $remote_addr - $remote_user [$time_local] $request ' -
'"$status" resp_body:"$resp_body" --"$ref1"-- ' -
'"$http_user_agent"'; -
location ~ /gzip/(.*) { -
default_type "text/html"; -
set $resp_body ""; -
content_by_lua ' -
--zlib 解碼 post gzip 資料 -
local zlib = require "zlib" -
local encoding = ngx.req.get_headers()["Content-Encoding"] -
if encoding == "gzip" then -
ngx.req.read_body() -
local body = ngx.req.get_body_data() -
ngx.say("++++++++++++++++++++++++++++body data:") -
ngx.print(body) -
if body then -
--ngx.var.resp_body = "55555555555555" -
local stream = zlib.inflate() -
ngx.var.resp_body = stream(body) -
end -
end -
'; -
access_log on; -
access_log /opt/data1/logs/nginx/pc/track/ooxx.com.access.log tracklog; -
} -
location ~ /post/(.*) { -
default_type "text/html"; -
lua_need_request_body on; -
set $resp_body ""; -
content_by_lua ' -
ngx.var.resp_body = ngx.var.request_body -
'; -
access_log on; -
access_log /opt/data1/logs/nginx/pc/track/ooxx.com.access.log tracklog; -
} -
location ~ /lua/(.*) { -
default_type "text/html"; -
set $ref1 "Hello,Nginx & Lua !"; -
#設定nginx變數 -
set $a $1; -
set $b $host; -
content_by_lua ' -
--nginx變數 -
local var = ngx.var -
ngx.say("ngx.var.a : ", var.a, "<br/>") -
ngx.say("ngx.var.b : ", var.b, "<br/>") -
ngx.say("ngx.var[2] : ", var[2], "<br/>") -
ngx.var.b = 2; -
ngx.say("<br/>") -
--請求頭 -
ngx.say(ngx.var.httpRef, "<br/>") -
local headers = ngx.req.get_headers() -
for k,v in pairs(headers) do -
if type(v) == "table" then -
ngx.say(k, " : ", table.concat(v, ","), "<br/>") -
else -
ngx.say(k, " : ", v, "<br/>") -
end -
end -
ngx.say("------------headers end-----------", "<br/><br/><br/>") -
--get請求uri引數 -
ngx.say("uri args begin", "<br/>") -
local uri_args = ngx.req.get_uri_args() -
for k, v in pairs(uri_args) do -
if type(v) == "table" then -
ngx.say(k, " : ", table.concat(v, ", "), "<br/>") -
else -
ngx.say(k, ": ", v, "<br/>") -
end -
end -
ngx.say("uri args end", "<br/>") -
ngx.say("a: ",ngx.var.arg_a, "<br/>") -
ngx.say("b: ",ngx.var.arg_b, "<br/>") -
--未經解碼的請求 uri -
local request_uri = headers["Host"] .. "/" .. ngx.var.request_uri; -
ngx.say("request_uri : ", request_uri, "<br/>"); -
--解碼後的 uri -
local decode_request_uri = headers["Host"] .. "/" .. ngx.unescape_uri(ngx.var.request_uri); -
ngx.var.ref1 = decode_request_uri; -
ngx.say("decode request_uri : ", decode_request_uri, "<br/>"); -
--MD5 -
ngx.say("ngx.md5 : ", ngx.md5("123"), "<br/>") -
--http time -
ngx.say("ngx.http_time : ", ngx.http_time(ngx.time()), "<br/>") -
--ngx.var.http_referer = "*********************" -
'; -
log_format LogFormatv1 '[email protected][email protected][email protected]@[email protected][$time_local]@[email protected]' -
'"$status"@[email protected]"$http_referer"@' -
'"$http_user_agent"'; -
access_log on; -
access_log /opt/data1/logs/nginx/PCv1/track/ooxx.com.access.log LogFormatv1; -
} -
} -
}
需要注意的是線上的 Nginx 可能面對的是高併發場景,對於自己的 Lua 程式碼最好做個壓力測試,比如:
-
tcpcopy -
或者 -
ab -c100 -n10000 'http://test.abc.com/lua/test%20haha/?a=3&b=4'
7、關於 64bit Cgywin 下編譯安裝 Tengine 的一些問題
(1)openSSL 庫不支援 64bit Cygwin
-
cryptlib.c:1:0: 錯誤:您選擇的 CPU 不支援 x86-64 指令集 -
/* crypto/cryptlib.c */ -
^ -
cryptlib.c:1:0: 錯誤:您選擇的 CPU 不支援 x86-64 指令集 -
<builtin>: recipe for target 'cryptlib.o' failed -
make[3]: *** [cryptlib.o] Error 1 -
make[3]: Leaving directory '/home/Jun/softs/openssl-1.0.1r/crypto' -
Makefile:281: recipe for target 'build_crypto' failed
這種要麼自己去網上找補丁 patch,要麼換成 Cygwin 32bit,還有一種解決方案就是自己在安裝 Cygwin 包的時候把 openssl 也裝上,也就是說選擇安裝包的時候儘量裝全一點。省得後續自己裝遇到各種問題。
這樣如果你自己已經裝了 openssl 那麼可以在configure 的時候去掉openssl 相關的編譯依賴選項:
./configure --with-openssl=/root/soft/openssl-1.0.1p (去掉該項)
(2)nginx 啟動報錯:
nginx: [emerg] the maximum number of files supported by select() is 64
畢竟 Cygwin 還是依賴 windows的,各種引數得針對 windows 優化,比如這個報錯是說預設配置檔案裡的 worker_connections 不能超過 64 個,你改成 20 即可。
-
events { -
use epoll; -
worker_connections 65535; -
}
比如我這裡的編譯配置引數是(注意有些目錄可能需要提前自己建立):
./configure --prefix=/opt/soft/nginx --with-pcre=/home/Jun/softs/pcre-8.38 --with-zlib=/home/Jun/softs/zlib-1.2.8 --add-module=/home/Jun/softs/ngx_devel_kit-master --add-module=/home/Jun/softs/echo-nginx-module-master --add-module=/home/Jun/softs/form-input-nginx-module-master --add-module=/home/Jun/softs/set-misc-nginx-module-master --add-module=/home/Jun/softs/lua-nginx-module-master --sbin-path=/usr/sbin/nginx --conf-path=/etc/nginx/nginx.conf --error-log-path=/var/log/nginx/error.log --http-log-path=/var/log/nginx/access.log --pid-path=/var/run/nginx.pid --lock-path=/var/run/nginx.lock --http-client-body-temp-path=/var/cache/nginx/client_temp --http-proxy-temp-path=/var/cache/nginx/proxy_temp --http-fastcgi-temp-path=/var/cache/nginx/fastcgi_temp --http-uwsgi-temp-path=/var/cache/nginx/uwsgi_temp --http-scgi-temp-path=/var/cache/nginx/scgi_temp最後 nginx.conf 稍加修改如下(注意有些目錄可能需要提前自己建立):
-
worker_processes 2; -
-
#error_log /var/log/nginx/error.log; -
pid /var/run/nginx.pid; -
-
events { -
worker_connections 20; -
} -
-
http { -
-
server { -
listen 80; -
-
set $idTest "idTest_11111111111" ; -
-
log_format tracklog '$idTest $msec $remote_addr - $remote_user [$time_local] $request ' -
'"$status" $body_bytes_sent --"$ref1"-- ' -
'"$http_user_agent"'; -
-
log_format LogFormatv1 '[email protected][email protected][email protected]@[email protected][$time_local]@[email protected]' -
'"$status"@[email protected]"$http_referer"@' -
'"$http_user_agent"'; -
-
access_log on; -
-
location ~ /lua/(.*) { -
default_type "text/html"; -
set $ref1 "Hello,Nginx & Lua !"; -
#設定nginx變數 -
set $a $1; -
set $b $host; -
-
content_by_lua ' -
--nginx變數 -
local var = ngx.var -
ngx.say("ngx.var.a : ", var.a, "<br/>") -
ngx.say("ngx.var.b : ", var.b, "<br/>") -
ngx.say("ngx.var[2] : ", var[2], "<br/>") -
ngx.var.b = 2; -
ngx.say("<br/>") -
-
--請求頭 -
ngx.say(ngx.var.httpRef, "<br/>") -
local headers = ngx.req.get_headers() -
for k,v in pairs(headers) do -
if type(v) == "table" then -
ngx.say(k, " : ", table.concat(v, ","), "<br/>") -
else -
ngx.say(k, " : ", v, "<br/>") -
end -
end -
ngx.say("------------headers end-----------", "<br/><br/><br/>") -
-
--get請求uri引數 -
ngx.say("uri args begin", "<br/>") -
local uri_args = ngx.req.get_uri_args() -
for k, v in pairs(uri_args) do -
if type(v) == "table" then -
ngx.say(k, " : ", table.concat(v, ", "), "<br/>") -
else -
ngx.say(k, ": ", v, "<br/>") -
end -
end -
ngx.say("uri args end", "<br/>") -
ngx.say("a: ",ngx.var.arg_a, "<br/>") -
ngx.say("b: ",ngx.var.arg_b, "<br/>") -
-
--未經解碼的請求 uri -
local request_uri = headers["Host"] .. "/" .. ngx.var.request_uri; -
ngx.say("request_uri : ", request_uri, "<br/>"); -
--解碼後的 uri -
local decode_request_uri = headers["Host"] .. "/" .. ngx.unescape_uri(ngx.var.request_uri); -
ngx.var.ref1 = decode_request_uri; -
ngx.say("decode request_uri : ", decode_request_uri, "<br/>"); -
--MD5 -
ngx.say("ngx.md5 : ", ngx.md5("123"), "<br/>") -
--http time -
ngx.say("ngx.http_time : ", ngx.http_time(ngx.time()), "<br/>") -
--ngx.var.http_referer = "*********************" -
'; -
-
access_log /var/log/nginx/ooxx.com.access.log tracklog; -
} -
-
} -
}
最後 nginx -s reload 效果如下,http://localhost/lua/?a=1&b=2 請求也正常,和 linux 下結果一致:

8、關於 nginx 正則說明
(1)location 匹配語法規則
Nginx location 的正則匹配語法與優先順序容易讓新同學迷惑。
~ #波浪線表示執行一個正則匹配,區分大小寫
~* #表示執行一個正則匹配,不區分大小寫
= #進行普通字元精確匹配,與location在配置檔案中的順序無關,= 精確匹配會第一個被處理
@ #"@" 定義一個命名的 location,使用在內部定向時,例如 error_page, try_files
^~ 識別符號後面跟一個字串。表示普通字元匹配,如果該選項匹配,只匹配該選項,不匹配別的選項,Nginx將在這個字串匹配後停止進行正則表示式的匹配(location指令中正則表示式的匹配的結果優先使用),如:location ^~ /images/,你希望對/images/這個目錄進行一些特別的操作,如增加expires頭,防盜鏈等,但是你又想把除了這個目錄的圖片外的所有圖片只進行增加expires頭的操作,這個操作可能會用到另外一個location,例如:location ~* \.(gif|jpg|jpeg)$,這樣,如果有請求/images/1.jpg,nginx如何決定去進行哪個location中的操作呢?結果取決於識別符號^~,如果你這樣寫:location /images/,這樣nginx會將1.jpg匹配到location ~* \.(gif|jpg|jpeg)$這個location中,這並不是你需要的結果,而增加了^~這個識別符號後,它在匹配了/images/這個字串後就停止搜尋其它帶正則的location。
例如:
-
location = / { -
# 只匹配"/". -
[ configuration A ] -
} -
location / { -
# 匹配任何請求,因為所有請求都是以"/"開始 -
# 但是更長字元匹配或者正則表示式匹配會優先匹配 -
[ configuration B ] -
} -
location ^~ /images/ { -
# 匹配任何以 /images/ 開始的請求,並停止匹配 其它location -
[ configuration C ] -
} -
location ~* \.(gif|jpg|jpeg)$ { -
# 匹配以 gif, jpg, or jpeg結尾的請求. -
# 但是所有 /images/ 目錄的請求將由 [Configuration C]處理. -
[ configuration D ] -
}
請求URI例子:
-
/ -> 符合configuration A
-
/documents/document.html -> 符合configuration B
-
/images/1.gif -> 符合configuration C
-
/documents/1.jpg ->符合 configuration D
= 表示精確的查詢地址,如location = /它只會匹配uri為/的請求,如果請求為/index.html,將查詢另外的location,而不會匹配這個,當然可以寫兩個location,location = /和location /,這樣/index.html將匹配到後者,如果你的站點對/的請求量較大,可以使用這個方法來加快請求的響應速度。
@ 表示為一個location進行命名,即自定義一個location,這個location不能被外界所訪問,只能用於Nginx產生的子請求,主要為error_page和try_files。
(2)location 優先順序官方文件
-
=字首的指令嚴格匹配這個查詢。如果找到,停止搜尋。
-
所有剩下的常規字串,最長的匹配。如果這個匹配使用^〜字首,搜尋停止。
-
正則表示式,在配置檔案中定義的順序。
-
如果第3條規則產生匹配的話,結果被使用。否則,如同從第2條規則被使用。
(3)正則語法
~ 為區分大小寫的匹配。
~* 不區分大小寫的匹配(匹配firefox的正則同時匹配FireFox)。
!~ 不匹配的
!~* 不匹配的
. 匹配除換行符以外的任意字元
\w 匹配字母或數字或下劃線或漢字
\s 匹配任意的空白符
\d 匹配數字
\b 匹配單詞的開始或結束
^ 匹配字串的開始
$ 匹配字串的結束
\W 匹配任意不是字母,數字,下劃線,漢字的字元
\S 匹配任意不是空白符的字元
\D 匹配任意非數字的字元
\B 匹配不是單詞開頭或結束的位置
捕獲 (exp) 匹配exp,並捕獲文字到自動命名的組裡
(?<name>exp) 匹配exp,並捕獲文字到名稱為name的組裡,也可以寫成(?'name'exp)
(?:exp) 匹配exp,不捕獲匹配的文字,也不給此分組分配組號
零寬斷言 (?=exp) 匹配exp前面的位置
(?<=exp) 匹配exp後面的位置
(?!exp) 匹配後面跟的不是exp的位置
(?<!exp) 匹配前面不是exp的位置
註釋 (?#comment) 這種型別的分組不對正則表示式的處理產生任何影響,用於提供註釋讓人閱讀
Refer:
[1] agentzh 的 Nginx 教程(版本 2015.03.19)
http://openresty.org/download/agentzh-nginx-tutorials-zhcn.html
[2] HttpLuaModule
http://wiki.nginx.org/HttpLuaModule
[3] nginx lua api翻譯
http://blog.csdn.net/imlsz/article/details/42915473
[4] nginx與lua的執行順序和步驟說明
http://www.mrhaoting.com/?p=157
[5] ngx_lua用例說明
http://www.mrhaoting.com/?p=165
[6] 第二章 Nginx+Lua開發入門
http://jinnianshilongnian.iteye.com/blog/2186448
[7] 在Nginx使用Lua擴充套件功能
http://yikebocai.com/2014/11/generate-seqid-in-nginx-by-lua/
[8] nginx location匹配規則
http://blog.csdn.net/gzh0222/article/details/7845981
[9] 平臺服務部署及Web框架
http://weibo.com/p/1001643875679132642345
[10] 我所熟悉的網站負載均衡技術
[11] Nginx、LVS及HAProxy負載均衡軟體的優缺點詳解
http://www.csdn.net/article/2014-07-24/2820837
[12] Nginx 與 Lua 實現一個簡單的服務端推方案
http://blogread.cn/it/article/5883?f=wb
[13] 深入 Nginx:我們是如何為效能和規模做設計的
http://blog.jobbole.com/88766/
[14] 本部落格 Nginx 配置之效能篇
https://imququ.com/post/my-nginx-conf-for-wpo.html
[15] 系統負載能力淺析
http://www.rowkey.me/blog/2015/09/09/load-analysis/
[16] Nginx學習總結:常用module(二)
http://shift-alt-ctrl.iteye.com/blog/2231359
[16] 為最佳效能調優 Nginx
http://blog.jobbole.com/87531/
[17] Nginx 重寫規則指南
[18] 跟我學Nginx+Lua開發目錄貼
http://jinnianshilongnian.iteye.com/blog/2190344
[19] 第二章 Nginx+Lua開發入門
http://jinnianshilongnian.iteye.com/blog/2186448
[20] Nginx Third party modules
http://wiki.nginx.org/3rdPartyModules
[21] Tengine 新特性介紹
http://tengine.taobao.org/index_cn.html
[22] Nginx開發從入門到精通
http://tengine.taobao.org/book/
[23] Tengine dso動態載入模組
http://www.mylinuxer.com/532.html
[24] Tengine動態模組載入的使用方法
http://www.bkjia.com/Linux/992215.html#top
[25] OpenResty的現狀、趨勢、使用及學習方法
[26] 使用nginx+lua+graphicmagick搭建圖片處理伺服器
http://shanks.leanote.com/post/Untitled-55ca439338f41148cd000759-23
[27] How to handle gziped capture?
https://github.com/openresty/lua-nginx-module/issues/12
[28] Nginx與Gzip請求
http://huoding.com/2013/09/02/283
轉自 :https://blog.csdn.net/ygm_linux/article/details/53534933