
【STM32乙太網線上培訓】手把手搭建TCP伺服器及TFTP伺服器
阿新 • • 發佈:2018-11-13
非常感謝STM32乙太網線上培訓,真的讓我學到非常多,沒培訓前很想搞乙太網但有種無從下手的感覺,經過這次培訓讓我從這個架構上有個從上到下的瞭解,再借助官方神器STM32CubeMX,開發和學習起來還是非常快的!我一直是STM32的粉絲,一直想去現場培訓,但無奈沒有機會,不過好希望能申請一個板子 看培訓直播的照片我就不發了,當時看這個直播喝水都是跑著去的。 我手上沒有官方的板子,帶乙太網的只有原子的F407的板子,所以也是在這個平臺上做的,板子上的PHY為LAN8720A,沒有用到顯示屏全為串列埠輸出除錯資訊。 實現功能:通過STM32CubeMX在原子F407板子上搭建TCP Server 及 TFTP Server ,實現這些功能非常簡單。 一、功能介紹 1、TCP Server 實現顯示連線上的客戶端IP及對客戶端發來的資料回傳 2、TFTP Server 實現IAP功能及讀取MCU內部FLASH資料。這裡用到的是檔案傳輸協議,主要是參考官方文件UM1709,及官方STM324xG_EVAL的LWIP IAP例子。 二、工程搭建 1、外設配置開啟STM32CubeMX,點NEW PROJECT,在左側的輸入框中輸入407ZG,在右側會顯示STM32F407ZGT6的MCU列表,選擇此列表,雙擊。 設定時鐘源為外部時鐘 開啟SWD除錯介面,開啟ETH外設,選擇RMII介面(LAN8720A為RMII介面),中介軟體裡時能LWIP。使用RMII介面的時候軟體會自動配置對應的引腳,但是一定要仔細對比軟體配置的引腳是否為板子上硬體所連線的。 原子F407板子上的LAN8720A的RMII介面引腳如下圖, 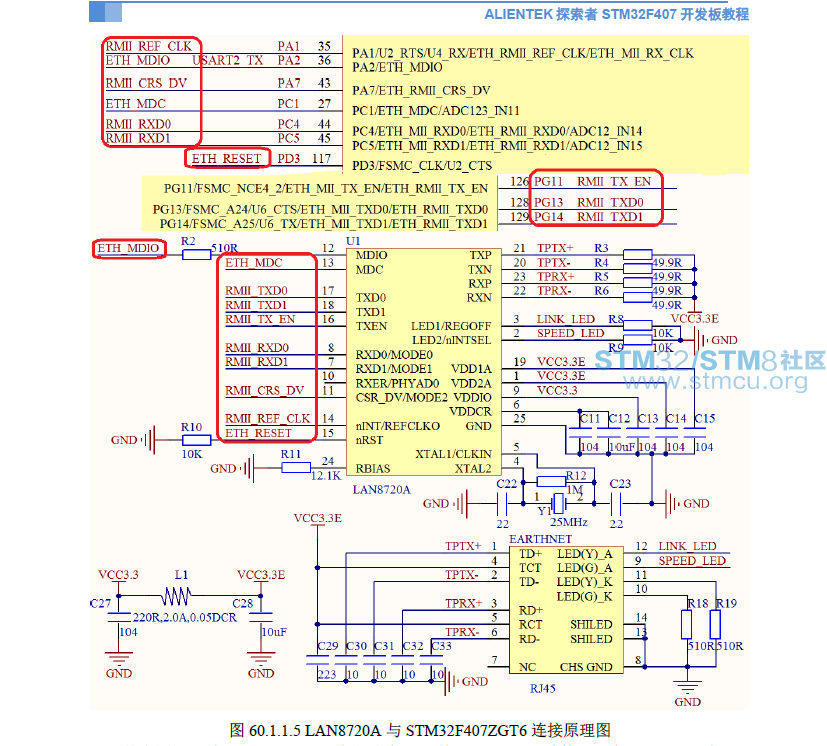 而軟體配置的引腳如下: 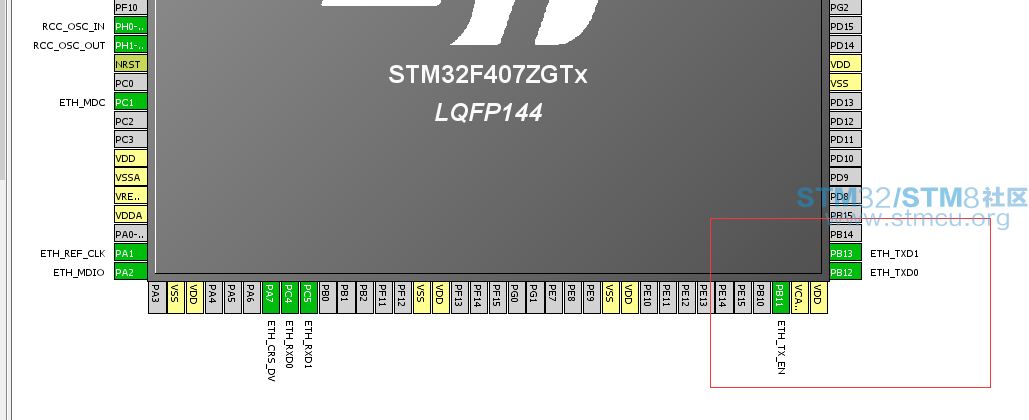 顯然與實際板子上的硬體連線不同,這裡需要手動調整3個引腳,分別為: ETH_TX_EN -> PG11 ETH_TXD0 -> PG13 ETH_TXD1 -> PG14 PD3配置成GPIO輸出(LAN8720A的硬體復位引腳) 時能串列埠1,用於除錯 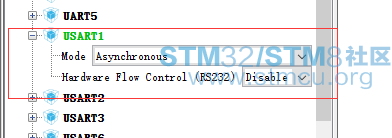 2、配置時鐘 外部高速晶振選擇為8M,PLL SORCE MUX 選擇為HSE,在HCLK處輸入168點回車,軟體會自動配置好。  3、中介軟體配置 這裡我們主要配置,ETH、LWIP、串列埠1、GPIO 因為PD3為PHY的輸入引腳,所有我們這裡直接配置它為輸出高,這樣就為正常工作狀態 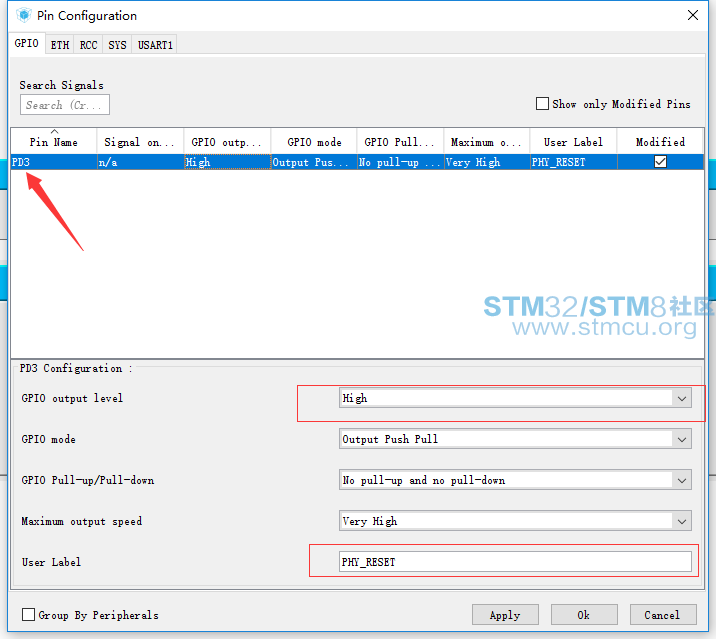 串列埠1我們設定它的波特率為115200,添加發送DMA,注意!如果添加了傳送或者接收DMA則必須開啟串列埠中斷。 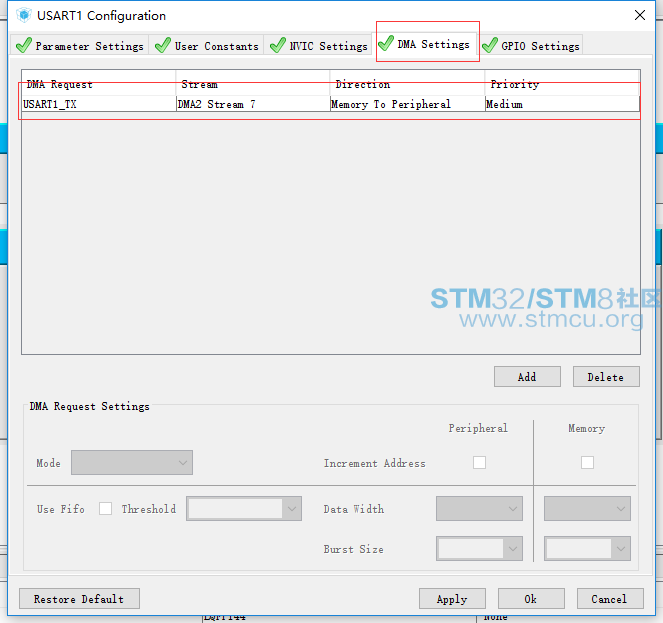  ETH設定,這裡主要是注意PHY的地址,原子407的PHY地址引腳為懸空,地址為0。 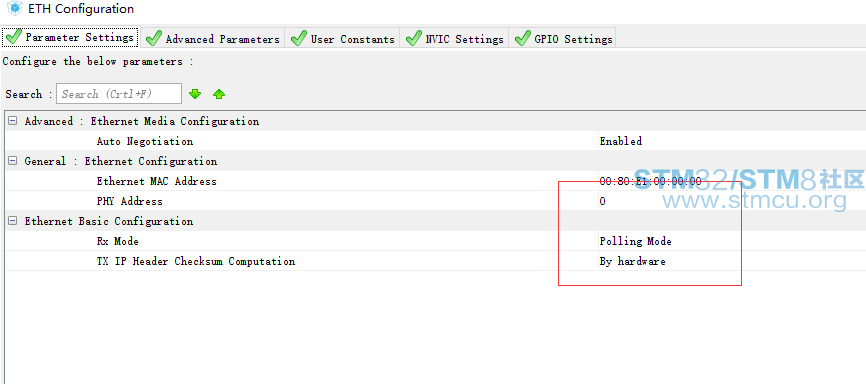 ETH設定的 Advanced Parameters 選項裡面,我們選擇PHY為USER PHY,名字我們取 LAN7820A,其它的設定全用預設即可。要改的暫存器基本就只有ExternalPHY Configuration,但是我看了下官方的例子,基本沒有用到這暫存器裡面的值,只有在使用作業系統並且時能了連線狀態變更回撥或者其它檢測的時候才用到,所有這裡我們也不管,都用預設值。 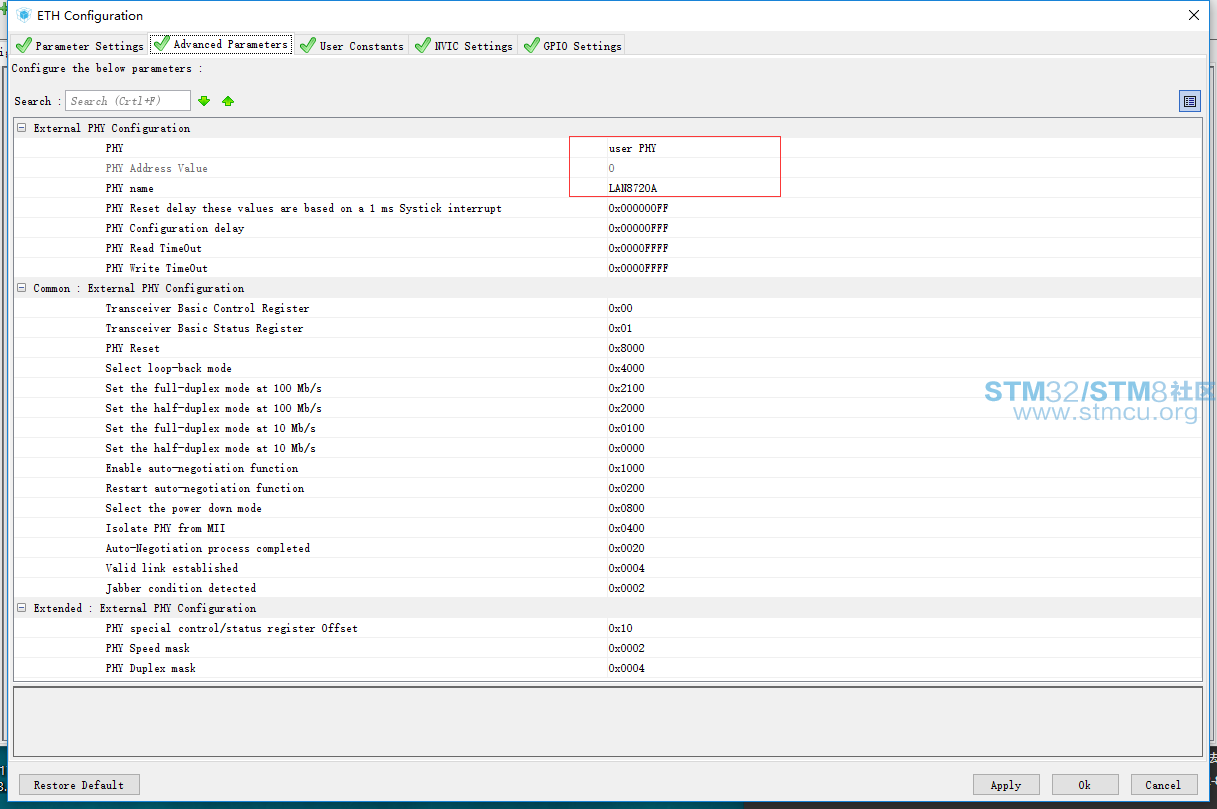 LWIP設定 ,我們關閉DHCP,採用靜態IP,因為我所在的閘道器為192.168.0.XXX,所以IP必須為192.168.0.XXX。這裡我設定IP為192.168.0.120。因為要用到TCP 和 UDP(TFTP就是用的UDP),所以這兩個都是時能的.其它設定選項我們先不管,直接點OK。 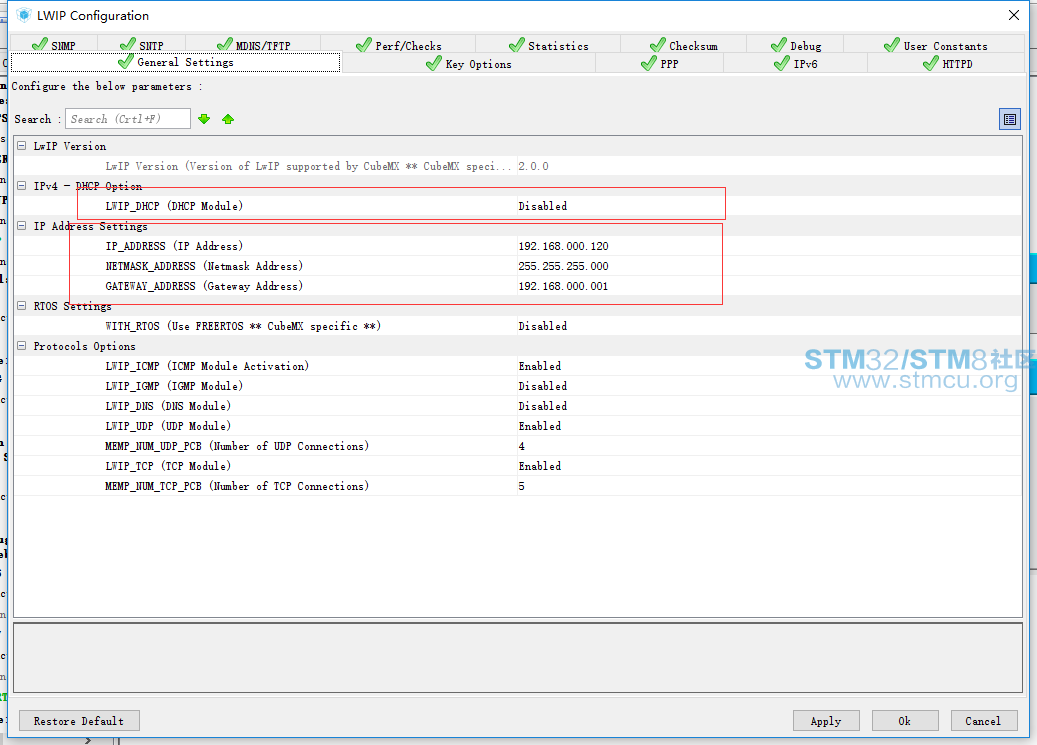 4、生成工程程式碼 點左上角的Project,選擇Settings ...(不建議直接點黃色的齒輪) 取個非中文的工程名,選擇IDE為KEIL MDK V5 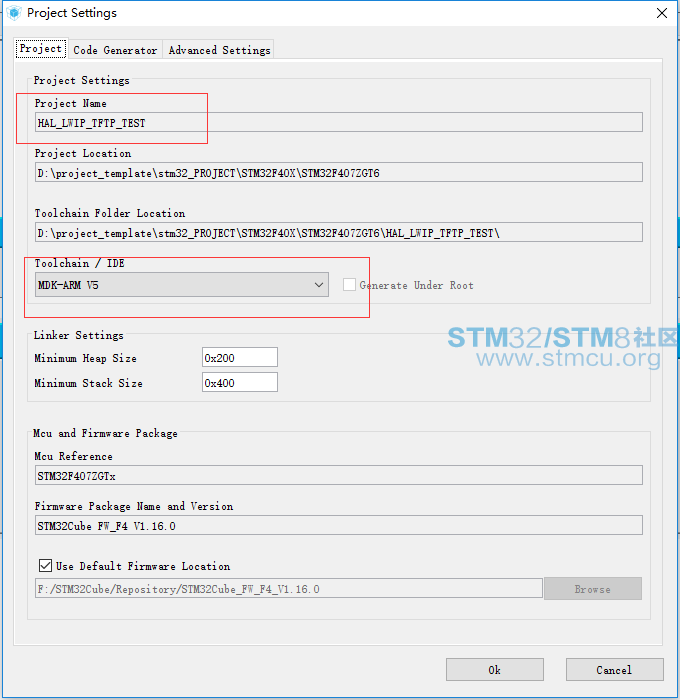 點選OK。再點右上方的黃色齒輪即可生成工程程式碼。 三、工程程式碼 生成的程式碼的試圖如下:  1、TCP Server 的實現 在math.h中 加入 #include "stm32f4xx_hal.h" #include "stdio.h" 用於支援printf 及 一些 HAL 定義的 資料結構 在uart.c 檔案中加入如下程式碼,用於把printf輸出到串列埠1
在LWIP.C 中新增如下程式碼:
接下來重點: 新建 tcp_echoserver.c 檔案,並在檔案中新增如下程式碼:
。看起來程式碼很多,起始真的不復雜,聽了之前的乙太網配置,這個理解起來還是很簡單的。大致流程如下,先新建一個TCB_PCB、開始監聽、掛載客戶端連線請求回撥函式、掛載接收資料回撥函式、掛載傳送完成回撥函式、掛載出錯回撥函式、掛載心跳包回撥函式、關閉連線等,最重要的是釋放記憶體!每收到一個數據鏈,它已經被申請了記憶體,所有在處理完這個資料後一定要釋放。 在mian.c檔案中加入如下程式碼: 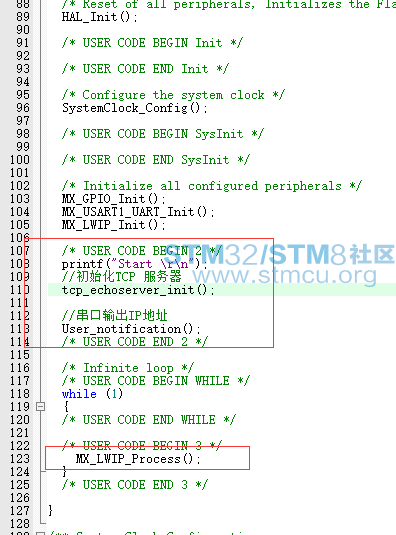 編譯,下載到開發板中。 串列埠輸出如下資料,表示伺服器已經開始監聽 Start 開始監聽 掛載客戶端連接回調函式 Static IP address: 192.168.0.120 點選電腦開始選單,輸入CMD點回車,出現命令列,在命令列中輸入 :"ping 192.168.0.120" 能ping通,顯示如下:  命令列使用技巧: 直接輸入 “help” 可以返回支援的命令, 在命令後面輸入 "/?" 可以返回命令的使用說明,比如輸入 “ping /?” 2、TCP伺服器 測試 用網路除錯助手連線TCP伺服器(兩者必須在一個閘道器裡面,192.168.000.XXX),網路除錯助手裡選擇TCP客戶端,遠端主機IP為 192.168.0.120 , 埠號為 7, 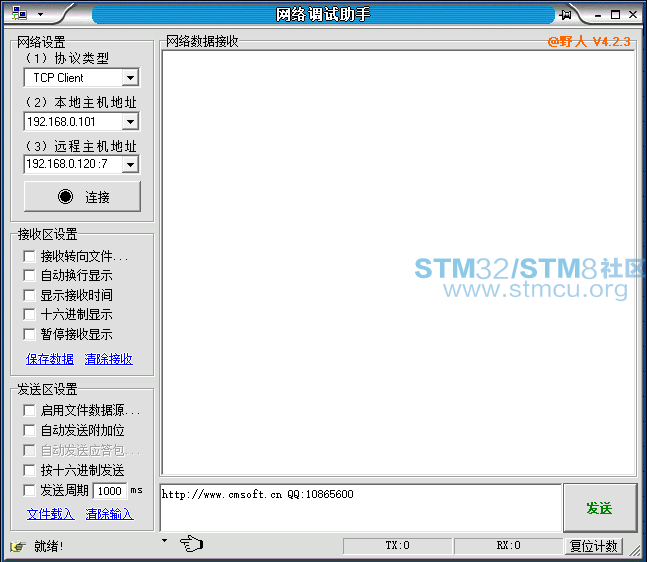 點選連線,串列埠除錯助手顯示如下資訊: 點選連線,串列埠除錯助手顯示如下資訊:Start 開始監聽 掛載客戶端連接回調函式 Static IP address: 192.168.0.120 收到客戶端連線請求,設定剛連線的客戶端為最低優先順序 客戶端 IP address: 192.168.0.101 為新連線的客戶端掛載需要的回撥函式及 呼叫引數 則表示連線正常,這時網路除錯助手輸出什麼資料就會收到什麼資料,同時串列埠也會輸出相關資訊 網路除錯助手 輸出: http://www.cmsoft.cn QQ:10865600 網路除錯助手 顯示: 【Receive from 192.168.0.120 :7】:http://www.cmsoft.cnQQ:10865600 串列埠除錯助手顯示如下: Start 開始監聽 掛載客戶端連接回調函式 Static IP address: 192.168.0.120 收到客戶端連線請求,設定剛連線的客戶端為最低優先順序 客戶端 IP address: 192.168.0.101 為新連線的客戶端掛載需要的回撥函式及 呼叫引數 收到客戶端資料 裝置剛連線,掛載剛才接收到的資料,設定傳送完成回撥 傳送資料的總長度 : 32 傳送資料: 0X68 0X74 0X74 0X70 0X3A 0X2F 0X2F 0X77 0X77 0X77 0X2E 0X63 0X6D 0X73 0X6F 0X66 0X74 0X2E 0X63 0X6E 0X20 0X51 0X51 0X3A 0X31 0X30 0X38 0X36 0X35 0X36 0X30 0X30 網路除錯助手點選“斷開”按鍵,串列埠除錯助手輸出如下資訊: Start 開始監聽 掛載客戶端連接回調函式 Static IP address: 192.168.0.120 收到客戶端連線請求,設定剛連線的客戶端為最低優先順序 客戶端 IP address: 192.168.0.101 為新連線的客戶端掛載需要的回撥函式及 呼叫引數 收到客戶端資料 裝置剛連線,掛載剛才接收到的資料,設定傳送完成回撥 傳送資料的總長度 : 32 傳送資料: 0X68 0X74 0X74 0X70 0X3A 0X2F 0X2F 0X77 0X77 0X77 0X2E 0X63 0X6D 0X73 0X6F 0X66 0X74 0X2E 0X63 0X6E 0X20 0X51 0X51 0X3A 0X31 0X30 0X38 0X36 0X35 0X36 0X30 0X30 收到客戶端資料 收到斷開連線請求 已關閉連線 通過上面的測試,則表示我們的TCP伺服器已經完成。您也可以通過手機連線這個路由器的WIFI,通過 網路除錯助手APP 來連線這個開發板的伺服器,電腦可以通過 TCP客戶端與開發板的TCP伺服器連線同時也可以用手機做TCP客戶端連線開發板的TCP伺服器。 3、TFTP Server 的實現 還是在上面的程式碼上來實現此功能,即在TCP 伺服器的程式碼上實現 TFTP 伺服器。 開啟剛才STM32CubeMX工程,在原來的基礎上來配置 LWIP,配置如下,時能TFTP 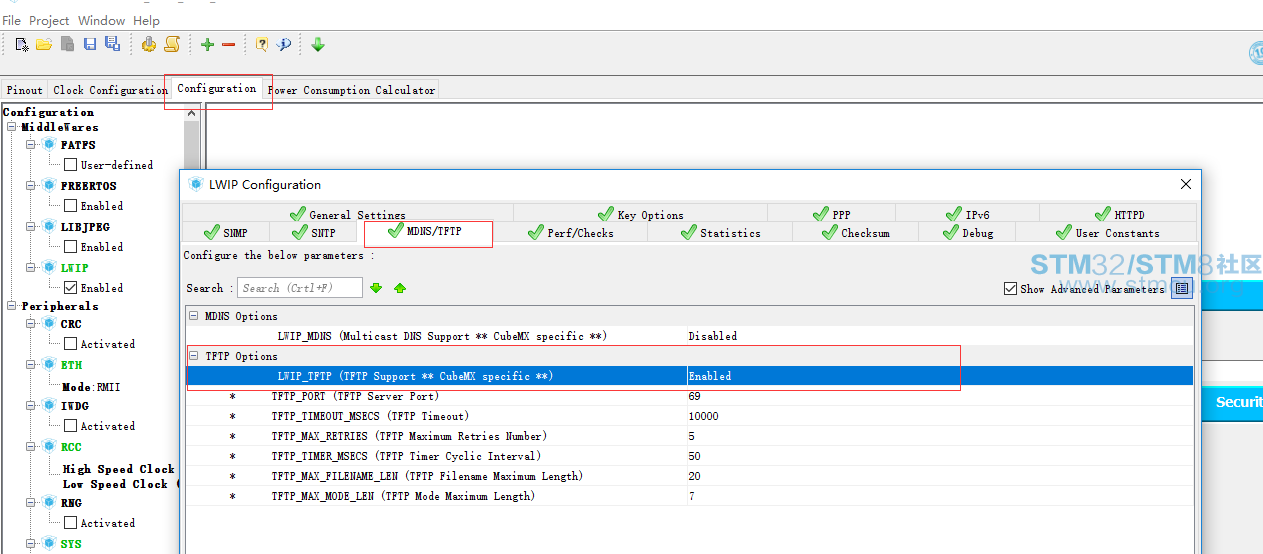 點選OK,然後點黃色的齒輪,重新生成程式碼。因為我們之前寫的程式碼要麼是在 /* USER CODE BEGIN X */ 與 /* USER CODE END X */ 中間新增程式碼要麼是在新建的檔案中新增程式碼,所以不會覆蓋之前的程式碼。 生成的程式碼檢視如下:  注意到了嗎?LWIP資料夾下多了一個新的.c,tftp_server.c,既然是在LWIP資料夾下,言外之意就是別人幫我們寫好了,不要動這裡面的檔案內容,相當於庫,但是我們還是要知道去怎麼用。這裡我們之間偷懶,直接開啟tptp_server.h,因為如果要給別的檔案提供功能函式,那麼必須會在.h檔案中存在宣告。開啟tptp_server.h檔案,內容如下:
裡面就一個 err_t tftp_init(const struct tftp_context* ctx); 從函式名的意思就是初始化,形參是一個結構體指標,而這個結構體裡面定義的全是函式指標,那麼很明確了,這個檔案就是要我們填寫輪子。 我們新建一個檔案 mytftpserverif.c ,這個檔案裡面的內容 就是用來寫那些輪子的實現函式,內容如下:
static void * OpenFile(const char* fname, const char* mode, u8_t write); static void Close_File(void* handle); static int Read_File(void* handle, void* buf, int bytes); static int Write_File(void* handle, struct pbuf* p); mytftpserverif.h檔案內容如下: #ifndef _MYTFTPSERVERIF_H_ #define _MYTFTPSERVERIF_H_ #include "lwip/mem.h" #include "lwip/udp.h" #include "lwip/apps/tftp_server.h" extern const struct tftp_context tftpContext; #endif 因為我們是要通過TFTP 來實現 IAP 功能 ,所有一定有FLASH 的操作,這裡我們之間COPY官方例子的裡面的flash_if.c和flash_if.h,flash_if.c檔案內容如下:
|