
王穎奇 20171010129《面向物件程式設計(java)》第十四周學習總結
實驗十四 Swing圖形介面元件
理論知識知識點:
1.Swing和MVC設計模式
2.佈局管理器
3.文字輸入
4.選擇元件
5.選單
6.對話方塊
實驗時間 2018-11-29
1、實驗目的與要求
(1) 掌握GUI佈局管理器用法;
(2) 掌握各類Java Swing元件用途及常用API;
2、實驗內容和步驟
實驗1: 匯入第12章示例程式,測試程式並進行組內討論。
測試程式1
l 在elipse IDE中執行教材479頁程式12-1,結合執行結果理解程式;
l 掌握各種佈局管理器的用法;
l 理解GUI介面中事件處理技術的用途。
l 在佈局管理應用程式碼處添加註釋;
程式碼:


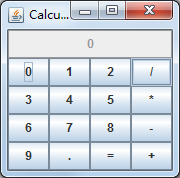
package calculator; import java.awt.*; import javax.swing.*; /** * @version 1.34 2015-06-12 * @author Cay Horstmann */ public class Calculator { public static void main(String[] args) { EventQueue.invokeLater(() -> { CalculatorFrame frameCalculator= new CalculatorFrame(); frame.setTitle("Calculator"); frame.setDefaultCloseOperation(JFrame.EXIT_ON_CLOSE); frame.setVisible(true); }); } }
package calculator; import javax.swing.*; /** * A frame with a calculator panel. */ public classCalculatorFrameCalculatorFrame extends JFrame { public CalculatorFrame() { add(new CalculatorPanel()); pack(); } }
package calculator;

import java.awt.*;
import java.awt.event.*;
import javax.swing.*;

/**
 * 帶有計算器按鈕和結果顯示的面板。
 */
public class CalculatorPanel extends JPanel
{
   private JButton display;
   private JPanel panel;
   private double result;
   private String lastCommand;
   private boolean start;

   public CalculatorPanel()
   {
      //為容器設定佈局管理器,為邊框佈局管理器
      setLayout(new BorderLayout());

      result = 0;
      lastCommand = "=";
      start = true;

      // 新增頁面顯示

      display = new JButton("0");
      display.setEnabled(false);
      add(display, BorderLayout.NORTH);

      ActionListener insert = new InsertAction();
      ActionListener command = new CommandAction();

      // 在4*4的網格中新增按鈕

      panel = new JPanel();
      //在panel物件中設定邊框佈局管理器
      panel.setLayout(new GridLayout(4, 4));

      addButton("7", insert);
      addButton("8", insert);
      addButton("9", insert);
      addButton("/", command);

      addButton("4", insert);
      addButton("5", insert);
      addButton("6", insert);
      addButton("*", command);

      addButton("1", insert);
      addButton("2", insert);
      addButton("3", insert);
      addButton("-", command);

      addButton("0", insert);
      addButton(".", insert);
      addButton("=", command);
      addButton("+", command);

      add(panel, BorderLayout.CENTER);
   }

   /**
    * 向中心面板新增一個按鈕。
    * @param label the button label
    * @param listener the button listener
    */
   private void addButton(String label, ActionListener listener)
   {
      JButton button = new JButton(label);
      button.addActionListener(listener);
      panel.add(button);
   }

   /**
    * 此操作將按鈕操作的字串插入到顯示文字的末尾。
    */
   private class InsertAction implements ActionListener
   {
      public void actionPerformed(ActionEvent event)
      {
         String input = event.getActionCommand();
         if (start)
         {
            display.setText("");
            start = false;
         }
         display.setText(display.getText() + input);
      }
   }

   /**
    * 該操作執行按鈕操作的字串表示的命令。
    */
   private class CommandAction implements ActionListener
   {
      public void actionPerformed(ActionEvent event)
      {
         String command = event.getActionCommand();

         if (start)
         {
            if (command.equals("-"))
            {
               display.setText(command);
               start = false;
            }
            else lastCommand = command;
         }
         else
         {
            calculate(Double.parseDouble(display.getText()));
            lastCommand = command;
            start = true;
         }
      }
   }

   /**
    * 具體的計算
    * @param x與先前結果累積的值。
    */
   public void calculate(double x)
   {
      if (lastCommand.equals("+")) result += x;
      else if (lastCommand.equals("-")) result -= x;
      else if (lastCommand.equals("*")) result *= x;
      else if (lastCommand.equals("/")) result /= x;
      else if (lastCommand.equals("=")) result = x;
      //將結果轉化成字串顯示
      display.setText("" + result);
   }
}
CalculatorPanel
執行結果:
測試程式2
l 在elipse IDE中除錯執行教材486頁程式12-2,結合執行結果理解程式;
l 掌握各種文字元件的用法;
l 記錄示例程式碼閱讀理解中存在的問題與疑惑。
程式碼:
package text;

import java.awt.*;
import javax.swing.*;

/**
 * @version 1.41 2015-06-12
 * @author Cay Horstmann
 */
public class TextComponentTest
{
   public static void main(String[] args)
   {
      EventQueue.invokeLater(() -> {
         JFrame frame = new TextComponentFrame();
         frame.setTitle("TextComponentTest");
         frame.setDefaultCloseOperation(JFrame.EXIT_ON_CLOSE);
         frame.setVisible(true);
      });
   }
}
TextComponentTest
package text;

import java.awt.BorderLayout;
import java.awt.GridLayout;

import javax.swing.JButton;
import javax.swing.JFrame;
import javax.swing.JLabel;
import javax.swing.JPanel;
import javax.swing.JPasswordField;
import javax.swing.JScrollPane;
import javax.swing.JTextArea;
import javax.swing.JTextField;
import javax.swing.SwingConstants;

/**
 * 帶有輸入文字框元件的框架。
 */
public class TextComponentFrame extends JFrame
{
   public static final int TEXTAREA_ROWS = 8;
   public static final int TEXTAREA_COLUMNS = 20;

   public TextComponentFrame()
   {
      JTextField textField = new JTextField();
      JPasswordField passwordField = new JPasswordField();

      JPanel northPanel = new JPanel();
      northPanel.setLayout(new GridLayout(2, 2));
      //SwingConstants通常用於在螢幕上定位或定向元件的常量的集合
      northPanel.add(new JLabel("User name: ", SwingConstants.RIGHT));
      northPanel.add(textField);
      northPanel.add(new JLabel("Password: ", SwingConstants.RIGHT));
      northPanel.add(passwordField);

      add(northPanel, BorderLayout.NORTH);

      //構造具有指定行數和列數的新的空 TextArea。
      JTextArea textArea = new JTextArea(TEXTAREA_ROWS, TEXTAREA_COLUMNS);
      //建立一個顯示指定元件內容的 JScrollPane物件,只要元件的內容超過檢視大小就會顯示水平和垂直滾動條。
      JScrollPane scrollPane = new JScrollPane(textArea);

      add(scrollPane, BorderLayout.CENTER);

      // add button to append text into the text area

      JPanel southPanel = new JPanel();

      JButton insertButton = new JButton("Insert");
      southPanel.add(insertButton);
      //將給定文字追加到文件結尾。
      insertButton.addActionListener(event ->
         textArea.append("User name: " + textField.getText() + " Password: "
            + new String(passwordField.getPassword()) + "\n"));

      add(southPanel, BorderLayout.SOUTH);
      pack();
   }
}
TextComponentFrame
執行結果:

測試程式3
l 在elipse IDE中除錯執行教材489頁程式12-3,結合執行結果理解程式;
l 掌握複選框元件的用法;
l 記錄示例程式碼閱讀理解中存在的問題與疑惑。
程式碼:
package checkBox;

import java.awt.*;
import javax.swing.*;

/**
 * @version 1.34 2015-06-12
 * @author Cay Horstmann
 */
public class CheckBoxTest
{
   public static void main(String[] args)
   {
      EventQueue.invokeLater(() -> {
         JFrame frame = new CheckBoxFrame();
         frame.setTitle("CheckBoxTest");
         frame.setDefaultCloseOperation(JFrame.EXIT_ON_CLOSE);
         frame.setVisible(true);
      });
   }
}
CheckBoxTest
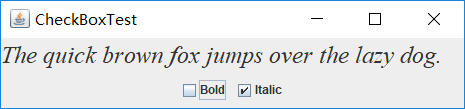
package checkBox;

import java.awt.*;
import java.awt.event.*;
import javax.swing.*;

/**
 * A frame with a sample text label and check boxes for selecting font attributes.
 */
public class CheckBoxFrame extends JFrame
{
   private JLabel label;
   private JCheckBox bold;
   private JCheckBox italic;
   private static final int FONTSIZE = 24;

   public CheckBoxFrame()
   {
      // 新增示例文字標籤

      label = new JLabel("The quick brown fox jumps over the lazy dog.");
      label.setFont(new Font("Serif", Font.BOLD, FONTSIZE));
      add(label, BorderLayout.CENTER);

      // 字型屬性
      // 複選框狀態的標籤

      ActionListener listener = event -> {
         int mode = 0;
         if (bold.isSelected()) mode += Font.BOLD;
         if (italic.isSelected()) mode += Font.ITALIC;
         label.setFont(new Font("Serif", mode, FONTSIZE));
      };

      // 新增複選框

      JPanel buttonPanel = new JPanel();

      bold = new JCheckBox("Bold");
      bold.addActionListener(listener);
      bold.setSelected(true);
      buttonPanel.add(bold);

      italic = new JCheckBox("Italic");
      italic.addActionListener(listener);
      buttonPanel.add(italic);

      add(buttonPanel, BorderLayout.SOUTH);
      pack();
   }
}
CheckBoxFrame
執行結果:
普通字型: 加粗:


斜體和加粗: 斜體:

測試程式4
l 在elipse IDE中除錯執行教材491頁程式12-4,執行結果理解程式;
l 掌握單選按鈕元件的用法;
l 記錄示例程式碼閱讀理解中存在的問題與疑惑。
程式碼:
package radioButton;

import java.awt.*;
import javax.swing.*;

/**
 * @version 1.34 2015-06-12
 * @author Cay Horstmann
 */
public class RadioButtonTest
{
   public static void main(String[] args)
   {
      EventQueue.invokeLater(() -> {
         JFrame frame = new RadioButtonFrame();
         frame.setTitle("RadioButtonTest");
         frame.setDefaultCloseOperation(JFrame.EXIT_ON_CLOSE);
         frame.setVisible(true);
      });
   }
}
RadioButtonTest
package radioButton;

import java.awt.*;
import java.awt.event.*;
import javax.swing.*;

/**
 * 帶有示例文字標籤和用於選擇字型大小的單選按鈕的框架。
 */
public class RadioButtonFrame extends JFrame
{
   private JPanel buttonPanel;
   private ButtonGroup group;
   private JLabel label;
   private static final int DEFAULT_SIZE = 36;

   public RadioButtonFrame()
   {
      // add the sample text label

      label = new JLabel("The quick brown fox jumps over the lazy dog.");
      label.setFont(new Font("Serif", Font.PLAIN, DEFAULT_SIZE));
      add(label, BorderLayout.CENTER);

      // add the radio buttons

      buttonPanel = new JPanel();
      group = new ButtonGroup();

      addRadioButton("Small", 8);
      addRadioButton("Medium", 12);
      addRadioButton("Large", 18);
      addRadioButton("Extra large", 36);

      add(buttonPanel, BorderLayout.SOUTH);
      pack();
   }

   /**
    * 新增一個單選按鈕,用於設定示例文字的字型大小。
    * @param 大小的規格要出現在按鈕上的字串
    * @param 按鈕設定的字型大小
    */
   public void addRadioButton(String name, int size)
   {
      boolean selected = size == DEFAULT_SIZE;
      JRadioButton button = new JRadioButton(name, selected);
      group.add(button);
      buttonPanel.add(button);

      // 此監聽器設定標籤字型大小

      ActionListener listener = event -> label.setFont(new Font("Serif", Font.PLAIN, size));

      button.addActionListener(listener);
   }
}
RadioButtonFrame
執行結果:
samll:

medium:

large:

extra large:

單選鈕,只能選中一個
測試程式5
l 在elipse IDE中除錯執行教材494頁程式12-5,結合執行結果理解程式;
l 掌握邊框的用法;
l 記錄示例程式碼閱讀理解中存在的問題與疑惑。
程式碼:
package border;

import java.awt.*;
import javax.swing.*;

/**
 * @version 1.34 2015-06-13
 * @author Cay Horstmann
 */
public class BorderTest
{
   public static void main(String[] args)
   {
      EventQueue.invokeLater(() -> {
         JFrame frame = new BorderFrame();
         frame.setTitle("BorderTest");
         frame.setDefaultCloseOperation(JFrame.EXIT_ON_CLOSE);
         frame.setVisible(true);
      });
   }
}
BorderTest
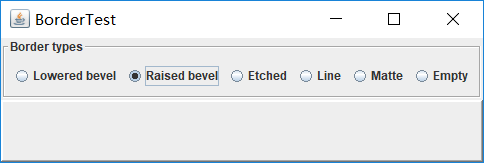
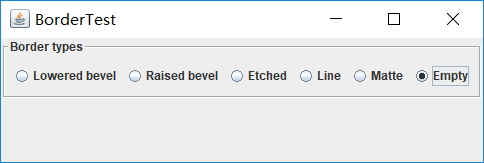
package border;

import java.awt.*;
import javax.swing.*;
import javax.swing.border.*;

/**
 * A frame with radio buttons to pick a border style.
 */
public class BorderFrame extends JFrame
{
   private JPanel demoPanel;
   private JPanel buttonPanel;
   private ButtonGroup group;

   public BorderFrame()
   {
      demoPanel = new JPanel();
      buttonPanel = new JPanel();
      group = new ButtonGroup();

      //設定不同的邊框型別按鈕,共六種(提供標準 Border 物件的工廠類)
      addRadioButton("Lowered bevel", BorderFactory.createLoweredBevelBorder());
      addRadioButton("Raised bevel", BorderFactory.createRaisedBevelBorder());
      addRadioButton("Etched", BorderFactory.createEtchedBorder());
      addRadioButton("Line", BorderFactory.createLineBorder(Color.BLUE));
      addRadioButton("Matte", BorderFactory.createMatteBorder(10, 10, 10, 10, Color.BLUE));
      addRadioButton("Empty", BorderFactory.createEmptyBorder());

      Border etched = BorderFactory.createEtchedBorder();
      Border titled = BorderFactory.createTitledBorder(etched, "Border types");
      buttonPanel.setBorder(titled);

      setLayout(new GridLayout(2, 1));
      add(buttonPanel);
      add(demoPanel);
      pack();
   }

   public void addRadioButton(String buttonName, Border b)
   {
      JRadioButton button = new JRadioButton(buttonName);
      button.addActionListener(event -> demoPanel.setBorder(b));
      group.add(button);
      buttonPanel.add(button);
   }
}
BorderFrame
執行結果:


測試程式6
l 在elipse IDE中除錯執行教材498頁程式12-6,結合執行結果理解程式;
l 掌握組合框元件的用法;
l 記錄示例程式碼閱讀理解中存在的問題與疑惑。
本小組負責的示例程式(如有問題與疑惑,請看註釋):
程式碼:
package comboBox;

import java.awt.*;
import javax.swing.*;

/**
 * @version 1.35 2015-06-12
 * @author Cay Horstmann
 */
public class ComboBoxTest
{
   public static void main(String[] args)
   {
      //lambda表示式
      EventQueue.invokeLater(() -> {
         //構造frame框架物件
         JFrame frame = new ComboBoxFrame();
         //設定標題
         frame.setTitle("ComboBoxTest");
         //設定使用者在此窗體上發起 "close" 時預設執行的操作。
         frame.setDefaultCloseOperation(JFrame.EXIT_ON_CLOSE);
         //設定框架是否可見
         frame.setVisible(true);
      });
   }
}
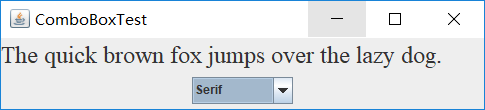
package comboBox;

import java.awt.BorderLayout;
import java.awt.Font;

import javax.swing.JComboBox;
import javax.swing.JFrame;
import javax.swing.JLabel;
import javax.swing.JPanel;

/**
 * 具有示例文字標籤和用於選擇字型外觀的組合框的框架。
 * 組合框:將按鈕或可編輯欄位與下拉列表組合的元件。
 * 使用者可以從下拉列表中選擇值,下拉列表在使用者請求時顯示。
 * 如果使組合框處於可編輯狀態,則組合框將包括使用者可在其中鍵入值的可編輯欄位。
 */

//ComboBoxFrame繼承於JFrame類
public class ComboBoxFrame extends JFrame
{
   //設定ComboBoxFrame的私有屬性
   private JComboBox<String> faceCombo;
   private JLabel label;
   private static final int DEFAULT_SIZE = 24;

   public ComboBoxFrame()
   {
      // 新增示例文字標籤

      label = new JLabel("The quick brown fox jumps over the lazy dog.");
      //設定字型
      label.setFont(new Font("Serif", Font.PLAIN, DEFAULT_SIZE));
      //新增到邊框佈局管理器的中間
      add(label, BorderLayout.CENTER);

      // 建立一個組合框物件並新增專案名稱

      faceCombo = new JComboBox<>();
      //把一個選項新增到選項列表中,共五種選項
      faceCombo.addItem("Serif");
      faceCombo.addItem("SansSerif");
      faceCombo.addItem("Monospaced");
      faceCombo.addItem("Dialog");
      faceCombo.addItem("DialogInput");

      // 組合框監聽器將標籤字型更改為所選的名稱(新增監聽器,使用lambda表示式)

      faceCombo.addActionListener(event ->
      //設定標籤的字型
         label.setFont(
            //getItemAt用於返回指定索引處的列表項;getSelectedIndex用於返回當前選擇的選項
            new Font(faceCombo.getItemAt(faceCombo.getSelectedIndex()),
               Font.PLAIN, DEFAULT_SIZE)));

      // 將組合框新增到框架南部邊界的面板

      JPanel comboPanel = new JPanel();
      comboPanel.add(faceCombo);
      add(comboPanel, BorderLayout.SOUTH);
      pack();
   }
}
執行結果:


測試程式7
l 在elipse IDE中除錯執行教材501頁程式12-7,結合執行結果理解程式;
l 掌握滑動條元件的用法;
l 記錄示例程式碼閱讀理解中存在的問題與疑惑。
程式碼:
package slider;

import java.awt.*;
import javax.swing.*;

/**
 * @version 1.15 2015-06-12
 * @author Cay Horstmann
 */
public class SliderTest
{
   public static void main(String[] args)
   {
      EventQueue.invokeLater(() -> {
         SliderFrame frame = new SliderFrame();
         frame.setTitle("SliderTest");
         frame.setDefaultCloseOperation(JFrame.EXIT_ON_CLOSE);
         frame.setVisible(true);
      });
   }
}
SliderTest
package slider;

import java.awt.*;
import java.util.*;
import javax.swing.*;
import javax.swing.event.*;

/**
 * A frame with many sliders and a text field to show slider values.
 */
public class SliderFrame extends JFrame
{
   private JPanel sliderPanel;
   private JTextField textField;
   private ChangeListener listener;

   public SliderFrame()
   {
      sliderPanel = new JPanel();
      sliderPanel.setLayout(new GridBagLayout());

      // common listener for all sliders
      listener = event -> {
         // update text field when the slider value changes
         JSlider source = (JSlider) event.getSource();
         textField.setText("" + source.getValue());
      };

      // add a plain slider

      JSlider slider = new JSlider();
      addSlider(slider, "Plain");

      // add a slider with major and minor ticks

      slider = new JSlider();
      slider.setPaintTicks(true);
      slider.setMajorTickSpacing(20);
      slider.setMinorTickSpacing(5);
      addSlider(slider, "Ticks");

      // add a slider that snaps to ticks

      slider = new JSlider();
      slider.setPaintTicks(true);
      slider.setSnapToTicks(true);
      slider.setMajorTickSpacing(20);
      slider.setMinorTickSpacing(5);
      addSlider(slider, "Snap to ticks");

      // add a slider with no track

      slider = new JSlider();
      slider.setPaintTicks(true);
      slider.setMajorTickSpacing(20);
      slider.setMinorTickSpacing(5);
      slider.setPaintTrack(false);
      addSlider(slider, "No track");

      // add an inverted slider

      slider = new JSlider();
      slider.setPaintTicks(true);
      slider.setMajorTickSpacing(20);
      slider.setMinorTickSpacing(5);
      slider.setInverted(true);
      addSlider(slider, "Inverted");

      // add a slider with numeric labels

      slider = new JSlider();
      slider.setPaintTicks(true);
      slider.setPaintLabels(true);
      slider.setMajorTickSpacing(20);
      slider.setMinorTickSpacing(5);
      addSlider(slider, "Labels");

      // add a slider with alphabetic labels

      slider = new JSlider();
      slider.setPaintLabels(true);
      slider.setPaintTicks(true);
      slider.setMajorTickSpacing(20);
      slider.setMinorTickSpacing(5);

      Dictionary<Integer, Component> labelTable = new Hashtable<>();
      labelTable.put(0, new JLabel("A"));
      labelTable.put(20, new JLabel("B"));
      labelTable.put(40, new JLabel("C"));
      labelTable.put(60, new JLabel("D"));
      labelTable.put(80, new JLabel("E"));
      labelTable.put(100, new JLabel("F"));

      slider.setLabelTable(labelTable);
      addSlider(slider, "Custom labels");

      // add a slider with icon labels

      slider = new JSlider();
      slider.setPaintTicks(true);
      slider.setPaintLabels(true);
      slider.setSnapToTicks(true);
      slider.setMajorTickSpacing(20);
      slider.setMinorTickSpacing(20);

      labelTable = new Hashtable<Integer, Component>();

      // add card images

      labelTable.put(0, new JLabel(new ImageIcon("nine.gif")));
      labelTable.put(20, new JLabel(new ImageIcon("ten.gif")));
      labelTable.put(40, new JLabel(new ImageIcon("jack.gif")));
      labelTable.put(60, new JLabel(new ImageIcon("queen.gif")));
      labelTable.put(80, new JLabel(new ImageIcon("king.gif")));
      labelTable.put(100, new JLabel(new ImageIcon("ace.gif")));

      slider.setLabelTable(labelTable);
      addSlider(slider, "Icon labels");

      // add the text field that displays the slider value

      textField = new JTextField();
      add(sliderPanel, BorderLayout.CENTER);
      add(textField, BorderLayout.SOUTH);
      pack();
   }

   /**
    * Adds a slider to the slider panel and hooks up the listener
    * @param s the slider
    * @param description the slider description
    */
   public void addSlider(JSlider s, String description)
   {
      s.addChangeListener(listener);
      JPanel panel = new JPanel();
      panel.add(s);
      panel.add(new JLabel(description));
      panel.setAlignmentX(Component.LEFT_ALIGNMENT);
      GridBagConstraints gbc = new GridBagConstraints();
      gbc.gridy = sliderPanel.getComponentCount();
      gbc.anchor = GridBagConstraints.WEST;
      sliderPanel.add(panel, gbc);
   }
}
SliderFrame
執行結果:

測試程式8
l 在elipse IDE中除錯執行教材512頁程式12-8,結合執行結果理解程式;
l 掌握選單的建立、選單事件監聽器、複選框和單選按鈕選單項、彈出選單以及快捷鍵和加速器的用法。
l 記錄示例程式碼閱讀理解中存在的問題與疑惑。
程式碼:
package menu;

import java.awt.*;
import javax.swing.*;

/**
 * @version 1.24 2012-06-12
 * @author Cay Horstmann
 */
public class MenuTest
{
   public static void main(String[] args)
   {
      EventQueue.invokeLater(() -> {
         JFrame frame = new MenuFrame();
         frame.setTitle("MenuTest");
         frame.setDefaultCloseOperation(JFrame.EXIT_ON_CLOSE);
         frame.setVisible(true);
      });
   }
}
MenuTest
  1 package menu;
  2
  3 import java.awt.event.*;
  4 import javax.swing.*;
  5
  6 /**
  7  * A frame with a sample menu bar.
  8  */
  9 public class MenuFrame extends JFrame
 10 {
 11    private static final int DEFAULT_WIDTH = 300;
 12    private static final int DEFAULT_HEIGHT = 200;
 13    private Action saveAction;
 14    private Action saveAsAction;
 15    private JCheckBoxMenuItem readonlyItem;
 16    private JPopupMenu popup;
 17
 18    /**
 19     * A sample action that prints the action name to System.out
 20     */
 21    class TestAction extends AbstractAction
 22    {
 23       public TestAction(String name)
 24       {
 25          super(name);
 26       }
 27
 28       public void actionPerformed(ActionEvent event)
 29       {
 30          System.out.println(getValue(Action.NAME) + " selected.");
 31       }
 32    }
 33
 34    public MenuFrame()
 35    {
 36       setSize(DEFAULT_WIDTH, DEFAULT_HEIGHT);
 37
 38       JMenu fileMenu = new JMenu("File");
 39       fileMenu.add(new TestAction("New"));
 40
 41       // demonstrate accelerators
 42
 43       JMenuItem openItem = fileMenu.add(new TestAction("Open"));
 44       openItem.setAccelerator(KeyStroke.getKeyStroke("ctrl O"));
 45
 46       fileMenu.addSeparator();
 47
 48       saveAction = new TestAction("Save");
 49       JMenuItem saveItem = fileMenu.add(saveAction);
 50       saveItem.setAccelerator(KeyStroke.getKeyStroke("ctrl S"));
 51
 52       saveAsAction = new TestAction("Save As");
 53       fileMenu.add(saveAsAction);
 54       fileMenu.addSeparator();
 55
 56       fileMenu.add(new AbstractAction("Exit")
 57          {
 58             public void actionPerformed(ActionEvent event)
 59             {
 60                System.exit(0);
 61             }
 62          });
 63
 64       // demonstrate checkbox and radio button menus
 65
 66       readonlyItem = new JCheckBoxMenuItem("Read-only");
 67       readonlyItem.addActionListener(new ActionListener()
 68          {
 69             public void actionPerformed(ActionEvent event)
 70             {
 71                boolean saveOk = !readonlyItem.isSelected();
 72                saveAction.setEnabled(saveOk);
 73                saveAsAction.setEnabled(saveOk);
 74             }
 75          });
 76
 77       ButtonGroup group = new ButtonGroup();
 78
 79       JRadioButtonMenuItem insertItem = new JRadioButtonMenuItem("Insert");
 80       insertItem.setSelected(true);
 81       JRadioButtonMenuItem overtypeItem = new JRadioButtonMenuItem("Overtype");
 82
 83       group.add(insertItem);
 84       group.add(overtypeItem);
 85
 86       // demonstrate icons
 87
 88       Action cutAction = new TestAction("Cut");
 89       cutAction.putValue(Action.SMALL_ICON, new ImageIcon("cut.gif"));
 90       Action copyAction = new TestAction("Copy");
 91       copyAction.putValue(Action.SMALL_ICON, new ImageIcon("copy.gif"));
 92       Action pasteAction = new TestAction("Paste");
 93       pasteAction.putValue(Action.SMALL_ICON, new ImageIcon("paste.gif"));
 94
 95       JMenu editMenu = new JMenu("Edit");
 96       editMenu.add(cutAction);
 97       editMenu.add(copyAction);
 98       editMenu.add(pasteAction);
 99
100       // demonstrate nested menus
101
102       JMenu optionMenu = new JMenu("Options");
103
104       optionMenu.add(readonlyItem);
105       optionMenu.addSeparator();
106       optionMenu.add(insertItem);
107       optionMenu.add(overtypeItem);
108
109       editMenu.addSeparator();
110       editMenu.add(optionMenu);
111
112       // demonstrate mnemonics
113
114       JMenu helpMenu = new JMenu("Help");
115       helpMenu.setMnemonic('H');
116
117       JMenuItem indexItem = new JMenuItem("Index");
118       indexItem.setMnemonic('I');
119       helpMenu.add(indexItem);
120
121       // you can also add the mnemonic key to an action
122       Action aboutAction = new TestAction("About");
123       aboutAction.putValue(Action.MNEMONIC_KEY, new Integer('A'));
124       helpMenu.add(aboutAction);
125
126       // add all top-level menus to menu bar
127
128       JMenuBar menuBar = new JMenuBar();
129       setJMenuBar(menuBar);
130
131       menuBar.add(fileMenu);
132       menuBar.add(editMenu);
133       menuBar.add(helpMenu);
134
135       // demonstrate pop-ups
136
137       popup = new JPopupMenu();
138       popup.add(cutAction);
139       popup.add(copyAction);
140       popup.add(pasteAction);
141
142       JPanel panel = new JPanel();
143       panel.setComponentPopupMenu(popup);
144       add(panel);
145    }
146 }
MenuFrame
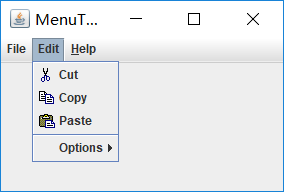
執行結果:
三個主選單:


1.點選Exit會關閉視窗
2.使用快捷鍵Ctrl+O和Ctrl+S,操作結果與滑鼠點選相同:
控制檯上顯示:

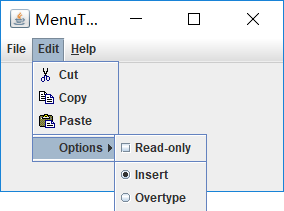
3.Options子選單(複選框和單選按鈕選單項)
測試程式9
l 在elipse IDE中除錯執行教材517頁程式12-9,結合執行結果理解程式;
l 掌握工具欄和工具提示的用法;
l 記錄示例程式碼閱讀理解中存在的問題與疑惑。
程式碼:
package toolBar;

import java.awt.*;
import javax.swing.*;

/**
 * @version 1.14 2015-06-12
 * @author Cay Horstmann
 */
public class ToolBarTest
{
   public static void main(String[] args)
   {
      EventQueue.invokeLater(() -> {
         ToolBarFrame frame = new ToolBarFrame();
         frame.setTitle("ToolBarTest");
         frame.setDefaultCloseOperation(JFrame.EXIT_ON_CLOSE);
         frame.setVisible(true);
      });
   }
}
ToolBarTest
package toolBar;

import java.awt.*;
import java.awt.event.*;
import javax.swing.*;

/**
 * A frame with a toolbar and menu for color changes.
 */
public class ToolBarFrame extends JFrame
{
   private static final int DEFAULT_WIDTH = 300;
   private static final int DEFAULT_HEIGHT = 200;
   private JPanel panel;

   public ToolBarFrame()
   {
      setSize(DEFAULT_WIDTH, DEFAULT_HEIGHT);

      // add a panel for color change

      panel = new JPanel();
      add(panel, BorderLayout.CENTER);

      // set up actions

      Action blueAction = new ColorAction("Blue", new ImageIcon("blue-ball.gif"), Color.BLUE);
      Action yellowAction = new ColorAction("Yellow", new ImageIcon("yellow-ball.gif"),
            Color.YELLOW);
      Action redAction = new ColorAction("Red", new ImageIcon("red-ball.gif"), Color.RED);

      Action exitAction = new AbstractAction("Exit", new ImageIcon("exit.gif"))
         {
            public void actionPerformed(ActionEvent event)
            {
               System.exit(0);
            }
         };
      exitAction.putValue(Action.SHORT_DESCRIPTION, "Exit");

      // populate toolbar

      JToolBar bar = new JToolBar();
      bar.add(blueAction);
      bar.add(yellowAction);
      bar.add(redAction);
      bar.addSeparator();
      bar.add(exitAction);
      add(bar, BorderLayout.NORTH);

      // populate menu

      JMenu menu = new JMenu("Color");
      menu.add(yellowAction);
      menu.add(blueAction);
      menu.add(redAction);
      menu.add(exitAction);
      JMenuBar menuBar = new JMenuBar();
      menuBar.add(menu);
      setJMenuBar(menuBar);
   }

   /**
    * The color action sets the background of the frame to a given color.
    */
   class ColorAction extends AbstractAction
   {
      public ColorAction(String name, Icon icon, Color c)
      {
         putValue(Action.NAME, name);
         putValue(Action.SMALL_ICON, icon);
         putValue(Action.SHORT_DESCRIPTION, name + " background");
         putValue("Color", c);
      }

      public void actionPerformed(ActionEvent event)
      {
         Color c = (Color) getValue("Color");
         panel.setBackground(c);
      }
   }
}
ToolBarFrame
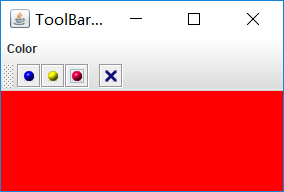
執行結果:
初始:

分別點選四個按鈕之後:
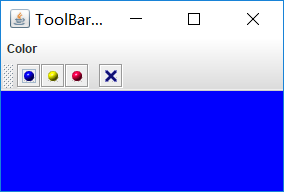

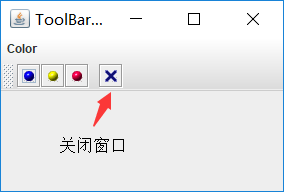
將滑鼠放置在四個按鈕上都會有對應的提示(如圖):

問題與疑惑:
1.此段程式碼中:putValue的使用意義和使用方法
class ColorAction extends AbstractAction{
public ColorAction(String name, Icon icon, Color c)
{
putValue(Action.NAME, name);
putValue(Action.SMALL_ICON, icon);
putValue(Action.SHORT_DESCRIPTION, name + " background");
putValue("Color", c);
}