
Spring Cloud實戰(一)-Spring Cloud Config Server
2016-08-01 釋出
 java
java25.2k 次閱讀 · 讀完需要 22 分鐘
5
概要
什麼是Spring Cloud Config?
建立並執行一個Spring Cloud Config Server
建立一個Repository
建立並執行一個Spring Cloud Config Client
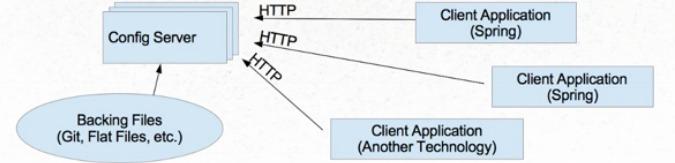
Spring Cloud Config是什麼?
什麼是配置資訊? 一個Application中不只是程式碼,還需要連線資源和其它應用,經常有很多需要外部設定的項去調整Application行為,如切換不同的資料庫,i18n國際化 等.應用中的會經常見到的xml,properties,yaml等就是配置資訊.
常見的實現資訊配置的方法:
-
硬編碼(缺點:需要修改程式碼,風險大)
-
放在xml等配置檔案中,和應用一起打包(缺點:需要重新打包和重啟)
-
檔案系統中(缺點:依賴作業系統等)
-
環境變數(缺點:有大量的配置需要人工設定到環境變數中,不便於管理,且依賴平臺)
-
雲端儲存(缺點:與其他應用耦合) Spring Cloud Config 就是雲端儲存配置資訊的,它具有中心化,版本控制,支援動態更新,平臺獨立,語言獨立等特性.
建立並執行一個Spring Cloud Config Server
1.建立一個名為my-config-server的應用,並新增spring-cloud-starter-parent,spring-cloud-config-server依賴,pom資訊具體如下
<?xml version="1.0" encoding="UTF-8"?>
<project xmlns="http://maven.apache.org/POM/4.0.0"
         xmlns:xsi="http://www.w3.org/2001/XMLSchema-instance"
         xsi:schemaLocation="http://maven.apache.org/POM/4.0.0 http://maven.apache.org/xsd/maven-4.0.0.xsd">
    <modelVersion>4.0.0</modelVersion>

    <parent>
        <groupId>org.springframework.cloud</groupId>
         <artifactId>spring-cloud-starter-parent</artifactId>
        <version>Brixton.SR4</version>
        <relativePath/>
    </parent>

    <groupId>org.mmb.cloud</groupId>
    <artifactId>mmb-config-server</artifactId>
    <version>1.0-SNAPSHOT</version>
    <packaging>jar</packaging>

    <dependencies>
        <dependency>
            <groupId>org.springframework.cloud</groupId>
            <artifactId>spring-cloud-config-server</artifactId>
        </dependency>

    </dependencies>


</project>
2.在Application主類上新增@EnableConfigServer註解,具體如下
package config;

import org.springframework.boot.SpringApplication;
import org.springframework.boot.autoconfigure.SpringBootApplication;
import org.springframework.cloud.config.server.EnableConfigServer;

/**
 * Created by mmb on 2016/7/30.
 */
@EnableConfigServer
@SpringBootApplication
public class MMBConfigServerApplication {
    public static void main(String[] args) {
        SpringApplication.run(MMBConfigServerApplication.class, args);
    }
}
3.去自己的GitHub上建立一個repository命名=MMBConfigData,並建立一個mmb-config-client.yml的配置檔案,並新增一個key為luck-word,value mmb,或者其它任何值.具體如下
---
lucky-word: mmb
4.回自己的工程,設定應用application.yml,配置spring.cloud.config.server.git.uri為"https://github.com/"YOUR-GITHUB-ID"/"YOUR-REPOSITORY-NAME"",並設定埠server.port為8001
server:
  port: 8001

spring:
  cloud:
    config:
      server:
        git:
          uri: https://github.com/mumubin/MMBConfigData
          searchPaths: data
{
"name": "mmb-config-client",
"profiles": [
"default"
],
"label": "master",
"version": "4d9240f45fecd34136f81683d44c2e144792af86",
"propertySources": [
{
"name": "https://github.com/mumubin/MMBConfigData/data/mmb-config-client.yml",
"source": {
"lucky-word": "mmb"
}
}
]
}建立並執行一個Spring Cloud Config Client
1.建立一個名為my-config-client的應用,並新增spring-cloud-starter-parent,spring-cloud-starter-config,spring-boot-starter-web依賴,pom資訊具體如下
<?xml version="1.0" encoding="UTF-8"?>
<project xmlns="http://maven.apache.org/POM/4.0.0"
         xmlns:xsi="http://www.w3.org/2001/XMLSchema-instance"
         xsi:schemaLocation="http://maven.apache.org/POM/4.0.0 http://maven.apache.org/xsd/maven-4.0.0.xsd">
    <modelVersion>4.0.0</modelVersion>

    <parent>
        <groupId>org.springframework.boot</groupId>
        <artifactId>spring-boot-starter-parent</artifactId>
        <version>1.3.5.RELEASE</version>
        <relativePath/> <!-- lookup parent from repository -->
    </parent>

    <dependencyManagement>
        <dependencies>
            <dependency>
                <groupId>org.springframework.cloud</groupId>
                <artifactId>spring-cloud-starter-parent</artifactId>
                <version>Brixton.SR4</version>
                <type>pom</type>
                <scope>import</scope>
            </dependency>
        </dependencies>
    </dependencyManagement>
    <dependencies>
        <dependency>
            <groupId>org.springframework.cloud</groupId>
            <artifactId>spring-cloud-starter-config</artifactId>
        </dependency>
        <dependency>
            <groupId>org.springframework.boot</groupId>
            <artifactId>spring-boot-starter-web</artifactId>
        </dependency>
        <!-- Allow for automatic restarts when classpath contents change. -->
        <dependency>
            <groupId>org.springframework.boot</groupId>
            <artifactId>spring-boot-devtools</artifactId>
            <optional>true</optional>
        </dependency>
    </dependencies>

    <groupId>org.mmb.cloud</groupId>
    <artifactId>mmb-config-client</artifactId>
    <version>1.0-SNAPSHOT</version>

</project>
2.建立bootstrap.yml在resource下,並設定spring.application.name,spring.cloud.config.uri,server.port資訊,具體如下
spring:
  application:
    name: mmb-config-client
  cloud:
    config:
      uri:  http://localhost:8001

---
server:
  port: 8002
注意這裡是bootstrap.yml而不是appliction.yml,因為bootstrap.yml會在應用啟動之前讀取,而spring.cloud.config.uri會影響應用啟動
3.建立一個Controller
 @RestController
    public class LuckyWordController {

      @Value("${lucky-word}") String luckyWord;

      @RequestMapping("/lucky-word")
      public String showLuckyWord() {
        return "The lucky word is: " + luckyWord;
      }
    }
@SpringBootApplication
public class Application {
public static void main(String[] args) {
SpringApplication.run(Application.class,args);
}
}The lucky word is: mmb