
SpringBoot之Web開發後續處理
回顧:
錯誤處理機制
1. SpringBoot預設的錯誤處理機制
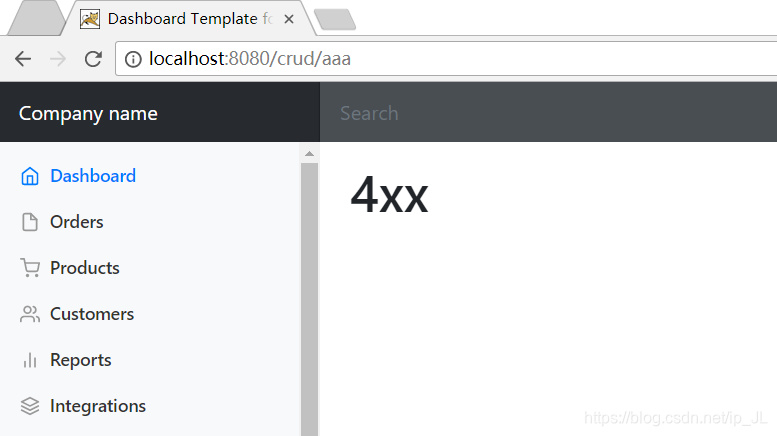
① pc端訪問

瀏覽器傳送請求的請求頭:

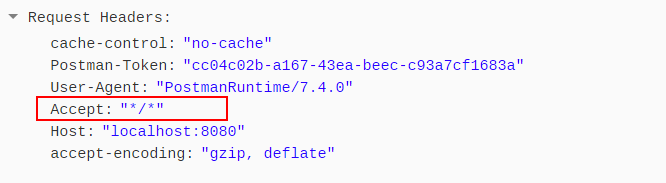
② 客戶端訪問(預設響應一個json格式的資料)

客戶端傳送請求的請求頭:
原理: 參照錯誤處理的自動配置類(ErrorMvcAutoConfiguration)
ErrorMvcAutoConfiguration給容器中添加了以下元件:
1) DefaultErrorAttributes
頁面共享資訊:


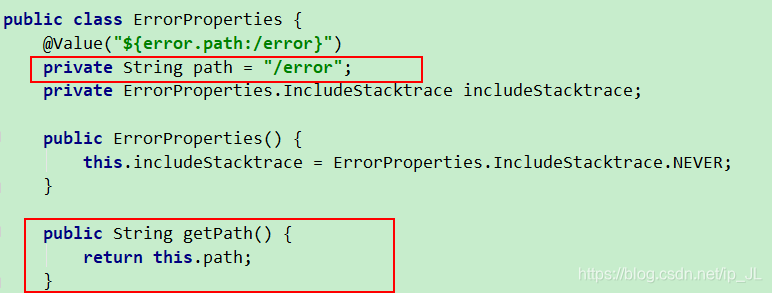
2) BasicErrorController(處理預設的/error請求)


3) ErrorPageCustomizer(定製錯誤的響應規則)
系統出現錯誤以後來到error請求進行處理


4) DefaultErrorViewResolver
public ModelAndView resolveErrorView(HttpServletRequest request, HttpStatus status, Map<String, Object> model) {
ModelAndView modelAndView = this.resolve(String.valueOf(status), model);
if (modelAndView == null && SERIES_VIEWS.containsKey(status.series())) {
modelAndView = this.resolve((String)SERIES_VIEWS.get(status.series()), model);
}
return modelAndView;
}
private ModelAndView resolve(String viewName, Map<String, Object> model) {
//預設SpringBoot可以去找到一個頁面 如: error/404
String errorViewName = "error/" + viewName;
//如果模板引擎可以解析這個頁面地址就用模板引擎解析, 返回一個ModelAndView
TemplateAvailabilityProvider provider = this.templateAvailabilityProviders.getProvider(errorViewName, this.applicationContext);
//如果模板引擎不可解析, 則在靜態資原始檔夾下找errorViewName對應的頁面 如error/404.html
return provider != null ? new ModelAndView(errorViewName, model) : this.resolveResource(errorViewName, model);
}
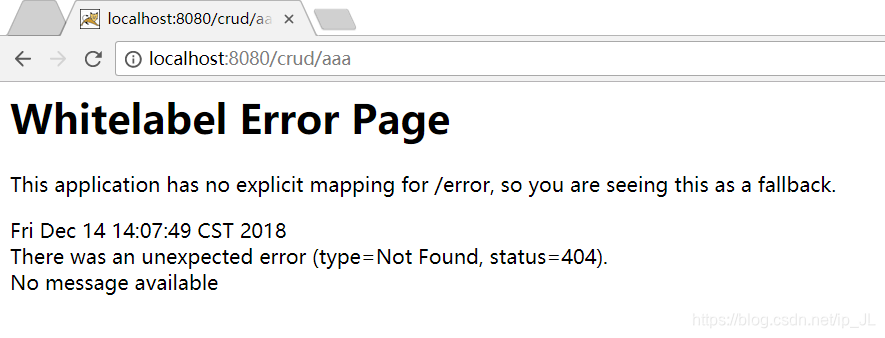
① 一旦系統出現4xx或5xx之類的錯誤, ErrorPageCustomizer就會生效.
② 此時就會被BasicErrorController處理, 根據請求頭做區分, 判斷是返回html頁面的資料還是json格式的資料.
@RequestMapping(
produces = {"text/html"} //將會產生html型別的資料, 瀏覽器傳送的請求來到這個方法處理
)
public ModelAndView errorHtml(HttpServletRequest request, HttpServletResponse response) {
HttpStatus status = this.getStatus(request);
Map<String, Object> model = Collections.unmodifiableMap(this.getErrorAttributes(request, this.isIncludeStackTrace(request, MediaType.TEXT_HTML)));
response.setStatus(status.value());
//生成具體的錯誤頁面, 包含頁面地址和頁面內容
ModelAndView modelAndView = this.resolveErrorView(request, response, status, model);
return modelAndView == null ? new ModelAndView("error", model) : modelAndView;
}
@RequestMapping
@ResponseBody //產生json格式資料, 其他客戶端傳送的請求來到這個方法處理
public ResponseEntity<Map<String, Object>> error(HttpServletRequest request) {
Map<String, Object> body = this.getErrorAttributes(request, this.isIncludeStackTrace(request, MediaType.ALL));
HttpStatus status = this.getStatus(request);
return new ResponseEntity(body, status);
}
protected ModelAndView resolveErrorView(HttpServletRequest request, HttpServletResponse response, HttpStatus status, Map<String, Object> model) {
Iterator var5 = this.errorViewResolvers.iterator();
ModelAndView modelAndView;
do {
if (!var5.hasNext()) {
return null;
}
//根據所有的ErrorViewResolver(DefaultErrorViewResolver的子類)得到ModelAndView
ErrorViewResolver resolver = (ErrorViewResolver)var5.next();
modelAndView = resolver.resolveErrorView(request, status, model);
} while(modelAndView == null);
return modelAndView;
}
2. 自定義響應
① 定製錯誤的頁面(pc端)
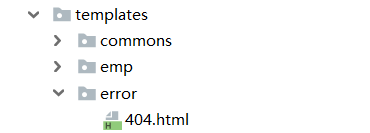
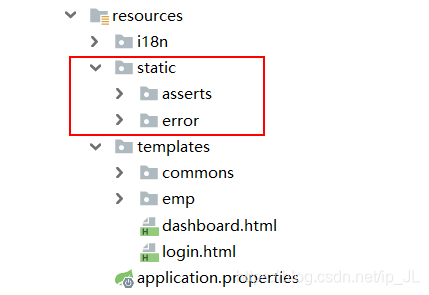
1) 有模板引擎的情況下, SpringBoot是在模板資料夾下找對應狀態碼的檔案, 如error/404.html, 即只需在templates資料夾下新建error/404.html, 即可在返回狀態碼是404的情況下跳轉到該自定義的頁面.

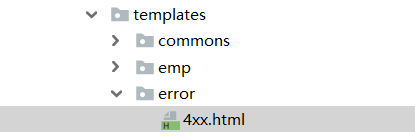
也可以通過4xx.html非精確匹配, 當精確匹配不到具體的頁面時, 則如果是4開頭的狀態碼, 則匹配至4xx.html頁面
頁面能獲取的資訊:
● timestamp: 時間戳
● status: 狀態碼
● error: 錯誤提示
● exception: 異常物件
● message: 異常的訊息
● errors: JSR303資料校驗的錯誤資訊


2) 在模板引擎無法解析的情況下, 則在靜態資原始檔夾下找
3) 以上都不滿足的情況下, 則跳轉SpringBoot預設的錯誤頁面.
② 定製json格式資料(客戶端)
自定義異常類:

1) 自定義異常處理, 返回定製的json資料

2) 轉發到/error請求進行自適應響應效果處理

3) 將定製的資料攜帶出去(以上兩種方式是無法攜帶定製的資料的)
出現錯誤以後, 會轉發至/error請求, 被BasicErrorController處理, 響應出去可以獲取的資料是由getErrorAttributes得到的, 該方法是父類(AbstractErrorController(ErrorController))規定的方法, SpringBoot規定, 當容器中沒有ErrorController的bean時, 則使用BasicErrorController, 那麼解決辦法
● 自定義一個ErrorController的實現類(或者是編寫AbstractErrorController的子類), 放入容器中即可.
● 頁面上能用的資料或者json返回的資料都是通過errorAttributes.getErrorAttributes得到的, 是由容器中 DefaultErrorAttributes.getErrorAttributes()預設進行資料處理的;


最終的效果: 響應是自適應的, 可以通過ErrorAttributes改變需要返回的內容.
頁面:

json資料:

配置嵌入式Servlet容器
SpringBoot預設使用的是嵌入式的Servlet容器(Tomcat)
1) 配置內嵌的Servlet容器(Tomcat)
① 在配置檔案中直接修改和server有關的配置(application.properties / application.yml)
server.port=8081
server.context-path=/crud
server.tomcat.uri-encoding=UTF-8
② EmbeddedServletContainerCustomizer(嵌入式的Servlet容器的定製器, 用來修改Servlet容器的配置)
//配置嵌入式的Servlet容器
@Bean
public EmbeddedServletContainerCustomizer embeddedServletContainerCustomizer(){
return new EmbeddedServletContainerCustomizer() {
//定製嵌入式的Servlet容器相關的規則
@Override
public void customize(ConfigurableEmbeddedServletContainer container) {
container.setPort(8083); //修改容器的埠
}
};
}
2) 註冊三大元件(Servlet / Filter / Listener)
利用ServletRegistrationBean / FilterRegistrationBean / ServletListenerRegistrationBean對三大元件進行註冊.
① ServletRegistrationBean(註冊Servlet)
public class MyServlet extends HttpServlet {
@Override
protected void doGet(HttpServletRequest req, HttpServletResponse resp) throws ServletException, IOException {
doPost(req,resp);
}
@Override
protected void doPost(HttpServletRequest req, HttpServletResponse resp) throws ServletException, IOException {
resp.getWriter().write("Hello MyServlet");
}
}
@Bean
public ServletRegistrationBean myServlet(){
ServletRegistrationBean registrationBean = new ServletRegistrationBean(new MyServlet(),"/myServlet");
registrationBean.setLoadOnStartup(1);
return registrationBean;
}
② FilterRegistrationBean(註冊Filter)
public class MyFilter implements Filter {
@Override
public void init(FilterConfig filterConfig) throws ServletException {
}
@Override
public void doFilter(ServletRequest request, ServletResponse response, FilterChain chain) throws IOException, ServletException {
System.out.println("MyFilter process...");
chain.doFilter(request,response);
}
@Override
public void destroy() {
}
}
@Bean
public FilterRegistrationBean myFilter(){
FilterRegistrationBean registrationBean = new FilterRegistrationBean();
registrationBean.setFilter(new MyFilter());
registrationBean.setUrlPatterns(Arrays.asList("/hello","/myServlet"));
return registrationBean;
}
③ ServletListenerRegistrationBean(註冊Listener)
public class MyListener implements ServletContextListener {
@Override
public void contextInitialized(ServletContextEvent sce) {
System.out.println("contextInitialized...web應用啟動");
}
@Override
public void contextDestroyed(ServletContextEvent sce) {
System.out.println("contextDestroyed...當前web專案銷燬");
}
}
@Bean
public ServletListenerRegistrationBean myListener(){
ServletListenerRegistrationBean<MyListener> registrationBean = new ServletListenerRegistrationBean<>(new MyListener());
return registrationBean;
}
3) 切換其他的Servlet容器
SpringBoot預設支援在三種容器之間切換
① Tomcat(預設使用)
<dependency>
<groupId>org.springframework.boot</groupId>
<artifactId>spring-boot-starter-web</artifactId>
</dependency>
② Jetty(適合開發長連線應用)
<dependency>
<groupId>org.springframework.boot</groupId>
<artifactId>spring-boot-starter-jetty</artifactId>
</dependency>
③ Undertow(不支援jsp, 但併發效能好)
<dependency>
<artifactId>spring-boot-starter-undertow</artifactId>
<groupId>org.springframework.boot</groupId>
</dependency>
4) 嵌入式Servlet容器的自動配置原理
① EmbeddedServletContainerAutoConfiguration(嵌入式的Servlet容器自動配置)
@AutoConfigureOrder(-2147483648)
@Configuration
@ConditionalOnWebApplication
@Import({EmbeddedServletContainerAutoConfiguration.BeanPostProcessorsRegistrar.class})
public class EmbeddedServletContainerAutoConfiguration {
@Configuration
@ConditionalOnClass({Servlet.class, Tomcat.class}) //兩個類: 原生Servlet和Tomcat, 判斷是否引入了Tomcat的依賴
@ConditionalOnMissingBean(
value = {EmbeddedServletContainerFactory.class}, //判斷當前容器中有沒有使用者自己定義的嵌入式的Servlet容器工廠
//該工廠的作用是建立嵌入式的Servlet容器
search = SearchStrategy.CURRENT
)
public static class EmbeddedTomcat {
public EmbeddedTomcat() {
}
@Bean
public TomcatEmbeddedServletContainerFactory tomcatEmbeddedServletContainerFactory() {
return new TomcatEmbeddedServletContainerFactory();
}
}
}
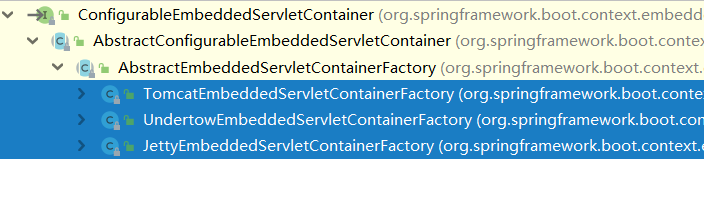
EmbeddedServletContainerFactory(獲取嵌入式的Servlet容器 ==> EmbeddedServletContainer)
該工廠的繼承樹正式三個內嵌的Servlet容器(Tomcat / Jetty / Undertow)
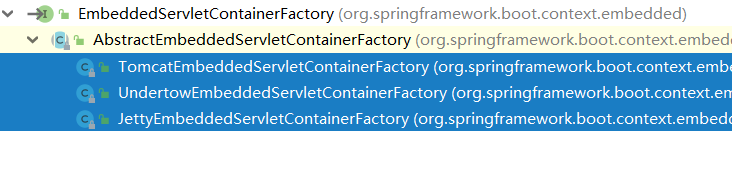
EmbeddedServletContainer(容器)
以TomcatEmbeddedServletContainerFactory為例
public EmbeddedServletContainer getEmbeddedServletContainer(ServletContextInitializer... initializers) {
Tomcat tomcat = new Tomcat(); //建立一個Tomcat例項
//配置Tomcat的基本環節
File baseDir = this.baseDirectory != null ? this.baseDirectory : this.createTempDir("tomcat");
tomcat.setBaseDir(baseDir.getAbsolutePath());
Connector connector = new Connector(this.protocol);
tomcat.getService().addConnector(connector);
this.customizeConnector(connector);
tomcat.setConnector(connector);
tomcat.getHost().setAutoDeploy(false);
this.configureEngine(tomcat.getEngine());
Iterator var5 = this.additionalTomcatConnectors.iterator();
while(var5.hasNext()) {
Connector additionalConnector = (Connector)var5.next();
tomcat.getService().addConnector(additionalConnector);
}
this.prepareContext(tomcat.getHost(), initializers);
return this.getTomcatEmbeddedServletContainer(tomcat); //將配置好的Tomcat傳入進去, 返回一個嵌入式的Tomcat容器
} //該方法執行完成之後則啟動Tomcat容器
步驟小結:
① SpringBoot根據匯入的依賴情況, 給容器中新增相應的
② 容器中某個元件要建立物件就會驚動後置處理器, 只要是嵌入式的Servlet容器工廠, 後置處理器就工作.
③ 後置處理器, 從容器中獲取所有的定製器, 呼叫定製器的定製方法.
5) 嵌入式Servlet容器的啟動原理
步驟:
① SpringBoot應用啟動執行run方法
② 建立IOC容器物件,並初始化容器,建立容器中的每一個元件, 如果是web應用, 則建立 AnnotationConfigEmbeddedWebApplicationContext, 如果不是, 則建立AnnotationConfigApplicationContext
③ 重新整理建立好的ioc容器
④ webIOC容器會建立嵌入式的Servlet容器
⑤ 獲取嵌入式的Servlet容器工廠
EmbeddedServletContainerFactory containerFactory = getEmbeddedServletContainerFactory();
從ioc容器中獲取EmbeddedServletContainerFactory 元件, TomcatEmbeddedServletContainerFactory建立物件,後置 處理器一看是這個物件,就獲取所有的定製器來先定製Servlet容器的相關配置;
⑥ 使用容器工廠獲取嵌入式的Servlet容器: this.embeddedServletContainer = containerFactory .getEmbeddedServletContainer(getSelfInitializer());
⑦ 嵌入式的Servlet容器建立物件並啟動Servlet容器,先啟動嵌入式的Servlet容器,再將ioc容器中剩下沒有創建出的物件獲取出來, 也就是IOC容器啟動並建立嵌入式的Servlet容器
配置外接的Servlet容器
優點: 簡單 / 便捷
缺點: 不支援jsp / 優化和定製比較複雜
1) 安裝外部Tomcat環境並配置web專案
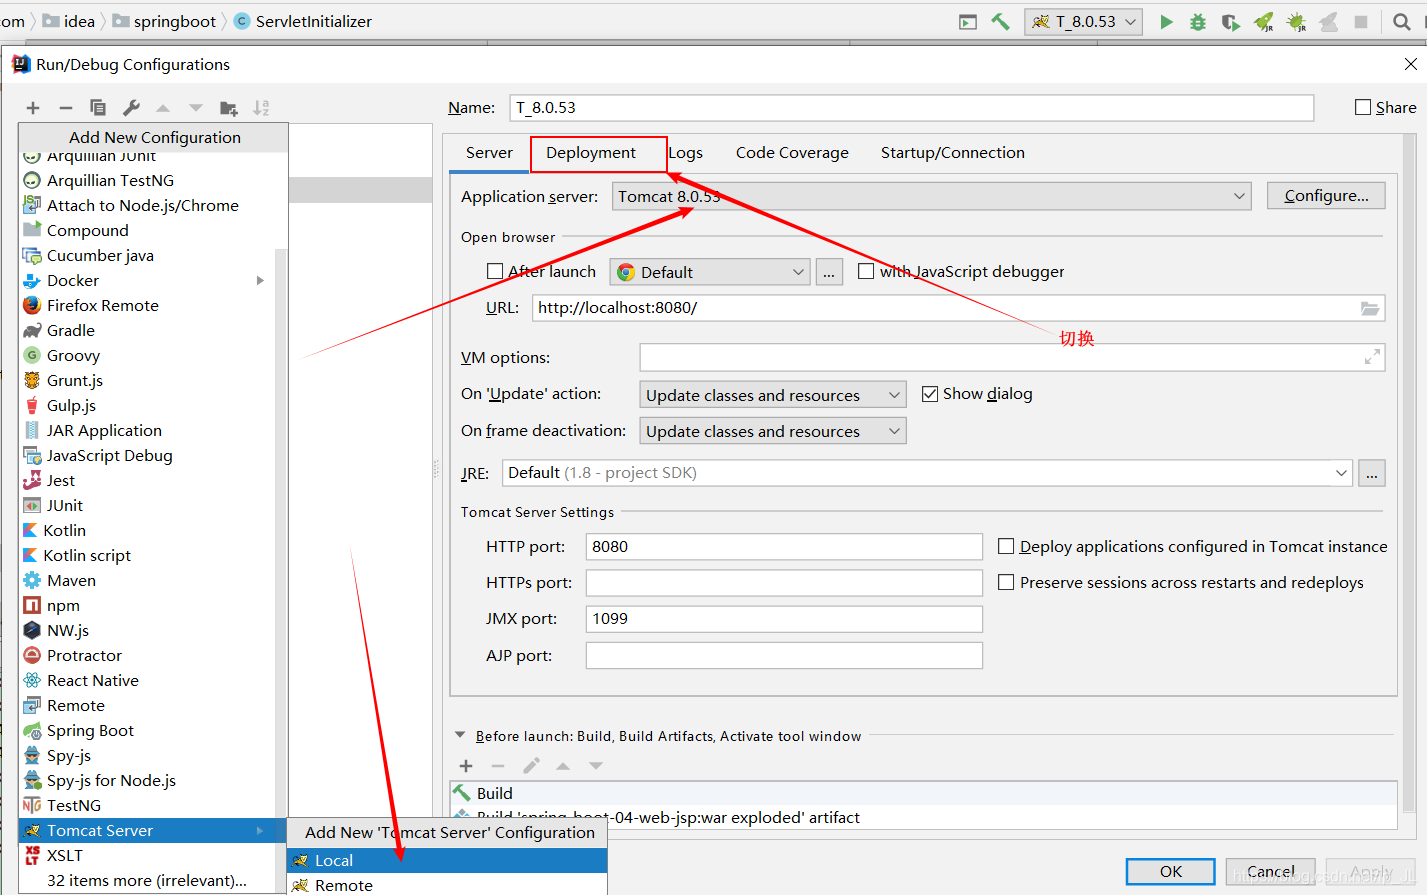

2) 小結
① 必須建立一個war專案
② 將嵌入式的Tomcat指定為provided
<dependency>
<groupId>org.springframework.boot</groupId>
<artifactId>spring-boot-starter-tomcat</artifactId>
<scope>provided</scope>
</dependency>
③ 必須編寫一個SpringBootInitializer的實現類, 並重寫configure方法
public class ServletInitializer extends SpringBootServletInitializer {
@Override
protected SpringApplicationBuilder configure(SpringApplicationBuilder application) { //SpringBoot應用程式的構建器
return application.sources(SpringBoot04WebJspApplication.class); //傳入SpringBoot應用的主程式
}
}
④ 啟動伺服器即可使用外部Tomcat
外部Tomcat啟動SpringBoot的原理
區別:
jar包: 執行SpringBoot的主方法, 啟動ioc容器, 建立嵌入式的Servlet容器
war包: 啟動伺服器, 伺服器啟動SpringBoot應用, 再啟動ioc容器
servlet3.0(Spring註解版):
8.2.4 Shared libraries / runtimes pluggability:
規則:
① 伺服器啟動(web應用啟動)會建立當前web應用裡面每一個jar包裡面ServletContainerInitializer例項:
② ServletContainerInitializer的實現放在jar包的META-INF/services資料夾下,有一個名為javax.servlet.ServletContainerInitializer的檔案,內容就是ServletContainerInitializer的實現類的全類名
③ 還可以使用@HandlesTypes,在應用啟動的時候載入我們感興趣的類;
流程:
① 啟動Tomcat
② org\springframework\spring-web\4.3.14.RELEASE\spring-web-4.3.14.RELEASE.jar!\META-INF\services\javax.servlet.ServletContainerInitializer:
Spring的web模組裡面有這個檔案:org.springframework.web.SpringServletContainerInitializer
③ SpringServletContainerInitializer將@HandlesTypes(WebApplicationInitializer.class)標註的所有這個型別的類都傳入到onStartup方法的Set<Class<?>>;為這些WebApplicationInitializer型別的類建立例項;
④ 每一個WebApplicationInitializer都呼叫自己的onStartup;
⑤ 相當於我們的SpringBootServletInitializer的類會被建立物件,並執行onStartup方法
⑥ SpringBootServletInitializer例項執行onStartup的時候會createRootApplicationContext;建立容器
protected WebApplicationContext createRootApplicationContext(
ServletContext servletContext) {
//建立SpringApplicationBuilder
SpringApplicationBuilder builder = createSpringApplicationBuilder();
StandardServletEnvironment environment = new StandardServletEnvironment();
environment.initPropertySources(servletContext, null);
builder.environment(environment);
builder.main(getClass());
ApplicationContext parent = getExistingRootWebApplicationContext(servletContext);
if (parent != null) {
this.logger.info("Root context already created (using as parent).");
servletContext.setAttribute(
WebApplicationContext.ROOT_WEB_APPLICATION_CONTEXT_ATTRIBUTE, null);
builder.initializers(new ParentContextApplicationContextInitializer(parent));
}
builder.initializers(
new ServletContextApplicationContextInitializer(servletContext));
builder.contextClass(AnnotationConfigEmbeddedWebApplicationContext.class);
//呼叫configure方法,子類重寫了這個方法,將SpringBoot的主程式類傳入了進來
builder = configure(builder);
//使用builder建立一個Spring應用
SpringApplication application = builder.build();
if (application.getSources().isEmpty() && AnnotationUtils
.findAnnotation(getClass(), Configuration.class) != null) {
application.getSources().add(getClass());
}
Assert.state(!application.getSources().isEmpty(),
"No SpringApplication sources have been defined. Either override the "
+ "configure method or add an @Configuration annotation");
if (this.registerErrorPageFilter) {
application.getSources().add(ErrorPageFilterConfiguration.class);
}
//啟動Spring應用
return run(application);
}
7)、Spring的應用就啟動並且建立IOC容器
public ConfigurableApplicationContext run(String... args) {
StopWatch stopWatch = new StopWatch();
stopWatch.start();
ConfigurableApplicationContext context = null;
FailureAnalyzers analyzers = null;
configureHeadlessProperty();
SpringApplicationRunListeners listeners = getRunListeners(args);
listeners.starting();
try {
ApplicationArguments applicationArguments = new DefaultApplicationArguments(
args);
ConfigurableEnvironment environment = prepareEnvironment(listeners,
applicationArguments);
Banner printedBanner = printBanner(environment);
context = createApplicationContext();
analyzers = new FailureAnalyzers(context);
prepareContext(context, environment, listeners, applicationArguments,
printedBanner);
//重新整理IOC容器
refreshContext(context);
afterRefresh(context, applicationArguments);
listeners.finished(context, null);
stopWatch.stop();
if (this.logStartupInfo) {
new StartupInfoLogger(this.mainApplicationClass)
.logStarted(getApplicationLog(), stopWatch);
}
return context;
}
catch (Throwable ex) {
handleRunFailure(context, listeners, analyzers, ex);
throw new IllegalStateException(ex);
}
}