
Linux 輸入子系統分析 Linux之輸入子系統分析(詳解)
- 為什麼要引入輸入子系統?
在前面我們寫了一些簡單的字元裝置的驅動程式,我們是怎麼樣開啟一個裝置並操作的呢?
一般都是在執行應用程式時,open一個特定的裝置檔案,如:/dev/buttons
1 ..... 2 int main(int argc, char **argv) 3 { 4 unsigned char key_val; 5 int ret; 6 fd = open("/dev/buttons", O_RDWR); //預設為阻塞操作 7 if (fd < 0) 8 { 9 printf("can't open!\n"); 10 return -1; 11 } 12 ......
但是實際上,一般的應用程式不會去開啟這樣裝置檔案“/dev/buttons”。一般開啟的都是系統原有的檔案,如“ dev/tty* ” ,還有可能是不需要開啟什麼tty,
而是直接“scanf()”就去獲得了按鍵的輸入。
以前我們寫一些輸入裝置(鍵盤、滑鼠等)的驅動都是採用字元裝置、混雜裝置處理的。問題由此而來,Linux開源社群的大神們看到了這大量輸入裝置如此分散不堪,有木有可以實現一種機制,可以對分散的、不同類別的輸入裝置進行統一的驅動,所以才出現了輸入子系統。
輸入子系統引入的好處:
(1)統一了物理形態各異的相似的輸入裝置的處理功能。例如,各種滑鼠,不論PS/2、USB、還是藍芽,都被同樣處理。
(2)提供了用於分發輸入報告給使用者應用程式的簡單的事件(event)介面。你的驅動不必建立、管理/dev節點以及相關的訪問方法。因此它能夠很方便的呼叫輸入API以傳送滑鼠移動、鍵盤按鍵,或觸控事件給使用者空間。X windows這樣的應用程式能夠無縫地運行於輸入子系統提供的event介面之上。
(3)抽取出了輸入驅動的通用部分,簡化了驅動,並提供了一致性。例如,輸入子系統提供了一個底層驅動(成為serio)的集合,支援對串列埠和鍵盤控制器等硬體輸入的訪問
詳見《精通Linux裝置驅動程式開發》
1.Linux輸入子系統框架

linux輸入子系統(linux input subsystem)從上到下由三層實現,分別為:
輸入子系統事件處理層(EventHandler)
輸入子系統核心層(InputCore)
輸入子系統裝置驅動層(input driver)
1.輸入子系統裝置驅動層:主要實現對硬體裝置的讀寫訪問,中斷設定,並把硬體產生的事件轉換為核心層定義的規範提交給事件處理層。
2.核心層:承上啟下。為驅動層提供輸入設備註冊與操作介面,如:input_register_device;通知事件處理層對事件進行處理;在/Proc下產生相應的裝置資訊。
裝置驅動層只要關心如何驅動硬體並獲得硬體資料(例如按下的按鍵資料),然後呼叫核心層提供的介面,核心層會自動把資料提交給事件處理層。
3.事件處理層:是使用者程式設計的介面(裝置節點),並處理驅動層提交的資料處理。
(Linux中在使用者空間將所有的裝置都當做檔案來處理,由於在一般的驅動程式中都有提供fops介面,以及在/dev下生成相應的裝置檔案nod,這些操作在輸入子系統中由事件處理層完成)
輸入子系統中有兩個型別的驅動,當我們要為一個輸入裝置(如觸控式螢幕)的編寫驅動的時候,我們是要編寫兩個驅動:輸入裝置驅動和輸入事件驅動?
答案是否定的。在子系統中,事件驅動是標準的,對所有的輸入類都是可以用的,所以你更可能的是實現輸入裝置驅動而不是輸入事件驅動。你的裝置可以利用一個已經存在的,合適的輸入事件驅動通過輸入核心和使用者應用程式介面。
輸入裝置都各有不同,那麼輸入子系統也就只能實現他們的共性,差異性則由裝置驅動來實現。差異性又體現在哪裡?
最直觀體現在裝置功能上的不同。對於驅動編寫者來說,在裝置驅動中就只要使用輸入子系統提供的工具(也就是函式)來完成這些“差異”就行了,其他的則是輸入子系統的工作。這個思想不僅存在於輸入子系統,其他子系統也是一樣(比如:usb子系統、video子系統等)
先分析核心層的程式碼 Input.c
以下轉載自Linux之輸入子系統分析(詳解)
Input.c
在最後有一下兩段:
subsys_initcall(input_init);   //修飾入口函式

module_exit(input_exit);     //修飾出口函式
可知,子系統是作為一個模組存在的。
1.先來分析入口函式input_init
 1 static int __init input_init(void)
 2 {
 3     int err;
 4
 5     err = class_register(&input_class); //註冊類,放在/sys/class
 6     if (err) {
 7         printk(KERN_ERR "input: unable to register input_dev class\n");
 8         return err;
 9     }
10
11     err = input_proc_init(); //在/proc下建立相關檔案
12     if (err)
13         goto fail1;
14
15     err = register_chrdev(INPUT_MAJOR, "input", &input_fops); //註冊驅動
16     if (err) {
17         printk(KERN_ERR "input: unable to register char major %d", INPUT_MAJOR);
18         goto fail2;
19     }
20
21     return 0;
22
23  fail2:    input_proc_exit();
24  fail1:    class_unregister(&input_class);
25     return err;
26 }
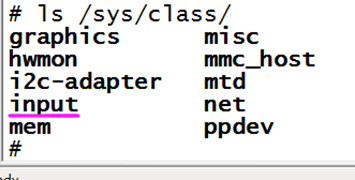
(1)上面第5行,class_register(&input_class),是在/sys/class中建立一個input類,input_class類結構如下:
struct class input_class = {
    .name            = "input",
    .release            = input_dev_release,
    .uevent            = input_dev_uevent,
};
如下圖,我們啟動核心,再啟動一個input子系統的驅動後,也可以看到建立了個"input"類 :
疑問:為什麼在此只建立了類,卻沒有使用class_dev_create()函式在類下面建立驅動裝置?
當註冊了input子系統的驅動後,才會有裝置驅動,此處程式碼沒有驅動。以下會詳細解釋。
(2)上面第15行通過register_chrdev建立驅動裝置,其中變數INPUT_MAJOR =13,所以建立了一個主裝置為13的"input"裝置。
然後我們來看看它的操作結構體input_fops,如下
static const struct file_operations input_fops = {
    .owner = THIS_MODULE,
    .open = input_open_file,
};
只有一個.open函式,比如當我們掛載一個新的input驅動,則核心便會呼叫該.open函式,接下來分析該.open函式
2.進入input_open_file函式(drivers/input/input.c)
 1 static int input_open_file(struct inode *inode, struct file *file)
 2  {
 3      struct input_handler *handler = input_table[iminor(inode) >> 5]; // (1)
 4      const struct file_operations *old_fops, *new_fops = NULL;
 5      int err;
 6
 7      if (!handler || !(new_fops = fops_get(handler->fops)))  //(2)
 8           return -ENODEV;
 9
10     if (!new_fops->open) {
11            fops_put(new_fops);
12            return -ENODEV;
13     }
14
15     old_fops = file->f_op;
16     file->f_op = new_fops;     //(3)
17
18     err = new_fops->open(inode, file);   //(4)
19     if (err) {
20           fops_put(file->f_op);
21            file->f_op = fops_get(old_fops);
22    }
23
24    fops_put(old_fops);
25
26     return err;
27 }
(1)第3行中,其中iminor (inode)函式呼叫了MINOR(inode->i_rdev);讀取子裝置號,然後將子裝置除以32,找到新掛載的input驅動的陣列號,然後放在input_handler 驅動處理函式handler中
(2)第7行中,若handler有值,說明掛載有這個驅動,就將handler結構體裡的成員file_operations * fops賦到新的file_operations *old_fops裡面
(3)第16行中, 再將新的file_operations *old_fops賦到file-> file_operations *f_op裡, 此時input子系統的file_operations就等於新掛載的input驅動的file_operations結構體,實現一個偷天換日的效果.
(4)第18行中,然後呼叫新掛載的input驅動的*old_fops裡面的成員.open函式
3.上面程式碼的input_table[]陣列在初始時是沒有值的,
所以我們來看看input_table數組裡面的資料又是在哪個函式裡被賦值
在input.c函式(drivers/input/input.c)中搜索input_table,找到它在input_register_handler()函式中被賦值,程式碼如下:
int input_register_handler(struct input_handler *handler)
{
... ...
input_table[handler->minor >> 5] = handler;    //input_table[]被賦值
... ...
list_add_tail(&handler->node, &input_handler_list); //然後將這個input_handler放到input_handler_list連結串列中
... ...
list_for_each_entry(dev, &input_dev_list, node) //對於每一個input_dev,呼叫input_attach_handler
input_attach_handler(dev, handler); //根據input_handler的id_table判斷能否支援這個input_dev
}
就是將驅動處理程式input_handler註冊到input_table[]中,然後放在input_handler_list連結串列中,後面會講這個連結串列
4.繼續來搜尋input_register_handler,看看這個函式被誰來呼叫
如下圖所示,有evdev.c(事件裝置),tsdev.c(觸控式螢幕裝置),joydev.c(joystick操作杆裝置),keyboard.c(鍵盤裝置),mousedev.c(滑鼠裝置) 這5個核心自帶的裝置處理函式註冊到input子系統中

以evdev.c為例,它在evdev_ini()函式中註冊:
static int __init evdev_init(void)
{
       return input_register_handler(&evdev_handler);  //註冊
}
5.我們來看看這個evdev_handler變數是什麼結構體,:
1 static struct input_handler evdev_handler = {
2        .event =  evdev_event,
3        .connect =      evdev_connect,  //(4)
4        .disconnect = evdev_disconnect,
5        .fops =           &evdev_fops,    //(1)
6        .minor =  EVDEV_MINOR_BASE, //(2)
7        .name =         "evdev",
8        .id_table =      evdev_ids, //(3)
9 };
就是我們之前看的input_handler驅動處理結構體
(1) 第5行中.fops:檔案操作結構體,其中evdev_fops函式就是自己的寫的操作函式,然後賦到.fops中
(2)第6行中 .minor:用來存放次裝置號
其中EVDEV_MINOR_BASE=64, 然後呼叫input_register_handler(&evdev_handler)後,由於EVDEV_MINOR_BASE/32=2,所以存到input_table[2]中
所以當open開啟這個input裝置,就會進入 input_open_file()函式,執行evdev_handler-> evdev_fops -> .open函式,如下所示:
 1 static const struct file_operations evdev_fops = {
 2     .owner =    THIS_MODULE,
 3     .read  =    evdev_read,
 4     .write =    evdev_write,
 5     .poll  =    evdev_poll,
 6     .open  =    evdev_open,
 7     .release =  evdev_release,
 8     .unlocked_ioctl = evdev_ioctl,
 9 #ifdef CONFIG_COMPAT
10     .compat_ioctl =    evdev_ioctl_compat,
11 #endif
12     .fasync =    evdev_fasync,
13     .flush  =    evdev_flush
14 };
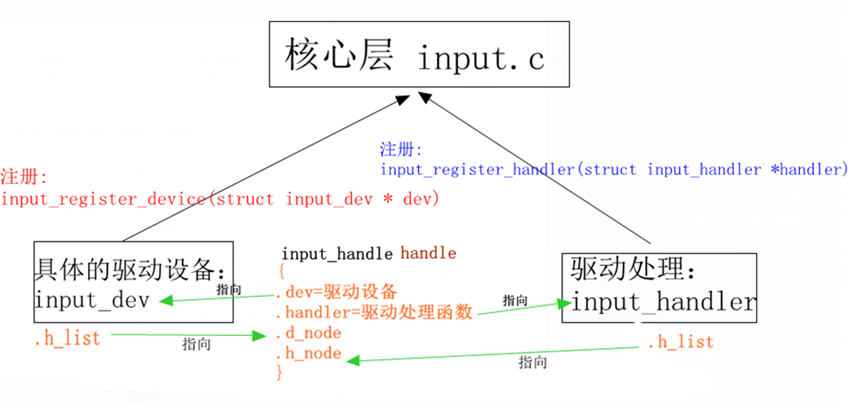
(3)第8行中.id_table : 表示能支援哪些輸入裝置,比如某個驅動裝置的input_dev->的id和某個input_handler的id_table相匹配,就會呼叫.connect連線函式,如下圖
(4)第3行中.connect:連線函式,將裝置input_dev和某個input_handler建立連線,如下圖

6.我們先來看看上圖的input_register_device()函式,如何建立驅動裝置的
搜尋input_register_device,發現核心自己就已經註冊了很多驅動裝置
6.1然後進入input_register_device()函式,程式碼如下:
1 int input_register_device(struct input_dev *dev)   //*dev:要註冊的驅動裝置
2 {
3  ... ...
4        list_add_tail(&dev->node, &input_dev_list);   //(1)放入連結串列中
5  ... ...
6        list_for_each_entry(handler, &input_handler_list, node)  //(2)
7          input_attach_handler(dev, handler);
8  ... ...
9 }
(1)第4行中,將要註冊的input_dev驅動裝置放在input_dev_list連結串列中
(2)第6行中,其中input_handler_list在前面講過,就是存放每個input_handle驅動處理結構體,
然後list_for_each_entry()函式會將每個input_handle從連結串列中取出,放到handler中
最後會呼叫input_attach_handler()函式,將每個input_handle的id_table進行判斷,若兩者支援便進行連線。
6.2然後我們在回過頭來看註冊input_handler的input_register_handler()函式,如下圖所示
在input.c中
 1 int input_register_handler(struct input_handler *handler)
 2 {
 3     struct input_dev *dev;
 4
 5     INIT_LIST_HEAD(&handler->h_list);
 6
 7     if (handler->fops != NULL) {
 8         if (input_table[handler->minor >> 5])
 9             return -EBUSY;
10
11         input_table[handler->minor >> 5] = handler; //放入陣列
12     }
13
14     list_add_tail(&handler->node, &input_handler_list); //放入連結串列
15
16     list_for_each_entry(dev, &input_dev_list, node)  //對於每一個input_dev,呼叫input_attach_handler
17         input_attach_handler(dev, handler);
18
19     input_wakeup_procfs_readers();
20     return 0;
所以,不管新新增input_dev還是input_handler,都會進入input_attach_handler()判斷兩者id是否有支援, 若兩者支援便進行連線
6.3我們來看看input_attach_handler()如何實現匹配兩者id的:
 1 static int input_attach_handler(struct input_dev *dev, struct input_handler *handler)
 2 {
 3 ... ...
 4 id = input_match_device(handler->id_table, dev);  //匹配兩者
 5
 6 if (!id)                                     //若不匹配,return退出
 7 return -ENODEV;
 8
 9 error = handler->connect(handler, dev, id);  //呼叫input_handler ->connect函式建立連線
10 ... ...
11
12 }
根據input_handler的id_table判斷能否支援這個input_dev
如果能支援,則呼叫input_handler的connect函式建立“連線”
7.以evdev.c(事件驅動) 的evdev_handler->connect函式來分析是怎樣建立連線的,如下:
1 static struct input_handler evdev_handler = {
2        .event   =    evdev_event,
3        .connect =    evdev_connect,
4        .disconnect = evdev_disconnect,
5        .fops  =          &evdev_fops,
6        .minor =  EVDEV_MINOR_BASE,
7        .name  =         "evdev",
8        .id_table =       evdev_ids,
9 };
7.1 evdev_handler的.connect函式是evdev_connect(),程式碼如下:
 1 static int evdev_connect(struct input_handler *handler, struct input_dev *dev, const struct input_device_id *id)
 2 {
 3 ... ...
 4 for (minor = 0; minor < EVDEV_MINORS && evdev_table[minor]; minor++); //查詢驅動裝置的子裝置號
 5     if (minor == EVDEV_MINORS) {  // EVDEV_MINORS=32,所以該事件下的驅動裝置最多存32個,
 6         printk(KERN_ERR "evdev: no more free evdev devices\n");
 7         return -ENFILE;                //沒找到驅動裝置
 8     }
 9  ... ...
10  evdev = kzalloc(sizeof(struct evdev), GFP_KERNEL);   //分配一個input_handle全域性結構體(沒有r)
11  ... ...
12  evdev->handle.dev = dev;            //指向引數input_dev驅動裝置
13 evdev->handle.name = evdev->name;
14 evdev->handle.handler = handler;    //指向引數 input_handler驅動處理結構體
15 evdev->handle.private = evdev;
16 sprintf(evdev->name, "event%d", minor);    //(1)儲存驅動裝置名字, event%d
17 ... ...
18 devt = MKDEV(INPUT_MAJOR, EVDEV_MINOR_BASE + minor),  //(2) 將主裝置號和次裝置號轉換成dev_t型別
19 cdev = class_device_create(&input_class, &dev->cdev, devt,dev->cdev.dev, evdev->name);
20                                                            // (3)在input類下建立驅動裝置
21
22 ... ...
23 error = input_register_handle(&evdev->handle); //(4)註冊這個input_handle結構體
24
25 ... ...
26 }
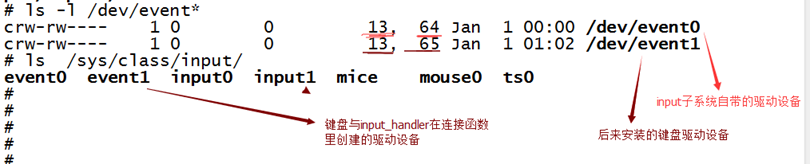
(1) 第16行中,是在儲存驅動裝置名字,名為event%d, 比如下圖(鍵盤驅動)event1: 因為沒有設定子裝置號,預設從小到大排列,其中event0是表示這個input子系統,所以這個鍵盤驅動名字就是event1
(2)第18行中,是在儲存驅動裝置的主次裝置號,其中主裝置號INPUT_MAJOR=13,因為EVDEV_MINOR_BASE=64,所以此裝置號=64+驅動程式本事子裝置號, 比如下圖(鍵盤驅動)event1: 主次裝置號就是13,65
(3)在之前在2小結裡就分析了input_class類結構,所以第19行中,會在/sys/class/input類下建立驅動裝置event%d,比如下圖(鍵盤驅動)event1:
(4)最終會進入input_register_handle()函式來註冊,程式碼在下面
7.2 input_register_handle()函式如下:
 1 int input_register_handle(struct input_handle *handle)
 2 {
 3       struct input_handler *handler = handle->handler; //handler= input_handler驅動處理結構體
 4
 5       list_add_tail(&handle->d_node, &handle->dev->h_list); //(1)
 6       list_add_tail(&handle->h_node, &handler->h_list);    // (2)
 7
 8       if (handler->start)
 9              handler->start(handle);
10       return 0;
11 }
(1)在第5行中, 因為handle->dev指向input_dev驅動裝置,所以就是將handle->d_node放入到input_dev驅動裝置的h_list連結串列中,
即input_dev驅動裝置的h_list連結串列就指向handle->d_node
(2) 在第6行中, 同樣, input_handler驅動處理結構體的h_list也指向了handle->h_node
最終如下圖所示:
兩者的.h_list都指向了同一個handle結構體,然後通過.h_list 來找到handle的成員.dev和handler,便能找到對方,便建立了連線
8.建立了連線後,又如何讀取evdev.c(事件驅動) 的evdev_handler->.fops->.read函式?
事件驅動的.read函式是evdev_read()函式,我們來分析下:
 1 static ssize_t evdev_read(struct file *file, char __user *      buffer, size_t count, loff_t *ppos)
 2 {
 3  ... ...
 4 /*判斷應用層要讀取的資料是否正確*/
 5 if (count < evdev_event_size())
 6 return -EINVAL;
 7
 8 /*在非阻塞操作情況下,若client->head == client->tail|| evdev->exist時(沒有資料),則return返回*/
 9  if (client->head == client->tail && evdev->exist && (file->f_flags & O_NONBLOCK))
10 return -EAGAIN;
11
12 /*若client->head == client->tail|| evdev->exist時(沒有資料),等待中斷進入睡眠狀態  */
13   retval = wait_event_interruptible(evdev->wait,client->head != client->tail || !evdev->exist);
14
15   ... ...           //上傳資料
16
17 }
9.若read函式進入了休眠狀態,又是誰來喚醒?
我們搜尋這個evdev->wait這個等待佇列變數,找到evdev_event函式裡喚醒:
static void evdev_event(struct input_handle *handle, unsigned int type, unsigned int code, int value)
{
... ...
 wake_up_interruptible(&evdev->wait);   //有事件觸發,便喚醒等待中斷
}
其中evdev_event()是evdev.c(事件驅動) 的evdev_handler->.event成員,如下所示:
1 static struct input_handler evdev_handler = {
2        .event   =    evdev_event,
3        .connect =    evdev_connect,
4        .disconnect = evdev_disconnect,
5        .fops  =          &evdev_fops,
6        .minor =  EVDEV_MINOR_BASE,
7        .name  =         "evdev",
8        .id_table =       evdev_ids,
9 };
當有事件發生了,比如對於按鍵驅動,當有按鍵按下時,就會進入.event函式中處理事件
10.分析下,是誰呼叫evdev_event()這個.event事件驅動函式
猜測:硬體相關的程式碼(input_dev那層)--中斷處理函式
來看看核心 gpio_keys_isr()函式程式碼例子就知道了 (driver/input/keyboard/gpio_key.c)
1 static irqreturn_t gpio_keys_isr(int irq, void *dev_id)
2 {
3  /*獲取按鍵值,賦到state裡*/
4  ... ...
5
6 /*上報事件*/
7 input_event(input, type, button->code, !!state);
8 input_sync(input);                        //同步訊號通知,表示事件傳送完畢
9 }
顯然就是通過input_event()來呼叫.event事件函式,我們來看看:
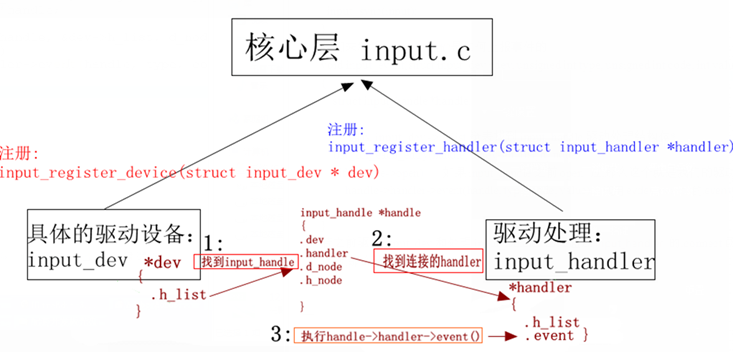
 1 void input_event(struct input_dev *dev, unsigned int type, unsigned int code, int value)
 2 {
 3 struct input_handle *handle;
 4 ... ...
 5
 6 /* 通過input_dev ->h_list連結串列找到input_handle驅動處理結構體*/
 7 list_for_each_entry(handle, &dev->h_list, d_node)
 8 if (handle->open)  //如果input_handle之前open 過,那麼這個就是我們的驅動處理結構體
 9     handle->handler->event(handle, type, code, value); //呼叫evdev_event()的.event事件函式
10
11 }
若之前驅動input_dev和處理input_handler已經通過input_handler 的.connect函式建立起了連線,那麼就呼叫evdev_event()的.event事件函式,如下圖所示:
11.本節總結分析:
1.註冊輸入子系統,進入input_init():
1)建立主裝置號為13的"input"字元裝置
err = register_chrdev(INPUT_MAJOR, "input", &input_fops);
2.open開啟驅動,進入input_open_file():
1)更新裝置的file_oprations
file->f_op=fops_get(handler->fops);
2)執行file_oprations->open函式
err = new_fops->open(inode, file);
3.註冊input_handler,進入input_register_handler():
1)新增到input_table[]處理陣列中
input_table[handler->minor >> 5] = handler;
2)新增到input_handler_list連結串列中
list_add_tail(&handler->node, &input_handler_list);
3)判斷input_dev的id,是否有支援這個驅動的裝置
list_for_each_entry(dev, &input_dev_list, node)   //遍歷查詢input_dev_list連結串列裡所有input_dev

 input_attach_handler(dev, handler);             //判斷兩者id,若兩者支援便進行連線。
4.註冊input_dev,進入input_register_device():
1)放在input_dev_list連結串列中
list_add_tail(&dev->node, &input_dev_list);
2)判斷input_handler的id,是否有支援這個裝置的驅動
list_for_each_entry(handler, &input_handler_list, node)  //遍歷查詢input_handler_list連結串列裡所有input_handler
input_attach_handler(dev, handler);                      //判斷兩者id,若兩者支援便進行連線。
5.判斷input_handler和input_dev的id,進入input_attach_handler():
1)匹配兩者id,
input_match_device(handler->id_table, dev); //匹配input_handler和dev的id,不成功退出函式
2)匹配成功呼叫input_handler ->connect
handler->connect(handler, dev, id); //建立連線
6.建立input_handler和input_dev的連線,進入input_handler->connect():
1)建立全域性結構體,通過input_handle結構體連線雙方
evdev = kzalloc(sizeof(struct evdev), GFP_KERNEL);    //建立兩者連線的input_handle全域性結構體
list_add_tail(&handle->d_node, &handle->dev->h_list); //連線input_dev->h_list
list_add_tail(&handle->h_node, &handler->h_list);    // 連線input_handle->h_list
7.有事件發生時,比如按鍵中斷,在中斷函式中需要進入input_event()上報事件:
1)找到驅動處理結構體,然後執行input_handler->event()
list_for_each_entry(handle, &dev->h_list, d_node)     // 通過input_dev ->h_list連結串列找到input_handle驅動處理結構體
if (handle->open)  //如果input_handle之前open 過,那麼這個就是我們的驅動處理結構體(有可能一個驅動裝置在不同情況下有不同的驅動處理方式)
    handle->handler->event(handle, type, code, value); //呼叫evdev_event()的.event事件函式