使用eclipse 建立Spring boot專案
阿新 • • 發佈:2018-12-18
1.下載maven並解壓
http://maven.apache.org/
2.配置eclipse中要使用maven,將maven解壓好的路徑配置進來
Window->Preferences->Maven->Installations->add
 3.配置要使用的maven的setting配置檔案(在maven的conf目錄下),local Repository本地倉庫沒有的話就預設就行
 如果需要指定jdk版本需要在setting中新增
<profiles>
<profile>
<id>jdk-1.8</id> 4.在eclipse中新建maven工程
(1).new maven Project
(2).選擇預設
 (3).選擇quickstart
 (4)設定工程名
 (5)工程建立成功
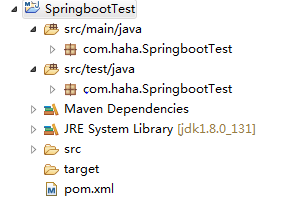 如果程式中不出現src/main/java,src/test/java等,需要為工程設定正確的jre(建議是選裝好的jdk路徑,因為spring boot打包成jar包需要jdk)
即右鍵工程->properties->java Build Path
如果程式中不出現src/main/java,src/test/java等,需要為工程設定正確的jre(建議是選裝好的jdk路徑,因為spring boot打包成jar包需要jdk)
即右鍵工程->properties->java Build Path

<parent>
	<groupId>org.springframework.boot</groupId>
	<artifactId>spring-boot-starter-parent</artifactId>
	<version>2.0.3.RELEASE</version>
	<relativePath />
</parent>
<dependencies>
	<dependency>
            <groupId>org.springframework.boot</groupId>
            <artifactId>spring-boot-starter-web</artifactId>
        </dependency>
</dependencies>
6.建立hello world測試
(1)建立兩檔案,HelloSpringboot.java和MainApplication.java(主函式)

HelloSpringboot.java
package com.haha.SpringbootTest.controller;
import org.springframework.stereotype.Controller;
import org.springframework.web.bind.annotation.RequestMapping;
import org.springframework.web.bind.annotation.ResponseBody;
@Controller
public class HelloSpringboot {
@RequestMapping("/hello")
@ResponseBody
public String hello()
{
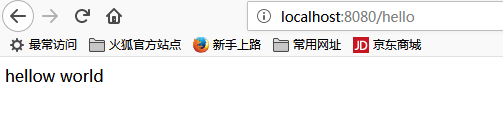
return "hellow world";
}
}
MainApplication.java
package com.haha.SpringbootTest;

import org.springframework.boot.SpringApplication;
import org.springframework.boot.autoconfigure.SpringBootApplication;

@SpringBootApplication
public class MainApplication {

	public static void main(String[] args) {

		SpringApplication.run(MainApplication.class, args);
	}
}
2.在MainApplication.java中執行工程,然後在瀏覽器輸入http://localhost:8080/hello