
深入 Vue 生命週期
“微信上看到一篇文章,覺得把VUE生命週期講的不錯,特轉載學習”
這篇部落格將會從下面四個常見的應用詮釋元件的生命週期,以及各個生命週期應該幹什麼事
1、單元件的生命週期 2、父子元件的生命週期 3、兄弟元件的生命週期 4、巨集mixin的生命週期
生命週期:Vue 例項從開始建立、初始化資料、編譯模板、掛載Dom→渲染、更新→渲染、解除安裝等一系列過程,我們稱這是 Vue 的生命週期,各個階段有相對應的事件鉤子
1、生命週期鉤子函式
下面這張圖是vue生命週期各個階段的執行情況:

 注意:
注意:
1、created階段的ajax請求與mounted請求的區別:前者頁面檢視未出現,如果請求資訊過多,頁面會長時間處於白屏狀態 2、mounted 不會承諾所有的子元件也都一起被掛載。如果你希望等到整個檢視都渲染
完畢,可以用 vm.$nextTick
vue2.0之後主動呼叫$destroy()不會移除dom節點,作者不推薦直接destroy這種做法,如果實在需要這樣用可以在這個生命週期鉤子中手動移除dom節點
2、單個元件的生命週期 現根據實際程式碼執行情況分析:
<template>
    <div>
        <h3>單元件</h3>
        <el-button @click="dataVar += 1">更新 {{dataVar}}</el-button>
        <el-button @click="handleDestroy">銷燬</el-button>
    </div>
</template>
export default {
    data() {
        return {
            dataVar: 1
        }
    },

    beforeCreate() {
        this.compName = 'single'
        console.log(`--${this.compName}--beforeCreate`)
    },

    created() {
        console.log(`--${this.compName}--created`)
    },

    beforeMount() {
        console.log(`--${this.compName}--beforeMount`)
    },

    mounted() {
        console.log(`--${this.compName}--mounted`)
    },

    beforeUpdate() {
        console.log(`--${this.compName}--beforeUpdate`)
    },

    updated() {
        console.log(`--${this.compName}--updated`)
    },

    beforeDestroy() {
        console.log(`--${this.compName}--beforeDestroy`)
    },

    destroyed() {
        console.log(`--${this.compName}--destroyed`)
    },

    methods: {
        handleDestroy() {
            this.$destroy()
        }
    }
}
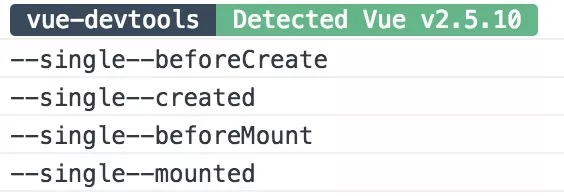
初始化元件時,列印:
 當data中的值變化時,列印:
 當元件銷燬時,列印:
 從列印結果可以看出:
1、初始化元件時,僅執行了beforeCreate/Created/beforeMount/mounted四個鉤子函式 2、當改變data中定義的變數(響應式變數)時,會執行beforeUpdate/updated鉤子函式 3、當切換元件(當前元件未快取)時,會執行beforeDestory/destroyed鉤子函式 4、初始化和銷燬時的生命鉤子函式均只會執行一次,beforeUpdate/updated可多次執行
3、 父子元件的生命週期 將單元件作為基礎元件(由於props在beforeCreate()中未初始化),需要做如下更改:
props: {
    compName: {
        type: String,
        default: 'single'
    }
},

beforeCreate() {
    // this.compName = 'single'
    // console.log(`--${this.compName}--beforeCreate`)

    console.log(` --data未初始化--beforeCreate`)
},
父元件程式碼如下:
<template>
    <div class="complex">
        <h3>複雜元件</h3>
        <lifecycle-single compName="child"></lifecycle-single>
    </div>
</template>
const COMPONENT_NAME = 'complex'

import LifecycleSingle from './LifeCycleSingle'

export default {
    beforeCreate() {
        console.log(`--${COMPONENT_NAME}--beforeCreate`)
    },

    created() {
        console.log(`--${COMPONENT_NAME}--created`)
    },

    beforeMount() {
        console.log(`--${COMPONENT_NAME}--beforeMount`)
    },

    mounted() {
        console.log(`--${COMPONENT_NAME}--mounted`)
    },

    beforeUpdate() {
        console.log(`--${COMPONENT_NAME}--beforeUpdate`)
    },

    updated() {
        console.log(`--${COMPONENT_NAME}--updated`)
    },

    beforeDestroy() {
        console.log(`--${COMPONENT_NAME}--beforeDestroy`)
    },

    destroyed() {
        console.log(`--${COMPONENT_NAME}--destroyed`)
    },

    components: {
        LifecycleSingle
    }
}
初始化元件時,列印:
 當子元件data中的值變化時,列印:
 當父元件data中的值變化時,列印:
 當props改變時,列印:
 當子元件銷燬時,列印:
 當父元件銷燬時,列印:
 從列印結果可以看出:
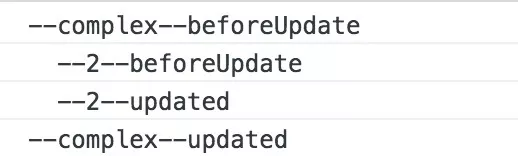
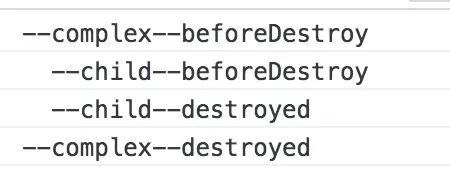
1、僅當子元件完成掛載後,父元件才會掛載 2、當子元件完成掛載後,父元件會主動執行一次beforeUpdate/updated鉤子函式(僅首次) 3、父子元件在data變化中是分別監控的,但是在更新props中的資料是關聯的(可實踐) 4、銷燬父元件時,先將子元件銷燬後才會銷燬父元件
4、兄弟元件的生命週期 在上面的基礎上,複雜元件做如下更改
<template>
    <div class="complex">
        <h3>複雜元件</h3>
        <lifecycle-single compName="cihld1"></lifecycle-single>
        <lifecycle-single compName="child2"></lifecycle-single>
        <el-button @click="dataVar += 1">complex更新 {{dataVar}}</el-button>
        <el-button @click="handleDestroy">complex銷燬</el-button>
    </div>
</template>
初始化元件時,列印:
 當child1更新和銷燬時,列印:
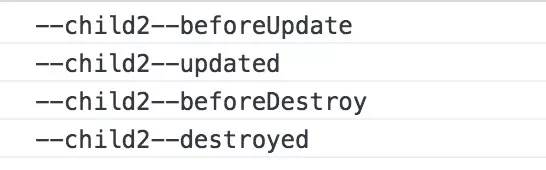
 當child2更新和銷燬時,列印:
 當父元件銷燬時,列印:
 從列印結果可以看出:
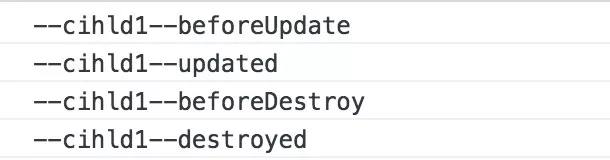
1、元件的初始化(mounted之前)分開進行,掛載是從上到下依次進行 2、當沒有資料關聯時,兄弟元件之間的更新和銷燬是互不關聯的
5、巨集mixin的生命週期 在上面的基礎上,新增一個mixin.js檔案,內容如下:
const COMPONENT_NAME = 'lifecycleMixin'

export default {
    name: COMPONENT_NAME,
    beforeCreate() {
        console.log(`--${COMPONENT_NAME}--beforeCreate`)
    },

    created() {
        console.log(`--${COMPONENT_NAME}--created`)
    },

    beforeMount() {
        console.log(`--${COMPONENT_NAME}--beforeMount`)
    },

    mounted() {
        console.log(`--${COMPONENT_NAME}--mounted`)
    },

    beforeUpdate() {
        console.log(`--${COMPONENT_NAME}--beforeUpdate`)
    },

    updated() {
        console.log(`--${COMPONENT_NAME}--updated`)
    },

    beforeDestroy() {
        console.log(`--${COMPONENT_NAME}--beforeDestroy`)
    },

    destroyed() {
        console.log(`--${COMPONENT_NAME}--destroyed`)
    }
}
同樣的,複雜元件做如下更改:
import lifecycleMixin from './mixin'
export default {
    mixins: [lifecycleMixin],
    // ...
}
元件初始化時,列印:
 元件銷燬時,列印:
 從列印結果可以看出:
mixin中的生命週期與引入該元件的生命週期是僅僅關聯的,且mixin的生命週期優先執行