
Vue中在父元件中定義子元件與父子元件間傳值
在父元件中定義子元件
我們除了定義獨立的元件之外,Vue還支援在父元件中定義子元件。
示例
原始碼
<!DOCTYPE html>
<html lang="en">
<head>
    <meta charset="UTF-8">
    <title>元件</title>
</head>
<body>
    <template id="parent">
        <h1>父元件</h1> <children></children>
    </template>
    <template id="children">
        <h2>子元件</h2>
    </template>
    <div id="app">
        <parent></parent>
    </div>
<script src="../../../js/vue/vue/1.0/vue.js"></script>
<script type="application/javascript">
    //定義父元件
    Vue.component('parent',{
        template:'#parent'
        //在父元件中定義子元件
        ,components:{
            'children':{
                template:'#children'
            }
        }
    });
    new Vue({
        el:'#app'
    });
</script>
</body>
</html>
結果
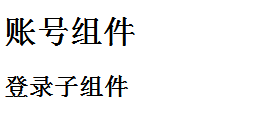
分析
如上面所示,我們在父元件parent中定義子元件children,由於子元件children是在父元件中定義的,所以說要想使用子元件,則子元件<children></children>必須在父元件中使用,不能在父元件之外的地方使用。
父元件向子元件傳值
在專案開發中,隨著我們定義的元件越來越多,也就越來越多的涉及到元件間傳值的情況,我這裡主要是講解父元件向子元件傳值的情況。
示例
原始碼
<!DOCTYPE html>
<html lang="en">
<head>
    <meta charset="UTF-8">
    <title>元件</title>
</head>
<body>
    <template id="parent">
        <h1>父元件:傳值id={{id}}</h1> <children :id="id"></children>
    </template>
    <template id="children">
        <h2>子元件:接收id={{id}}</h2>
    </template>
    <div id="app">
        <parent></parent>
    </div>
<script src="../../../js/vue/vue/1.0/vue.js"></script>
<script type="application/javascript">
    //定義父元件
    Vue.component('parent',{
        template:'#parent'
        ,data(){
            return {
                id:10
            }
        }
        //在父元件中定義子元件
        ,components:{
            'children':{
                props:['id']
                ,template:'#children'
            }
        }
    });
    new Vue({
        el:'#app'
    });
</script>
</body>
</html>
結果
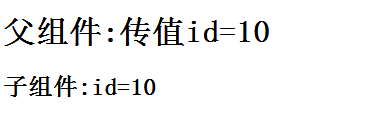
分析
上圖中實現的功能是在父元件中向子元件進行傳值,其傳遞的id值為10。這需要我們在父元件的資料域中定義一個id:10,這裡需要注意的是,為了將元件間的資料域進行隔離,這裡的data引數後面跟的不是物件,而是函式,用該函式返回一個物件,以此來實現元件間資料的隔離。
我們在用父元件給子元件傳值時,是在父元件用到子元件的地方,在這裡新增:id="id",此時第二個id中的值指的就是父元件資料域中的id值,而其:id,指的就是子元件中的props:['id']中的id,這樣我們就將父元件中的id值成功的傳遞給了子元件中的props:['id']中的id中,而我們在子元件中使用該值時,直接用{{id}}
子元件向父元件傳值
在專案開發中,我們還會經常用到子元件給父元件傳值的情況,比如說下面的示例就是如此。
示例
原始碼:
<!DOCTYPE html>
<html lang="en">
<head>
    <meta charset="UTF-8">
    <title>元件</title>
</head>
<body>
    <template id="parent">
        <h1>父元件:接收資訊 {{message}}</h1>
        <children @:message="getData"></children>
    </template>
    <template id="children">
        <h2>子元件:傳送資訊 {{hello}}</h2>
        <button @click="sendData">傳送資料</button>
    </template>
    <div id="app">
        <parent></parent>
    </div>
<script src="../../../js/vue/vue/1.0/vue.js"></script>
<script type="application/javascript">
    //定義父元件
    Vue.component('parent',{
        template:'#parent'
        ,data(){
            return {
                message:''
            }
        }
        ,methods:{
            getData(val){
                //父元件展示子元件傳送來的資訊
                this.message = val;
            }
        }
        //在父元件中定義子元件
        ,components:{
            'children':{
                template:'#children'
                ,data(){
                    return {
                        hello:''
                    }
                }
                ,methods:{
                    //子元件傳送資訊
                    sendData(){
                        //子元件展示傳送的資訊
                        this.hello = 'Hello !';
                        //子元件傳送資訊
                        this.$emit('message',this.hello);
                    }
                }
            }
        }
    });
    new Vue({
        el:'#app'
    });
</script>
</body>
</html>
結果
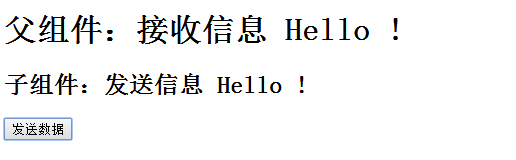
分析
在上面的程式碼中實現的功能是通過在子元件中點擊發送資訊按鈕,在子元件中的資訊就被父元件接收和展示了出來。
我們在子元件的資料域中定義了一個空的hello,通過點選子元件的傳送資訊按鈕,其按鈕繫結的事件sendData就會在子元件的方法域中查詢並執行sendData()。
該sendData()方法執行了兩個操作,其一是將子元件傳送的資訊展示在子元件面板中,其二是觸發一個$emit事件傳送,其傳送的key為message,其值為賦值後的hello,也就是說是Hello !。
由於message被註冊到了父元件引用子元件的@:message中,其值呼叫的則是父元件中的getData方法,因而其會在父元件中的方法域中查詢並執行getData(val)方法,而該方法中的val即為父元件接收的子元件中的資訊。而該資訊又被賦值給了父元件資料域中的message,所以,最終在父元件中就會展示出子元件傳送來的資訊Hello !。