
Spring中的Bean的配置形式
Spring中Bean的配置形式有兩種,基於XML檔案的方式和基於註解的方式。
1.基於XML檔案的方式配置Bean
<?xml version="1.0" encoding="UTF-8"?>
<beans xmlns="http://www.springframework.org/schema/beans"
	xmlns:xsi="http://www.w3.org/2001/XMLSchema-instance"
	xmlns:p="http://www.springframework.org/schema/p"
	xsi:schemaLocation="http://www.springframework.org/schema/beans http://www.springframework.org/schema/beans/spring-beans.xsd
		http://www.springframework.org/schema/util http://www.springframework.org/schema/util/spring-util-4.1.xsd">
<bean id="address" class="com.java.spring.autowire.Address" p:city="上海" p:street="南京路"></bean>
<bean id="car" class="com.java.spring.autowire.Car" p:brand="Audi" p:price="500000.0000"></bean>
<bean id="person" class="com.java.spring.autowire.Person" p:name="Tom" autowire="byType"></bean>
</beans>
像上面這樣,在xml檔案中使用<bean...></bean>標籤設定Bean屬性。
2.基於註解的方式配置Bean
把一個Bean加上註解放到IOC容器中,首先需要了解元件掃描。元件掃描(component scanning)是指Spring 能夠從 classpath 下自動掃描, 偵測和例項化具有特定註解的元件。特定元件包括:
- @Component: 基本註解, 標識了一個受 Spring 管理的元件
- @Respository: 標識持久層元件
- @Service: 標識服務層(業務層)元件
- @Controller: 標識表現層元件
對於掃描到的元件, Spring 有預設的命名策略: 使用非限定類名, 第一個字母小寫. 也可以在註解中通過 value 屬性值標識元件的名稱。當在元件類上使用了特定的註解之後, 還需要在 Spring 的配置檔案中宣告 <context:component-scan> :
- base-package 屬性指定一個需要掃描的基類包,Spring 容器將會掃描這個基類包裡及其子包中的所有類.當需要掃描多個包時, 可以使用逗號分隔;
- 如果僅希望掃描特定的類而非基包下的所有類,可使用 resource-pattern 屬性過濾特定的類;
- <context:include-filter> 子節點表示要包含的目標類;
- <context:exclude-filter> 子節點表示要排除在外的目標類;
<context:component-scan> 下可以擁有若干個 <context:include-filter> 和 <context:exclude-filter> 子節點。
2.1 base-package屬性
如圖,建立如下的專案目錄:
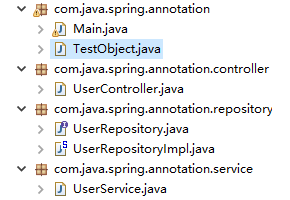
分別用TestObject,UserController,UserRepositoryImpl,UserService模擬基本註解,表現層,持久層和業務層。
TestObject.java
package com.java.spring.annotation;
import org.springframework.stereotype.Component;
@Component
public class TestObject {

}
UserController.java
package com.java.spring.annotation.controller;
import org.springframework.stereotype.Controller;
@Controller
public class UserController {
	public void excute(){
		System.out.println("UserController's excute...");
	}
}
UserService.java
package com.java.spring.annotation.service;
import org.springframework.stereotype.Service;
@Service
public class UserService {
	public void add(){
		System.out.println("UserService's add...");
	}
}
UserRepository.java
package com.java.spring.annotation.repository;
public interface UserRepository {
	void save();
}
UserRepositoryImpl.java
package com.java.spring.annotation.repository;
import org.springframework.stereotype.Repository;
@Repository("userRepositoryImpl")
public class UserRepositoryImpl implements UserRepository {
	@Override
	public void save() {
	    System.out.println("UserRepositoryImpl's save...");
	}
}
為Bean添加註解之後還需要在 Spring 的配置檔案中宣告:
<context:component-scan base-package="com.java.spring.annotation"></context:component-scan>
base-package="com.java.spring.annotation"意思是要掃描annotation包下的所有類。
寫一個測試類Main.java:
package com.java.spring.annotation;
import org.springframework.context.ApplicationContext;
import org.springframework.context.support.ClassPathXmlApplicationContext;
import com.java.spring.annotation.controller.UserController;
import com.java.spring.annotation.repository.UserRepositoryImpl;
import com.java.spring.annotation.service.UserService;
public class Main {
	public static void main(String[] args){
		ApplicationContext ctx=new ClassPathXmlApplicationContext("beans-annotation.xml");
		UserRepositoryImpl uri=(UserRepositoryImpl) ctx.getBean("userRepositoryImpl");
		System.out.println(uri);
		TestObject to=(TestObject) ctx.getBean("testObject");
		System.out.println(to);
        UserService us=(UserService) ctx.getBean("userService");
        System.out.println(us);
        UserController uc=(UserController) ctx.getBean("userController");
        System.out.println(uc);
	}
}
執行後輸出:
[email protected]b
[email protected]
[email protected]
[email protected]
2.2 <context:include-filter>子節點
子節點表示要包含的目標類。使用<context:include-filter>時要將use-default-filters的值設定為false,預設為true。
比如在beans-annotation.xml中進行配置:
 <context:component-scan base-package="com.java.spring.annotation" use-default-filters="false">
    <context:include-filter type="annotation" expression="org.springframework.stereotype.Repository"/>
 </context:component-scan>
則掃描到的元件只有@Repository("userRepositoryImpl")註解的持久層。
執行後輸出:
[email protected]
Exception in thread "main" org.springframework.beans.factory.NoSuchBeanDefinitionException: No bean named 'testObject' is defined
	at org.springframework.beans.factory.support.DefaultListableBeanFactory.getBeanDefinition(DefaultListableBeanFactory.java:638)
	at org.springframework.beans.factory.support.AbstractBeanFactory.getMergedLocalBeanDefinition(AbstractBeanFactory.java:1159)
	at org.springframework.beans.factory.support.AbstractBeanFactory.doGetBean(AbstractBeanFactory.java:282)
	at org.springframework.beans.factory.support.AbstractBeanFactory.getBean(AbstractBeanFactory.java:195)
	at org.springframework.context.support.AbstractApplicationContext.getBean(AbstractApplicationContext.java:973)
	at com.java.spring.annotation.Main.main(Main.java:12)
其他Bean顯示未被定義。
2.3 <context:exclude-filter>子節點
子節點表示要排除在外的目標類,如下排除Repository類。
在beans-annotation.xml中進行配置:
<context:component-scan base-package="com.java.spring.annotation">
	<context:exclude-filter type="annotation" expression="org.springframework.stereotype.Repository"/>
</context:component-scan>
Main.java中修改為:
public class Main {
	public static void main(String[] args){
		ApplicationContext ctx=new ClassPathXmlApplicationContext("beans-annotation.xml");
		TestObject to=(TestObject) ctx.getBean("testObject");
		System.out.println(to);
        UserService us=(UserService) ctx.getBean("userService");
        System.out.println(us);
        UserController uc=(UserController) ctx.getBean("userController");
        System.out.println(uc);
        UserRepositoryImpl uri=(UserRepositoryImpl) ctx.getBean("userRepositoryImpl");
        System.out.println(uri);
	}
}
執行後輸出:
[email protected]
[email protected]
[email protected]
Exception in thread "main" org.springframework.beans.factory.NoSuchBeanDefinitionException: No bean named 'userRepositoryImpl' is defined
	at org.springframework.beans.factory.support.DefaultListableBeanFactory.getBeanDefinition(DefaultListableBeanFactory.java:638)
	at org.springframework.beans.factory.support.AbstractBeanFactory.getMergedLocalBeanDefinition(AbstractBeanFactory.java:1159)
	at org.springframework.beans.factory.support.AbstractBeanFactory.doGetBean(AbstractBeanFactory.java:282)
	at org.springframework.beans.factory.support.AbstractBeanFactory.getBean(AbstractBeanFactory.java:195)
	at org.springframework.context.support.AbstractApplicationContext.getBean(AbstractApplicationContext.java:973)
	at com.java.spring.annotation.Main.main(Main.java:16)
將Repository排除,則掃描不到被@Repository("userRepositoryImpl")註解的Bean userRepositoryImpl,顯示該Bean未被定義。
3.元件裝配
<context:component-scan> 元素還會自動註冊 AutowiredAnnotationBeanPostProcessor 例項, 該例項可以自動裝配具有 @Autowired 和 @Resource 、@Inject註解的屬性.
3.1 使用@Autowired自動裝配所有Bean
@Autowired 註解自動裝配具有相容型別的單個 Bean屬性。
- 構造器, 普通欄位(即使是非 public), 一切具有引數的方法都可以應用@Authwired 註解
- 預設情況下, 所有使用 @Authwired 註解的屬性都需要被設定. 當 Spring 找不到匹配的 Bean 裝配屬性時, 會丟擲異常, 若某一屬性允許不被設定, 可以設定 @Authwired 註解的 required 屬性為 false
- 預設情況下, 當 IOC 容器裡存在多個型別相容的 Bean 時, 通過型別的自動裝配將無法工作. 此時可以在 @Qualifier 註解裡提供 Bean 的名稱. Spring 允許對方法的入參標註 @Qualifiter 已指定注入 Bean 的名稱
- @Authwired 註解也可以應用在陣列型別的屬性上, 此時 Spring 將會把所有匹配的 Bean 進行自動裝配.
- @Authwired 註解也可以應用在集合屬性上, 此時 Spring 讀取該集合的型別資訊, 然後自動裝配所有與之相容的 Bean.
- @Authwired 註解用在 java.util.Map 上時, 若該 Map 的鍵值為 String, 那麼 Spring 將自動裝配與之 Map 值型別相容的 Bean, 此時 Bean 的名稱作為鍵值.
示例程式碼:使用Autowired註解
UserController.java
package com.java.spring.annotation.controller;
import org.springframework.beans.factory.annotation.Autowired;
import org.springframework.stereotype.Controller;
import com.java.spring.annotation.service.UserService;
@Controller
public class UserController {
	@Autowired
	private UserService userservice;
	public void excute(){
		System.out.println("UserController's excute...");
		userservice.add();
	}
}
UserService.java
package com.java.spring.annotation.service;
import org.springframework.beans.factory.annotation.Autowired;
import org.springframework.stereotype.Service;
import com.java.spring.annotation.repository.UserRepository;
@Service
public class UserService {
	@Autowired
	private UserRepository userrepository;
	public void add(){
		System.out.println("UserService's add...");
		userrepository.save();
	}
}
UserRepositoryImpl.java
package com.java.spring.annotation.repository;
import org.springframework.stereotype.Repository;
@Repository("userRepository")
public class UserRepositoryImpl implements UserRepository {
	@Override
	public void save() {
	    System.out.println("UserRepository's save...");
	}
}
在主方法中測試:
public class Main {
	public static void main(String[] args){
		ApplicationContext ctx=new ClassPathXmlApplicationContext("beans-annotation.xml");
        UserController uc=(UserController) ctx.getBean("userController");
        System.out.println(uc);
        uc.excute();
	}
主方法中呼叫uc.excute();指向 UserController.java 中的excute()方法,先執行System.out.println("UserController's excute...");,再呼叫userservice.add();方法,此時需要使用Autowired註解UserService這個Bean,否則相當於UserService這個Bean未配置到IOC容器中去,出錯;userservice.add();方法指向 UserService.java中的add()方法,先執行System.out.println("UserService's add...");,再呼叫userrepository.save();方法,同理需要註解Bean,可以看到在UserRepositoryImpl.java中使用註解@Repository("userRepository")。
3.2 @Resource 和 @Inject
Spring 還支援 @Resource 和 @Inject 註解,這兩個註解和 @Autowired 註解的功用類似。@Resource 註解要求提供一個 Bean 名稱的屬性,若該屬性為空,則自動採用標註處的變數或方法名作為 Bean 的名稱。@Inject 和 @Autowired 註解一樣也是按型別匹配注入的 Bean, 但沒有 reqired 屬性。建議使用 @Autowired 註解。
4.泛型依賴注入
Spring 4.x 中可以為子類注入子類對應的泛型型別的成員變數的引用。

BaseService<T>中引用了BaseRepository<T>,UserService為BaseService<T>的實現類,UserRepository為BaseRepository<T>的實現類,那麼UserService和BaseService之間會自動地建立引用關係。
示例程式碼:
BaseService.java
package com.java.spring.generic.di;

import org.springframework.beans.factory.annotation.Autowired;

public class BaseService<T>{
	@Autowired
    private BaseRepository<T> repository;
    public void add(){
    	System.out.println("add...");
    	System.out.println(repository);
    }
}
BaseRepository.java
package com.java.spring.generic.di;

public class BaseRepository<T> {

}
User.java
package com.java.spring.generic.di;
public class User {
	public User() {
	}
}
UserService.java
package com.java.spring.generic.di;
import org.springframework.stereotype.Service;
@Service
public class UserService extends BaseService<User> {

}
UserRepository.java
package com.java.spring.generic.di;
import org.springframework.stereotype.Repository;
@Repository
public class UserRepository extends BaseRepository{
	public UserRepository() {

	}
}
在beans-generic-di.xml中進行配置:
<context:component-scan base-package="com.java.spring.generic.di"></context:component-scan>
在主方法中進行測試:
public static void main(String[] args){
		ApplicationContext ctx=new ClassPathXmlApplicationContext("beans-generic-di.xml");
		UserService userService=(UserService) ctx.getBean("userService");
		System.out.println(userService);
		userService.add();
	}
執行輸出:
[email protected]
add...
[email protected]
在以上的程式碼中,BaseService中引用了BaseReponsitory,並且在BaseService的add方法中呼叫了BaseReponsitory的add方法。在他們的子類中,繼承了這種關係。因此我們在測試方法中呼叫userService.add(); 也是可以成功地呼叫UserReponsitory中的add方法。