
自定義View-剪下區
阿新 • • 發佈:2018-12-23
Canvas 提供了剪下區的功能,剪下區可以是一個 Rect 或者是一個 Path,兩個剪下區還能進
行圖形運算,得到更加複雜的剪下區。我們來看看相關的方法:
結果:
行圖形運算,得到更加複雜的剪下區。我們來看看相關的方法:
public boolean clipRect(Rect rect)
public boolean clipRect(RectF rect)
public boolean clipRect(float left,float top,float right,float bottom)
public boolean clipRect(int left,int top,int right,int bottom)
以上 4 個方法定義一個矩形的剪下區
public boolean clipPath(Path path)以上方法定義一個 Path 剪下區,用於定義更加複雜的區域。
MainActivity:
public class ClipView extends View {
    public ClipView(Context context, AttributeSet attrs) {
        super(context, attrs);
    }

    @Override
    protected void onDraw(Canvas canvas) {
        super.onDraw(canvas);
        Bitmap bmpDog = BitmapFactory.decodeResource(getResources(), R.mipmap.tiger);
        //繪製老虎完整照片
        canvas.drawBitmap(bmpDog, 0, 0, null);
        //平移座標
        canvas.translate(0, 300);//先把整個畫布向下移動300個單位
        //定義剪下區
        canvas.clipRect(new Rect(0, 0, 200, 200));//呼叫clipRect()方法後,只會顯示被裁剪的區域,之外的區域將不會顯示
        //再次繪製老虎照片
        canvas.drawBitmap(bmpDog, 0, 0, null);//把裁剪後的影象畫出來
    }
}
結果:
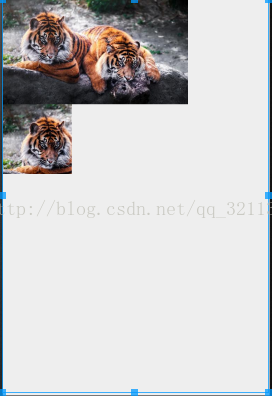
注意:最後執行結果第一張和第二張之間有300個單位