
Java核心(一)Thread詳解
一、概述
在開始學習Thread之前,我們先來了解一下 執行緒和程序之間的關係:
執行緒(Thread)是程序的一個實體,是CPU排程和分派的基本單位。 執行緒不能夠獨立執行,必須依存在應用程式中,由應用程式提供多個執行緒執行控制。 執行緒和程序的關係是:執行緒是屬於程序的,執行緒執行在程序空間內,同一程序所產生的執行緒共享同一記憶體空間,當程序退出時該程序所產生的執行緒都會被強制退出並清除。
由上描述,可以得知執行緒作為cpu的基本排程單位,只有把多執行緒用好,才能充分利用cpu的多核資源。
本文基於JDK 8(也可以叫JDK 1.8)。
二、執行緒使用
2.1 啟動執行緒
建立執行緒有四種方式:
- 實現Runnable介面
- 繼承Thread類
- 使用JDK 8 的Lambda
- 使用Callable和Future
2.1.1 Runnable建立方式
1 2 3 4 5 6 |
public class MyThread implements Runnable {
    @Override
    public void run() {
        System.out.println(Thread.currentThread().getName());
    }
}
|
1 2 |
Thread thread = new Thread(new MyThread()); thread.start(); |
2.1.2 繼承Thread建立方式
1 2 3 4 5 6 |
public class MyThread extends Thread{
    @Override
    public void run() {
        System.out.println(Thread.currentThread().getName());
    }
}
|
1 2 |
MyThread thread = new MyThread(); thread.start(); |
以上程式碼有更簡單的寫法,如下:
1 2 3 4 5 6 7 |
Thread thread = new Thread(){
    @Override
    public void run() {
        System.out.println(Thread.currentThread().getName());
    }
};
thread.start();
|
2.1.3 Lambda建立方式
1 |
new Thread(()-> System.out.println(Thread.currentThread().getName())).start(); |
2.1.4 使用Callable和Future
看原始碼可以知道Thread的父類是Runnable是JDK1.0提供的,而Callable和Runnable類似,是JDK1.5提供的,彌補了呼叫執行緒沒有返回值的情況,可以看做是Runnable的一個補充,下面看看Callable的實現。
1 2 3 4 5 6 7 8 |
public class MyThread implements Callable<String> {

    @Override
    public String call() throws Exception {
        System.out.println(Thread.currentThread().getName());
        return Thread.currentThread().getName();
    }
}
|
1 2 3 4 |
Callable<String> callable = new MyThread(); FutureTask<String> ft = new FutureTask<>(callable); new Thread(ft,"threadName").start(); System.out.println(ft.get()); |
2.1.5 run()和start()的區別
真正啟動執行緒的是start()方法而不是run(),run()和普通的成員方法一樣,可以重複使用,但不能啟動一個新執行緒。
2.2 Thread的常用方法
Thread類方法
| 方法 | 說明 |
|---|---|
| start() | 啟動執行緒 |
| setName(String name) | 設定執行緒名稱 |
| setPriority(int priority) | 設定執行緒優先順序,預設5,取值1-10 |
| join(long millisec) | 掛起執行緒xx毫秒,引數可以不傳 |
| interrupt() | 終止執行緒 |
| isAlive() | 測試執行緒是否處於活動狀態 |
Thread靜態(static)方法
| 方法 | 說明 |
|---|---|
| yield() | 暫停當前正在執行的執行緒物件,並執行其他執行緒。 |
| sleep(long millisec)/sleep(long millis, int nanos) | 掛起執行緒xx秒,引數不可省略 |
| currentThread() | 返回對當前正在執行的執行緒物件的引用 |
| holdsLock(Object x) | 當前執行緒是否擁有鎖 |
2.3 sleep()和wait()的區別
sleep為執行緒的方法,而wait為Object的方法,他們的功能相似,最大本質的區別是:sleep不釋放鎖,wait釋放鎖。
用法上的不同:sleep(milliseconds)可以用時間指定來使他自動醒過來,如果時間不到你只能呼叫interreput()來終止執行緒;wait()可以用notify()/notifyAll()直接喚起。
重點: 測試wait和sleep釋放鎖的程式碼如下:
1 2 3 4 5 6 7 8 9 10 11 12 13 14 15 16 17 |
public class SynchronizedTest extends Thread {
    int number = 10;
    public synchronized void first(){
        System.out.println("this is first!");
        number = number+1;
    }
    public synchronized void secord() throws InterruptedException {
        System.out.println("this is secord!!");
        Thread.sleep(1000);
//        this.wait(1000);
        number = number*100;
    }
    @Override
    public void run() {
        first();
    }
}
|
1 2 3 4 5 6 |
SynchronizedTest synchronizedTest = new SynchronizedTest(); synchronizedTest.start(); synchronizedTest.secord(); // 主執行緒稍等10毫秒 Thread.sleep(10); System.out.println(synchronizedTest.number); |
根據結果可以得知:
- 執行sleep(1000)執行的結果是:1001
- 執行wait(1000)執行的結果是:1100
總結: 使用 sleep(1000)不釋放同步鎖,執行的是10*100+1=1001,wait(1000)釋放了鎖,執行的順序是(10+1)x100=1100,所以sleep不釋放鎖,wait釋放鎖。
三、執行緒狀態
3.1 執行緒狀態概覽
執行緒狀態:
- NEW 尚未啟動
- RUNNABLE 正在執行中
- BLOCKED 阻塞的(被同步鎖或者IO鎖阻塞)
- WAITING 永久等待狀態
- TIMED_WAITING 等待指定的時間重新被喚醒的狀態
- TERMINATED 執行完成
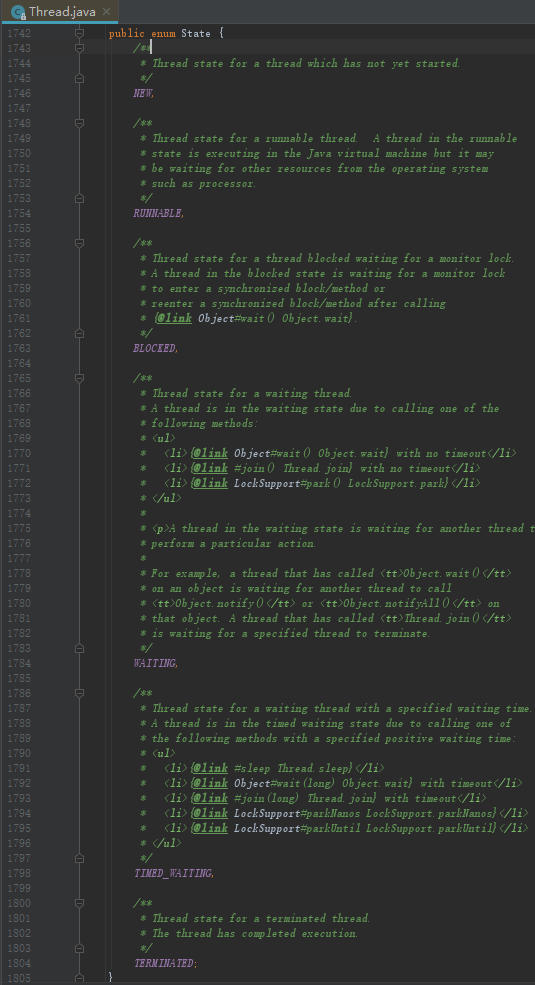
執行緒的狀態可以使用getState()檢視,更多狀態詳情,檢視Thread原始碼,如下圖:
3.2 執行緒的狀態程式碼實現
3.2.1 NEW 尚未啟動狀態
1 2 3 4 5 6 7 8 |
Thread thread = new Thread() {
    @Override
    public void run() {
        System.out.println(Thread.currentThread().getName());
    }
};
// 只宣告不呼叫start()方法,得到的狀態是NEW
System.out.println(thread.getState()); // NEW
|
3.2.2 RUNNABLE 執行狀態
1 2 3 4 5 6 7 8 |
Thread thread = new Thread() {
    @Override
    public void run() {
        System.out.println(Thread.currentThread().getName());
    }
};
thread.start();
System.out.println(thread.getState()); // RUNNABLE
|
3.2.3 BLOCKED 阻塞狀態
使用synchronized同步阻塞實現,程式碼如下:
1 2 3 4 5 6 7 8 9 10 11 |
public class MyCounter {
    int counter;
    public synchronized void increase()  {
        counter++;
        try {
            Thread.sleep(10*1000);
        } catch (InterruptedException e) {
            e.printStackTrace();
        }
    }
}
|
1 2 3 4 5 6 7 8 9 10 11 |
MyCounter myCounter = new MyCounter(); // 執行緒1呼叫同步執行緒,模擬阻塞 new Thread(()-> myCounter.increase()).start(); // 執行緒2繼續呼叫同步阻塞方法 Thread thread = new Thread(()-> myCounter.increase()); thread.start(); // 讓主執行緒等10毫秒 Thread.currentThread().sleep(10); // 列印執行緒2,為阻塞狀態:BLOCKED System.out.println(thread.getState()); |
3.2.4 WAITING 永久等待狀態
1 2 3 4 5 6 7 8 9 10 11 12 13 |
public class MyThread extends Thread{
    @Override
    public void run() {
        synchronized (MyThread.class){
            try {
                MyThread.class.wait();
                System.out.println(Thread.currentThread().getName());
            } catch (InterruptedException e) {
                e.printStackTrace();
            }
        }
    }
}
|
1 2 3 4 5 6 |
Thread thread = new Thread(new MyThread()); thread.start(); // 主執行緒掛起200毫秒,等thread執行完成 Thread.sleep(200); // 輸出WAITING,執行緒thread一直處於被掛起狀態 System.out.println(thread.getState()); |
喚醒執行緒: 可使用 notify/notifyAll 方法,程式碼如下:
1 2 3 |
synchronized (MyThread.class) {
    MyThread.class.notify();
}
|
使執行緒WAITING的方法:
- Object的wait() 不設定超時時間
- Thread.join()不設定超時時間
- LockSupport的park()
檢視Thread原始碼可以知道Thread的join方法,底層使用的是Object的wait實現的,如下圖:
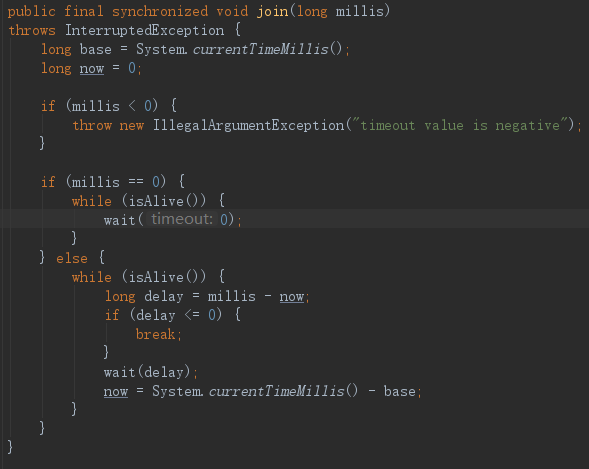
注意: 檢視Object的原始碼可知wait(),不傳遞引數,等同於wait(0),設定的“0”不是立即執行,而是無限的等待,不執行,如下圖:

3.2.5 TIMED_WAITING 超時等待狀態
TIMED_WAITING狀態,只需要給wait設定上時間即可,程式碼如下:
1 2 3 4 5 6 7 8 9 10 11 12 13 |
public class MyThread extends Thread{
    @Override
    public void run() {
        synchronized (MyThread.class){
            try {
                MyThread.class.wait(1000);
                System.out.println(Thread.currentThread().getName());
            } catch (InterruptedException e) {
                e.printStackTrace();
            }
        }
    }
}
|
呼叫程式碼還是一樣的,如下:
1 2 3 4 5 6 7 8 9 |
Thread thread = new Thread(new MyThread());
thread.start();
// 主執行緒掛起200毫秒,等thread執行完成
Thread.sleep(200);
// 輸出TIMED_WAITING
System.out.println(thread.getState());
synchronized (MyThread.class) {
    MyThread.class.notify();
}
|
3.2.6 TERMINATED 完成狀態
1 2 3 4 5 |
Thread thread = new Thread(()-> System.out.println(Thread.currentThread().getName())); thread.start(); // 讓主執行緒等10毫秒 Thread.currentThread().sleep(10); System.out.println(thread.getState()); |
四、死鎖
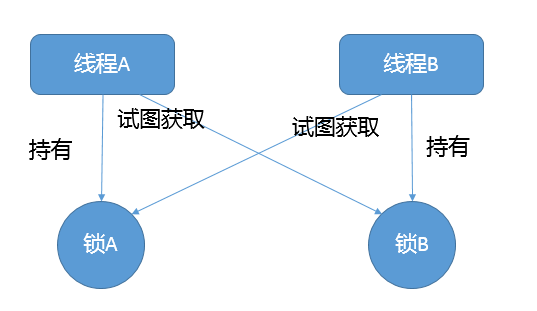
根據前面的知識,我們知道使用sleep的時候是不釋放鎖的,所以利用這個特性我們可以很輕易的寫出死鎖的程式碼,具體的流程如圖(圖片來源於楊曉峰老師文章):
程式碼如下:
1 2 3 4 5 6 7 8 9 10 11 12 13 14 15 16 17 18 19 20 21 22 23 24 25 26 27 28 29 30 31 32 33 34 35 36 37 38 39 |
static  Object object1 = new Object();
static  Object object2 = new Object();

public static void main(String[] args) {

    Thread thread = new Thread(){
        @Override
        public void run() {
            synchronized (object1){
                try {
                    Thread.sleep(1000);
                } catch (InterruptedException e) {
                    e.printStackTrace();
                }
                synchronized (object2){
                    System.out.println(Thread.currentThread().getName());
                }
            }
        }
    };

    Thread thread2 = new Thread(){
        @Override
        public void run() {
            synchronized (object2){
                try {
                    Thread.sleep(1000);
                } catch (InterruptedException e) {
                    e.printStackTrace();
                }
                synchronized (object1){
                    System.out.println(Thread.currentThread().getName());
                }
            }
        }
    };

    thread.start();
    thread2.start();
|
執行上面的程式碼,程式會處於無限等待之中。