
C++介面庫:使用Graphic Element Template製作按鈕模板
阿新 • • 發佈:2018-12-27
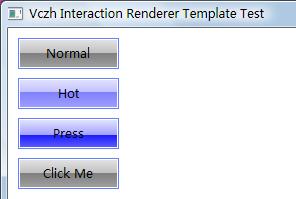
這一次製作的按鈕模板具有通過模板屬性動態配置圖形的功能。模板的屬性一共有6個:x、y、w、h、state、content,其中state有normal、hot和press三個取值。XML、程式碼和截圖如下:
下面的模板檔案有兩個模板,分別是background和button。background製作玻璃效果,button給background加上一個邊框,展示了property evaluation和template reference的功能:
1 <?xml version="1.0" encoding="utf-8" ?> 2 <irconfig xmlns="http://tempuri.org/irconfig.xsd"> 3 <resources> 4 <brush name="outer_border_brush" kind="solid"
程式由4個按鈕組成,4個按鈕都是button的例項化,但是隻處理了最後一個按鈕的訊息。因為現在只有畫圖,所以訊息處理部分是手動的。下面是截圖:
下面是程式碼:
1 class ConfigForm : public VL_WinForm
2 {
3 protected:
4 IVL_IrFactory::Ptr FFactory;
5 IVL_IrCanvas::Ptr FCanvas;
6 VL_IrConfigLoader::Ptr FLoader;
7 VL_IrConfig::Ptr FConfig;
8 VL_IrTemplateInstance::Ptr FNormalButton;
9 VL_IrTemplateInstance::Ptr FHotButton;
10 VL_IrTemplateInstance::Ptr FPressButton;
11 VL_IrTemplateInstance::Ptr FButton;
12 VBool FClickedOnButton;
13 14 VL_IrTemplateInstance::Ptr CreateButton(VL_IrPoint Position , VUnicodeString State , VUnicodeString Text)
15 {
16 VL_IrTemplateInstance::Ptr Instance=FConfig->FindTemplate(L"button")->CreateInstance();
17 for(VInt i=0;i<Instance->GetRootElements().GetCount();i++)
18 {
19 FCanvas->GetRootElement()->Container()->AddChild(Instance->GetRootElements()[i]);
20 }
21 22 Instance->GetInts()[L"x"]=Position.X;
23 Instance->GetInts()[L"y"]=Position.Y;
24 Instance->GetInts()[L"w"]=100;
25 Instance->GetInts()[L"h"]=30;
26 Instance->GetStrs()[L"state"]=State;
27 Instance->GetStrs()[L"content"]=Text;
28 Instance->Update();
29 30 return Instance;
31 }
32 33 VBool IsOnButton(VLS_MouseStruct Struct)
34 {
35 return FButton->GetRootElements()[0]->Properties()->ContainedPoint(VL_IrPoint(Struct.X,Struct.Y))!=IVL_IrElement::htrNone;
36 }
37 38 void Form_MouseDown(VL_Base* Sender , VLS_MouseStruct Struct)
39 {
40 FClickedOnButton=IsOnButton(Struct);
41 FButton->GetStrs()[L"state"]=FClickedOnButton?L"press":L"normal";
42 FButton->Update();
43 FCanvas->Render();
44 }
45 46 void Form_MouseMove(VL_Base* Sender , VLS_MouseStruct Struct)
47 {
48 VUnicodeString PreviousState=FButton->GetStrs()[L"state"];
49 if(FClickedOnButton)
50 {
51 FButton->GetStrs()[L"state"]=IsOnButton(Struct)?L"press":L"hot";
52 }
53 elseif(Struct.LeftButton)
54 {
55 FButton->GetStrs()[L"state"]=IsOnButton(Struct)?L"hot":L"normal";
56 }
57 else 58 {
59 FButton->GetStrs()[L"state"]=IsOnButton(Struct)?L"hot":L"normal";
60 }
61 if(FButton->GetStrs()[L"state"]!=PreviousState)
62 {
63 FButton->Update();
64 FCanvas->Render();
65 }
66 }
67 68 void Form_MouseUp(VL_Base* Sender , VLS_MouseStruct Struct)
69 {
70 FClickedOnButton=false;
71 FButton->GetStrs()[L"state"]=IsOnButton(Struct)?L"hot":L"normal";
72 FButton->Update();
73 FCanvas->Render();
74 }
75 public:
76 ConfigForm():VL_WinForm(true)
77 {
78 SetBorder(vwfbSingle);
79 SetMinimizeBox(false);
80 SetMaximizeBox(false);
81 SetClientWidth(800);
82 SetClientHeight(600);
83 SetText(L"Vczh Interaction Renderer Template Test");
84 85 OnLeftButtonDown.Bind(this,&ConfigForm::Form_MouseDown);
86 OnLeftButtonUp.Bind(this,&ConfigForm::Form_MouseUp);
87 OnMouseMove.Bind(this,&ConfigForm::Form_MouseMove);
88 FClickedOnButton=false;
89 90 FFactory=CreateInteractionFactory(L"GDI");
91 FCanvas=FFactory->CreateCanvas(this);
92 FLoader=new VL_IrConfigLoader(FFactory);
93 FConfig=FLoader->Load(VFileName(GetApplication()->GetAppName()).MakeAbsolute(L"..\\Renderer\\IrConfig_Test.xml").GetStrW());
94 95 VL_IrBrushRec WhiteBrushRec;
96 WhiteBrushRec.BrushKind=VL_IrBrushRec::bkSolid;
97 WhiteBrushRec.MainColor=VL_IrColor(255,255,255);
98 IVL_IrBrush::Ptr WhiteBrush=FFactory->CreateBrush(WhiteBrushRec);
99 100 IVL_IrRectangle::Ptr Root=FFactory->CreateRectangle();
101 Root->Properties()->SetBrush(WhiteBrush);
102 Root->Update(VL_IrPoint(0,0),VL_IrPoint(800,600));
103 FCanvas->SetRootElement(Root);
104 105 FNormalButton=CreateButton(VL_IrPoint(10,10),L"normal",L"Normal");
106 FHotButton=CreateButton(VL_IrPoint(10,50),L"hot",L"Hot");
107 FPressButton=CreateButton(VL_IrPoint(10,90),L"press",L"Press");
108 FButton=CreateButton(VL_IrPoint(10,130),L"normal",L"Click Me");
109 110 FCanvas->Render();
111 }
112 };
程式建立了一個白色的全屏的長方形當背景,然後把button的四個例項產生的圖形都加入長方形中。使用類似的方法就可以將不同的東西堆疊起來,最後組成一個完整的程式介面了。接下來開始設計介面庫的架構,做一系列可以自動排版、基於MVC和上面那個模板的元件。 posted on 2009-08-20 21:38 陳梓瀚(vczh) 閱讀(3522) 評論(7) 編輯 收藏 引用 所屬分類: 2D