
Maven生成可以直接執行的jar包的多種方式
轉:http://blog.csdn.net/xiao__gui/article/details/47341385
Maven可以使用mvn package指令對專案進行打包,如果使用Java -jar xxx.jar執行執行jar檔案,會出現"no main manifest attribute, in xxx.jar"(沒有設定Main-Class)、ClassNotFoundException(找不到依賴包)等錯誤。
要想jar包能直接通過java -jar xxx.jar執行,需要滿足:
1、在jar包中的META-INF/MANIFEST.MF中指定Main-Class,這樣才能確定程式的入口在哪裡;
2、要能載入到依賴包。
使用Maven有以下幾種方法可以生成能直接執行的jar包,可以根據需要選擇一種合適的方法。
方法一:使用maven-jar-plugin和maven-dependency-plugin外掛打包
在pom.xml中配置:
<build>
	<plugins>

		<plugin>
			<groupId>org.apache.maven.plugins</groupId>
			<artifactId>maven-jar-plugin</artifactId>
			<version>2.6</version>
			<configuration>
				<archive>
					<manifest>
						<addClasspath>true</addClasspath>
						<classpathPrefix>lib/</classpathPrefix>
						<mainClass>com.xxg.Main</mainClass>
					</manifest>
				</archive>
			</configuration>
		</plugin>
		<plugin>
			<groupId>org.apache.maven.plugins</groupId>
			<artifactId>maven-dependency-plugin</artifactId>
			<version>2.10</version>
			<executions>
				<execution>
					<id>copy-dependencies</id>
					<phase>package</phase>
					<goals>
						<goal>copy-dependencies</goal>
					</goals>
					<configuration>
						<outputDirectory>${project.build.directory}/lib</outputDirectory>
					</configuration>
				</execution>
			</executions>
		</plugin>

	</plugins>
</build>
maven-jar-plugin用於生成META-INF/MANIFEST.MF檔案的部分內容,<mainClass>com.xxg.Main</mainClass>指定MANIFEST.MF中的Main-Class,<addClasspath>true</addClasspath>會在MANIFEST.MF加上Class-Path項並配置依賴包,<classpathPrefix>lib/</classpathPrefix>指定依賴包所在目錄。
例如下面是一個通過maven-jar-plugin外掛生成的MANIFEST.MF檔案片段:
Class-Path: lib/commons-logging-1.2.jar lib/commons-io-2.4.jar
Main-Class: com.xxg.Main
只是生成MANIFEST.MF檔案還不夠,maven-dependency-plugin外掛用於將依賴包拷貝到<outputDirectory>${project.build.directory}/lib</outputDirectory>指定的位置,即lib目錄下。
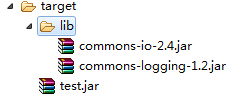
配置完成後,通過mvn package指令打包,會在target目錄下生成jar包,並將依賴包拷貝到target/lib目錄下,目錄結構如下:
指定了Main-Class,有了依賴包,那麼就可以直接通過java -jar xxx.jar執行jar包。
這種方式生成jar包有個缺點,就是生成的jar包太多不便於管理,下面兩種方式只生成一個jar檔案,包含專案本身的程式碼、資源以及所有的依賴包方法二:使用maven-assembly-plugin外掛打包
在pom.xml中配置:
<build>
	<plugins>

		<plugin>
			<groupId>org.apache.maven.plugins</groupId>
			<artifactId>maven-assembly-plugin</artifactId>
			<version>2.5.5</version>
			<configuration>
				<archive>
					<manifest>
						<mainClass>com.xxg.Main</mainClass>
					</manifest>
				</archive>
				<descriptorRefs>
					<descriptorRef>jar-with-dependencies</descriptorRef>
				</descriptorRefs>
			</configuration>
		</plugin>

	</plugins>
</build>
打包方式:
mvn package assembly:single打包後會在target目錄下生成一個xxx-jar-with-dependencies.jar檔案,這個檔案不但包含了自己專案中的程式碼和資源,還包含了所有依賴包的內容。所以可以直接通過java -jar來執行。
此外還可以直接通過mvn package來打包,無需assembly:single,不過需要加上一些配置:<build>
<plugins>
<plugin>
<groupId>org.apache.maven.plugins</groupId>
<artifactId>maven-assembly-plugin</artifactId>
<version>2.5.5</version>
<configuration>
<archive>
<manifest>
<mainClass>com.xxg.Main</mainClass>
</manifest>
</archive>
<descriptorRefs>
<descriptorRef>jar-with-dependencies</descriptorRef>
</descriptorRefs>
</configuration>
<executions>
<execution>
<id>make-assembly</id>
<phase>package</phase>
<goals>
<goal>single</goal>
</goals>
</execution>
</executions>
</plugin>
</plugins>
</build>其中<phase>package</phase>、<goal>single</goal>即表示在執行package打包時,執行assembly:single,所以可以直接使用mvn package打包。
不過,如果專案中用到spring Framework,用這種方式打出來的包執行時會出錯,使用下面的方法三可以處理。
方法三:使用maven-shade-plugin外掛打包
在pom.xml中配置:<build>
<plugins>
<plugin>
<groupId>org.apache.maven.plugins</groupId>
<artifactId>maven-shade-plugin</artifactId>
<version>2.4.1</version>
<executions>
<execution>
<phase>package</phase>
<goals>
<goal>shade</goal>
</goals>
<configuration>
<transformers>
<transformer implementation="org.apache.maven.plugins.shade.resource.ManifestResourceTransformer">
<mainClass>com.xxg.Main</mainClass>
</transformer>
</transformers>
</configuration>
</execution>
</executions>
</plugin>
</plugins>
</build>配置完成後,執行mvn package即可打包。在target目錄下會生成兩個jar包,注意不是original-xxx.jar檔案,而是另外一個。和maven-assembly-plugin一樣,生成的jar檔案包含了所有依賴,所以可以直接執行。
如果專案中用到了Spring Framework,將依賴打到一個jar包中,執行時會出現讀取XML schema檔案出錯。原因是Spring Framework的多個jar包中包含相同的檔案spring.handlers和spring.schemas,如果生成一個jar包會互相覆蓋。為了避免互相影響,可以使用AppendingTransformer來對檔案內容追加合併:
<build>
	<plugins>

		<plugin>
			<groupId>org.apache.maven.plugins</groupId>
			<artifactId>maven-shade-plugin</artifactId>
			<version>2.4.1</version>
			<executions>
				<execution>
					<phase>package</phase>
					<goals>
						<goal>shade</goal>
					</goals>
					<configuration>
						<transformers>
							<transformer implementation="org.apache.maven.plugins.shade.resource.ManifestResourceTransformer">
								<mainClass>com.xxg.Main</mainClass>
							</transformer>
							<transformer implementation="org.apache.maven.plugins.shade.resource.AppendingTransformer">
								<resource>META-INF/spring.handlers</resource>
							</transformer>
							<transformer implementation="org.apache.maven.plugins.shade.resource.AppendingTransformer">
								<resource>META-INF/spring.schemas</resource>
							</transformer>
						</transformers>
					</configuration>
				</execution>
			</executions>
		</plugin>

	</plugins>
</build>