
(6)基於hadoop的簡單網盤應用實現2
阿新 • • 發佈:2019-01-05
一、呼叫hadoop api實現檔案的上傳、下載、刪除、建立目錄和顯示功能
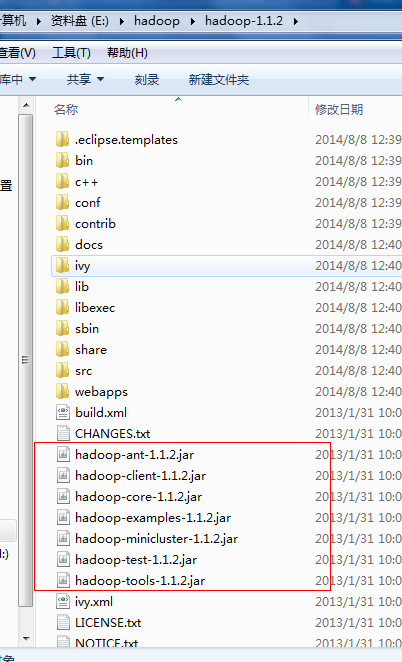
(1)新增必要的hadoop jar包。
A、首先將Hadoop1.1.2.tar.gz解壓到某一個磁碟下。
B、右鍵選擇工程,選擇build path...., build configure path;
C、將hadoop1.1.2資料夾下的jar包新增進去;
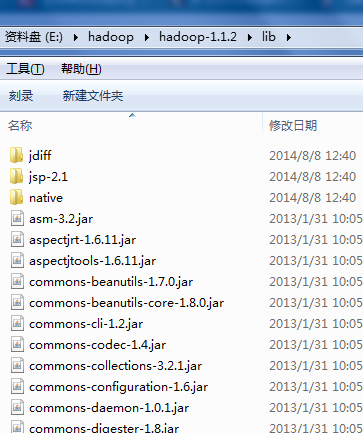
還有lib資料夾下的所有jar包(注意:jasper-compiler-5.5.12.jar和jasper-runtime-5.5.12.jar不要引進,否則會報錯)

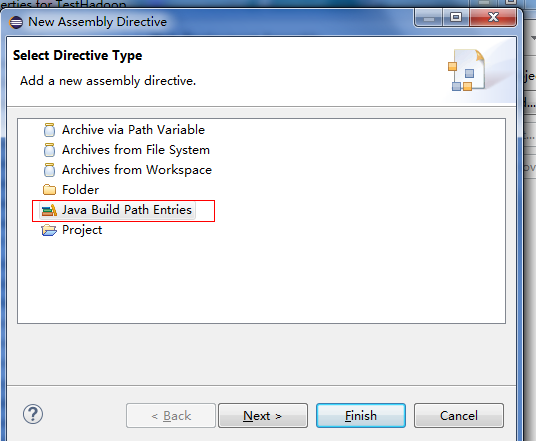
注意:在build path引入這些jar包後,還需要將這些jar包複製到WEB-INF/lib目錄下,可以通過下面操作實現:
選擇工程,右鍵“Properties”,選擇Deployment Assembly。
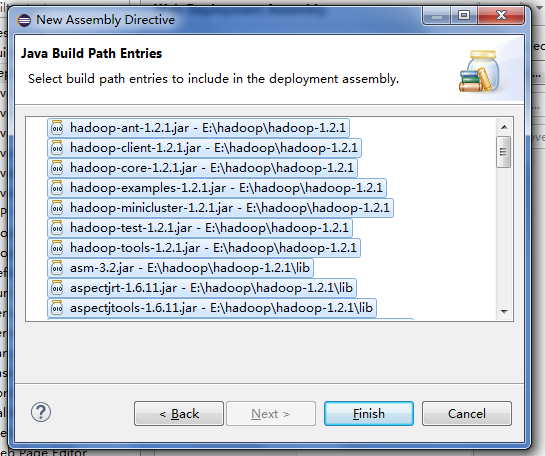
點選Add,選擇Java Build Path Entries。
然後把你剛剛引進的Jar包全部選上,點選finishes。
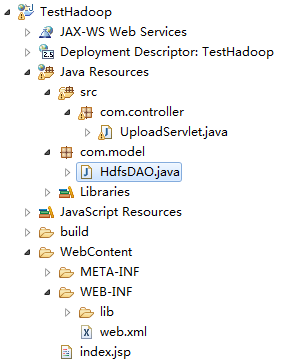
D 、建立java工程
建立HdfsDAO類:
package com.model;

import java.io.IOException;
import java.net.URI;

import org.apache.hadoop.conf.Configuration;
import org.apache.hadoop.fs.FileStatus;
import org.apache.hadoop.fs.FileSystem;
import org.apache.hadoop.fs.Path;
import org.apache.hadoop.mapred.JobConf;

public class HdfsDAO {

    //HDFS訪問地址
    private static final String HDFS = "hdfs://192.168.1.104:9000";


    public HdfsDAO(Configuration conf) {
        this(HDFS, conf);
    }

    public HdfsDAO(String hdfs, Configuration conf) {
        this.hdfsPath = hdfs;
        this.conf = conf;
    }

    //hdfs路徑
    private String hdfsPath;
    //Hadoop系統配置
    private Configuration conf;


    //啟動函式
    public static void main(String[] args) throws IOException {
        JobConf conf = config();
        HdfsDAO hdfs = new HdfsDAO(conf);
        //hdfs.mkdirs("/Tom");
        //hdfs.copyFile("C:\\files", "/wgc/");
         hdfs.ls("hdfs://192.168.1.104:9000/wgc/files");
        //hdfs.rmr("/wgc/files");
        //hdfs.download("/wgc/(3)windows下hadoop+eclipse環境搭建.docx", "c:\\");
        //System.out.println("success!");
    }

    //載入Hadoop配置檔案
    public  static JobConf config(){
        JobConf conf = new JobConf(HdfsDAO.class);
        conf.setJobName("HdfsDAO");
        conf.addResource("classpath:/hadoop/core-site.xml");
        conf.addResource("classpath:/hadoop/hdfs-site.xml");
        conf.addResource("classpath:/hadoop/mapred-site.xml");
        return conf;
    }

    //在根目錄下建立資料夾
    public void mkdirs(String folder) throws IOException {
        Path path = new Path(folder);
        FileSystem fs = FileSystem.get(URI.create(hdfsPath), conf);
        if (!fs.exists(path)) {
            fs.mkdirs(path);
            System.out.println("Create: " + folder);
        }
        fs.close();
    }

    //某個資料夾的檔案列表
    public FileStatus[] ls(String folder) throws IOException {
        Path path = new Path(folder);
        FileSystem fs = FileSystem.get(URI.create(hdfsPath), conf);
        FileStatus[] list = fs.listStatus(path);
        System.out.println("ls: " + folder);
        System.out.println("==========================================================");
        if(list != null)
        for (FileStatus f : list) {
            //System.out.printf("name: %s, folder: %s, size: %d\n", f.getPath(), f.isDir(), f.getLen());
        	System.out.printf("%s, folder: %s, 大小: %dK\n", f.getPath().getName(), (f.isDir()?"目錄":"檔案"), f.getLen()/1024);
        }
        System.out.println("==========================================================");
        fs.close();

        return  list;
    }


    public void copyFile(String local, String remote) throws IOException {
        FileSystem fs = FileSystem.get(URI.create(hdfsPath), conf);
        //remote---/使用者/使用者下的檔案或資料夾
        fs.copyFromLocalFile(new Path(local), new Path(remote));
         System.out.println("copy from: " + local + " to " + remote);
        fs.close();
    }

    //刪除檔案或資料夾
    public void rmr(String folder) throws IOException {
        Path path = new Path(folder);
        FileSystem fs = FileSystem.get(URI.create(hdfsPath), conf);
        fs.deleteOnExit(path);
        System.out.println("Delete: " + folder);
        fs.close();
    }


    //下載檔案到本地系統
    public void download(String remote, String local) throws IOException {
        Path path = new Path(remote);
        FileSystem fs = FileSystem.get(URI.create(hdfsPath), conf);
        fs.copyToLocalFile(path, new Path(local));
        System.out.println("download: from" + remote + " to " + local);
        fs.close();
    }


}
在測試前,請啟動hadoop;
執行測試該程式:
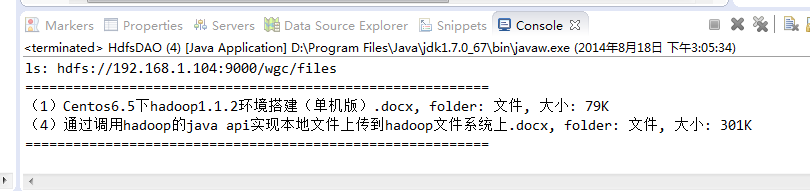
其他函式測試也成功,這裡就不一一列舉了。
二、結合web前臺和hadoop api
開啟Uploadservlet檔案,修改:
package com.controller;

import java.io.File;
import java.io.IOException;
import java.util.Iterator;
import java.util.List;

import javax.servlet.ServletContext;
import javax.servlet.ServletException;
import javax.servlet.http.HttpServlet;
import javax.servlet.http.HttpServletRequest;
import javax.servlet.http.HttpServletResponse;
import javax.servlet.jsp.PageContext;

import org.apache.commons.fileupload.DiskFileUpload;
import org.apache.commons.fileupload.FileItem;
import org.apache.commons.fileupload.disk.DiskFileItemFactory;
import org.apache.commons.fileupload.servlet.ServletFileUpload;
import org.apache.hadoop.fs.FileStatus;
import org.apache.hadoop.mapred.JobConf;

import com.model.HdfsDAO;


/**
 * Servlet implementation class UploadServlet
 */
public class UploadServlet extends HttpServlet {

	/**
	 * @see HttpServlet#doGet(HttpServletRequest request, HttpServletResponse response)
	 */
	protected void doGet(HttpServletRequest request, HttpServletResponse response) throws ServletException, IOException {
		this.doPost(request, response);
	}

	/**
	 * @see HttpServlet#doPost(HttpServletRequest request, HttpServletResponse response)
	 */
	protected void doPost(HttpServletRequest request, HttpServletResponse response) throws ServletException, IOException {
		   request.setCharacterEncoding("UTF-8");
		   File file ;
		   int maxFileSize = 50 * 1024 *1024;  //50M
		   int maxMemSize = 50 * 1024 *1024;    //50M
		   ServletContext context = getServletContext();
		   String filePath = context.getInitParameter("file-upload");
			System.out.println("source file path:"+filePath+"");
		   // 驗證上傳內容了型別
		   String contentType = request.getContentType();
		   if ((contentType.indexOf("multipart/form-data") >= 0)) {

		      DiskFileItemFactory factory = new DiskFileItemFactory();
		      // 設定記憶體中儲存檔案的最大值
		      factory.setSizeThreshold(maxMemSize);
		      // 本地儲存的資料大於 maxMemSize.
		      factory.setRepository(new File("c:\\temp"));

		      // 建立一個新的檔案上傳處理程式
		      ServletFileUpload upload = new ServletFileUpload(factory);
		      // 設定最大上傳的檔案大小
		      upload.setSizeMax( maxFileSize );
		      try{
		         // 解析獲取的檔案
		         List fileItems = upload.parseRequest(request);

		         // 處理上傳的檔案
		         Iterator i = fileItems.iterator();

		         System.out.println("begin to upload file to tomcat server</p>");
		         while ( i.hasNext () )
		         {
		            FileItem fi = (FileItem)i.next();
		            if ( !fi.isFormField () )
		            {
		            // 獲取上傳檔案的引數
		            String fieldName = fi.getFieldName();
		            String fileName = fi.getName();

		            String fn = fileName.substring( fileName.lastIndexOf("\\")+1);
		            System.out.println("<br>"+fn+"<br>");
		            boolean isInMemory = fi.isInMemory();
		            long sizeInBytes = fi.getSize();
		            // 寫入檔案
		            if( fileName.lastIndexOf("\\") >= 0 ){
		            file = new File( filePath ,
		            fileName.substring( fileName.lastIndexOf("\\"))) ;
		            //out.println("filename"+fileName.substring( fileName.lastIndexOf("\\"))+"||||||");
		            }else{
		            file = new File( filePath ,
		            fileName.substring(fileName.lastIndexOf("\\")+1)) ;
		            }
		            fi.write( file ) ;
		            System.out.println("upload file to tomcat server success!");

		           <span style="color:#ff0000;"> System.out.println("begin to upload file to hadoop hdfs</p>");
		            //將tomcat上的檔案上傳到hadoop上

		            JobConf conf = HdfsDAO.config();
		            HdfsDAO hdfs = new HdfsDAO(conf);
		            hdfs.copyFile(filePath+"\\"+fn, "/wgc/"+fn);
		            System.out.println("upload file to hadoop hdfs success!");</span>

		            request.getRequestDispatcher("index.jsp").forward(request, response);

		            }
		         }
		      }catch(Exception ex) {
		         System.out.println(ex);
		      }
		   }else{
		      System.out.println("<p>No file uploaded</p>");

		   }


	}

}
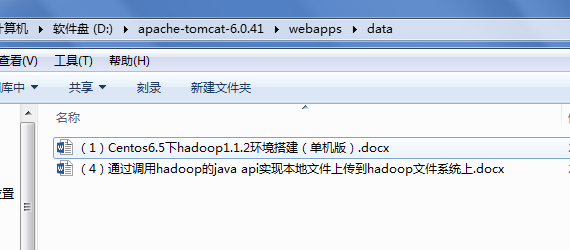
啟動tomcat伺服器測試:
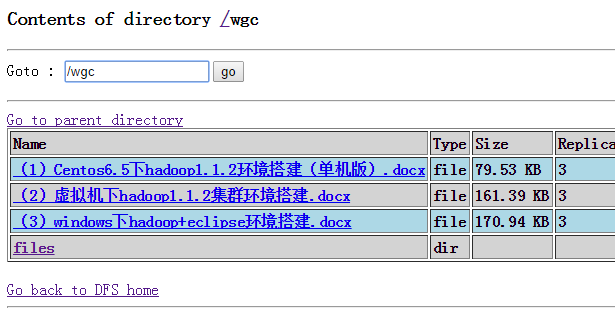
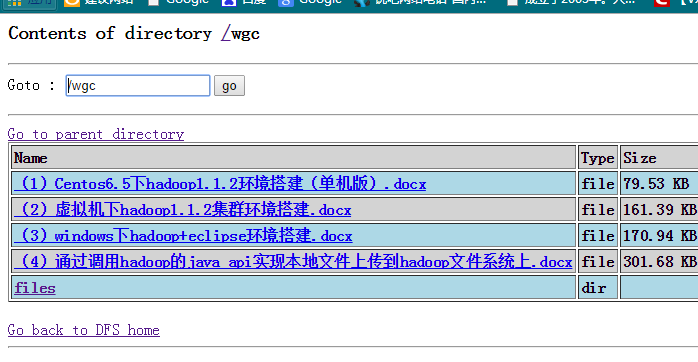
在上傳前,hdfs下的wgc資料夾列表如下:
接下來我們上傳:(4)通過呼叫hadoop的java api實現本地檔案上傳到hadoop檔案系統上.docx
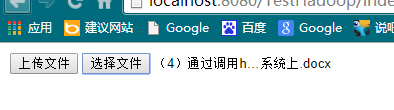
在tomcat伺服器上,我們可以看到剛剛上傳的檔案:
開啟http://hadoop:50070/檢視檔案系統,可以看到新上傳的檔案:
那麼,到此,一個簡陋的網盤上傳功能就實現了,接下來我們就對這個簡陋的網盤做一些美工,讓它看起來更漂亮些。
參考資料: