
Spring boot +Mybatis 實戰(完整版)
個人開源專案
更多幹貨
正題
本專案使用的環境:
- 開發工具:Intellij IDEA 2017.1.3
- springboot: 1.5.6
- jdk:1.8.0_161
- maven:3.3.9
額外功能
- PageHelper 分頁外掛
- mybatis generator 自動生成程式碼外掛
步驟:
1.建立一個springboot專案:
2.建立專案的檔案結構以及jdk的版本 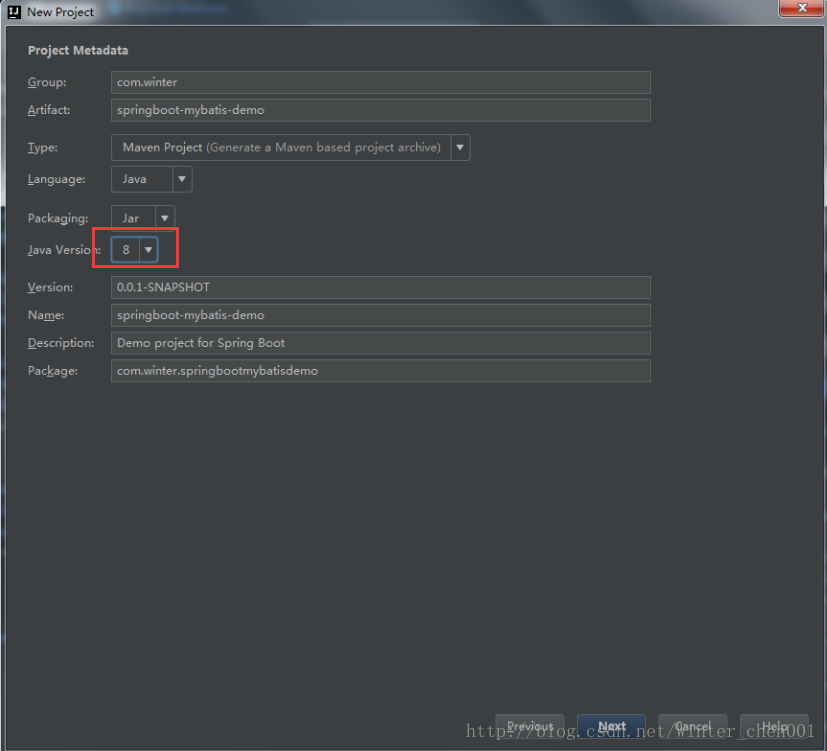
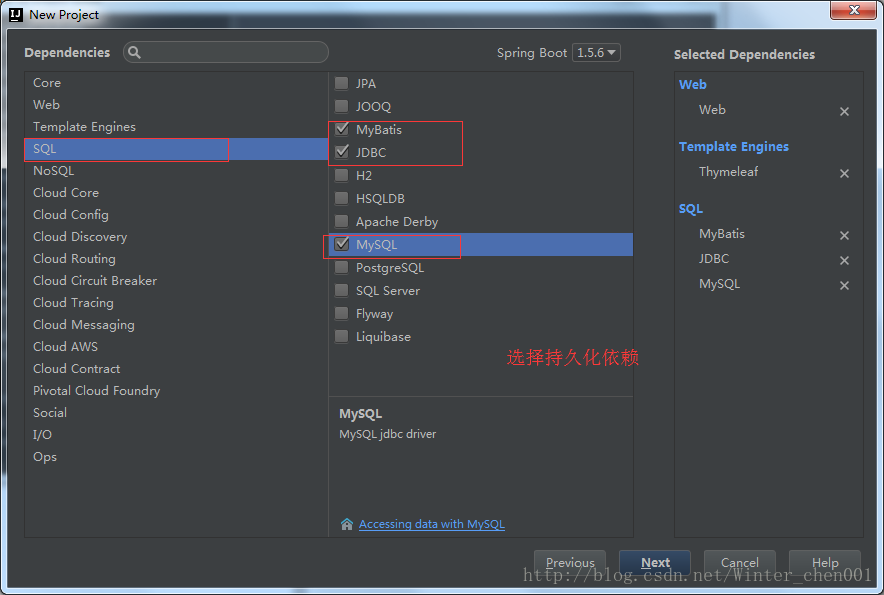
3.選擇專案所需要的依賴
然後點選finish


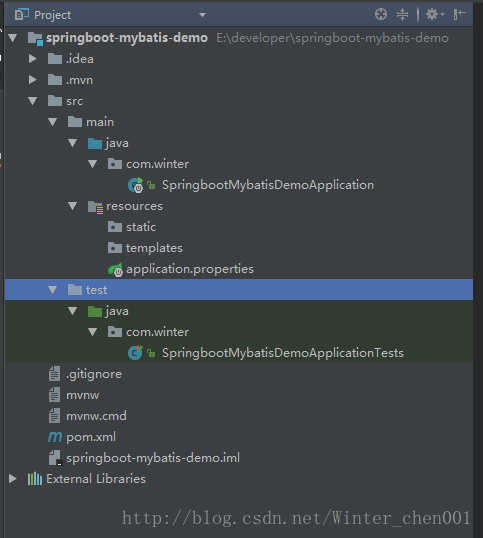
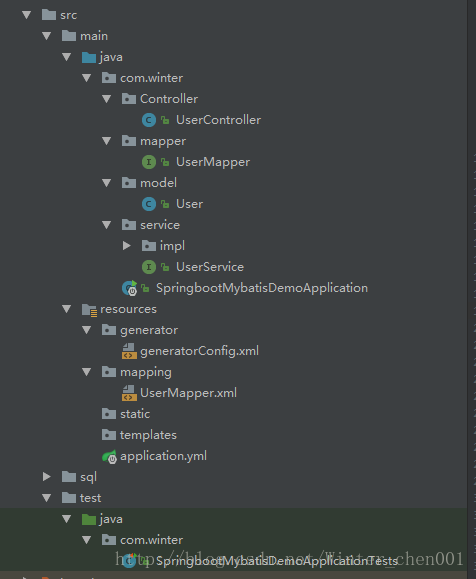
5.看一下檔案的結構:
6.檢視一下pom.xml:
<?xml version="1.0" encoding="UTF-8"?>
<project xmlns="http://maven.apache.org/POM/4.0.0" xmlns:xsi="http://www.w3.org/2001/XMLSchema-instance"
    xsi:schemaLocation="http://maven.apache.org/POM/4.0.0 http://maven.apache.org/xsd/maven-4.0.0.xsd">
    <modelVersion>4.0.0</modelVersion>

    <groupId>com.winter</groupId>
    <artifactId>springboot-mybatis-demo</artifactId>
    <version>0.0.1-SNAPSHOT</version>
    <packaging>jar</packaging>

    <name>springboot-mybatis-demo</name>
    <description>Demo project for Spring Boot</description>

    <parent>
        <groupId>org.springframework.boot</groupId>
        <artifactId>spring-boot-starter-parent</artifactId>
        <version>1.5.6.RELEASE</version>
        <relativePath/> <!-- lookup parent from repository -->
    </parent>

    <properties>
        <project.build.sourceEncoding>UTF-8</project.build.sourceEncoding>
        <project.reporting.outputEncoding>UTF-8</project.reporting.outputEncoding>
        <java.version>1.7</java.version>
    </properties>

    <dependencies>
        <dependency>
            <groupId>org.mybatis.spring.boot</groupId>
            <artifactId>mybatis-spring-boot-starter</artifactId>
            <version>1.3.0</version>
        </dependency>
        <dependency>
            <groupId>org.springframework.boot</groupId>
            <artifactId>spring-boot-starter-thymeleaf</artifactId>
        </dependency>
        <dependency>
            <groupId>org.springframework.boot</groupId>
            <artifactId>spring-boot-starter-web</artifactId>
        </dependency>

        <dependency>
            <groupId>org.springframework.boot</groupId>
            <artifactId>spring-boot-starter-test</artifactId>
            <scope>test</scope>
        </dependency>
        <dependency>
            <groupId>mysql</groupId>
            <artifactId>mysql-connector-java</artifactId>
            <version>5.1.35</version>
        </dependency>
        <!-- alibaba的druid資料庫連線池 -->
        <dependency>
            <groupId>com.alibaba</groupId>
            <artifactId>druid</artifactId>
            <version>1.0.11</version>
        </dependency>
        <dependency>
            <groupId>com.fasterxml.jackson.core</groupId>
            <artifactId>jackson-core</artifactId>
        </dependency>
        <dependency>
            <groupId>com.fasterxml.jackson.core</groupId>
            <artifactId>jackson-databind</artifactId>
        </dependency>
        <dependency>
            <groupId>com.fasterxml.jackson.datatype</groupId>
            <artifactId>jackson-datatype-joda</artifactId>
        </dependency>
        <dependency>
            <groupId>com.fasterxml.jackson.module</groupId>
            <artifactId>jackson-module-parameter-names</artifactId>
        </dependency>
        <!-- 分頁外掛 -->
        <dependency>
            <groupId>com.github.pagehelper</groupId>
            <artifactId>pagehelper-spring-boot-starter</artifactId>
            <version>1.1.2</version>
        </dependency>
        <!-- alibaba的druid資料庫連線池 -->
        <dependency>
            <groupId>com.alibaba</groupId>
            <artifactId>druid-spring-boot-starter</artifactId>
            <version>1.1.0</version>
        </dependency>
    </dependencies>

    <build>
        <plugins>
            <plugin>
                <groupId>org.springframework.boot</groupId>
                <artifactId>spring-boot-maven-plugin</artifactId>
            </plugin>
            <!-- mybatis generator 自動生成程式碼外掛 -->
            <plugin>
                <groupId>org.mybatis.generator</groupId>
                <artifactId>mybatis-generator-maven-plugin</artifactId>
                <version>1.3.2</version>
                <configuration>
                    <configurationFile>${basedir}/src/main/resources/generator/generatorConfig.xml</configurationFile>
                    <overwrite>true</overwrite>
                    <verbose>true</verbose>
                </configuration>
            </plugin>
        </plugins>
    </build>


</project>
7.專案不使用application.properties檔案 而使用更加簡潔的application.yml檔案:
將原有的resource資料夾下的application.properties檔案刪除,建立一個新的application.yml配置檔案,
檔案的內容如下:
server:
  port: 8080

spring:
    datasource:
        name: test
        url: jdbc:mysql://127.0.0.1:3306/depot
        username: root
        password: root
        # 使用druid資料來源
        type: com.alibaba.druid.pool.DruidDataSource
        driver-class-name: com.mysql.jdbc.Driver
        filters: stat
        maxActive: 20
        initialSize: 1
        maxWait: 60000
        minIdle: 1
        timeBetweenEvictionRunsMillis: 60000
        minEvictableIdleTimeMillis: 300000
        validationQuery: select 'x'
        testWhileIdle: true
        testOnBorrow: false
        testOnReturn: false
        poolPreparedStatements: true
        maxOpenPreparedStatements: 20
mybatis:
  mapper-locations: classpath:mapping/*.xml
  type-aliases-package: com.winter.model

#pagehelper分頁外掛
pagehelper:
    helperDialect: mysql
    reasonable: true
    supportMethodsArguments: true
    params: count=countSql
- 8.建立資料庫:
-
CREATE DATABASE mytest;

CREATE TABLE t_user(
  user_id INT NOT NULL PRIMARY KEY AUTO_INCREMENT,
  user_name VARCHAR(255) NOT NULL ,
  password VARCHAR(255) NOT NULL ,
  phone VARCHAR(255) NOT NULL
) ENGINE=INNODB AUTO_INCREMENT=1000 DEFAULT CHARSET=utf8;
9.使用mybatis generator 自動生成程式碼:
- 配置pom.xml中generator 外掛所對應的配置檔案 ${basedir}/src/main/resources/generator/generatorConfig.xml
<?xml version="1.0" encoding="UTF-8"?>
<!DOCTYPE generatorConfiguration
        PUBLIC "-//mybatis.org//DTD MyBatis Generator Configuration 1.0//EN"
        "http://mybatis.org/dtd/mybatis-generator-config_1_0.dtd">
<generatorConfiguration>
    <!-- 資料庫驅動:選擇你的本地硬碟上面的資料庫驅動包-->
    <classPathEntry  location="E:\developer\mybatis-generator-core-1.3.2\lib\mysql-connector-java-5.1.25-bin.jar"/>
    <context id="DB2Tables"  targetRuntime="MyBatis3">
        <commentGenerator>
            <property name="suppressDate" value="true"/>
            <!-- 是否去除自動生成的註釋 true:是 : false:否 -->
            <property name="suppressAllComments" value="true"/>
        </commentGenerator>
        <!--資料庫連結URL,使用者名稱、密碼 -->
        <jdbcConnection driverClass="com.mysql.jdbc.Driver" connectionURL="jdbc:mysql://127.0.0.1/mytest" userId="root" password="root">
        </jdbcConnection>
        <javaTypeResolver>
            <property name="forceBigDecimals" value="false"/>
        </javaTypeResolver>
        <!-- 生成模型的包名和位置-->
        <javaModelGenerator targetPackage="com.winter.model" targetProject="src/main/java">
            <property name="enableSubPackages" value="true"/>
            <property name="trimStrings" value="true"/>
        </javaModelGenerator>
        <!-- 生成對映檔案的包名和位置-->
        <sqlMapGenerator targetPackage="mapping" targetProject="src/main/resources">
            <property name="enableSubPackages" value="true"/>
        </sqlMapGenerator>
        <!-- 生成DAO的包名和位置-->
        <javaClientGenerator type="XMLMAPPER" targetPackage="com.winter.mapper" targetProject="src/main/java">
            <property name="enableSubPackages" value="true"/>
        </javaClientGenerator>
        <!-- 要生成的表 tableName是資料庫中的表名或檢視名 domainObjectName是實體類名-->
        <table tableName="t_user" domainObjectName="User" enableCountByExample="false" enableUpdateByExample="false" enableDeleteByExample="false" enableSelectByExample="false" selectByExampleQueryId="false"></table>
    </context>
</generatorConfiguration>
- 點選run-Edit Configurations
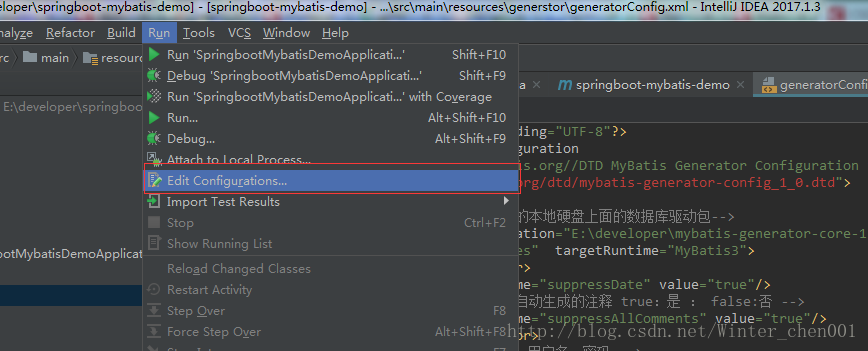
- 新增配置
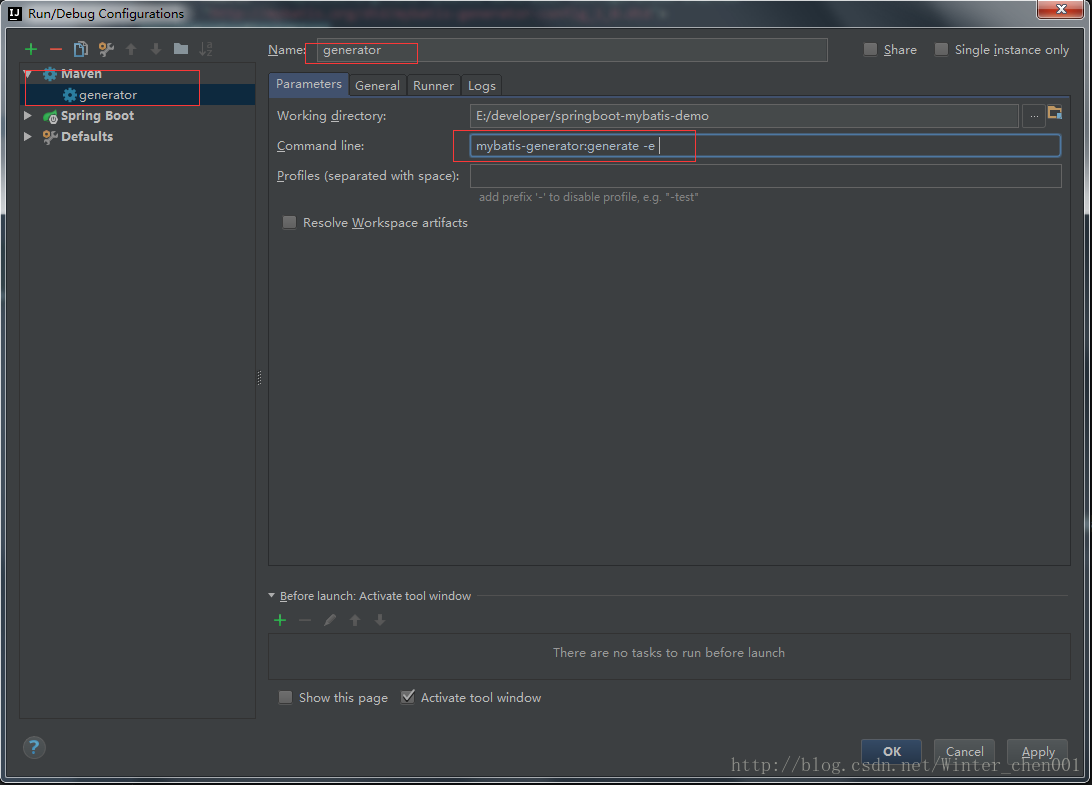
-
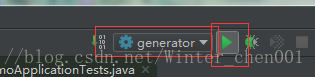
執行
最後生成的檔案以及結構:
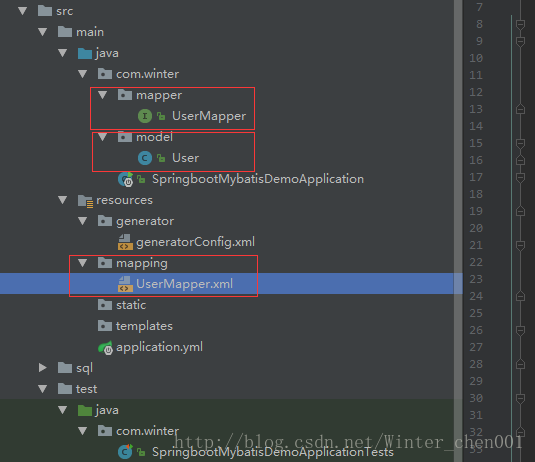
10. 生成的檔案
UserMapper.java
package com.winter.mapper;

import com.winter.model.User;

public interface UserMapper {
    int deleteByPrimaryKey(Integer userId);

    int insert(User record);

    int insertSelective(User record);

    User selectByPrimaryKey(Integer userId);

    int updateByPrimaryKeySelective(User record);

    int updateByPrimaryKey(User record);
    //這個方式我自己加的
    List<User> selectAllUser();
User.java
package com.winter.model;
public class User {
private Integer userId;
private String userName;
private String password;
private String phone;
public Integer getUserId() {
return userId;
}
public void setUserId(Integer userId) {
this.userId = userId;
}
public String getUserName() {
return userName;
}
public void setUserName(String userName) {
this.userName = userName == null ? null : userName.trim();
}
public String getPassword() {
return password;
}
public void setPassword(String password) {
this.password = password == null ? null : password.trim();
}
public String getPhone() {
return phone;
}
public void setPhone(String phone) {
this.phone = phone == null ? null : phone.trim();
}
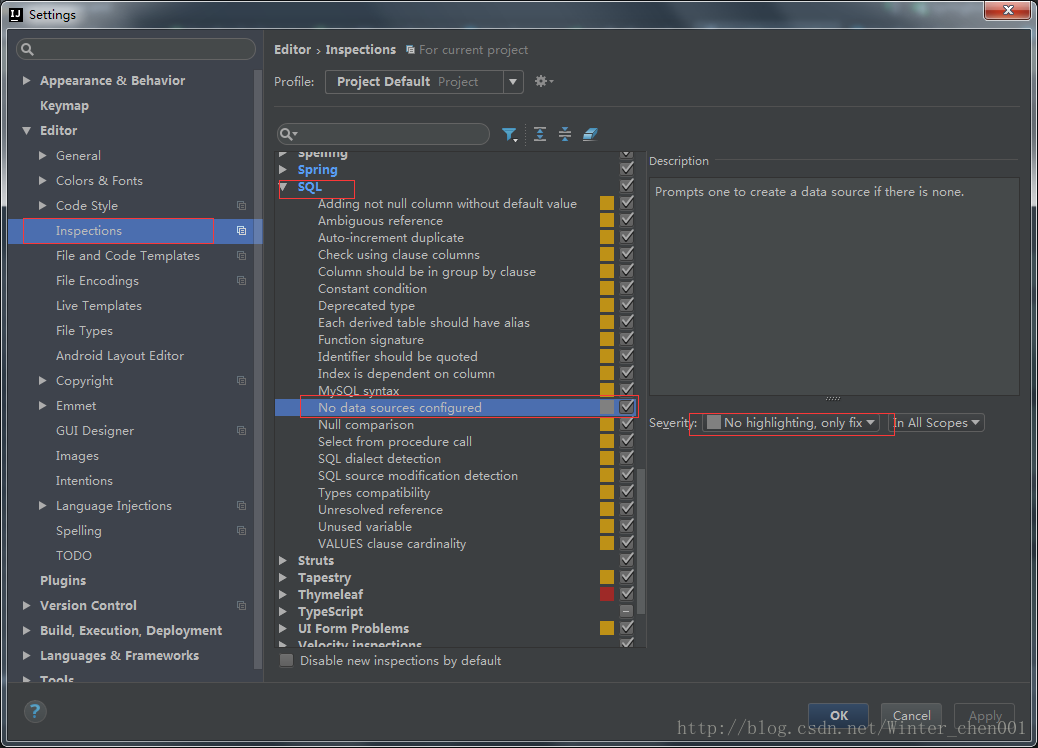
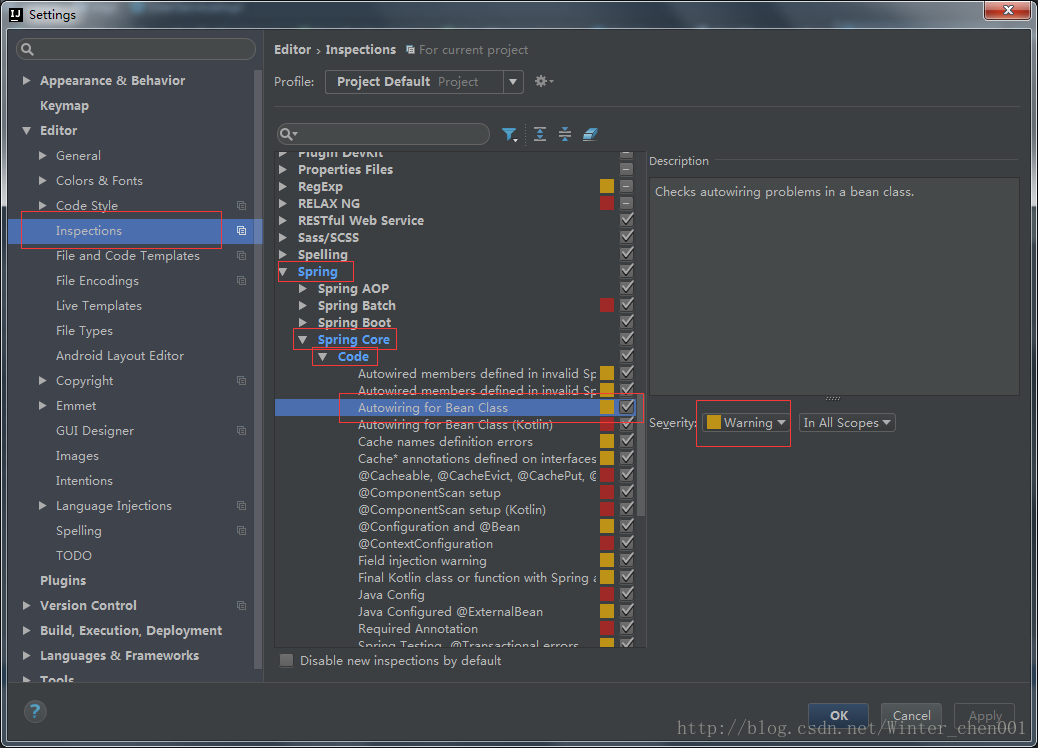
}對於sql語句這種黃色的背景,真心是看不下去了(解決方案):
UserMapper.xml
<?xml version="1.0" encoding="UTF-8" ?>
<!DOCTYPE mapper PUBLIC "-//mybatis.org//DTD Mapper 3.0//EN" "http://mybatis.org/dtd/mybatis-3-mapper.dtd" >
<mapper namespace="com.winter.mapper.UserMapper" >
  <resultMap id="BaseResultMap" type="com.winter.model.User" >
    <id column="user_id" property="userId" jdbcType="INTEGER" />
    <result column="user_name" property="userName" jdbcType="VARCHAR" />
    <result column="password" property="password" jdbcType="VARCHAR" />
    <result column="phone" property="phone" jdbcType="VARCHAR" />
  </resultMap>
  <sql id="Base_Column_List" >
    user_id, user_name, password, phone
  </sql>
  <select id="selectByPrimaryKey" resultMap="BaseResultMap" parameterType="java.lang.Integer" >
    select
    <include refid="Base_Column_List" />
    from t_user
    where user_id = #{userId,jdbcType=INTEGER}
  </select>
  <!-- 這個方法是我自己加的 -->
  <select id="selectAllUser" resultMap="BaseResultMap">
    select
    <include refid="Base_Column_List" />
    from t_user
  </select>
  <delete id="deleteByPrimaryKey" parameterType="java.lang.Integer" >
    delete from t_user
    where user_id = #{userId,jdbcType=INTEGER}
  </delete>
  <insert id="insert" parameterType="com.winter.model.User" >
    insert into t_user (user_id, user_name, password,
      phone)
    values (#{userId,jdbcType=INTEGER}, #{userName,jdbcType=VARCHAR}, #{password,jdbcType=VARCHAR},
      #{phone,jdbcType=VARCHAR})
  </insert>
  <insert id="insertSelective" parameterType="com.winter.model.User" >
    insert into t_user
    <trim prefix="(" suffix=")" suffixOverrides="," >
      <if test="userId != null" >
        user_id,
      </if>
      <if test="userName != null" >
        user_name,
      </if>
      <if test="password != null" >
        password,
      </if>
      <if test="phone != null" >
        phone,
      </if>
    </trim>
    <trim prefix="values (" suffix=")" suffixOverrides="," >
      <if test="userId != null" >
        #{userId,jdbcType=INTEGER},
      </if>
      <if test="userName != null" >
        #{userName,jdbcType=VARCHAR},
      </if>
      <if test="password != null" >
        #{password,jdbcType=VARCHAR},
      </if>
      <if test="phone != null" >
        #{phone,jdbcType=VARCHAR},
      </if>
    </trim>
  </insert>
  <update id="updateByPrimaryKeySelective" parameterType="com.winter.model.User" >
    update t_user
    <set >
      <if test="userName != null" >
        user_name = #{userName,jdbcType=VARCHAR},
      </if>
      <if test="password != null" >
        password = #{password,jdbcType=VARCHAR},
      </if>
      <if test="phone != null" >
        phone = #{phone,jdbcType=VARCHAR},
      </if>
    </set>
    where user_id = #{userId,jdbcType=INTEGER}
  </update>
  <update id="updateByPrimaryKey" parameterType="com.winter.model.User" >
    update t_user
    set user_name = #{userName,jdbcType=VARCHAR},
      password = #{password,jdbcType=VARCHAR},
      phone = #{phone,jdbcType=VARCHAR}
    where user_id = #{userId,jdbcType=INTEGER}
  </update>
</mapper>
11.開啟類SpringbootMybatisDemoApplication.java,這個是springboot的啟動類。我們需要新增點東西:
package com.winter;

import org.mybatis.spring.annotation.MapperScan;
import org.springframework.boot.SpringApplication;
import org.springframework.boot.autoconfigure.SpringBootApplication;

@SpringBootApplication
@MapperScan("com.winter.mapper")//將專案中對應的mapper類的路徑加進來就可以了
public class SpringbootMybatisDemoApplication {

    public static void main(String[] args) {
        SpringApplication.run(SpringbootMybatisDemoApplication.class, args);
    }
}
12.到這裡所有的搭建工作都完成了,接下來就是測試的工作,沒使用junit4進行測試:
首先看一下完成之後的檔案的結構:
現在controller,service層的程式碼都寫好:
UserController.java
package com.winter.Controller;

import com.winter.model.User;
import com.winter.service.UserService;
import org.springframework.beans.factory.annotation.Autowired;
import org.springframework.stereotype.Controller;
import org.springframework.web.bind.annotation.PathVariable;
import org.springframework.web.bind.annotation.RequestMapping;
import org.springframework.web.bind.annotation.ResponseBody;

/**
 * Created by Administrator on 2017/8/16.
 */
@Controller
@RequestMapping(value = "/user")
public class UserController {

    @Autowired
    private UserService userService;

    @ResponseBody
    @RequestMapping(value = "/add", produces = {"application/json;charset=UTF-8"})
    public int addUser(User user){
        return userService.addUser(user);
    }

    @ResponseBody
    @RequestMapping(value = "/all/{pageNum}/{pageSize}", produces = {"application/json;charset=UTF-8"})
    public Object findAllUser(@PathVariable("pageNum") int pageNum, @PathVariable("pageSize") int pageSize){

        return userService.findAllUser(pageNum,pageSize);
    }
}
UserService.java
package com.winter.service;

import com.winter.model.User;

import java.util.List;

/**
 * Created by Administrator on 2017/8/16.
 */
public interface UserService {

    int addUser(User user);

    List<User> findAllUser(int pageNum, int pageSize);
}
UserServiceImpl.java
package com.winter.service.impl;

import com.github.pagehelper.PageHelper;
import com.winter.mapper.UserMapper;
import com.winter.model.User;
import com.winter.service.UserService;
import org.springframework.beans.factory.annotation.Autowired;
import org.springframework.stereotype.Service;

import java.util.List;

/**
 * Created by Administrator on 2017/8/16.
 */
@Service(value = "userService")
public class UserServiceImpl implements UserService {

    @Autowired
    private UserMapper userMapper;//這裡會報錯,但是並不會影響

    @Override
    public int addUser(User user) {

        return userMapper.insertSelective(user);
    }

    /*
    * 這個方法中用到了我們開頭配置依賴的分頁外掛pagehelper
    * 很簡單,只需要在service層傳入引數,然後將引數傳遞給一個外掛的一個靜態方法即可;
    * pageNum 開始頁數
    * pageSize 每頁顯示的資料條數
    * */
    @Override
    public List<User> findAllUser(int pageNum, int pageSize) {
        //將引數傳給這個方法就可以實現物理分頁了,非常簡單。
        PageHelper.startPage(pageNum, pageSize);
        return userMapper.selectAllUser();
    }
}
如果強迫症看不下去那個報錯:(解決方法)
測試我使用了idea一個很用心的功能。
可以發http請求的外掛:
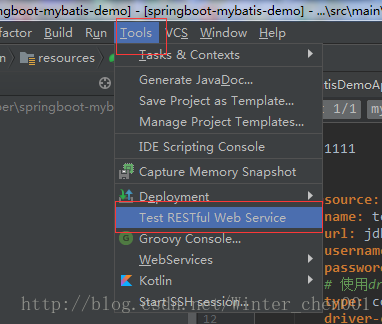
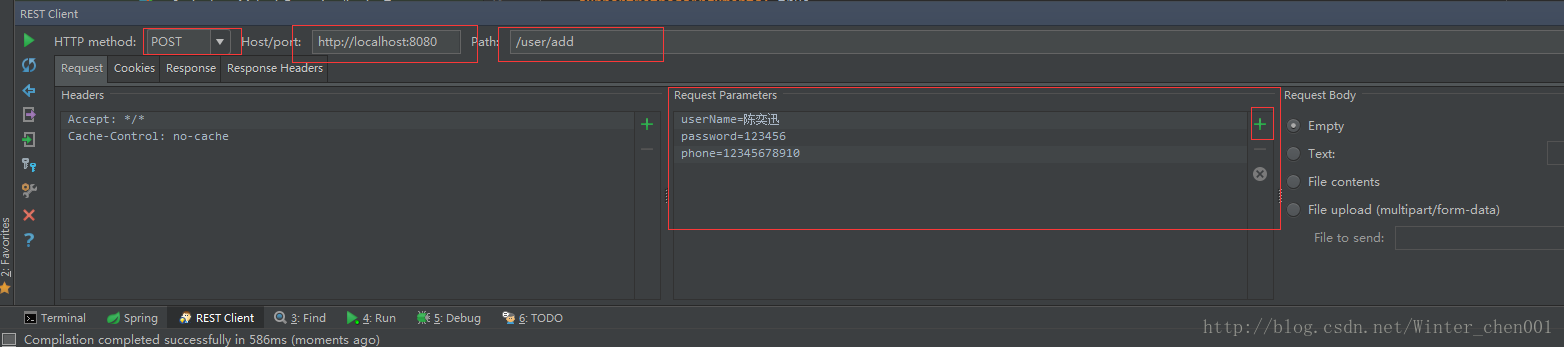
點選左側的執行按鈕就可以傳送請求了;
如果返回值正確 說明你已經搭建成功了!!
如果出現mapper注入不了的情況,請檢查版本,當前部落格的搭建方法只適合1.5.*版本的,如果你的版本是2.0以上的版本,請參照我的另一篇部落格的mybatis的配置:springboot2.0整合mybatis
相關推薦
Spring boot +Mybatis 實戰(完整版)
個人開源專案 更多幹貨 正題 本專案使用的環境: 開發工具:Intellij IDEA 2017.1.3 springboot: 1.5.6 jdk:1.8.0_161 maven:3.3.9 額外功能 PageHelper 分頁外掛 myb
Spring boot Mybatis 整合(完整版)
個人開源專案 springboot+mybatis+thymeleaf+docker構建的個人站點開源專案(集成了個人主頁、個人作品、個人部落格) 推薦開源專案 開源的springboot介面文件元件swagger2 更多幹貨 SpringBoot
1112_Spring boot Mybatis 整合(完整版)
Spring boot Mybatis 整合(完整版) 2017年08月16日 15:59:47 LuisChen的部落格 閱讀數:369023更多 所屬專欄: springboot 版權宣告:本文為博主原創文章,未經博主允許不得轉載。 https://blog.csdn.net/Win
Spring boot Mybatis 整合(註解版)
之前寫過一篇關於springboot 與 mybatis整合的博文,使用了一段時間spring-data-jpa,發現那種方式真的是太爽了,mybatis的xml的對映配置總覺得有點麻煩。介面定義和對映離散在不同的檔案中,閱讀起來不是很方便。於是,準備使用
輕輕鬆鬆學習SpringBoot2:第二十五篇: Spring Boot和Mongodb整合(完整版)
今天主要講的是Spring Boot和Mongodb整合我們先來回顧一下前面章節的相關內容前面我們講了SpringBoot和mysql整合,並且講了操作資料庫的幾種方式自動生成表資料庫操作操作篇回到正題,mongodb的安裝在這就不累述了,win版本的去官網下載,然後一直下一
最新大資料24期實戰專案 9天 附課件原始碼(完整版)
課程目錄: 第一天: 01.傳統廣告回顧 02.幾個問題思考 03.廣告的表現形式 04.名詞解釋 05.DSP原理圖 06.DSP業務流程 07.DMP專案背景 08.DMP業務流程----重要 09.日誌格式介紹 10.需求一日誌轉parquet檔案 第二天: 01.
spring boot 學習筆記(第二天)spring boot整合mybatis
1.spring boot整合mybatis 1.在pom檔案中新增mybatis依賴(如果在建立專案時已經勾選了mybatis選項,就不用新增mybatis-spring-boot-starter了) <dependency> <groupId>
史上最全Spring Boot面試題(含答案)看完就是Spring Boot專家!
一.Spring Boot、Spring MVC 和 Spring 有什麼區別? SpringFrame
Spring Boot 2.x(十一):AOP實戰--列印介面日誌
介面日誌有啥用 在我們日常的開發過程中,我們可以通過介面日誌去檢視這個介面的一些詳細資訊。比如客戶端的IP,客戶端的型別,響應
Spring Boot入門系列(十八)整合mybatis,使用註解的方式實現增刪改查
之前介紹了Spring Boot 整合mybatis 使用xml配置的方式實現增刪改查,還介紹了自定義mapper 實現複雜多表關聯查詢。雖然目前 mybatis 使用xml 配置的方式 已經極大減輕了配置的複雜度,支援 generator 外掛 根據表結構自動生成實體類、配置檔案和dao層程式碼,減輕很大一
Spring Boot入門系列(十七)整合Mybatis,建立自定義mapper 實現多表關聯查詢!
之前講了Springboot整合Mybatis,介紹瞭如何自動生成pojo實體類、mapper類和對應的mapper.xml 檔案,並實現最基本的增刪改查功能。mybatis 外掛自動生成的mapper 實現了大部分基本、通用的方法,如:insert、update、delete、select 等大概20個左右
Spring Boot入門系列(十九)整合mybatis,使用註解實現動態Sql、引數傳遞等常用操作!
前面介紹了Spring Boot 整合mybatis 使用註解的方式實現資料庫操作,介紹瞭如何自動生成註解版的mapper 和pojo類。 接下來介紹使用mybatis 常用註解以及如何傳引數等資料庫操作中的常用操作。 其實,mybatis 註解方式 和 XML配置方式兩者的使用基本上相同,只有在構建 SQL
字符串函數---atof()函數具體解釋及實現(完整版)
記錄 == include als 技術 整數 ast fill 跳過 atof()函數 atof():double atof(const char *str ); 功 能: 把字符串轉換成浮點數 str:要轉換的字符串。 返回值:每一個函數返回 double 值。此值
spring-boot-starter-actuator(健康監控)配置和使用
frame maven git 追蹤 包括 屬性 per dump zookeepe 在生產環境中,需要實時或定期監控服務的可用性。Spring Boot的actuator(健康監控)功能提供了很多監控所需的接口,可以對應用系統進行配置查看、相關功能統計等。 集成:
Java框架spring Boot學習筆記(十四):log4j介紹
inf alt 技術分享 images 使用 image 詳細 配置文件 -128 功能 日誌功能,通過log4j可以看到程序運行過程的詳細信息。 使用 導入log4j的jar包 復制log4j的配置文件,復制到src下面 3.設置日誌級別
史上最全設計模式導學目錄(完整版)
最全 content bsp 書籍 轉載 http 模式 ogr book 該文章是轉載大牛的分享。備忘學習。 http://blog.csdn.net/lovelion/article/details/17517213 GitHu上分享的一些資料 https://zh
ztree--插件實現增刪改查demo(完整版)
mes add treenode pan tno btn tin 異步 als ztree--插件實現增刪改查demo(完整版) var setting = { async: { enabl
spring boot系統學習(知識點筆記)
調試接口 .com tco map aid 結果 ota http 而且 一、http的註解配置 1、@SpringBootAplication=@SpringBootConfiguration(其實就是個@Configuration)+@EnableAutoConfi
【劍指offer】Java版代碼(完整版)
從尾到頭打印鏈表 .net 字符串 刪除 ron 代碼下載 逆序 鏈表 撲克 原文地址:https://blog.csdn.net/baiye_xing/article/details/78428561 一、引言 《劍指offer》可謂是程序猿面試的神書了,在面試中幫了我很
git 命令大全(完整版)
拉取 str 修改版本 xxx 用戶 command 克隆 單個 sage Git 常用命令詳解 Git 是一個很強大的分布式版本控制系統。它不但適用於管理大型開源軟件的源代碼,管理私人的文檔和源代碼也有很多優勢。 1.Git文件操作 $ git help [command