
QT學習筆記17Socket通訊
Qt中提供的所有的Socket類都是非阻塞的。
Qt中常用的用於socket通訊的套接字類:
-
QTcpServer
用於TCP/IP通訊, 作為伺服器端套接字使用
-
QTcpSocket
用於TCP/IP通訊,作為客戶端套接字使用。
-
QUdpSocket
用於UDP通訊,伺服器,客戶端均使用此套接字。
1 TCP/IP
傳統TCP通訊過程: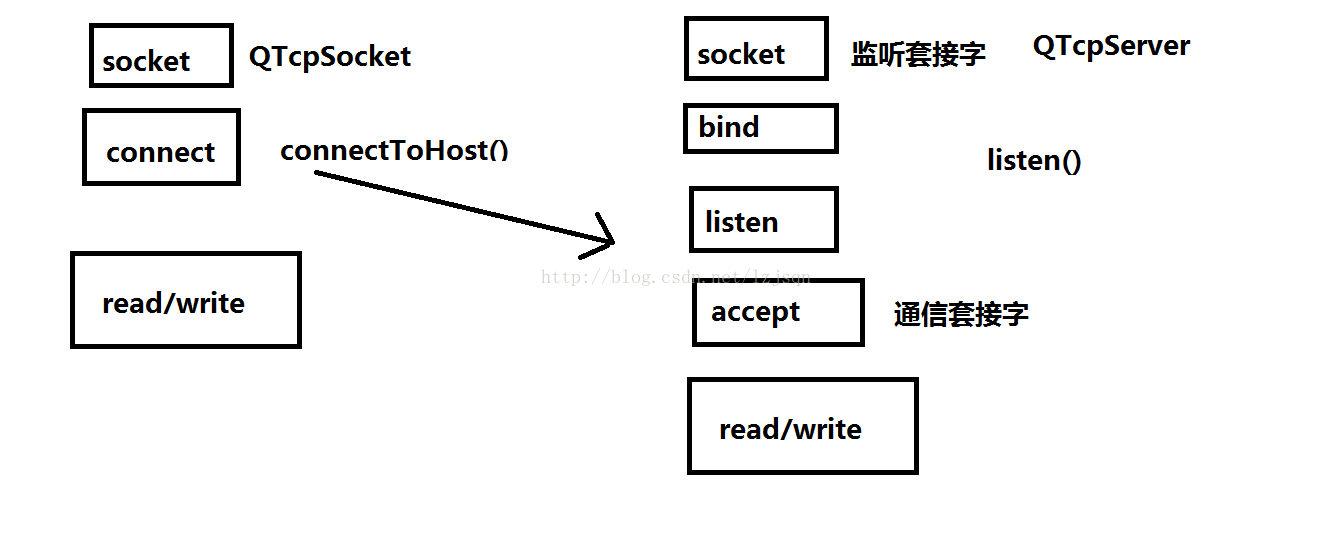
在Qt中實現TCP/IP伺服器端通訊的流程:
- 建立套接字
- 將套接字設定為監聽模式
-
等待並接受客戶端請求
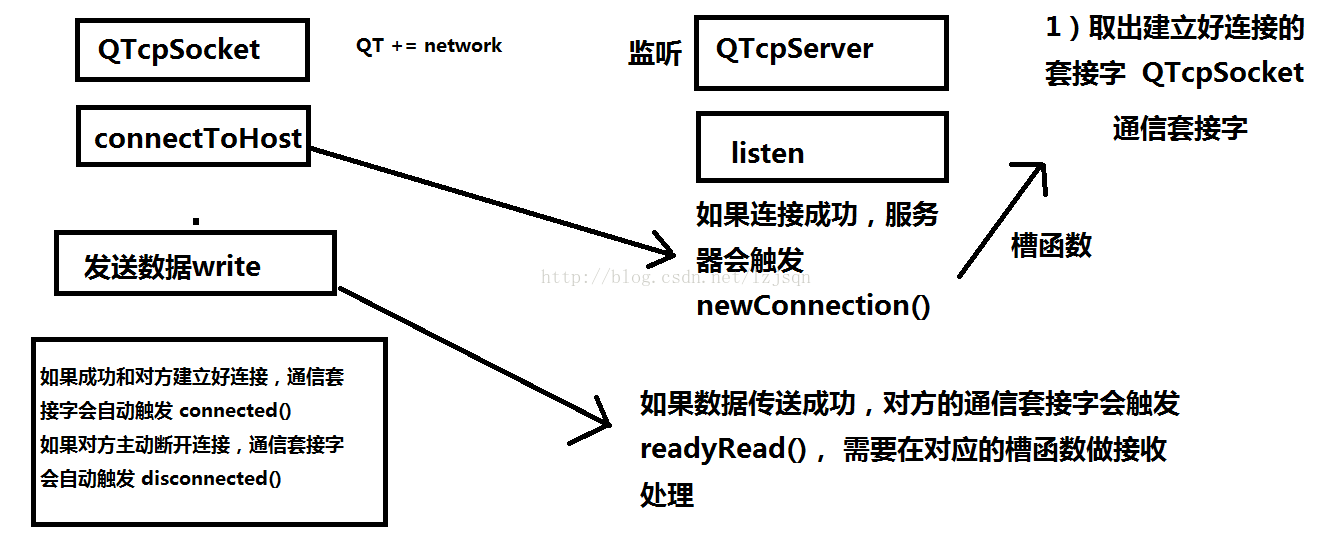
可以通過QTcpServer提供的void newConnection()訊號來檢測是否有連線請求,如果有可以在對應的槽函式中呼叫nextPendingConnection函式獲取到客戶端的Socket資訊(返回值為QTcpSocket*型別指標),通過此套接字與客戶端之間進行通訊。
-
接收或者向客戶端傳送資料
- 接收資料:使用read()或者readAll()函式
- 傳送資料:使用write()函式
客戶端通訊流程:
- 建立套接字
-
連線伺服器
可以使用QTcpSocket類的connectToHost()函式來連線伺服器。
- 向伺服器傳送或者接受資料
下面例子為簡單的TCP/IP通訊的實現:
伺服器端
通過Qt提供的QTcpServer類實現伺服器端的socket通訊:
//---------- tcpserver.h ------------
class TCPServer : public QMainWindow
{
Q_OBJECT
public:
explicit TCPServer(QWidget *parent = 0);
~TCPServer();
public slots:
void slotNewConnection();
void slotReadyRead();
private:
Ui::TCPServer *ui;
// 負責監聽的套接字
QTcpServer* m_server;
// 負責通訊的套接字
QTcpSocket* m_client;
};
//---------- tcpserver.cpp ------------
TCPServer::TCPServer(QWidget *parent) :
QMainWindow(parent),
ui(new Ui::TCPServer),
m_server(NULL),
m_client(NULL)
{
ui->setupUi(this);
//建立套接字物件
m_server = new QTcpServer(this);
//將套接字設定為監聽模式
m_server->listen(QHostAddress::Any, 9999);
//通過訊號接收客戶端請求
connect(m_server, &QTcpServer::newConnection,
this, &TCPServer::slotNewConnection);
}
TCPServer::~TCPServer()
{
delete ui;
}
void TCPServer::slotNewConnection()
{
if(m_client == NULL)
{
//處理客戶端的連線請求
m_client = m_server->nextPendingConnection();
//傳送資料
m_client->write("伺服器連線成功!!!");
//連線訊號, 接收客戶端資料
connect(m_client, &QTcpSocket::readyRead,
this, &TCPServer::slotReadyRead);
}
}
void TCPServer::slotReadyRead()
{
//接收資料
QByteArray array = m_client->readAll();
QMessageBox::information(this, "Client Message", array);
}
客戶端
客戶端通過使用Qt提供的QTcpSocket類可以方便的實現與伺服器端的通訊。
//------------- tcpclient.h ------------
class TCPClient : public QMainWindow
{
Q_OBJECT
public:
explicit TCPClient(QWidget *parent = 0);
~TCPClient();
public slots:
void slotReadyRead();
void slotSendMsg();
private:
Ui::TCPClient *ui;
QTcpSocket* m_client;
};
//------------- tcpclient.cpp --------------
TCPClient::TCPClient(QWidget *parent) :
QMainWindow(parent),
ui(new Ui::TCPClient)
{
ui->setupUi(this);
//建立套接字
m_client = new QTcpSocket(this);
//連線伺服器
m_client->connectToHost(QHostAddress("127.0.0.1"), 9999);
//通過訊號接收伺服器資料
connect(m_client, &QTcpSocket::readyRead,
this, &TCPClient::slotReadyRead);
//傳送按鈕
connect(ui->btnSend, &QPushButton::clicked,
this, &TCPClient::slotSendMsg);
}
TCPClient::~TCPClient()
{
delete ui;
}
void TCPClient::slotReadyRead()
{
//接收資料
QByteArray array = m_client->readAll();
QMessageBox::information(this, "Server Message", array);
}
void TCPClient::slotSendMsg()
{
QString text = ui->textEdit->toPlainText();
//傳送資料
m_client->write(text.toUtf8());
ui->textEdit->clear();
}
綜合示例:
客戶端: 標頭檔案#ifndef CLIENTWIDGET_H
#define CLIENTWIDGET_H
#include <QWidget>
#include <QTcpSocket> //通訊套接字
namespace Ui {
class ClientWidget;
}
class ClientWidget : public QWidget
{
Q_OBJECT
public:
explicit ClientWidget(QWidget *parent = 0);
~ClientWidget();
private slots:
void on_buttonConnect_clicked();
void on_buttonSend_clicked();
void on_buttonClose_clicked();
private:
Ui::ClientWidget *ui;
QTcpSocket *tcpSocket; //通訊套接字
};
#endif // CLIENTWIDGET_H
實現檔案
#include "clientwidget.h"
#include "ui_clientwidget.h"
#include <QHostAddress>

ClientWidget::ClientWidget(QWidget *parent) :
    QWidget(parent),
    ui(new Ui::ClientWidget)
{
    ui->setupUi(this);

    tcpSocket = NULL;

    //分配空間,指定父物件
    tcpSocket = new QTcpSocket(this);

    setWindowTitle("客戶端");


    connect(tcpSocket, &QTcpSocket::connected,
            [=]()
            {
                ui->textEditRead->setText("成功和伺服器建立好連線");
            }
            );

    connect(tcpSocket, &QTcpSocket::readyRead,
            [=]()
            {
                //獲取對方傳送的內容
                QByteArray array = tcpSocket->readAll();
                //追加到編輯區中
                ui->textEditRead->append(array);
            }

            );

}

ClientWidget::~ClientWidget()
{
    delete ui;
}

void ClientWidget::on_buttonConnect_clicked()
{
    //獲取伺服器ip和埠
    QString ip = ui->lineEditIP->text();
    qint16 port = ui->lineEditPort->text().toInt();

    //主動和伺服器建立連線
    tcpSocket->connectToHost(QHostAddress(ip), port);

}

void ClientWidget::on_buttonSend_clicked()
{
    //獲取編輯框內容
    QString str = ui->textEditWrite->toPlainText();
    //傳送資料
    tcpSocket->write( str.toUtf8().data() );

}

void ClientWidget::on_buttonClose_clicked()
{
    //主動和對方斷開連線
    tcpSocket->disconnectFromHost();
    tcpSocket->close();
}
伺服器: 標頭檔案
#ifndef SERVERWIDGET_H
#define SERVERWIDGET_H

#include <QWidget>
#include <QTcpServer> //監聽套接字
#include <QTcpSocket> //通訊套接字

namespace Ui {
class ServerWidget;
}

class ServerWidget : public QWidget
{
    Q_OBJECT

public:
    explicit ServerWidget(QWidget *parent = 0);
    ~ServerWidget();

private slots:
    void on_buttonSend_clicked();

    void on_buttonClose_clicked();

private:
    Ui::ServerWidget *ui;

    QTcpServer *tcpServer; //監聽套接字
    QTcpSocket *tcpSocket; //通訊套接字

};

#endif // SERVERWIDGET_H
實現檔案
#include "serverwidget.h"
#include "ui_serverwidget.h"

ServerWidget::ServerWidget(QWidget *parent) :
    QWidget(parent),
    ui(new Ui::ServerWidget)
{
    ui->setupUi(this);

    tcpServer = NULL;
    tcpSocket = NULL;

    //監聽套接字,指定父物件,讓其自動回收空間
    tcpServer = new QTcpServer(this);

    tcpServer->listen(QHostAddress::Any, 8888);

    setWindowTitle("伺服器: 8888");

    connect(tcpServer, &QTcpServer::newConnection,
            [=]()
            {
                //取出建立好連線的套接字
                tcpSocket = tcpServer->nextPendingConnection();

                //獲取對方的IP和埠
                QString ip = tcpSocket->peerAddress().toString();
                qint16 port = tcpSocket->peerPort();
                QString temp = QString("[%1:%2]:成功連線").arg(ip).arg(port);

                ui->textEditRead->setText(temp);

                connect(tcpSocket, &QTcpSocket::readyRead,
                        [=]()
                        {
                            //從通訊套接字中取出內容
                            QByteArray array = tcpSocket->readAll();
                            ui->textEditRead->append(array);
                        }

                        );


            }

            );

}

ServerWidget::~ServerWidget()
{
    delete ui;
}

void ServerWidget::on_buttonSend_clicked()
{
    if(NULL == tcpSocket)
    {
        return;
    }
    //獲取編輯區內容
    QString str = ui->textEditWrite->toPlainText();
    //給對方傳送資料, 使用套接字是tcpSocket
    tcpSocket->write( str.toUtf8().data() );

}

void ServerWidget::on_buttonClose_clicked()
{
    if(NULL == tcpSocket)
    {
        return;
    }

    //主動和客戶端埠連線
    tcpSocket->disconnectFromHost();
    tcpSocket->close();
    tcpSocket = NULL;
}
2 UDP
使用Qt提供的QUdpSocketQUdpSocket進行UDP通訊。在UDP方式下,客戶端並不與伺服器建立連線,它只負責呼叫傳送函式向伺服器傳送資料。類似的伺服器也不從客戶端接收連線,只負責呼叫接收函式,等待來自客戶端的資料的到達。
傳統UDP通訊過程:
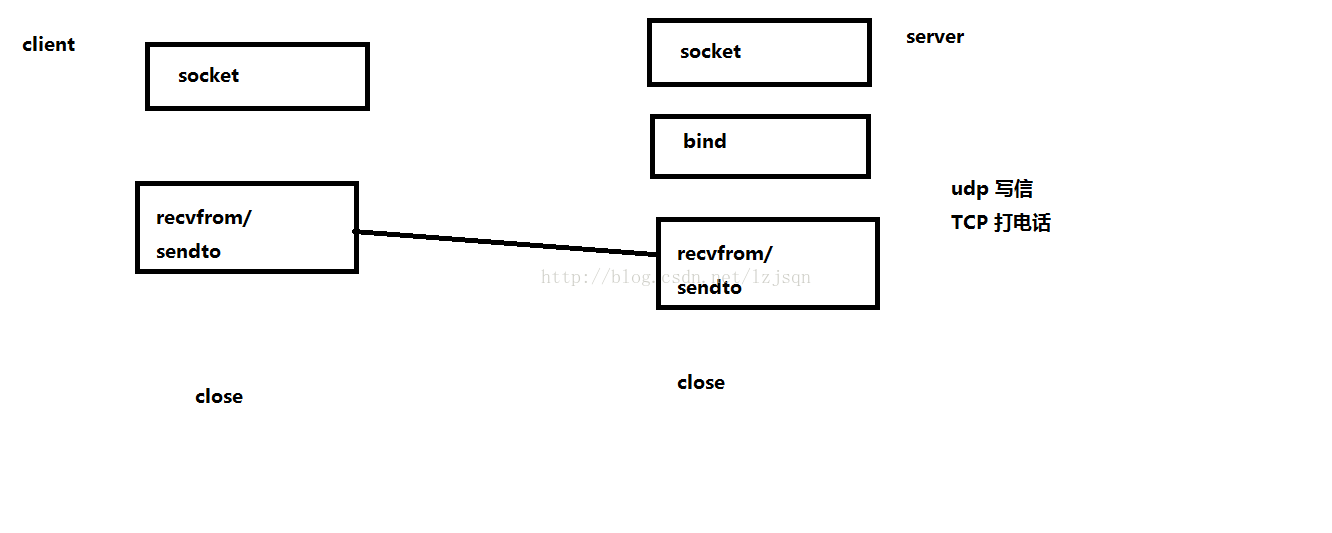
在UDP通訊中,伺服器端和客戶端的概念已經顯得有些淡化,兩部分做的工作都大致相同:
- 建立套接字
-
繫結套接字
在UDP中如果需要接收資料則需要對套接字進行繫結,只發送資料則不需要對套接字進行繫結。
通過呼叫bind()函式將套接字繫結到指定埠上。
-
接收或者傳送資料
-
接收資料:使用readDatagram()接收資料,函式宣告如下:
qint64 readDatagram(char * data, qint64 maxSize,
QHostAddress * address = 0, quint16 * port = 0)
-
接收資料:使用readDatagram()接收資料,函式宣告如下:
引數:
- data: 接收資料的快取地址
- maxSize: 快取接收的最大位元組數
- address: 資料傳送方的地址(一般使用提供的預設值)
- port: 資料傳送方的埠號(一般使用提供的預設值)
QT中的UDP通訊過程
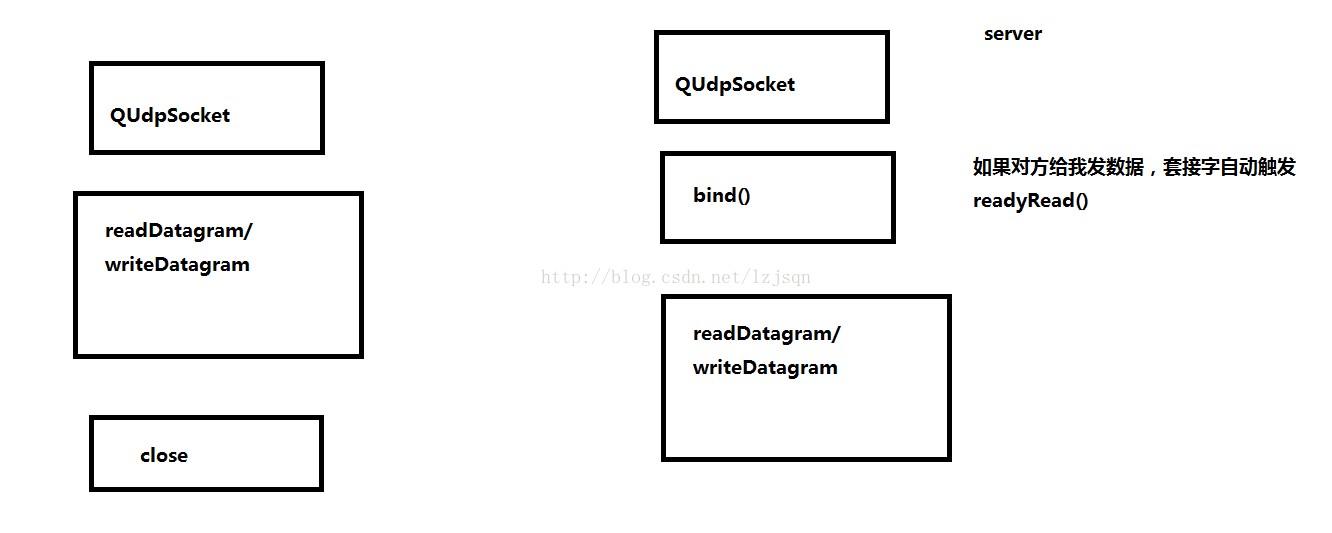
使用pendingDatagramSize()可以獲取到將要接收的資料的大小,根據該函式返回值來準備對應大小的記憶體空間存放將要接收的資料。
-
傳送資料: 使用writeDatagram()函式傳送資料,函式宣告如下:
qint64 writeDatagram(const QByteArray & datagram,
const QHostAddress & host, quint16 port)
引數:
- datagram:要傳送的字串
- host:資料接收方的地址
- port:資料接收方的埠號
標頭檔案
#ifndef WIDGET_H
#define WIDGET_H

#include <QWidget>
#include <QUdpSocket> //UDP套接字

namespace Ui {
class Widget;
}

class Widget : public QWidget
{
    Q_OBJECT

public:
    explicit Widget(QWidget *parent = 0);
    ~Widget();

    void dealMsg(); //槽函式,處理對方發過來的資料

private slots:
    void on_buttonSend_clicked();

private:
    Ui::Widget *ui;

    QUdpSocket *udpSocket; //UDP套接字
};

#endif // WIDGET_H
實現檔案
#include "widget.h"
#include "ui_widget.h"
#include <QHostAddress>

Widget::Widget(QWidget *parent) :
    QWidget(parent),
    ui(new Ui::Widget)
{
    ui->setupUi(this);

    //分配空間,指定父物件
    udpSocket = new QUdpSocket(this);

    //繫結
    //udpSocket->bind(8888);
    udpSocket->bind(QHostAddress::AnyIPv4, 8888);

    //加入某個組播
    //組播地址是D類地址
    udpSocket->joinMulticastGroup( QHostAddress("224.0.0.2") );
    //udpSocket->leaveMulticastGroup(); //退出組播

    setWindowTitle("伺服器埠為:8888");

    //當對方成功傳送資料過來
    //自動觸發 readyRead()
    connect(udpSocket, &QUdpSocket::readyRead, this, &Widget::dealMsg);
}

void Widget::dealMsg()
{
    //讀取對方傳送的內容
    char buf[1024] = {0};
    QHostAddress cliAddr; //對方地址
    quint16 port;    //對方埠
    qint64 len = udpSocket->readDatagram(buf, sizeof(buf), &cliAddr, &port);
    if(len > 0)
    {
        //格式化 [192.68.2.2:8888]aaaa
        QString str = QString("[%1:%2] %3")
                .arg(cliAddr.toString())
                .arg(port)
                .arg(buf);
        //給編輯區設定內容
        ui->textEdit->setText(str);
    }


}

Widget::~Widget()
{
    delete ui;
}

//傳送按鈕
void Widget::on_buttonSend_clicked()
{
    //先獲取對方的IP和埠
    QString ip = ui->lineEditIP->text();
    qint16 port = ui->lineEditPort->text().toInt();

    //獲取編輯區內容
    QString str = ui->textEdit->toPlainText();

    //給指定的IP傳送資料
    udpSocket->writeDatagram(str.toUtf8(), QHostAddress(ip), port);


}
定時器示例 標頭檔案
#ifndef WIDGET_H
#define WIDGET_H

#include <QWidget>
#include <QTimer> //定時器物件

namespace Ui {
class Widget;
}

class Widget : public QWidget
{
    Q_OBJECT

public:
    explicit Widget(QWidget *parent = 0);
    ~Widget();

private slots:
    void on_buttonStart_clicked();

    void on_buttonStop_clicked();

private:
    Ui::Widget *ui;

    QTimer *myTimer; //定時器物件
    int i;
};

#endif // WIDGET_H
實現檔案
#include "widget.h"
#include "ui_widget.h"

Widget::Widget(QWidget *parent) :
    QWidget(parent),
    ui(new Ui::Widget)
{
    ui->setupUi(this);

    myTimer = new QTimer(this);
    i = 0;

    connect(myTimer, &QTimer::timeout,
            [=]()
            {
                i++;
                ui->lcdNumber->display(i);
            }

            );


}

Widget::~Widget()
{
    delete ui;
}

void Widget::on_buttonStart_clicked()
{
    //啟動定時器
    //時間間隔為100ms
    //每隔100ms,定時器myTimer自動觸發timeout()
    //如果定時器沒有啟用,才啟動
    if(myTimer->isActive() == false)
    {
         myTimer->start(100);
    }

}

void Widget::on_buttonStop_clicked()
{
    if(true == myTimer->isActive())
    {
        myTimer->stop();
        i = 0;
    }
}
廣播
在使用QUdpSocket類的writeDatagram()函式傳送資料的時候,其中第二個引數host應該指定為廣播地址:QHostAddress::Broadcast此設定相當於QHostAddress("255.255.255.255")
使用UDP廣播的的特點:
- 使用UDP進行廣播,區域網內的其他的UDP使用者全部可以收到廣播的訊息
- UDP廣播只能在區域網範圍內使用
組播
我們再使用廣播發送訊息的時候會發送給所有使用者,但是有些使用者是不想接受訊息的,這時候我們就應該使用組播,接收方只有先註冊到組播地址中才能收到組播訊息,否則則接受不到訊息。另外組播是可以在Internet中使用的。
在使用QUdpSocket類的writeDatagram()函式傳送資料的時候,其中第二個引數host應該指定為組播地址,關於組播地址的分類:
- 224.0.0.0~224.0.0.255為預留的組播地址(永久組地址),地址224.0.0.0保留不做分配,其它地址供路由協議使用;
- 224.0.1.0~224.0.1.255是公用組播地址,可以用於Internet;
- 224.0.2.0~238.255.255.255為使用者可用的組播地址(臨時組地址),全網範圍內有效;
- 239.0.0.0~239.255.255.255為本地管理組播地址,僅在特定的本地範圍內有效。
註冊加入到組播地址需要使用QUdpSocket類的成員函式:
bool joinMulticastGroup(const QHostAddress & groupAddress)
3 TCP/IP 和 UDP的區別
|
TCP/IP |
UDP |
|
|
是否連線 |
面向連線 |
無連線 |
|
傳輸方式 |
基於流 |
基於資料報 |
|
傳輸可靠性 |
可靠 |
不可靠 |
|
傳輸效率 |
效率低 |
效率高 |
|
能否廣播 |
不能 |
能 |
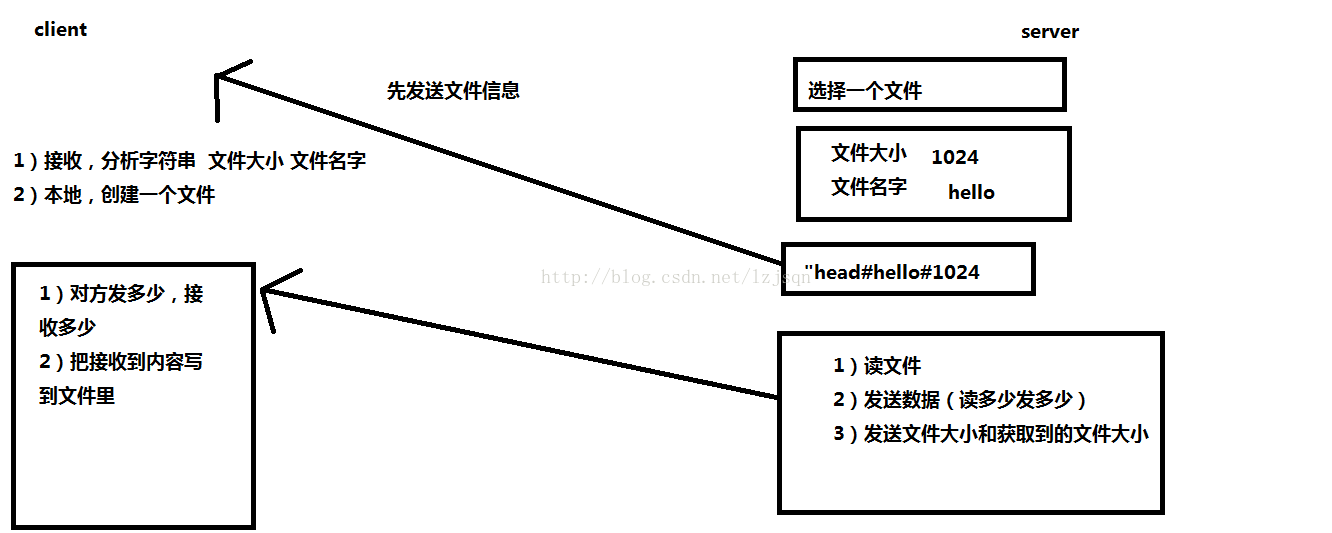
TCP傳送檔案
用一個應用程式進行測試(傳送接收都是同一個程式):
主體框架:
#include "serverwidget.h"
#include <QApplication>
#include "clientwidget.h"

int main(int argc, char *argv[])
{
    QApplication a(argc, argv);
    ServerWidget w;
    w.show();

    ClientWidget w2;
    w2.show();

    return a.exec();
}
客戶端
標頭檔案
#ifndef CLIENTWIDGET_H
#define CLIENTWIDGET_H

#include <QWidget>
#include <QTcpSocket>
#include <QFile>

namespace Ui {
class ClientWidget;
}

class ClientWidget : public QWidget
{
    Q_OBJECT

public:
    explicit ClientWidget(QWidget *parent = 0);
    ~ClientWidget();

private slots:
    void on_buttonConnect_clicked();

private:
    Ui::ClientWidget *ui;

    QTcpSocket *tcpSocket;

    QFile file; //檔案物件
    QString fileName; //檔名字
    qint64 fileSize; //檔案大小
    qint64 recvSize; //已經接收檔案的大小

    bool isStart;   //標誌位,是否為頭部資訊
};

#endif // CLIENTWIDGET_H
實現檔案
#include "clientwidget.h"
#include "ui_clientwidget.h"
#include <QDebug>
#include <QMessageBox>
#include <QHostAddress>

ClientWidget::ClientWidget(QWidget *parent) :
    QWidget(parent),
    ui(new Ui::ClientWidget)
{
    ui->setupUi(this);

    tcpSocket = new QTcpSocket(this);

    isStart = true;

    ui->progressBar->setValue(0); //當前值

    setWindowTitle("客戶端");

    connect(tcpSocket, &QTcpSocket::connected,
    [=]()
    {
        //提示連線成功
        ui->textEdit->clear();
        ui->textEdit->append("和伺服器連線成功,等待伺服器傳送檔案……");
    }
    );

    connect(tcpSocket, &QTcpSocket::readyRead,
    [=]()
    {
        //取出接收的內容
        QByteArray buf = tcpSocket->readAll();

        if(true == isStart)
        {//接收頭
            isStart = false;
            //解析頭部資訊 QString buf = "hello##1024"
            //                    QString str = "hello##1024#mike";
            //                            str.section("##", 0, 0)

            //初始化
            //檔名
            fileName = QString(buf).section("##", 0, 0);
            //檔案大小
            fileSize = QString(buf).section("##", 1, 1).toInt();
            recvSize = 0;   //已經接收檔案大小

            //開啟檔案
            //關聯檔名字
            file.setFileName(fileName);

            //只寫方式方式,開啟檔案
            bool isOk = file.open(QIODevice::WriteOnly);
            if(false == isOk)
            {
                qDebug() << "WriteOnly error 49";

                tcpSocket->disconnectFromHost(); //斷開連線
                tcpSocket->close(); //關閉套接字

                return; //如果開啟檔案失敗,中斷函式
            }

            //彈出對話方塊,顯示接收檔案的資訊
            QString str = QString("接收的檔案: [%1: %2kb]").arg(fileName).arg(fileSize/1024);
            //QMessageBox::information(this, "檔案資訊", str);
            ui->textEdit->append(str);
            ui->textEdit->append("正在接收檔案……");

            //設定進度條
            ui->progressBar->setMinimum(0); //最小值
            ui->progressBar->setMaximum(fileSize/1024); //最大值
            ui->progressBar->setValue(0); //當前值

        }
        else //檔案資訊
        {
            qint64 len = file.write(buf);
            if(len >0) //接收資料大於0
            {
                recvSize += len; //累計接收大小
                qDebug() << len;
            }

            //更新進度條
            ui->progressBar->setValue(recvSize/1024);

            if(recvSize == fileSize) //檔案接收完畢
            {

                //先給服務傳送(接收檔案完成的資訊)
                tcpSocket->write("file done");

                ui->textEdit->append("檔案接收完成");
                QMessageBox::information(this, "完成", "檔案接收完成");
                file.close(); //關閉檔案
                //斷開連線
                tcpSocket->disconnectFromHost();
                tcpSocket->close();

            }
        }

        }

    );


}

ClientWidget::~ClientWidget()
{
    delete ui;
}

void ClientWidget::on_buttonConnect_clicked()
{
    //獲取伺服器的ip和埠
    QString ip = ui->lineEditIP->text();
    quint16 port = ui->lineEditPort->text().toInt();

    //主動和伺服器連線
    tcpSocket->connectToHost(QHostAddress(ip), port);

    isStart = true;

    //設定進度條
    ui->progressBar->setValue(0);
}
伺服器
標頭檔案
#ifndef SERVERWIDGET_H
#define SERVERWIDGET_H

#include <QWidget>
#include <QTcpServer> //監聽套接字
#include <QTcpSocket> //通訊套接字
#include <QFile>
#include <QTimer>

namespace Ui {
class ServerWidget;
}

class ServerWidget : public QWidget
{
    Q_OBJECT

public:
    explicit ServerWidget(QWidget *parent = 0);
    ~ServerWidget();

    void sendData(); //傳送檔案資料

private slots:
    void on_buttonFile_clicked();

    void on_buttonSend_clicked();

private:
    Ui::ServerWidget *ui;

    QTcpServer *tcpServer; //監聽套接字
    QTcpSocket *tcpSocket; //通訊套接字

    QFile file; //檔案物件
    QString fileName; //檔名字
    qint64 fileSize; //檔案大小
    qint64 sendSize; //已經發送檔案的大小

    QTimer timer; //定時器


};

#endif // SERVERWIDGET_H
實現檔案
#include "serverwidget.h"
#include "ui_serverwidget.h"
#include <QFileDialog>
#include <QDebug>
#include <QFileInfo>

ServerWidget::ServerWidget(QWidget *parent) :
    QWidget(parent),
    ui(new Ui::ServerWidget)
{
    ui->setupUi(this);

    //監聽套接字
    tcpServer = new QTcpServer(this);

    //監聽
    tcpServer->listen(QHostAddress::Any, 8888);
    setWindowTitle("伺服器埠為:8888");

    //兩個按鈕都不能按
    ui->buttonFile->setEnabled(false);
    ui->buttonSend->setEnabled(false);

    //如果客戶端成功和伺服器連線
    //tcpServer會自動觸發 newConnection()
    connect(tcpServer, &QTcpServer::newConnection,
    [=]()
    {
        //取出建立好連線的套接字
        tcpSocket = tcpServer->nextPendingConnection();
        //獲取對方的ip和埠
        QString ip = tcpSocket->peerAddress().toString();
        quint16 port = tcpSocket->peerPort();

        QString str = QString("[%1:%2] 成功連線").arg(ip).arg(port);
        ui->textEdit->setText(str); //顯示到編輯區

        //成功連線後,才能按選擇檔案
        ui->buttonFile->setEnabled(true);

        connect(tcpSocket, &QTcpSocket::readyRead,
                [=]()
                {
                    //取客戶端的資訊
                    QByteArray buf = tcpSocket->readAll();
                    if(QString(buf) == "file done")
                    {//檔案接收完畢
                         ui->textEdit->append("檔案傳送完畢");
                         file.close();

                         //斷開客戶端埠
                         tcpSocket->disconnectFromHost();
                         tcpSocket->close();
                    }

                }

                );

    }
    );

    connect(&timer, &QTimer::timeout,
            [=]()
            {
                //關閉定時器
                timer.stop();

                //傳送檔案
                sendData();
            }

            );

}

ServerWidget::~ServerWidget()
{
    delete ui;
}

//選擇檔案的按鈕
void ServerWidget::on_buttonFile_clicked()
{
    QString filePath = QFileDialog::getOpenFileName(this, "open", "../");
    if(false == filePath.isEmpty()) //如果選擇檔案路徑有效
    {
        fileName.clear();
        fileSize = 0;

        //獲取檔案資訊
        QFileInfo info(filePath);
        fileName = info.fileName(); //獲取檔名字
        fileSize = info.size(); //獲取檔案大小

        sendSize = 0; //傳送檔案的大小

        //只讀方式開啟檔案
        //指定檔案的名字
        file.setFileName(filePath);

        //開啟檔案
        bool isOk = file.open(QIODevice::ReadOnly);
        if(false == isOk)
        {
            qDebug() << "只讀方式開啟檔案失敗 106";
        }

        //提示開啟檔案的路徑
        ui->textEdit->append(filePath);

        ui->buttonFile->setEnabled(false);
        ui->buttonSend->setEnabled(true);

    }
    else
    {
        qDebug() << "選擇檔案路徑出錯 118";
    }

}
//傳送檔案按鈕
void ServerWidget::on_buttonSend_clicked()
{
    ui->buttonSend->setEnabled(false);

    //先發送檔案頭資訊  檔名##檔案大小
    QString head = QString("%1##%2").arg(fileName).arg(fileSize);
    //傳送頭部資訊
    qint64 len = tcpSocket->write( head.toUtf8() );
    if(len > 0)//頭部資訊傳送成功
    {
        //傳送真正的檔案資訊
        //防止TCP黏包
        //需要通過定時器延時 20 ms
        timer.start(20);


    }
    else
    {
        qDebug() << "頭部資訊傳送失敗 142";
        file.close();
        ui->buttonFile->setEnabled(true);
        ui->buttonSend->setEnabled(false);
    }
}

void ServerWidget::sendData()
{
    ui->textEdit->append("正在傳送檔案……");
     qint64 len = 0;
     do
     {
        //每次傳送資料的大小
        char buf[4*1024] = {0};
        len = 0;

        //往檔案中讀資料
        len = file.read(buf, sizeof(buf));
        //傳送資料,讀多少,發多少
        len = tcpSocket->write(buf, len);

        //傳送的資料需要累積
        sendSize += len;

     }while(len > 0);


//     //是否傳送檔案完畢
//     if(sendSize == fileSize)
//     {
//         ui->textEdit->append("檔案傳送完畢");
//         file.close();

//         //把客戶端埠
//         tcpSocket->disconnectFromHost();
//         tcpSocket->close();
//     }


}
相關推薦
QT學習筆記17Socket通訊
Qt中提供的所有的Socket類都是非阻塞的。 Qt中常用的用於socket通訊的套接字類: QTcpServer 用於TCP/IP通訊, 作為伺服器端套接字使用 QTcpSocket 用於TCP/IP通訊,作為客戶端套接字使用。 QUdpSocket 用於UDP通訊
QT學習筆記——串列埠通訊
寫一個最簡單的串列埠助手。 QT5以後,編寫串列埠不需要藉助第三方庫了,可以說方便了不少。 先建立QT專案,在.pro檔案里加入下面這行程式碼,不然會沒有串列埠庫額昂你使用的 QT += serialport 然後在標頭檔案mainwindows.h中加入標頭檔案 #inc
QT學習筆記(3) 我的第一個程序
9.png har 中文 gets 有一個 setw 通過 坐標 關系 今天,學習搭建一個空項目,了解程序是如何運行的。 (1)新建一個空項目 1、在創建完空項目之後,項目中只有一個空的項目文件( .pro) 2、然後需要在項目文件(.pro)中添加:
QT學習筆記(5) 菜單欄、工具欄、窗口、對話框
let qlabel rman 運行 內存空間 介紹 edi left setw 本程序主要介紹了以下幾種常用控件的使用方法: (1)菜單欄、工具欄 (2)核心控件、狀態欄、浮動窗口 (3)模態窗口、非模態窗口 (4)標準對話框、文件對話框 代碼如下: mainwindow
QT學習筆記(14) 定時器類DTimer的使用
fin isa play htm number conn stat alt .cn 一、 在前面的學習筆記中,我們已經學習定時器事件http://www.cnblogs.com/blog-ccs/p/7445323.html 現在,我們學習QTimer定時器類,比較
QT學習筆記(13) QT下的UDP通信
組播 create pan int cor 通過 width widget window 一、UDP通信 UDP通信沒有明確的服務器端和客戶端之分 TCP通信像是打電話(必須要接通才能通信),UDP通信像是寫信(不管能不能收到都發送出去) 首先需要QUdpSOc
QT學習筆記(16) QT5的數據庫操作
libmysql gets pan detail ima () 數據庫服務 oca else 一、編譯驅動 參考博客:http://blog.csdn.net/xian0gang/article/details/49791351 因為從QT5以來,它就自帶數據庫驅動
Qt學習筆記:清除用QAxObject建立的Office程序
環境 系統:Windows10 64位 家庭中文版 Qt版本:5.6.0 msvc2013 32位 編譯器:Visual Studio 2013 專業版 目的 在Qt中,當程式非正常關閉時,用QAxObject建立的Office程序不會隨著程式的關閉而關閉,導致程序殘留。我們需要
Qt學習筆記:把QtQuick作為控制元件嵌入到QtWidgets
環境 系統:Windows10 64位 家庭中文版 Qt版本:5.6.0 msvc2013 64位 編譯器:Visual Studio 2013 專業版 目的 把用QML實現的介面嵌入到QtWidget,同時實現對QML屬性的設定。 步驟 1.把要實現的QML視窗設計
Qt學習筆記:QLabel同時顯示圖片和文字
環境 系統:Windows10 64位 家庭中文版 Qt版本:5.6.0 msvc2013 64位 編譯器:Visual Studio 2013 專業版 前言 QLabel是Qt自帶的一個顯示用控制元件,可以用來顯示圖片和文字。其使用也非常方便:用setPixmap(cons
Qt學習筆記3:Qt工程的目錄結構
經過前兩篇的學習,已經可以使用Qt空專案模板建立自己的工程了。通過本篇的學習,整理一下如果使用Qt工程的目錄結構,使專案更規範和容易管理。 當前的目錄結構 如圖所示,這是前篇中建立的工程,只有main.cpp和widget.cpp、widget.h三個檔案,直接放在了一個目錄下,
Qt學習筆記2:QMainWindow和QWidget的區別
在Qt工程建立時,Qt Widget Application模板下提供了不同的父類繼承。 這裡,主要分析一下QMainWindow和QWidget的區別。 建立工程 分別以QMainWindow和QWidget為基類建立工程,工程建立完成後,如下圖所示: Qt會自動建
Qt學習筆記(1) — 深入瞭解Hello World的建立過程
年初的時候就準備學習Qt了,因為工作原因被擱淺好久,現在開始學也不晚,以後每週更新2遍博文作為總結。 學過Windows開發的,會覺得Qt很親切,學起來不是很費勁(PS: 環境搭建比較簡單,本文不作說明),但是還得從Hello World開始一步步來。下面,筆者將用4種不同的方
QT學習筆記——QCharts的簡單應用
官方推出的QCharts以後,QT畫圖再也不用需要配置第三方的qcustomplot和qwt外掛了,QCharts功能比兩者都好,且易用安裝和使用。我用的是目前最新版的5.11.1這個版本(強烈推薦升級)。安裝的時候只需要勾選qtcharts就行
Qt學習筆記(四)——新增動作、資原始檔
一、新增動作 Qt 使用QAction類作為動作。顧名思義,這個類就是代表了視窗的一個“動作”,這個動作可能顯示在選單,作為一個選單項,當用戶點選該選單項,對使用者的點選做出響應;也可能在工具欄,作為一個工具欄按鈕,使用者點選這個按鈕就可以執行相應的操作。有一點值得注意:無
Qt學習筆記(五)——物件模型、佈局管理器
一、物件模型 Qt 使用 moc,為標準 C++ 增加了一些特性: 訊號槽機制,用於解決物件之間的通訊,可以認為是 Qt 最明顯的特性之一; 可查詢,並且可設計的物件屬性; 強大的事件機制以及事件過濾器; 基於上下文的字串翻譯機制(國際化),也就是 tr() 函式;
Qt學習筆記(八)——QLineEdit的用法總結
常用成員函式: 1.void setClearButtonEnabled(bool); //是否設定一個清空按鈕. 點選這個清空按鈕後,就會自動刪除行編輯框內的所有內容,類似於clear(). 2.void setEchoMode(QLineEdit::EchoM
Qt學習筆記——QTimer計時器的基本使用
QTimer <-- 計時器 重複觸發 : QTimer *timer = new QTimer(this); //this 為parent類, 表示當前視窗 connect(timer, SIGNAL(timeout()), this, SLOT())
Qt學習筆記——QMainWindow下建立選單欄與工具欄
選單欄與工具欄的建立 <------QMainWindow 需要QAction 選單欄選項快捷鍵設定,QAction物件->setShortcuts(QKeySequence); <--函式表示設定QAction這個物件的快捷鍵,QKeySequen
Qt學習筆記4——視窗和控制元件
1.1 視窗定義 視窗:當一個部件沒有嵌入到其他部件中,則把這個部件叫作視窗或者頂層視窗,頂層視窗是沒有父視窗的,一般的,這些視窗都會被列在工作列中。通常,一個視窗會包含有標題欄,視窗邊框等。如果一個視窗具有父類,則這個視窗被稱為是次級視窗,例如設定了父類的QDialog就