
UITextField(限制文字輸入,調整游標,內容,佔位文字顯示的位置,以及基本使用)
#import "ViewController.h"
#import "CustomTextfield.h"
@interfaceViewController ()<UITextFieldDelegate>
@end
@implementation ViewController
- (void)viewDidLoad {
[superviewDidLoad];
//文字框,可以顯示資料,可以與使用者互動,只能顯示一行資料
UITextField *textField = [[UITextFieldalloc]initWithFrame:CGRectMake
//設定邊框的樣式
textField.borderStyle =UITextBorderStyleRoundedRect;
//背景顏色
textField.backgroundColor = [UIColorcyanColor];
//知識點2:設定暗文輸入(密碼),表示輸入之後就會隱藏你輸入的數字。
textField.secureTextEntry =YES;
//知識點1:設定清除文字的按鈕 (輸入時,出現清除按鈕),即顯示在文字框的右側小圓圈叉叉。
textField.clearButtonMode =UITextFieldViewModeWhileEditing;
//知識點3:成為第一響應者(會自動彈出鍵盤),即進入介面,鍵盤自動彈出。成為第一響應者,其實就是開始編輯.會觸發UITextFieldTextDidBeginEditingNotification
[textField becomeFirstResponder];
//placeholder設定提示文字
textField.placeholder =@"請輸入內容";
//設定鍵盤樣式(純數字鍵盤)
// textField.keyboardType =UIKeyboardTypeNumberPad;
textField.keyboardType =UIKeyboardTypeDefault;
//設定鍵盤右側按鈕的樣式,將會覆蓋之前的return按鈕
textField.returnKeyType =UIReturnKeyGo;
textField.clearsOnInsertion=YES;//設定為YES。那麼再一次輸入內容的時候,會清楚之前的內容,顯示最新的內容。
//設定delegate為檢視控制器物件.通過代理方法實現一些需要處理的操作。
textField.delegate =self;
textField.tag =100;
[self.viewaddSubview:textField];
UIView *view=[[UIViewalloc]initWithFrame:CGRectMake(0,0,40,40)];
view.backgroundColor=[UIColorredColor];
//textField.inputView=view;//自定義輸入檢視之後,那麼就不會有鍵盤的顯示了。自定義什麼介面就顯示什麼樣的介面,可以自定義需要的鍵盤。
textField.inputAccessoryView=view;//建立附屬的view,檢視位於鍵盤之上,隨鍵盤的高度變化而變化
UILabel *label = [[UILabelalloc]initWithFrame:CGRectMake(10,90,300,30)];
label.backgroundColor = [UIColoryellowColor];
label.tag =101;
label.text=@"顯示內容";
[self.viewaddSubview:label];
CustomTextfield *customTextField=[[CustomTextfieldalloc]initWithFrame:CGRectMake(10,150,self.view.frame.size.width-80,44)];
customTextField.placeholder=@"自定義編輯區域";
customTextField.borderStyle=UITextBorderStyleRoundedRect;
customTextField.tag=1001;
customTextField.clearsOnBeginEditing=YES;//設定為YES當用點觸文字欄位時,欄位內容會被清除,再另外一次開始編輯的時候,之前的內容會自動清除。
customTextField.adjustsFontSizeToFitWidth =YES;//設定為YES時文字會自動縮小以適應文字視窗大小。預設是保持原來大小,而讓長文字滾動
[self.view addSubview:customTextField];
}
#pragma mark - UITextFieldDelegate
//當開始編輯文字時,(鍵盤彈出時),觸發此方法
- (void)textFieldDidBeginEditing:(UITextField *)textField{
NSLog(@"begin editing!");
}
//結束編輯時,(鍵盤收回時),觸發此方法。把UITextField中的文字內容給label。
- (void)textFieldDidEndEditing:(UITextField *)textField{
NSLog(@"end editing!");
UILabel *label = (UILabel *)[self.viewviewWithTag:101];
//text 屬性取到使用者輸入的內容
label.text = textField.text;
}
//點選鍵盤右側的按鈕時,觸發此方法
- (BOOL)textFieldShouldReturn:(UITextField *)textField{
//收鍵盤(取消第一響應者)
//[textField resignFirstResponder];
[textFieldendEditing:YES];//結束編輯,(取消第一響應者)
NSLog(@"右側按鈕被點選!");
returnYES;
}
//當用戶手指觸控到self.view時,會觸發此方法
- (void)touchesBegan:(NSSet *)touches withEvent:(UIEvent *)event{
//收鍵盤
UITextField *field = (UITextField *)[self.viewviewWithTag:100];
CustomTextfield *textField=(CustomTextfield *)[self.viewviewWithTag:1001];
[textField resignFirstResponder];
[field resignFirstResponder];
}
- (BOOL)textField:(UITextField*)textField shouldChangeCharactersInRange:(NSRange)range replacementString:(NSString *)string{
//當用戶使用自動更正功能,把輸入的文字修改為推薦的文字時,就會呼叫這個方法。
//這對於想要加入撤銷選項的應用程式特別有用
//可以跟蹤欄位內所做的最後一次修改,也可以對所有編輯做日誌記錄,用作審計用途。
//要防止文字被改變可以返回NO
//這個方法的引數中有一個NSRange物件,指明瞭被改變文字的位置,建議修改的文字也在其中
returnYES;
}
- (BOOL)textFieldShouldClear:(UITextField *)textField{
//返回一個BOOL值指明是否允許根據使用者請求清除內容
//可以設定在特定條件下才允許清除內容
returnYES;
}
/*
通知
UITextField派生自UIControl,所以UIControl類中的通知系統在文字欄位中也可以使用。除了UIControl類的標準事件,你還可以使用下列UITextField類特有的事件
UITextFieldTextDidBeginEditingNotification
UITextFieldTextDidChangeNotification
UITextFieldTextDidEndEditingNotification
當文字欄位退出編輯模式時觸發。通知的object屬性儲存了最終文字。因為文字欄位要使用鍵盤輸入文字,所以下面這些事件發生時,也會發送動作通知
UIKeyboardWillShowNotification 鍵盤顯示之前傳送
UIKeyboardDidShowNotification 鍵盤顯示之後傳送
UIKeyboardWillHideNotification 鍵盤隱藏之前傳送
UIKeyboardDidHideNotification 鍵盤隱藏之後傳送
*/
@end
#import <UIKit/UIKit.h>
@interface CustomTextfield :UITextField
@end
#import "CustomTextfield.h"
@implementation CustomTextfield
// 重寫繪製行為
// 除了UITextField物件的風格選項,你還可以定製化UITextField物件,為他新增許多不同的重寫方法,來改變文字欄位的顯示行為。這些方法都會返回一個CGRect結構,制定了文字欄位每個部件的邊界範圍。如果你創見了一個自定義的UITextField類,你可以重寫這些方法,這樣就可以改變一個或多個邊界。一定不要直接呼叫 fan廣發;它們都是被iPhone執行庫呼叫的回撥函式下面舉個例子:
/*
// drawing and positioning overrides
- (CGRect)borderRectForBounds:(CGRect)bounds; 指定矩形邊界
- (CGRect)textRectForBounds:(CGRect)bounds; 指定顯示文字的邊界
- (CGRect)placeholderRectForBounds:(CGRect)bounds; 指定站位文字的邊界
- (CGRect)editingRectForBounds:(CGRect)bounds; 指定編輯中文字的邊界
- (CGRect)clearButtonRectForBounds:(CGRect)bounds; 指定顯示清除按鈕的邊界
- (CGRect)leftViewRectForBounds:(CGRect)bounds; 指定顯示左附著檢視的邊界
- (CGRect)rightViewRectForBounds:(CGRect)bounds; 指定顯示右附著檢視的邊界
*/
//設定預設文字的顯示區域
-(CGRect)placeholderRectForBounds:(CGRect)bounds{
returnCGRectMake(20,0,bounds.size.width ,bounds.size.height);
}
//設定文字顯示的區域
-(CGRect)textRectForBounds:(CGRect)bounds{
returnCGRectMake(20,0,bounds.size.width ,bounds.size.height);
}
//編輯區域,即游標的位置
-(CGRect)editingRectForBounds:(CGRect)bounds{
returnCGRectMake(20,0,bounds.size.width ,bounds.size.height);
}
@end
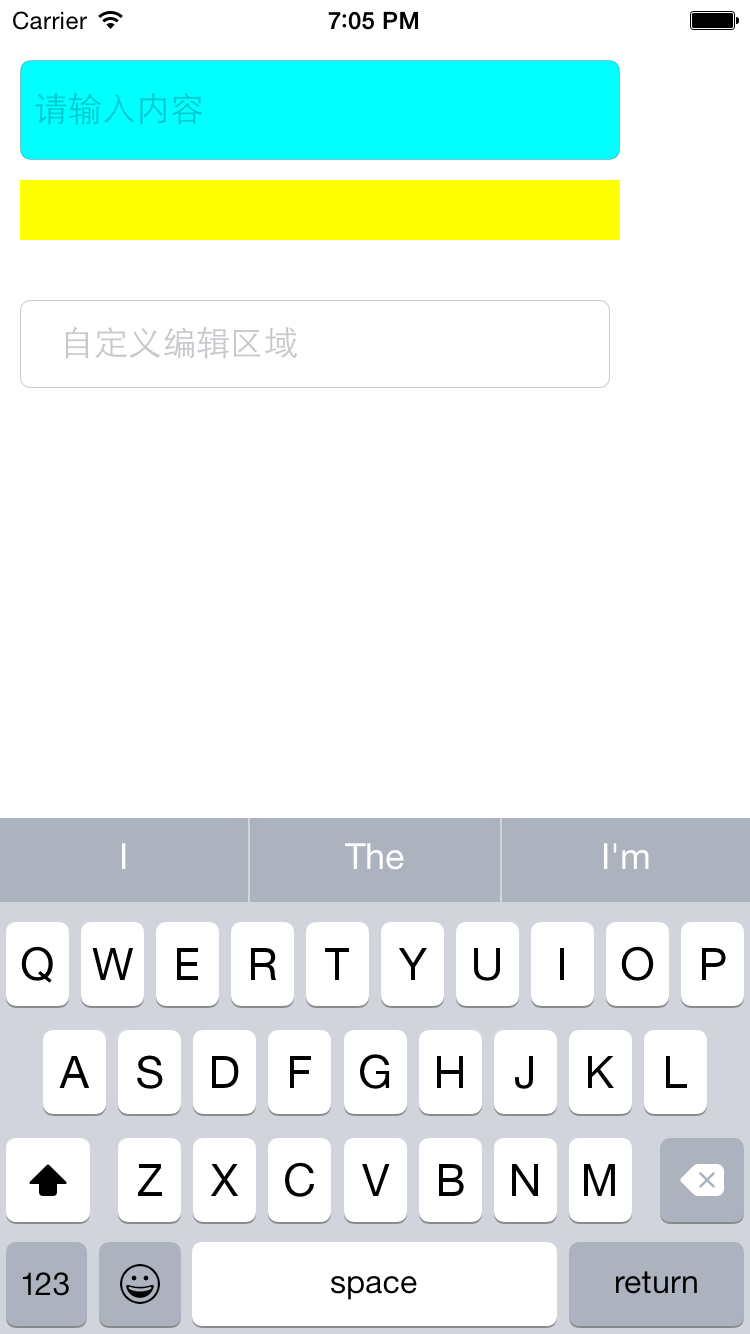
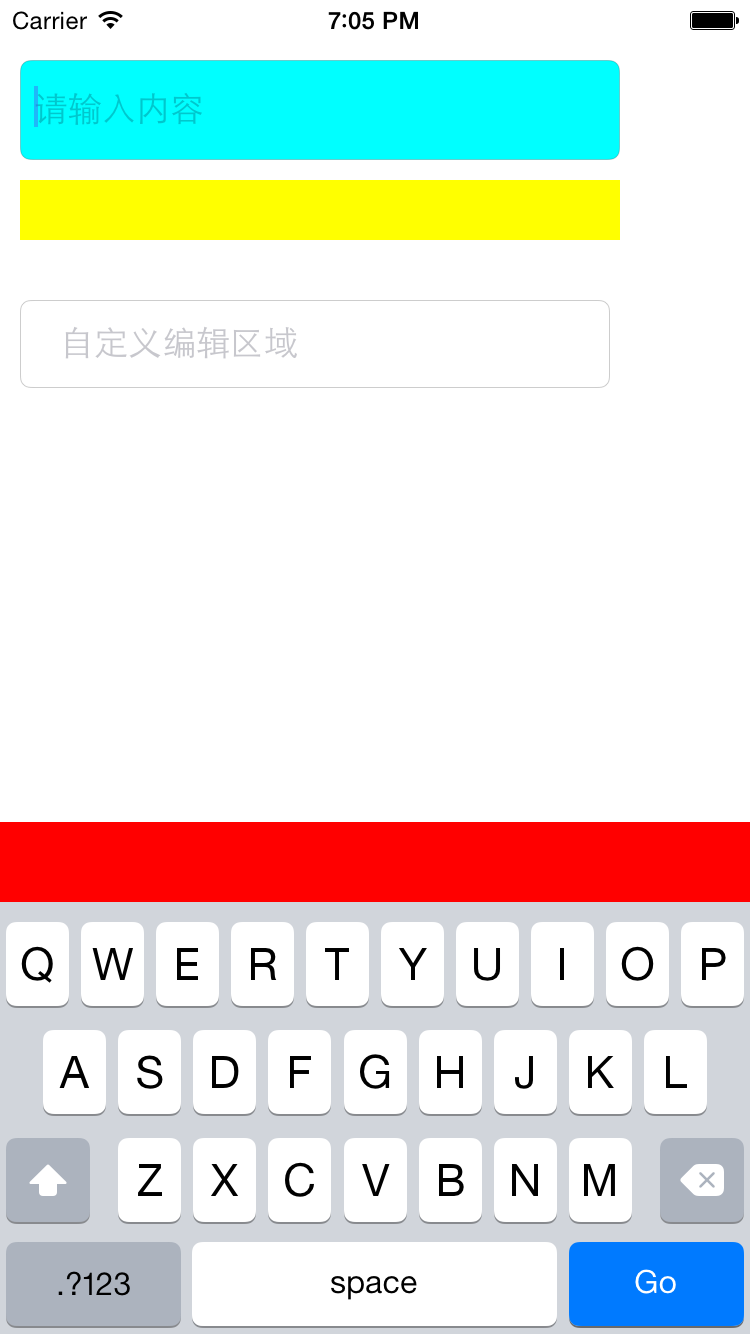
基本檢視 帶附屬檢視的UITextField
二:UITextField單行文字內容限制文字輸入
實現程式碼如下:
@interface ZYJEditNickNameViewController ()<UITextFieldDelegate>{
UIButton *saveButton;
BOOL isMeetWords;
UIActivityIndicatorView *indicatorView;
UITextField *textFiled;
}
@end
@implementation ZYJEditNickNameViewController
- (void)viewDidLoad {
[super viewDidLoad];
[email protected]"編輯暱稱";
self.view.backgroundColor=[UIColor system235GrayColor];
isMeetWords=YES;
textFiled=[[UITextField alloc]initWithFrame:CGRectMake(10, 20,self.view.frame.size.width-20,45)];
textFiled.delegate=self;
textFiled.font = [UIFont systemFontOfSize:14.f];
textFiled.returnKeyType=UIReturnKeyDefault;
textFiled.clearButtonMode=UITextFieldViewModeWhileEditing;
[textFiled becomeFirstResponder];
textFiled.layer.borderWidth=0.5;
textFiled.layer.borderColor=[UIColor system178GrayColor].CGColor;
[self.view addSubview:textFiled];
//UITextField註冊觀察者.實時監聽textfield內容的變化,並作出相應的改變.
[[NSNotificationCenter defaultCenter]addObserver:self selector:@selector(textFiledDidChange) name:UITextFieldTextDidChangeNotification object:nil];
saveButton=[UIButton buttonWithType:UIButtonTypeCustom]; saveButton.frame=CGRectMake(CGRectGetMinX(textFiled.frame),CGRectGetMaxY(textFiled.frame)+15,CGRectGetWidth(textFiled.frame),
CGRectGetHeight(textFiled.frame));
saveButton.backgroundColor=[UIColor systemZuiyoujiRedColor];
[saveButton setTitle:@"儲存" forState:UIControlStateNormal];
[saveButton setTintColor:[UIColor whiteColor]];
[saveButton handleControlEvent:UIControlEventTouchUpInside withBlock:^{
[textFiled resignFirstResponder];
}];
[self.view addSubview:saveButton];
// Do any additional setup after loading the view.
}
#pragma -----UITextViewDelegate-----------
-(BOOL)textField:(UITextField *)textField shouldChangeCharactersInRange:(NSRange)range replacementString:(NSString *)string{
if ([string isEqualToString:@"\n"])
{
NSLog(@"%@",string);
[textField resignFirstResponder];
return NO;
}
NSString *new = [textField.text stringByReplacingCharactersInRange:range withString:string];
NSInteger res = 10-[new length];
if(res >=0){
return YES;//可以替換文字.及就文字內容被新文字替換
}
else{
if (isMeetWords==YES) {//第一次進行提醒
alert(@"親: 使用者暱稱請填寫在10個字以內哦!謝謝!");
isMeetWords=NO;
}
if ( [new length]>=10) {//如果超過10就取前面10個欄位
textFiled.text = [new substringToIndex:10];
}
return NO;//不能夠進行替換文字
}
return YES;
}
-(void)textFiledDidChange{
if (textFiled.text.length>0) {//有文字儲存按鈕顯示紅色
saveButton.enabled=YES;
saveButton.backgroundColor=[UIColor systemZuiyoujiRedColor];
}else{
saveButton.enabled=NO;//無文字儲存按鈕顯示灰色不可點選
saveButton.backgroundColor=[UIColor system178GrayColor];
}
}
-(void)touchesBegan:(NSSet *)touches withEvent:(UIEvent *)event{
[textFiled resignFirstResponder];
}
注:如果是多行文字輸入限制文字數量,那麼使用UITextView,只要去掉監聽者,在原有的基礎上把UITextField變為UITextView再實現一個代理方法即可.
- (void)textViewDidChange:(UITextView *)textView
{
if (textView.text.length>0) {
saveButton.enabled=YES;
saveButton.backgroundColor=[UIColor systemZuiyoujiRedColor];
}else{
saveButton.enabled=NO;
saveButton.backgroundColor=[UIColor system178GrayColor];
}
}
部分效果圖:


圖一:有文字時候的效果 圖二:無文字時候的效果
改變游標顏色
textField.tintColor = UIColor.red設定預設文字屬性(字型、顏色)
let attributes: [NSAttributedStringKey : Any] = [NSAttributedStringKey.foregroundColor: UIColor.black,
NSAttributedStringKey.font: UIFont(name: "Menlo", size: 17.0) ?? UIFont.systemFont(ofSize: 17.0) ]

        textField.attributedPlaceholder = NSAttributedString(string: "Placeholder Text", attributes: attributes)
相關推薦
UITextField(限制文字輸入,調整游標,內容,佔位文字顯示的位置,以及基本使用)
#import "ViewController.h" #import "CustomTextfield.h" @interfaceViewController ()<UITextFie
關於文字輸入框獲取游標位置以及指定位置插入內容
<!DOCTYPE html> <html lang="en"> <head> <meta charset="UTF-8"> <title></title> <script
CCombobox控制元件修改編輯框游標顯示位置,呈現:上下垂直狀態
使用MFC中系統CCombobox控制元件中CBN_DROPDWON風格時,edit編輯控制元件的高度的游標一直處於左上角位置。 效果如下圖所示: 其實,想要實現游標處於垂直狀態,如下圖所示: 這種效果看著就比較順眼了。 在此,有人想要問,怎麼改變編輯框的高度呢?
百度之星程式設計大賽的資格賽 1001調查問卷(用二進位制位運算,暴力列舉想要的那幾個位置上的數)
Problem Description 度度熊為了完成畢業論文,需要收集一些資料來支撐他的論據,於是設計了一份包含 mm 個問題的調查問卷,每個問題只有 'A' 和 'B' 兩種選項。 將問卷散發出去之後,度度熊收到了 nn 份互不相同的問卷,在整理結果的時候,他發現可以
彙編基礎練習題18:編寫輸出子程式,把AX中的數以二進位制形式顯示輸出,並在主程式中驗證。(需要使用迴圈移位指令,邏輯與指令。)
彙編基礎練習題18: 編寫輸出子程式,把AX中的數以二進位制形式顯示輸出,並在主程式中驗證。(需要使用迴圈移位指令,邏輯與指令。) 編譯工具:Masm for Windows 整合實驗環境2012.5 (附帶一個工具下載地址https://download.csdn.net/down
Toast 更改Toast顯示位置,顯示帶有圖片的吐司,自定義吐司
更改Toast的顯示位置: toast.setGravity(Gravity.CENTER,0,0); //接受返回物件後的設定 顯示帶有圖片的Toast Toast toast = Toast.makeText(this, "吐司", Toast.LEN
彙編基礎練習題2:編寫輸出子程式,功能是將AX中的數顯示輸出,並在主程式中驗證。
彙編基礎練習題2: 編寫輸出子程式,功能是將AX中的數顯示輸出,並在主程式中驗證。 編譯工具:Masm for Windows 整合實驗環境2012.5 (附帶一個工具下載地址https://download.csdn.net/download/qq_36931762/1082577
兩個字串A,B,求B在A中首次出現的位置,如果B不在A中返回-1.
package paixu; import java.util.*; /** * Created by Administrator on 2017/9/17. */ public class PIpei { public static void main(Str
python學習之網站的編寫(HTML,CSS,JS)(八)----------label標籤,點選label標籤的文字將編輯的游標移過來
如果不加label的話,只設置值的話,點選文字是不能將編輯的游標移過來的,必須將id連線上之後,才可以實現,點選文字就可以將編輯的游標移過來。 實現結果: 程式碼: <!DOCTYPE html> <html lang="en"> <hea
限制input輸入字元數(中文2個字元,英文1個字元)
input的maxlength可以限制input的輸入的字元數,但是是字串的長度,相當於判斷str.length;然而經常會有中文字元算2個字元英文算1個字元的需求,目前只能通過編寫程式碼來實現。 <input class="remark-modify" maxlength="32" type=
Android學習筆記 —— Android 開發中,限制 EditText 輸入框不能輸入中文(漢字)
今天在練習開發一個小專案的時候,需要限制 EditText 輸入框不能輸入中文(漢字),在網上找了很多例子, 結合自己的實際,終於完成了這一功能。現在把程式碼記錄下來,方便以後查詢! 首先是xml佈
input框限制只能輸入正整數,邏輯與和或運算 有時需要限制文字框輸入內容的型別,本節分享下正則表示式限制文字框只能輸入數字、小數點、英文字母、漢字等程式碼。 例如,輸入大於0的正整數 程式碼
有時需要限制文字框輸入內容的型別,本節分享下正則表示式限制文字框只能輸入數字、小數點、英文字母、漢字等程式碼。 例如,輸入大於0的正整數 程式碼如下: <input onkeyup="if(this.value.length==1){this.value=this.value.replace(/[^
文字輸入框(UITextField)的用法
1,文字框的建立,有如下幾個樣式: UITextBorderStyle.None:無邊框 UITextBorderStyle.Line:直線邊框 UITextBorderStyle.RoundedRect:圓角矩形邊框 UITextBorderSt
關於在使用easyui的時候,實現游標定位在easyui-combogrid和easyui-textbox輸入框內(也就是獲取焦點)
方法很簡單,下面就直接貼程式碼和顯示的效果圖,這也是我畢業之後第一份工作,在公司做專案的時候要實現的效果,在百度上找了很多辦法但是都是雜七雜八的,可能我沒有描述對問題,至於這樣做的原理我就不清楚了,我也是才開始研究easyui沒多久!程式碼: jsp頁面的輸入
(用指標方法處理)有n個整數,使前面各數順序向後移m個位置,最後m個數變成最前面m個數。編寫一個函式實現上述功能,在主函式中輸入n個整數,並輸出調整後的n個數
第一種方法:指標法 #include<stdio.h> #include<stdlib.h> int w(int *d,int e,int g) { int i,j,t; int *r; j=0; for(i=
iOS 鍵盤處理(改變鍵盤為完成鍵),UITextField鍵盤顯示隱藏,彈出,回彈
框架 設置代理 res bool sea boa rst frame 技術分享 很多時候用到UITextField時,處理鍵盤是一個很棘手的問題。 問題一:如何隱藏鍵盤? 方案1.改變鍵盤右下角的換行(enter)鍵為完成鍵,後實現代理方法鍵盤自動回彈 keyBoard
c程序設計 8.15寫幾個函數:①輸個職工的姓名和職工號;②按職工號由小到大順序排序,姓名順序也隨之調整;③要求輸入一個職工號,用折半法找出該職工的姓名,從主函數輸入要查找的職工號,輸出該職工
xmx ebr ckey ros lbp loj ase vfk cu2 8.15寫幾個函數:①輸個職工的姓名和職工號;②按職工號由小到大順序排序,姓名順序也隨之調整;③要求輸入一個職工號,用折半法找出該職工的姓名, 從主函數輸入要查找的職工號,輸出該職工。 寫的時候為
css限制顯示字數,文字長度超出部分用省略號表示【轉】
class over nbsp text pac ips csdn div width 為了保證頁面的整潔美觀,在很多的時候,我們常需要隱藏超出長度的文字。這在列表條目,題目,名稱等地方常用到。 (1).文字超出一行,省略超出部分,顯示‘...‘ 如果這種情況比較多,可以取
input輸入框限制輸入正整數、小數、字母、文字
需要 isn text 英文 false 運算 運算符號 ice return 有的時候需要限制input的輸入格式: 例如,輸入大於0的正整數 <input onkeyup="if(this.value.length==1){this.value=this.val
黑馬基礎階段測試題:通過字符輸入流讀取info.txt中的所有內容,每次讀取一行,將每一行的第一個文字截取出來並打印在控制臺上。
print swift red amr ack pub flush app args package com.swift; import java.io.BufferedReader; import java.io.BufferedWriter; import java