
SpringSecurity學習之快速上手
網際網路專案中,安全與許可權控制是不可迴避的問題,為了解決這一些列問題,許多安全框架應運而生了。這些框架旨在幫我們解決公用的安全問題,讓我們的程式更加健壯,從而讓程式設計師全身心投入到業務開發當中。那麼SpringSecurity出自於大名鼎鼎的Spring家族,同時能與SpringBoot,SpringCloud無縫整合,它也是業界流行的安全框架之一。
一、SpringSecurity的準備工作
注意:本示例是基於註解的springmvc構建,SpringBoot的版本對應的是2.0.3.REALEASE。Spring版本5.0.7REALEASE,SpringSecurity的版本是5.0.5
首先新增SpringSecurity的依賴:
compile('org.springframework.boot:spring-boot-starter-security')
緊接著按照如下目錄規範建立
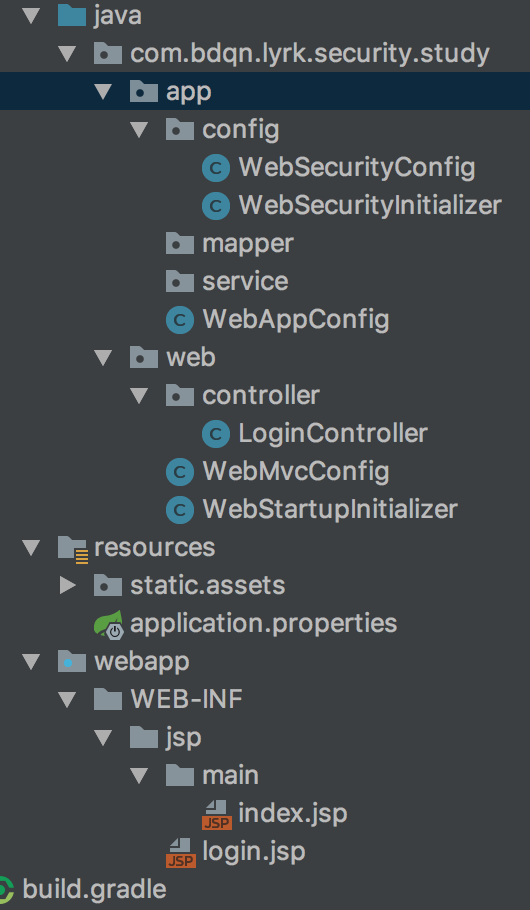
app包下主要為Root WebApplicationContext提供配置,而web包下主要是為servlet WebApplicationContext提供相關配置,這種方式更符合WebApplicationContext的層次化規範,同時也方便管理配置
二、實現app包下的配置
2.1、WebSecurityInitializer


package com.bdqn.lyrk.security.study.app.config;View Codeimport org.springframework.security.web.context.AbstractSecurityWebApplicationInitializer; /** * 這個類可以在新增springSecurity核心過濾器之前或之後做一些我們需要的操作 * * @author chen.nie * @date 2018/6/8 **/ public class WebSecurityInitializer extends AbstractSecurityWebApplicationInitializer { }
2.2、WebSecurityConfig
package com.bdqn.lyrk.security.study.app.config;

import org.springframework.security.config.annotation.authentication.builders.AuthenticationManagerBuilder;
import org.springframework.security.config.annotation.web.builders.HttpSecurity;
import org.springframework.security.config.annotation.web.configuration.EnableWebSecurity;
import org.springframework.security.config.annotation.web.configuration.WebSecurityConfigurerAdapter;
import org.springframework.security.core.userdetails.User;

/**
 * spring-security的相關配置
 *
 * @author chen.nie
 * @date 2018/6/7
 **/
@EnableWebSecurity
public class WebSecurityConfig extends WebSecurityConfigurerAdapter {

    @Override
    protected void configure(HttpSecurity http) throws Exception {
        /*
            1.配置靜態資源不進行授權驗證
            2.登入地址及跳轉過後的成功頁不需要驗證
            3.其餘均進行授權驗證
         */
        http.
                authorizeRequests().antMatchers("/static/**").permitAll().
                and().authorizeRequests().anyRequest().authenticated().
                and().formLogin().loginPage("/login").successForwardUrl("/toIndex").permitAll();
    }

    @Override
    protected void configure(AuthenticationManagerBuilder auth) throws Exception {
        /*
            在記憶體中建立使用者
         */
        User.UserBuilder users = User.withDefaultPasswordEncoder();
        auth.inMemoryAuthentication().withUser(users.username("admin").password("123").roles("ADMIN"));
    }
}
View Code
該類主要是設定安全配置注意使用@EnableWebSecruity註解,我們可以在這裡設定Http的安全配置和最基本的認證配置等,其中在該程式碼裡設定靜態資源 登入頁 和登入成功需要跳轉的頁面不用認證,另外基於記憶體設定了使用者admin
另外:loginPage()裡的值即為跳轉頁面的路徑又為處理登入驗證的路徑。當get請求時為前者而post請求時為後者
2.3、WebAppConfig
package com.bdqn.lyrk.security.study.app;

import org.springframework.context.annotation.Bean;
import org.springframework.context.annotation.ComponentScan;
import org.springframework.context.annotation.Configuration;
import org.springframework.context.annotation.PropertySource;
import org.springframework.context.support.PropertySourcesPlaceholderConfigurer;

/**
 * 主配置類
 *
 * @author chen.nie
 * @date 2018/6/8
 **/
@Configuration
@ComponentScan
@PropertySource("classpath:application.properties")
public class WebAppConfig {


    @Bean
    public static PropertySourcesPlaceholderConfigurer propertySourcesPlaceholderConfigurer() {
        return new PropertySourcesPlaceholderConfigurer();
    }
}
View Code
三、實現WebMvc的配置
3.1、初始化DispatcherServlet配置
WebStartupInitializer:
package com.bdqn.lyrk.security.study.web;

import com.bdqn.lyrk.security.study.app.WebAppConfig;
import org.springframework.web.servlet.support.AbstractAnnotationConfigDispatcherServletInitializer;

public class WebStartupInitializer extends AbstractAnnotationConfigDispatcherServletInitializer {
    @Override
    protected Class<?>[] getRootConfigClasses() {
        return new Class[]{WebAppConfig.class};
    }

    @Override
    protected Class<?>[] getServletConfigClasses() {
        return new Class[]{WebMvcConfig.class};
    }

    @Override
    protected String[] getServletMappings() {
        return new String[]{"/"};
    }
}
View Code
在這裡注意配置RootConfigClass為WebAppConfig,ServletConfigClass為WebMvcConfig
3.2、建立WebMvcConfig
package com.bdqn.lyrk.security.study.web;

import org.springframework.context.annotation.Bean;
import org.springframework.context.annotation.ComponentScan;
import org.springframework.context.annotation.Configuration;
import org.springframework.web.servlet.ViewResolver;
import org.springframework.web.servlet.config.annotation.EnableWebMvc;
import org.springframework.web.servlet.config.annotation.ResourceHandlerRegistry;
import org.springframework.web.servlet.config.annotation.WebMvcConfigurer;
import org.springframework.web.servlet.view.InternalResourceViewResolver;
import org.springframework.web.servlet.view.JstlView;

@Configuration
@ComponentScan
@EnableWebMvc
public class WebMvcConfig implements WebMvcConfigurer {

    /**
     * 建立檢視解析器
     * @return
     */
    @Bean
    public ViewResolver viewResolver() {
        InternalResourceViewResolver viewResolver = new InternalResourceViewResolver();
        viewResolver.setViewClass(JstlView.class);
        viewResolver.setPrefix("/WEB-INF/jsp/");
        viewResolver.setSuffix(".jsp");
        return viewResolver;
    }

    /**
     * 處理靜態資源
     * @param registry
     */
    @Override
    public void addResourceHandlers(ResourceHandlerRegistry registry) {
        registry.addResourceHandler("/static/**").addResourceLocations("classpath:/static/").setCachePeriod(60 * 2);
    }
}
View Code
3.3、建立Controller
package com.bdqn.lyrk.security.study.web.controller;

import org.springframework.security.core.context.SecurityContextHolder;
import org.springframework.security.core.userdetails.User;
import org.springframework.stereotype.Controller;
import org.springframework.ui.ModelMap;
import org.springframework.web.bind.annotation.GetMapping;
import org.springframework.web.bind.annotation.PostMapping;

@Controller
public class LoginController {


    @PostMapping("/toIndex")
    public String index(ModelMap modelMap) {
        User user = (User) SecurityContextHolder.getContext().getAuthentication().getPrincipal();
        modelMap.put("user", user);
        return "main/index";
    }

    @GetMapping("/login")
    public String login() {

        return "login";
    }
}
View Code
四、頁面設定
4.1、登入頁
login.jsp:
<%--
  Created by IntelliJ IDEA.
  User: chen.nie
  Date: 2018/6/8
  Time: 上午9:49
  To change this template use File | Settings | File Templates.
--%>
<%@ page contentType="text/html;charset=UTF-8" language="java" %>
<!doctype html>
<html>

<head>
    <meta charset="utf-8">
    <meta http-equiv="X-UA-Compatible" content="IE=edge">
    <title>Amaze UI Admin index Examples</title>
    <meta name="description" content="這是一個 index 頁面">
    <meta name="keywords" content="index">
    <meta name="viewport" content="width=device-width, initial-scale=1">
    <meta name="renderer" content="webkit">
    <meta http-equiv="Cache-Control" content="no-siteapp" />
    <link rel="icon" type="image/png" href="assets/i/favicon.png">
    <link rel="apple-touch-icon-precomposed" href="assets/i/[email protected]">
    <meta name="apple-mobile-web-app-title" content="Amaze UI" />
    <link rel="stylesheet" href="${request.contextPath}/static/assets/css/amazeui.min.css" />
    <link rel="stylesheet" href="${request.contextPath}/static/assets/css/admin.css">
    <link rel="stylesheet" href="${request.contextPath}/static/assets/css/app.css">
</head>

<body data-type="login">

<div class="am-g myapp-login">
    <div class="myapp-login-logo-block  tpl-login-max">
        <div class="myapp-login-logo-text">
            <div class="myapp-login-logo-text">
                Amaze UI<span> Login</span> <i class="am-icon-skyatlas"></i>

            </div>
        </div>

        <div class="login-font">
            <i>Log In </i> or <span> Sign Up</span>
        </div>
        <div class="am-u-sm-10 login-am-center">
            <form class="am-form" action="/login" method="post">
                <fieldset>
                    <div class="am-form-group">
                        <input name="username" type="text" class="" id="doc-ipt-email-1" placeholder="輸入登入名">
                    </div>
                    <div class="am-form-group">
                        <input name="password" type="password" class="" id="doc-ipt-pwd-1" placeholder="設定個密碼吧">
                    </div>
                    <p><button type="submit" class="am-btn am-btn-default">登入</button></p>

                </fieldset>
                <input type="hidden" name="_csrf" value="${_csrf.token}" />
            </form>
        </div>
    </div>
</div>

<script src="${request.contextPath}/static/assets/js/jquery.min.js"></script>
<script src="${request.contextPath}/static/assets/js/amazeui.min.js"></script>
<script src="${request.contextPath}/static/assets/js/app.js"></script>
</body>
View Code
注意:1)表單屬性action為httpSecurity的loginPage()配置地址
2)表單為post方式提交
3)input的name屬性分別為username,password代表使用者名稱,密碼
4)必須設定隱藏表單_csrf 如果不設定請http.csrf().ignoringAntMatchers()方法進行排除
4.2、 登入成功頁
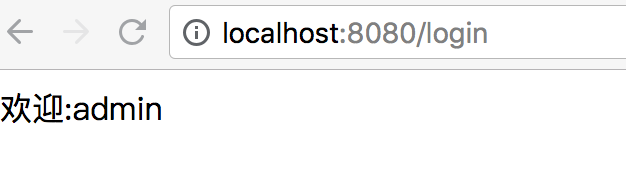
<%--
  Created by IntelliJ IDEA.
  User: chen.nie
  Date: 2018/6/8
  Time: 上午9:56
  To change this template use File | Settings | File Templates.
--%>
<%@ page contentType="text/html;charset=UTF-8" language="java" %>
<html>
<head>
    <title>Title</title>
</head>
<body>
歡迎:${user.username}
</body>
</html>
View Code
在成功頁時打印出認證成功的使用者.
隨即當我們訪問http://localhost:8080/toIndex時跳轉至登入頁:

登入成功時:
在實際應用中登入頁可能要複雜的多,可能包括驗證碼或者其他業務。另外使用者不可能都存在記憶體當中,關於更詳細的驗證問題,我們會在下篇討論。
相關推薦
SpringSecurity學習之快速上手
網際網路專案中,安全與許可權控制是不可迴避的問題,為了解決這一些列問題,許多安全框架應運而生了。這些框架旨在幫我們解決公用的安全問題,讓我們的程式更加健壯,從而讓程式設計師全身心投入到業務開發當中。那麼SpringSecurity出自於大名鼎鼎的Spring家族,同時能與SpringBoot,Spring
大資料Hadoop學習之快速入門方法
1、Hadoop生態概況 Hadoop是一個由Apache基金會所開發的分散式系統整合架構,使用者可以在不瞭解分散式底層細節情況下,開發分散式程式,充分利用叢集的威力來進行高速運算與儲存,具有可靠、高效、可伸縮的特點 Hadoop的核心是YARN,HDFS,Mapreduce,常用模組架構如
【Keras】中文文件學習筆記-快速上手Keras
基於中文官方文件與英文官方文件的學習筆記,較系統的總結學習歷程。 Keras是一個高層神經網路API,Keras由純Python編寫而成並基Tensorflow、Theano以及CNTK後端。Keras 為支援快速實驗而生,能夠把你的idea迅速轉換為結果,如
STM32學習 X 快速上手ILI9341LCD顯示屏
本次使用野火的2.8寸LCD螢幕學習LCD的原理 在學習之前自行了解一下什麼是畫素,解析度,彩色深度。 廢話少說。。。。。。。。。 首先看看液晶面板的訊號線 RGB訊號線 RGB各八根,分別表示紅綠藍三個分量,我們常見的RGB565 就是5紅,6
TensorFlow 之快速上手詳解
TensorFlow 基本使用簡述 一、概念簡述 1、學習目標 使用圖 (graph) 來表示計算任務. 在被稱之為 會話 (Session) 的上下文 (context) 中執行圖. 使用 tensor 表示資料. 通過 變數 (Va
SpringSecurity學習之自定義過濾器
我們系統中的認證場景通常比較複雜,比如說使用者被鎖定無法登入,限制登入IP等。而SpringSecuriy最基本的是基於使用者與密碼的形式進行認證,由此可知它的一套驗證規範根本無法滿足業務需要,因此擴充套件勢在必行。那麼我們可以考慮自己定義filter新增至SpringSecurity的過濾器棧當中,來實
SpringSecurity學習之基於資料庫的使用者認證
SpringSecurity給我們提供了一套最基本的認證方式,可是這種方式遠遠不能滿足大多數系統的需求。不過好在SpringSecurity給我們預留了許多可擴充套件的介面給我們,我們可以基於這些介面實現自己的認證方式。 一、前期準備工作 1.1、建立示例資料庫 Student表: creat
(轉)Django學習之 第二章:Django快速上手
nbsp ida IT 介紹 你在 django edi nal python代碼 安裝Python 安裝Django非常容易。因為Django可以運行在任何可以運行Python的環境中,所以可以以多種方式進行配置。 在本章我們將嘗試覆蓋幾種常見的Django安裝場景。
SpringBoot中oauth2.0學習之服務端配置快速上手
現在第三方登入的例子數見不鮮。其實在這種示例當中,oauth2.0是使用比較多的一種授權登入的標準。oauth2.0也是從oauth1.0升級過來的。那麼關於oauth2.0相關的概念及其原理,大家可以參考這篇文章,這篇文章中會有更詳細的解釋,下來我們直接進入正題。 1.1、gradle依賴
如何快速上手一個新技術之vue學習經驗
.com art 共享 數據源 dash das 函數 blog 雲筆記 碰到緊急項目挪別人的vue項目過來直接改,但是vue是18年初看過一遍,18年底再來用,早就忘到九霄雲外了,結果丟臉的從打開vue開始學,雖然之前在有道雲筆記做了很多記錄,然後沒有系統整理。所以借
python編程快速上手之第10章實踐項目參考答案(11.11.2)
答案 nic .com final timeout pre image 保存圖片 iframe #!/usr/bin/env python # -*- coding:utf-8 -*- import os import re import urllib import
python編程快速上手之第10章實踐項目參考答案(11.11.3)
name driver ret text rul from url .get right from selenium import webdriver from selenium.webdriver.common.keys import Keys import time
python編程快速上手之第10章實踐項目參考答案(12.13.1)
true style span tip 12.1 user python input multi #! python3 # multiplicationTable.py import openpyxl,os from openpyxl.styles import Font
python編程快速上手之第13章實踐項目參考答案(13.6.1)
encrypted iter close ffi mes python編程 實踐項目 reader blog import os,PyPDF2 os.chdir(‘D:\\My Documents‘) for folderName, subfolders, filenam
python編程快速上手之第13章實踐項目參考答案(13.6.2)
nbsp python add sha odi log span import imp #! python3 # encoding: UTF-8 import os import docx from docx import Document from docx.shar
python編程快速上手之第15章實踐項目參考答案(17.7.2)
col ges code sid documents mod 編程 bsp tof #! python3 # Import modules and write comments to describe this program. import zipfile, os fr
python編程快速上手之第15章實踐項目參考答案(17.7.3)
lane width ima font height 開始 users nco window #! python3 # encoding: UTF-8 import os,docx from PIL import Image, ImageDraw from PIL imp
學習Git---20分鐘git快速上手
diff 是什麽 學習 改變世界 ren ont 其中 網線 復雜 學習Git-----20分鐘git快速上手 (圖片已修復)在Git如日中天的今天,不懂git都不好意思跟人說自己是程序猿。你是不是早就躍躍欲試了,只是苦於沒有借口(契機)。 好吧,機會就在今
Hibernate學習筆記(1)---hibernate快速上手與準備工作
成了 -- 開源 工作 快速 tar ref orm 磁盤 持久層介紹 持久化:將內存中的數據保存在磁盤等存儲設備中。 持久化對象:指已經存儲在數據庫護著磁盤的業務對象 經典的軟件應用體系結構(三層結構) 在三層結構中,由於業務邏輯除了負責業務邏輯以外,還要負責相關的數據
Spring Boot 成長之路(一) 快速上手
啟動引導 pom.xml relative 技術 build sans hot clas 1.2 1.創建工程 利用IntelliJ IDEA新建一個Spring Boot項目的Web工程 2.查看初始化的spring boot項目 工程建好之後會出現如下的目錄