
ARKit學習之1.0版本基礎
為了方便AR開發交流,博主建立了一個群 :891555732,歡迎一起討論
目錄
一.開發環境配置

在此提一句,assetstore中Unity ARKit Plugin 不再有效。如果想獲取之前版本的ARKit,請用sourcetree拉取,點選分支即可

二.ARKit實現原理

螢幕每一次重新整理都會重新計算使用者姿態並將現實生活中的點與攝像機拍到的畫面進行畫素匹配,上面兩者相互獨立相互彌補

三.ARKit Remote
1.將UnityARKitRemote場景新增至Build Settings中打包出Xcode工程並安裝到手機上
2.Console - editor - 選擇自己手機

3.執行
如果是自己新建的場景

點選之後手機上即可檢視執行
注意點:
①.但是2018之後的Remote版本非常卡頓,可以尋找之前的版本
②.如果執行之後報如下錯誤:

UnityARCameraManager中新增Bool變數,開啟識別後再使用m_session,更改程式碼如如下:
private bool sessionStarted = false;
void FirstFrameUpdate(UnityARCamera cam)
{
    sessionStarted = true;
    UnityARSessionNativeInterface.ARFrameUpdatedEvent -= FirstFrameUpdate;
}
void Start () {

    m_session = UnityARSessionNativeInterface.GetARSessionNativeInterface();

    Application.targetFrameRate = 60;

    var config = sessionConfiguration;
    if (config.IsSupported) {
        m_session.RunWithConfig (config);
        UnityARSessionNativeInterface.ARFrameUpdatedEvent += FirstFrameUpdate;
    }

    if (m_camera == null) {
        m_camera = Camera.main;
    }
}
void Update () {
    if (m_camera != null && sessionStarted)
    {
        // JUST WORKS!
        Matrix4x4 matrix = m_session.GetCameraPose();
        m_camera.transform.localPosition = UnityARMatrixOps.GetPosition(matrix);
        m_camera.transform.localRotation = UnityARMatrixOps.GetRotation (matrix);

        m_camera.projectionMatrix = m_session.GetCameraProjection ();
     }
}
四.判斷是否判斷裝置是否支援ARKit
using UnityEngine.XR.iOS;
void Start () {
        ARKitFaceTrackingConfiguration Configuration = new ARKitFaceTrackingConfiguration();
        Debug.Log(Configuration.IsSupported);
        ARKitWorldTrackingSessionConfiguration Configuration1 = new ARKitWorldTrackingSessionConfiguration();
        Debug.Log(Configuration1.IsSupported);
}
如果你想使用者手機不支援ARKit你就不允許其下載,可在Xcode中做如下設定:

五.開啟攝像頭並開啟檢測
1.在攝像機上掛如下指令碼即可開啟攝像頭
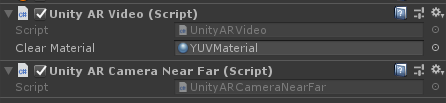
UnityARVideo : 將攝像頭拍攝的畫面渲染出來
2.在新增UnityARCameraManager指令碼(會判斷裝置是否支援ARKit)
3.新增UnityARGeneratePlane並設定識別到平面新增的平面預製體
4.新增識別過程中新增的點雲PointCloudParticleExample
其上預製體有兩種方式:
①.粒子系統
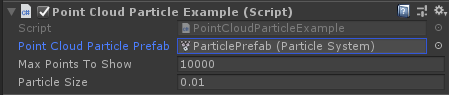
②.預製體

5.控制識別的開始與暫停 :
private UnityARSessionNativeInterface m_session;
void Start () {

        m_session = UnityARSessionNativeInterface.GetARSessionNativeInterface();
}
public void OnPauseClick()
{
     m_session.Pause();
}
public void OnRunClick()
{
     m_session.Run();
     var config = sessionConfiguration;
     if (config.IsSupported) {
          m_session.RunWithConfig (config);
     }
}
public void ResetAndRun()
{
     var config = sessionConfiguration;
     if (config.IsSupported) {
            m_session.RunWithConfigAndOptions(config, UnityARSessionRunOption.ARSessionRunOptionResetTracking);
     }
}
public void RemoveAndRun()
{
     var config = sessionConfiguration;
     if (config.IsSupported) {
            m_session.RunWithConfigAndOptions(config, UnityARSessionRunOption.ARSessionRunOptionRemoveExistingAnchors);
     }
}
 public ARKitWorldTrackingSessionConfiguration sessionConfiguration
 {
        get
        {
            ARKitWorldTrackingSessionConfiguration config = new ARKitWorldTrackingSessionConfiguration ();
            config.planeDetection = UnityARPlaneDetection.Horizontal;   //檢測平面型別,關閉檢測設定為none即可
            config.alignment = UnityARAlignment.UnityARAlignmentGravity;   //檢測型別
            config.getPointCloudData = true;  //是否獲取點雲
            config.enableLightEstimation = true;  //是否需要光照資訊
            config.enableAutoFocus = true;    //是否自動聚焦
            config.maximumNumberOfTrackedImages = 0;  //圖片最大追蹤數量
            config.environmentTexturing = UnityAREnvironmentTexturing.UnityAREnvironmentTexturingNone;
            if (detectionImages != null)
                config.referenceImagesGroupName = detectionImages.resourceGroupName;

			if (detectionObjects != null)
			{
				config.referenceObjectsGroupName = "";  //lets not read from XCode asset catalog right now
				config.dynamicReferenceObjectsPtr = m_session.CreateNativeReferenceObjectsSet(detectionObjects.LoadReferenceObjectsInSet());
			}

            return config;
        }
 }
6.獲取檢測到的平面資訊並放置物體
Touch GetTouch()
 {
#if UNITY_EDITOR
            var touch = new Touch();
            if (Input.GetMouseButtonDown(0))
                touch.phase = TouchPhase.Began;
            else if (Input.GetMouseButton(0) && m_LastTouchPosition != Input.mousePosition)
                touch.phase = TouchPhase.Moved;
            else
                touch.phase = TouchPhase.Stationary;

            touch.position = Input.mousePosition;
            m_LastTouchPosition = touch.position;
            return touch;
#else
            return Input.GetTouch(0);
#endif
}

bool touched
{
      get
      {
           return Input.GetMouseButton(0) || (Input.touchCount > 0);
      }
 }

void Update()
{
   if (touched)
   {
     var touch = GetTouch();
      switch (touch.phase)
       {
         case TouchPhase.Began:
              DoBegan(touch);
              break;
         case TouchPhase.Moved:
              DoMoved(touch);
              break;
       }
   }
}

void DoBegan(Touch touch)
{
     var screenPosition = Camera.main.ScreenToViewportPoint(touch.position);
            ARPoint point = new ARPoint()
            {
                x = screenPosition.x,
                y = screenPosition.y
            };
            //ARHitTestResultType有四種類型
            var hitResults = UnityARSessionNativeInterface.GetARSessionNativeInterface().HitTest(point, ARHitTestResultType.ARHitTestResultTypeExistingPlaneUsingExtent);
            if (hitResults.Count < 1)
                return;

            hitOut = hitResults[0];
             if(currentObj == null)
            {
               currentObj  = Instantiate(currentObj);
            }
            currentObj .transform.position = UnityARMatrixOps.GetPosition(hitOut.worldTransform);
            currentObj .transform.rotation = UnityARMatrixOps.GetRotation(hitOut.worldTransform);
}
如果想用Remote測試點選新增物體 :
將GeneratePlanes物體的層級變成ARKitPlane

7.疊加物體的陰影
將GeneratePlanes上的預製體設定為shadowPlanePrefab:

8.物體遮擋
將GeneratePlanes上的預製體設定為occlusionPlanePrefab:

原理是 : 識別到另外的平面,遮擋底下的平面
9.獲取相機實時資料
 public void OnEnable()
 {
        UnityARSessionNativeInterface.ARFrameUpdatedEvent += ARFrameUpdate;
 }
 public void OnDisable()
 {
        UnityARSessionNativeInterface.ARFrameUpdatedEvent -= ARFrameUpdate;
 }
 public void ARFrameUpdate(UnityARCamera camera)
 {
        Matrix4x4 matrix4X4 = new Matrix4x4();
        matrix4X4.SetColumn(3, camera.worldTransform.column3);
        Vector3 pos = UnityARMatrixOps.GetPosition(matrix4X4);
 }
六.API


相關推薦
ARKit學習之1.0版本基礎
為了方便AR開發交流,博主建立了一個群 :891555732,歡迎一起討論 目錄 六.API 一.開發環境配置 在此提一句,assetstore中Unity ARKit Plugin 不再有效。如果想獲取之前
ARKit學習之2.0基礎及案例解析(後續再更新)
為了方便AR開發交流,博主建立了一個群 :891555732,歡迎一起討論 一.多人共享資料 官方案例原始碼 : https://github.com/Unity-Technologies/SharedSpheres ①.獲取資料及儲
spring原始碼學習(5.1.0版本)——Bean的初始化(中)
目錄 前言 createBean 有自定義TargetSource代理類的生成 resolveBeforeInstantiation applyBeanPostProcessorsBeforeInstantiation postProcessBeforeIn
spring原始碼學習(5.1.0版本)——Bean的初始化(上)
目錄 前言 源頭 preInstantiateSingletons方法 getBean(String beanName) doGetBean getObjectForBeanInstance getObjectFromFactoryBean doGe
以太坊學習(6)關於web3.js 1.0版本中event事件無法觸發的問題
關於web3.js 1.0版本中event事件無法觸發的問題 寫在最前:請檢查你的provider連線方式,http provider已不支援event事件的觸發了 具體請看官方源文件 一、問題還原: (1)先給出智慧合約程式碼 合約內容比較簡單 deposi
第十天七:浪跡天涯網上商城(1.0版本)--Feign基礎使用教程
1、為什麼選擇Feign而不是其他 Feign使得 Java HTTP 客戶端編寫更方便。Feign 靈感來源於Retrofit、JAXRS-2.0和WebSocket。Feign 最初是為了降低統一繫結Denominator 到 HTTP API 的複雜度,不區分是否支援
WorkerMan 入門學習之(三)基礎教程-Timer類的使用
timer類 定時 基礎教程 連接 worker loader 入門 入門學習 json 1、ServerTimer.php 代碼: <?php /** * 定時器學習 */ require_once __DIR__ . ‘/Workerman/Autoload
【java】java學習之路-01-Linux基礎(一)
x文件 字母 at命令 超過 用戶登錄 創建刪除 軟連接 nbsp tail linux學習方法: 你的程序要在服務器(linux)上執行,服務器沒有桌面系統,學習linux就是學習命令。 一、Linux介紹 1、芬蘭大學生,名字叫Linux,因為個人興趣,編寫了一個類Un
我的RabbitMQ學習之1(介紹)
代理 tutorials 轉發數據 一個 mode 圖片 ssa 方式 初始化 官方網址:http://www.rabbitmq.com 我翻譯官網的文檔,僅供自己學習用................... RabbitMQ 是什麽,它就是一個消息隊列,用在哪裏,用
Linux學習之路--http-2基礎設置及訪問限制【15】---20180108
first 配置 特定 http modules rmi 目錄訪問控制 可重復 als 一、HTTP軟件1、http服務器應用http服務器程序 httpd apache nginx lighttpd應用程序服務器 IIS .asp tomca
Linux學習筆記1.0
Linux 基礎 知識積累 終端(terminal)物理終端(/dev/console) 控制臺console虛擬終端(/dev/tty[1-6]) tty:teletypewriters,可有n個,ctrl+alt+F[1-6]圖形終端(/dev/tty7)串行終端(/dev/ttyS#)偽終端
Tensorflow深度學習之十二:基礎圖像處理之二
fcm 數字 ssi port con tty .net term file Tensorflow深度學習之十二:基礎圖像處理之二 from:https://blog.csdn.net/davincil/article/details/76598474 首先放出
redis安裝1.0版本
redisyum install gccwget http://download.redis.io/releases/redis-3.2.6.tar.gztar xzf redis-3.2.6.tar.gzcd redis-3.2.6make MALLOC=libcmake install cp redis.
NFS安裝1.0版本
nfs服務端yum install nfs-utils rpcbind -y#####rpm -qa nfs-utils rpcbind#####id nfsnobody/etc/init.d/rpcbind start#####/etc/init.d/rpcbind status netstat -tnul
Xamarin.Forms 3.1.0+版本 Android 原生支持底部導航欄
toolbar ott 支持 cor for aml otto nfx XML Xamarin.Forms 3.1.0+版本 Android 原生支持底部導航欄 Xamarin.Forms 3.1.0以上版本終於支持Android底部導航欄啦,可以不用第三方的支持庫了。 h
Ubuntu 18.04 打不開1.1.0版本網易雲音樂的解決方法匯總
amp http desktop 繼承 pin ica 關閉 分享圖片 系統監視 Ubuntu自古以來的問題吧。。。。。據說是因為deepin沒問題所以網易雲音樂數次更新都沒有解決這個bug 法0:--no-sandbox (繼承自以往版本的Ubuntu) 在終端輸入
tensorflow從1.0版本切換到1.3
1.先解除安裝之前的版本 sudo pip3 uninstall tensorflow-gpu 2.安裝新的tf sudo pip3 install tensorflow-gpu==1.3 3.tensorflow1.3需要
Tensorflow 低版本程式碼自動升級為1.0版本
TensorFlow 1.0 中的 API 有所變化,引數位置發現變化,造成在 TensorFlow 0.n 上執行的 TensorFlow 程式無法在 TensorFlow 1.0 上執行。 自動將程式碼移植到 1.0,有一個轉換工具。 GitHub工具包地址:https://github
tf.reshape()的Tensorflow 1.0 版本問題報錯
tf.reverse tf.reverse之前會用一維 bool 張量控制要顛倒哪些維度。現在我們使用軸索引張量。 例如,tf.reverse(a, [True, False, True]) 現在必須是 tf.reve
服務計算學習之路-Go版本agenda開發專案
Go版本agenda開發專案 文章目錄 Go版本agenda開發專案 專案簡介 開發環境 安裝使用 專案實現 cobra包 安裝cobra