
shiro關於認證的學習
一、shiro認證入門程式工程
shiro分為認證和授權,這裡我們先學習shiro的認證。
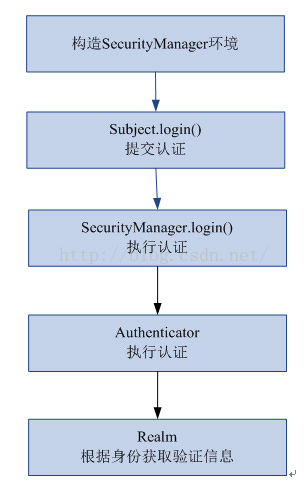
1、shiro認證流程
2、shiro認證入門工程的搭建
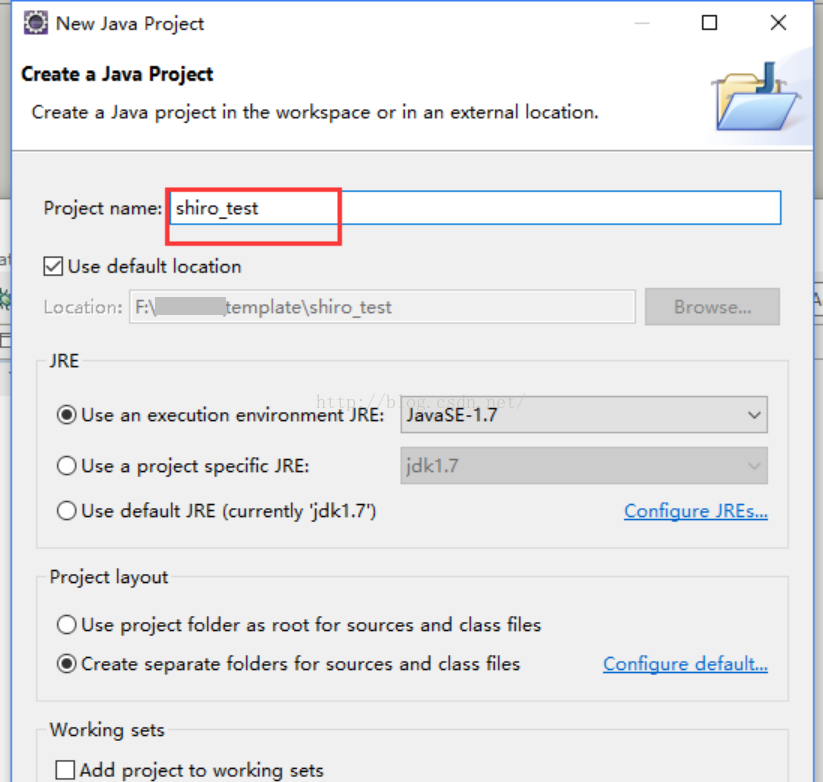
(1)首先建立一個java工程
在eclipse中顯示的工程結構

(2)新增shiro的jar包
最核心的jar包就是:shiro-core.jar(下邊其他的是需要依賴的jar包)
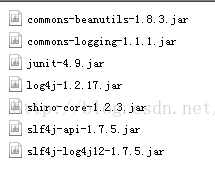
在工程中建立一個lib資料夾(Folder),把jar包拷貝進去,然後build path。
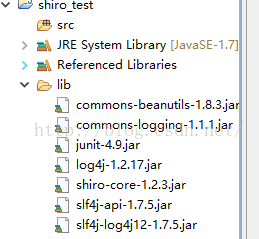
在eclipse中顯示的工程結構
這裡我也貼一下,用maven時候,pom檔案中的座標
<dependency>
	<groupId>org.apache.shiro</groupId>
	<artifactId>shiro-core</artifactId>
	<version>1.2.3</version>
</dependency>
<dependency>
	<groupId>org.apache.shiro</groupId>
	<artifactId>shiro-web</artifactId>
	<version>1.2.3</version>
</dependency>
<dependency>
	<groupId>org.apache.shiro</groupId>
	<artifactId>shiro-spring</artifactId>
	<version>1.2.3</version>
</dependency>
<dependency>
	<groupId>org.apache.shiro</groupId>
	<artifactId>shiro-ehcache</artifactId>
	<version>1.2.3</version>
</dependency>
<dependency>
	<groupId>org.apache.shiro</groupId>
	<artifactId>shiro-quartz</artifactId>
	<version>1.2.3</version>
</dependency>

也可以通過引入shiro-all包括shiro所有的包:
<dependency>
	<groupId>org.apache.shiro</groupId>
	<artifactId>shiro-all</artifactId>
	<version>1.2.3</version>
</dependency>
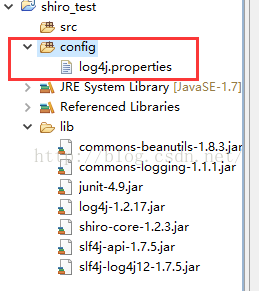
(3)建立一個log4j的日誌檔案
建立一個config資料夾(Source Folder),把log4j的日誌檔案貼進去。
這裡可以簡短的貼一下log4j日誌檔案最基本的內容
log4j.rootLogger=debug,stdout

log4j.appender.stdout=org.apache.log4j.ConsoleAppender
log4j.appender.stdout.layout=org.apache.log4j.PatternLayout
log4j.appender.stdout.layout.ConversionPattern=%d %p [%c] - %m %n
到時候建立一個log4j.properties檔案,把上邊的貼入進去就可以了。
在eclipse中顯示的工程結構
這樣我們這個最入門的工程就搭建好了。
3、開始寫shiro測試Demo
首先我們建立一個包com.shiro.authentication,建立一個測試類AnthenticationTest.java。
我們在測試這個環境中,並沒有連線資料庫,而是建立一個ini檔案,在測試執行的時候載入ini檔案裡邊配置的內容,就相當於從資料庫中比對了。(ini檔案相對於properties檔案,就是可以分組,而properties檔案只是簡單的key,value形式)
ini檔案配置的內容
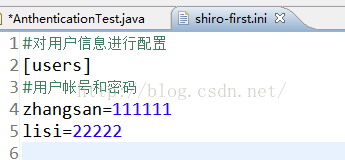
(ini配置檔案放在config資料夾中)
接下來是測試類的內容
package com.shiro.authentication;

import org.apache.shiro.SecurityUtils;
import org.apache.shiro.authc.AuthenticationException;
import org.apache.shiro.authc.UsernamePasswordToken;
import org.apache.shiro.config.IniSecurityManagerFactory;
import org.apache.shiro.mgt.SecurityManager;
import org.apache.shiro.subject.Subject;
import org.apache.shiro.util.Factory;
import org.junit.Test;

/**
 *
 * <p>Title: AnthenticationTest</p>
 * <p>Description: 認證測試</p>
 * <p>Company: www.zonsim.com</p>
 * @author	Liuyl
 * @date	2016年10月5日上午12:14:55
 * @version 1.0
 */
public class AnthenticationTest {

	// 使用者登陸和退出
	@Test
	public void testLoginAndLogout(){

		/**
		 * (1)構建securityManager環境
		 */
		// 建立securityManager工廠,通過ini配置檔案建立securityManager工廠(ini是window中的一種配置檔案)
		Factory<SecurityManager> factory = new IniSecurityManagerFactory(
				"classpath:shiro-first.ini");
		//在ini裡進行的配置,SecurityManager建立的時候就把ini裡邊的資訊載入進來了,就相當於查詢資料庫了
		//在說明一些SecurityManager類要匯入org.apache.shiro.mgt.SecurityManager;包


		// 建立SecurityManager
		SecurityManager securityManager = factory.getInstance();
		//通過建立SecurityManager工廠和建立SecurityManager物件,完成了第一步構建securityManager環境


		/**
		 * 這個算是中間銜接的過程
		 */
		// 將securityManager設定當前的執行環境中(這裡是單例裡的,但是不用我們管理,SecurityUtils完成這件事)
		SecurityUtils.setSecurityManager(securityManager);

		/**
		 * 現在是一個測試環境,需要模擬一個subject,這裡需要我們構造出來。
		 * 正常情況下,這個subject不需要我們來管,到時候就是我的一個http請求就是subject
		 */
		// 從SecurityUtils裡邊建立一個subject
		Subject subject = SecurityUtils.getSubject();


		/**
		 * (2)執行認證提交
		 */
		// 在認證提交前準備token(令牌)
		// 這裡的賬號和密碼 將來是由使用者輸入進去
		UsernamePasswordToken token = new UsernamePasswordToken("zhangsan",
				"111111");

		//我們在認證的時候可以丟擲一個異常
		try {
			//認證提交
			subject.login(token);
		} catch (AuthenticationException e) {//AuthenticationException:shiro自己的認證異常
			// TODO Auto-generated catch block
			e.printStackTrace();
		}

		/**
		 * (3)得到一個驗證的結果
		 */
		// 是否認證通過
		boolean isAuthenticated = subject.isAuthenticated();

		System.out.println("是否認證通過:" + isAuthenticated);

		// 退出操作
		subject.logout();//一退出,身份資訊就沒有了

		// 是否認證通過
		isAuthenticated = subject.isAuthenticated();

		System.out.println("是否認證通過:" + isAuthenticated);//退出了就因該是false了

		/**
		 * 整體的流程就是token中的使用者名稱密碼要和ini配置檔案裡邊的使用者名稱密碼進行比對,
		 * 成功了就是true,沒有就是false
		 */

	}

}
4、測試結果說明
(1)上邊測試的就過是true,false。
在執行程式的時候,會拿著UsernamePasswordToken產生的token,去對面ini配置檔案裡邊定義的帳號密碼。有就返回true。
當退出之後,身份資訊就沒有了,在進行身份認證,就是返回false了。
(2)如果使用者名稱不對
會報帳號不存在異常:org.apache.shiro.authc.UnknownAccountException
返回結果則是false,false
(3)如果密碼不正確
會報憑證錯誤異常:org.apache.shiro.authc.IncorrectCredentialsException
返回結果則是false,false
5、總結shrio認證執行流程
@1.通過ini配置檔案建立securityManager。
@2.呼叫subject.login方法主體提交認證,提交的token。
@3.securityManager進行認證,securityManager通過Authenticator介面,最終由(呼叫)ModularRealmAuthenticator進行認證。
@4.ModularRealmAuthenticator呼叫IniRealm(給realm傳入的token)去ini配置檔案中查詢使用者資訊。
@5.IniRealm根據輸入的token(UsernamePasswordToken)從shiro-first.ini(自己定義的ini檔案)查詢使用者資訊,根據賬號查詢使用者資訊(賬號和密碼)
如果查詢到使用者資訊,就給ModularRealmAuthenticator返回使用者資訊(賬號和密碼),
如果查詢不到,就給ModularRealmAuthenticator返回null(說明賬號不存在)。
@6.ModularRealmAuthenticator接收IniRealm返回Authentication認證資訊,
如果返回的認證資訊是null,ModularRealmAuthenticator丟擲異常(org.apache.shiro.authc.UnknownAccountException)。
如果返回的認證資訊不是null(說明inirealm找到了使用者),ModularRealmAuthenticator對IniRealm返回使用者密碼(在ini檔案中存在)和token中的密碼進行對比,如果不一致丟擲異常(org.apache.shiro.authc.IncorrectCredentialsException)
二、自定義reaml認證
將來實際開發需要realm從資料庫中查詢使用者資訊。
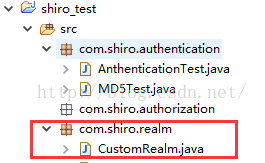
1、在專案中建立一個realm包com.shiro.realm
2、開始建立自定義realm類
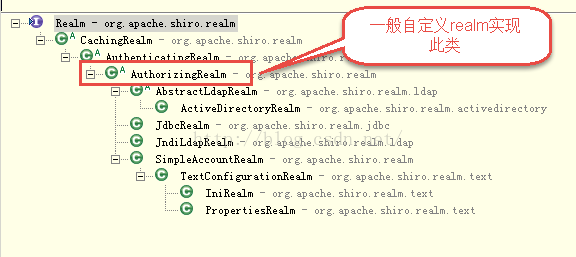
這個自定義realm類一般繼承AuthorizingRealm這個類。
下面就是自定義realm類
package com.shiro.realm;


import org.apache.shiro.authc.AuthenticationException;
import org.apache.shiro.authc.AuthenticationInfo;
import org.apache.shiro.authc.AuthenticationToken;
import org.apache.shiro.authc.SimpleAuthenticationInfo;
import org.apache.shiro.authz.AuthorizationInfo;
import org.apache.shiro.realm.AuthorizingRealm;
import org.apache.shiro.subject.PrincipalCollection;

/**
 *
 * <p>Title: CustomRealm</p>
 * <p>Description: 自定義realm</p>
 * <p>Company: www.zonsim.com</p>
 * @author	Liuyl
 * @date	2016年10月5日下午3:47:58
 * @version 1.0
 */
public class CustomRealm extends AuthorizingRealm{

	// 設定realm的名稱(這裡邊就讀取ini配置檔案中的資料)
	@Override
	public void setName(String name) {
		super.setName("customRealm");
	}

	/**
	 * 需要實現AuthorizingRealm這個介面的兩個方法
	 */

	//使用者認證
	@Override
	protected AuthenticationInfo doGetAuthenticationInfo(AuthenticationToken token) throws AuthenticationException {

		//因為我們現在還不連線資料庫,我們在這裡模擬一下
		//第一步從token中取出身份資訊( token是使用者輸入的)(這裡邊userCode取到的值是前邊測試類中UsernamePasswordToken設定的值)
		String userCode = (String) token.getPrincipal();


		// 第二步:根據使用者輸入的userCode從資料庫查詢
		// ....


		//下邊這步是模擬沒有找到使用者時候的情況
		// 如果查詢不到返回null
		//資料庫中使用者賬號是zhangsansan
		if(!userCode.equals("zhangsansan")){//
			return null;
		}


		// 模擬從資料庫查詢到密碼
		String password = "111111";


		// 如果查詢到返回認證資訊AuthenticationInfo
		//引數1.身份資訊 2.憑證3.realm的名稱
		SimpleAuthenticationInfo simpleAuthenticationInfo = new SimpleAuthenticationInfo(
				userCode, password, this.getName());

		return simpleAuthenticationInfo;

	}

	//使用者授權
	@Override
	protected AuthorizationInfo doGetAuthorizationInfo(PrincipalCollection arg0) {
		// TODO Auto-generated method stub
		return null;
	}

}
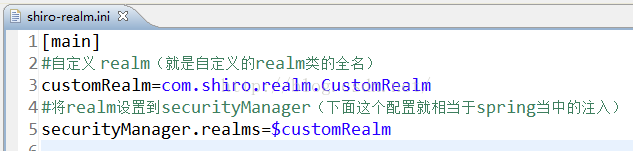
3、配置自定義realm
自定義reaml定義好之後,要對realm進行配置,如果不配置realm,securityManager就不知道呼叫哪個realm。
所以需要在shiro-realm.ini(也可以配置到shiro-first.ini)配置realm注入到securityManager中。
ini配置檔案的內容為:
4、寫測試類進行測試
就是上邊測試類,改變一下載入的ini配置檔名稱,不載入shiro-first.ini,改為載入shiro-realm.ini
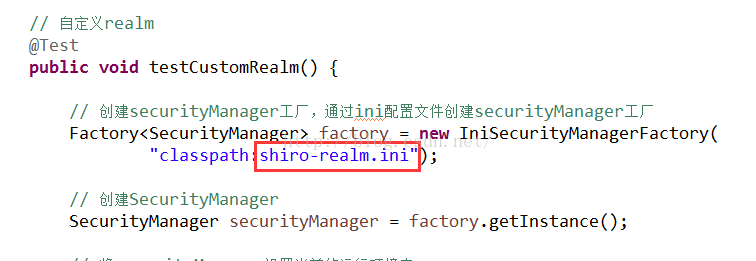
這樣完成了自定義realm的認證方式。
以後的開發中都會用自定義realm的方式來寫。
最後測試的結果,同上邊的入門工程測試結果一樣。
三、自定義realm支援雜湊演算法的認證
1、首先了解一下加密的雜湊演算法
通常需要對密碼進行雜湊,常用的有md5、sha,(md5雜湊後就不能逆向了)。
對md5密碼,如果知道雜湊後的值可以通過窮舉演算法,得到md5密碼對應的明文。
建議對md5進行雜湊時加salt(鹽),進行加密相當於對原始密碼+鹽進行雜湊。
正常使用時雜湊方法:
在程式中對原始密碼+鹽進行雜湊,將雜湊值儲存到資料庫中,並且還要將鹽也要儲存在資料庫中。
如果進行密碼對比時,使用相同方法,將原始密碼+鹽進行雜湊,進行比對。
2、先來一個加密的測試程式,繼續瞭解一下
package com.shiro.authentication;

import org.apache.shiro.crypto.hash.Md5Hash;
import org.apache.shiro.crypto.hash.SimpleHash;
import org.junit.Test;

/**
 *
 * <p>Title: MD5Test</p>
 * <p>Description: </p>
 * <p>Company: www.zonsim.com</p>
 * @author	Liuyl
 * @date	2016年10月5日下午4:36:30
 * @version 1.0
 */
public class MD5Test {


	@Test
	public void MD5_Test(){
		//原始 密碼
		String source = "111111";
		//鹽
		String salt = "qwerty";
		//雜湊次數
		int hashIterations = 2;
		//上邊雜湊1次:f3694f162729b7d0254c6e40260bf15c
		//上邊雜湊2次:36f2dfa24d0a9fa97276abbe13e596fc


		//構造方法中:
		//第一個引數:明文,原始密碼
		//第二個引數:鹽,通過使用隨機數
		//第三個引數:雜湊的次數,比如雜湊兩次,相當 於md5(md5(''))
		Md5Hash md5Hash = new Md5Hash(source, salt, hashIterations);

		//得到md5雜湊後的密碼
		String password_md5 =  md5Hash.toString();
		System.out.println(password_md5);


		//第一個引數:雜湊演算法 (這個和上邊的作用是一樣的)
		SimpleHash simpleHash = new SimpleHash("md5", source, salt, hashIterations);
		System.out.println(simpleHash.toString());
	}
}
3、接下來,寫最重要的支援雜湊演算法的自定義realm
package com.shiro.realm;


import org.apache.shiro.authc.AuthenticationException;
import org.apache.shiro.authc.AuthenticationInfo;
import org.apache.shiro.authc.AuthenticationToken;
import org.apache.shiro.authc.SimpleAuthenticationInfo;
import org.apache.shiro.authz.AuthorizationInfo;
import org.apache.shiro.realm.AuthorizingRealm;
import org.apache.shiro.subject.PrincipalCollection;
import org.apache.shiro.util.ByteSource;

/**
 *
 * <p>Title: CustomRealm</p>
 * <p>Description: 自定義realm</p>
 * <p>Company: www.zonsim.com</p>
 * @author	Liuyl
 * @date	2016年10月5日下午3:47:58
 * @version 1.0
 */
public class CustomRealmMD5 extends AuthorizingRealm{

	// 設定realm的名稱
	@Override
	public void setName(String name) {
		super.setName("customRealmMD5");
	}

	/**
	 * 需要實現AuthorizingRealm這個介面的兩個方法
	 */

	//使用者認證
	@Override
	protected AuthenticationInfo doGetAuthenticationInfo(AuthenticationToken token) throws AuthenticationException {

		//因為我們現在還不連線資料庫,我們在這裡模擬一下
		//第一步從token中取出身份資訊( token是使用者輸入的)(這裡邊userCode取到的值是前邊測試類中UsernamePasswordToken設定的值)
		String userCode = (String) token.getPrincipal();


		// 第二步:根據使用者輸入的userCode從資料庫查詢
		// ....


		/*//下邊這步是模擬沒有找到使用者時候的情況
		// 如果查詢不到返回null
		//資料庫中使用者賬號是zhangsansan
		if(!userCode.equals("zhangsansan")){//
			return null;
		}*/


		// 模擬從資料庫查詢到密碼,進行雜湊後的值(原來的明文密碼是111111)
		String password = "f3694f162729b7d0254c6e40260bf15c";
		// 從資料庫獲取salt
		String salt = "qwerty";


		// 如果查詢到返回認證資訊AuthenticationInfo
		//引數1.身份資訊 2.憑證3.鹽4.realm的名稱
		SimpleAuthenticationInfo simpleAuthenticationInfo = new SimpleAuthenticationInfo(
				userCode, password, ByteSource.Util.bytes(salt), this.getName());

		return simpleAuthenticationInfo;

	}

	//使用者授權
	@Override
	protected AuthorizationInfo doGetAuthorizationInfo(PrincipalCollection arg0) {
		// TODO Auto-generated method stub
		return null;
	}

}
4、同上,需要配置自定義realm
這裡需要把憑證匹配器和自定義的realm都定義到realm中。
ini配置檔案的內容為:

5、寫測試類進行認證測試
就是上邊測試類,改變一下載入的ini配置檔名稱,不載入shiro-realm.ini,改為載入shiro-realm-md5.ini
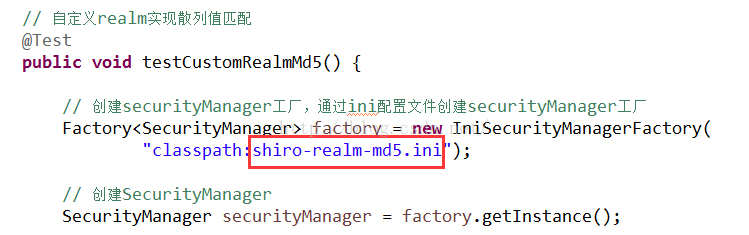
這種方式基本上都用這種。
最後測試的結果,同上邊的入門工程測試結果一樣。
這樣關於shiro認證方面的使用方法和知識點都介紹完成了。