
(Caffe,LeNet)前向計算(五)
本部分剖析Caffe中Net::Forward()函式,即前向計算過程。從LeNet網路角度出發,且調式網路為測試網路(區別為訓練網路),具體網路層資訊見(Caffe,LeNet)初始化測試網路(四)
1 入口資訊
通過如下的呼叫堆疊資訊可以定位到函式ForwardFromTo(其他函式中無重要資訊)
caffe::Net<float>::ForwardFromTo() at net.cpp:574
caffe::Net<float>::ForwardPrefilled() at net.cpp:596
caffe::Net<float>::Forward 對於ForwardFromTo有,對每層網路前向計算(start=0,end=11共12層網路)。
template <typename Dtype>
Dtype Net<Dtype>::ForwardFromTo(int start, int end) {

  for (int i = start; i <= end; ++i) {
    Dtype layer_loss = layers_[i]->Forward(bottom_vecs_[i], top_vecs_[i]);
    loss += layer_loss;
  }
  return loss;
} 在ForwardFromTo中,對網路的每層呼叫Forward函式,Forward中根據配置情況選擇呼叫Forward_gpu還是Forward_cpu。
以下主要從Forward_gpu中紹介
2 第一層DataLayer
DataLayer未實現Forward_cpu或Forward_gpu,其父類BasePrefetchingDataLayer實現了。
內容為從BasePrefetchingDataLayer的資料快取佇列BlockingQueue<Batch*>取出一個Batch的資料放入DataLayer的Top Blob中,其中Top[0]存放資料,Top[1]存放標籤。
3 第二層SplitLayer
SplitLayer有兩個Top Blob label_mnist_1_split_0和label_mnist_1_split_1,在其Forward_g(c)pu中,從它的Bottom Blob,也就是DataLayer的第二個Top Blob,label中把資料 指向資料的指標複製到label_mnist_1_split_0和label_mnist_1_split_1中(即共享了資料)。
程式碼如下,將bottom[0]複製成多個top blob
void SplitLayer<Dtype>::Forward_gpu(const vector<Blob<Dtype>*>& bottom,
      const vector<Blob<Dtype>*>& top) {
  for (int i = 0; i < top.size(); ++i) {
    top[i]->ShareData(*bottom[0]);
  }
}
4 第三層ConvolutionLayer
Caffe中的卷原理見(Caffe)卷積的實現
以GPU為例,展開程式碼如下:
template <typename Dtype>
void ConvolutionLayer<Dtype>::Forward_gpu(const vector<Blob<Dtype>*>& bottom,
      const vector<Blob<Dtype>*>& top) {
  const Dtype* weight = this->blobs_[0]->gpu_data();

  //對第一個Bottom Blob,對於Lenet此處只有一個Bottom Blob
  for (int i = 0; i < bottom.size(); ++i) {
    const Dtype* bottom_data = bottom[i]->gpu_data();

    //對於一個Batch中的第一個樣本的Featrue Maps,對於Lenet此處num_為64(train)或者100(test)
    for (int n = 0; n < this->num_; ++n) {

      //bottom_data中的資料與weight作卷積,結果放入top_data中
      this->forward_gpu_gemm(bottom_data + n * this->bottom_dim_, weight,
          top_data + n * this->top_dim_);

          //*****展開forward_gpu_gemm開始*****
          template <typename Dtype>
          void BaseConvolutionLayer<Dtype>::forward_gpu_gemm(const Dtype* input,
          const Dtype* weights, Dtype* output, bool skip_im2col) {
            const Dtype* col_buff = input;
            //1x1卷積不處理
            if (!is_1x1_) {
              if (!skip_im2col) {
                //把影象展開成列,進而可以表示一個矩陣(即這個矩陣最後還是寫成了一個列向量col_buffer)
                conv_im2col_gpu(input, col_buffer_.mutable_gpu_data());
              }
              col_buff = col_buffer_.gpu_data();
            }

              //呼叫gemm,對weights與col_buff作卷積,結果放入output
              caffe_gpu_gemm<Dtype>(CblasNoTrans, CblasNoTrans, conv_out_channels_ /
                  group_, conv_out_spatial_dim_, kernel_dim_,
                  (Dtype)1., weights + weight_offset_ * g, col_buff + col_offset_ * g,
                  (Dtype)0., output + output_offset_ * g);
            }
          }
          //*****展開forward_gpu_gemm結束*****

      //計算偏置
      if (this->bias_term_) {
        const Dtype* bias = this->blobs_[1]->gpu_data();
        this->forward_gpu_bias(top_data + n * this->top_dim_, bias);
      }
    }
  }
}
5 第四層PoolingLayer
Caffe中實現了Max Pooling和Average Pooling兩種方法,cuda程式碼在理解演算法上會更易讀些:
template <typename Dtype>
__global__ void MaxPoolForward(...) {
  //CUDA_KERNEL_LOOP為caffe中的相關巨集,index為執行緒索引,caffe中grid,block(512)都一維的
  //在其它《(Caffe)程式設計小技巧》中介紹了
  //nthreads為執行緒的總數,為該pooling層top blob的輸出神經元總數,也就是說一個執行緒對應輸出的一個結點
  CUDA_KERNEL_LOOP(index, nthreads) {
    // 該執行緒對應的top blob(N,C,H,W)中的N,即樣本個數
    const int n = index / pooled_width / pooled_height / channels;
    // 該執行緒對應的top blob(N,C,H,W)中的C,即第C個Channel(number of feature maps)
    const int c = (index / pooled_width / pooled_height) % channels;
    // 該執行緒對應的top blob(N,C,H,W)中的H,輸出Feature Map的中的高的座標
    const int ph = (index / pooled_width) % pooled_height;
    // 該執行緒對應的top blob(N,C,H,W)中的W,輸出Feature Map的中的寬的座標
    const int pw = index % pooled_width;

    // hstart,wstart,hend,wend分別為bottom blob(上一層feature map)中的點的座標範圍
    // 由這些點計算出該執行緒對應的點(top blob中的點)
    int hstart = ph * stride_h - pad_h;
    int wstart = pw * stride_w - pad_w;
    const int hend = min(hstart + kernel_h, height);
    const int wend = min(wstart + kernel_w, width);
    hstart = max(hstart, 0);
    wstart = max(wstart, 0);
    Dtype maxval = -FLT_MAX;
    int maxidx = -1;

    // bottom_slice為上一層(bottom blob)中相關的那**一個**feature map的切片檢視
    const Dtype* const bottom_slice =
        bottom_data + (n * channels + c) * height * width;
    for (int h = hstart; h < hend; ++h) {
      for (int w = wstart; w < wend; ++w) {
        if (bottom_slice[h * width + w] > maxval) {
          maxidx = h * width + w;
          maxval = bottom_slice[maxidx];
        }
      }
    }
    // index正好是top blob中對應點的索引,這也是為什麼執行緒都是用了一維的維度
    // 資料在Blob.data中最後都是一維的形式儲存的
    top_data[index] = maxval;
    if (mask) {
      mask[index] = maxidx;
    } else {
      top_mask[index] = maxidx;
    }
  }
}
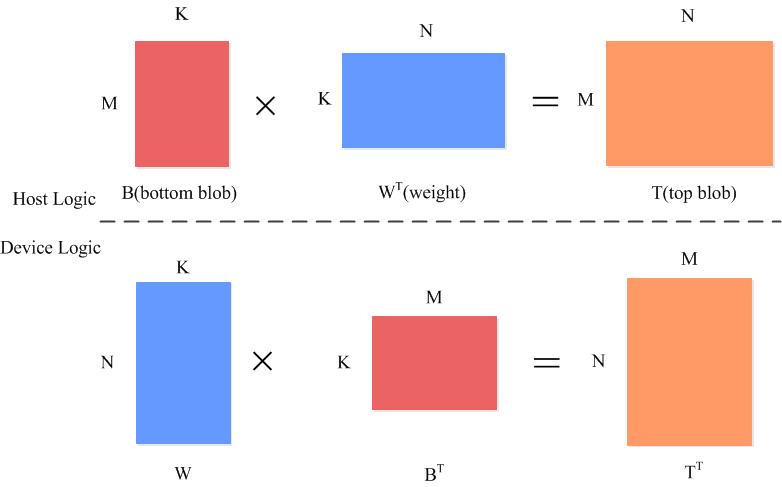
6 第七層InnerProductLayer
在InnerProductLayer的Forward_gpu實際止呼叫了以下的核心程式碼來求兩個矩陣的積。其中bottom_data為
    caffe_gpu_gemm<Dtype>(CblasNoTrans, CblasTrans, M_, N_, K_, (Dtype)1.,
bottom_data, weight, (Dtype)0., top_data);caffe_gpu_gemm中的實際上呼叫了cublas的矩陣計算。
void caffe_gpu_gemm<float>(const CBLAS_TRANSPOSE TransA,
const CBLAS_TRANSPOSE TransB, const int M, const int N, const int K,
const float alpha, const float* A, const float* B, const float beta,
float* C) {
// Note that cublas follows fortran order.
int lda = (TransA == CblasNoTrans) ? K : M;
int ldb = (TransB == CblasNoTrans) ? N : K;
// lenet中cuTransA是不轉置的
cublasOperation_t cuTransA =
(TransA == CblasNoTrans) ? CUBLAS_OP_N : CUBLAS_OP_T;
// lenet中cuTransB是需要轉置的
cublasOperation_t cuTransB =
(TransB == CblasNoTrans) ? CUBLAS_OP_N : CUBLAS_OP_T;
CUBLAS_CHECK(cublasSgemm(Caffe::cublas_handle(), cuTransB, cuTransA,
N, M, K, &alpha, B, ldb, A, lda, &beta, C, N));
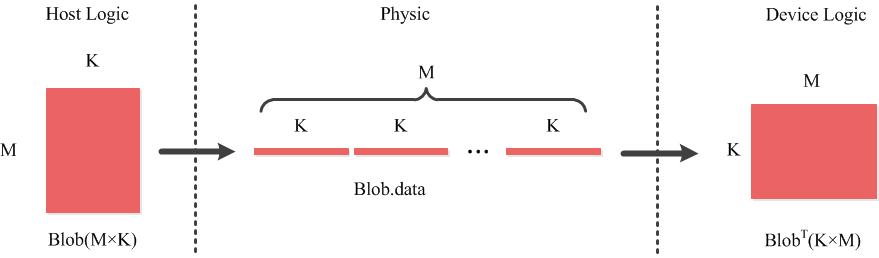
}這裡針對caffe的例子對呼叫cublas做說明:
Caffe行優先儲存,Cuda列優先儲存,矩陣表達的關係:主機端的矩陣
B ,其與裝置端的BT 在物理儲存上是等價的InnerProductLayer中的例子
- 要計算主機端的
T ,實際上是要計算裝置端的TT ,所以用公式TT=W×BT (裝置端表示) - 而主機端的
B ,W 與裝置端的BT ,WT 物理上是相同的儲存,所以在呼叫cublasSgemm的時候(此時在主機端),需要對W 設定轉置
- 要計算主機端的
cublasSgemm的計算公式為
C=alpha×A×B+beta×C
7 第八層ReLUForward
ReLu層很簡單,就是實現了公式
核心程式碼如下,其中negative_slope一般取0,即為以上公式。
out[index] = in[index] > 0 ? in[index] : in[index] * negative_slope;8 第十一層AccuracyLayer
void AccuracyLayer<Dtype>::Forward_cpu(const vector<Blob<Dtype>*>& bottom,
    const vector<Blob<Dtype>*>& top) {
  Dtype accuracy = 0;

  // 一個Batch中包含的樣本數量,lenet中outer_num_=100
  for (int i = 0; i < outer_num_; ++i) {
    //一個樣本對應的類別數量,lenet中一個樣本一個標籤,所以inner_num_=1
    for (int j = 0; j < inner_num_; ++j) {
      //該樣本的label
      const int label_value = static_cast<int>(bottom_label[i * inner_num_ + j]);

      // top_k為取前k個最高評分(的預測標籤)
      // Top-k accuracy
      std::vector<std::pair<Dtype, int> > bottom_data_vector;
      // num_labels為分類類別個數,lenet中為10
      // 接下來兩步把測試評分與類別ID掛勾,並對評分排序
      for (int k = 0; k < num_labels; ++k) {
        bottom_data_vector.push_back(std::make_pair(
            bottom_data[i * dim + k * inner_num_ + j], k));
      }
      std::partial_sort(
          bottom_data_vector.begin(), bottom_data_vector.begin() + top_k_,
          bottom_data_vector.end(), std::greater<std::pair<Dtype, int> >());

      // 看top_5個預測的標籤與實際標籤是不是相同
      // check if true label is in top k predictions
      for (int k = 0; k < top_k_; k++) {
        if (bottom_data_vector[k].second == label_value) {
          ++accuracy;
          if (top.size() > 1) ++top[1]->mutable_cpu_data()[label_value];
          break;
        }
      }
      // 最後的正確率寫入只有一個單位的top blob中
      top[0]->mutable_cpu_data()[0] = accuracy / count;
    }
  }
}
說明:
- outer_num_與inner_num_和為樣本總數量
- lenet中outer_num_為一個Batch中包含的樣本數量
- lenet中inner_num_為1
- 詳細見介紹AccuracyLayer的博文
- top_k為取前k個最高評分(的預測標籤)
9 第十二層SoftmaxWithLossLayer
關於SoftmaxWithLossLayer與SoftmaxLayer的關係參見(Caffe,LeNet)初始化訓練網路(三)10.3節
9.1 SoftmaxLayer
在其Forward_gpu函式中把100*10的bottom blob,計算得到100*10的top blob,可以理解為100個樣本,每個樣本特徵數量為10,計算這100個樣本分別在10個類別上的概率。計算公式如下:
對應的說明圖,針對一個樣本而言,y為樣本的標籤:

程式碼如下:
void SoftmaxLayer<Dtype>::Forward_gpu(const vector<Blob<Dtype>*>& bottom,
    const vector<Blob<Dtype>*>& top) {
  const Dtype* bottom_data = bottom[0]->gpu_data();
  // top shape: 100*10
  Dtype* top_data = top[0]->mutable_gpu_data();
  // scale shape: 100*1
  Dtype* scale_data = scale_.mutable_gpu_data();
  int count = bottom[0]->count();
  int channels = top[0]->shape(softmax_axis_);
  // 從bottom 複製到 top,以下操作都在top上進行
  caffe_copy(count, bottom_data, top_data);

  // 求最大值m=max(z_i)(存放在scale_data)
  kernel_channel_max<Dtype><<<CAFFE_GET_BLOCKS(outer_num_ * inner_num_),
      CAFFE_CUDA_NUM_THREADS>>>(outer_num_, channels, inner_num_, top_data,
      scale_data);
  // 求減法,z_k-m(存放在top_data)
  kernel_channel_subtract<Dtype><<<CAFFE_GET_BLOCKS(count),
      CAFFE_CUDA_NUM_THREADS>>>(count, outer_num_, channels, inner_num_,
      scale_data, top_data);
  // 求指數e^{z_k-m}(存放在top_data)
  kernel_exp<Dtype><<<CAFFE_GET_BLOCKS(count), CAFFE_CUDA_NUM_THREADS>>>(
      count, top_data, top_data);
  // 求和\sum_i^n{e^{z_i-m}}(存放在scale_data)
  kernel_channel_sum<Dtype><<<CAFFE_GET_BLOCKS(outer_num_ * inner_num_),
      CAFFE_CUDA_NUM_THREADS>>>(outer_num_, channels, inner_num_, top_data,
      scale_data);
  // 求除法,得到結果\frac{e^{z_k-m}}{\sum_i^n{e^{z_i-m}}}(存放在top_data)
  kernel_channel_div<Dtype><<<CAFFE_GET_BLOCKS(count),
      CAFFE_CUDA_NUM_THREADS>>>(count, outer_num_, channels, inner_num_,
      scale_data, top_data);
}
9.2 SoftmaxWithLossLayer
對於樣本(x,y),z為x經過網路處理後在ip2層的輸出,也就是SoftmaxWithLossLayer的輸入,同時也是Softmax的輸入。注意n為n個樣本,y為樣本對應的類別(標籤),y=0,1,…,N,損失如下公式計算:
Forward_gpu函式程式碼:
void SoftmaxWithLossLayer<Dtype>::Forward_gpu(
    const vector<Blob<Dtype>*>& bottom, const vector<Blob<Dtype>*>& top) {
  // 計算出prob_(100*10維),即每個樣本屬於某個類別的概率
  softmax_layer_->Forward(softmax_bottom_vec_, softmax_top_vec_);
  const Dtype* prob_data = prob_.gpu_data();
  const Dtype* label = bottom[1]->gpu_data();
  const int dim = prob_.count() / outer_num_;
  const int nthreads = outer_num_ * inner_num_;

  // 求loss,見公式
  // prob_data為100*10,label為100*10,
  // 計算後得loss_data為100*1
  SoftmaxLossForwardGPU<Dtype><<<CAFFE_GET_BLOCKS(nthreads),
      CAFFE_CUDA_NUM_THREADS>>>(nthreads, prob_data, label, loss_data,
      outer_num_, dim, inner_num_, has_ignore_label_, ignore_label_, counts);
  Dtype loss;

  // 求和,loss_data為(1)所以最後輸出為1維
  caffe_gpu_asum(nthreads, loss_data, &loss);

  // 歸一化,除以樣本總數。最後存放在top blob中,top blob只有一個單位內在,用來存放loss
  top[0]->mutable_cpu_data()[0] = loss / get_normalizer(normalization_, valid_count);

}
SoftmaxLossForwardGPU程式碼:
// 為了提高可讀性,程式碼有改動
__global__ void SoftmaxLossForwardGPU(const int nthreads,
          const Dtype* prob_data, const Dtype* label, Dtype* loss,
          const int num, const int dim, const int spatial_dim,
          const bool has_ignore_label_, const int ignore_label_,
          Dtype* counts) {
  CUDA_KERNEL_LOOP(index, nthreads) {
    const int n = index;
    //label_value為真實標籤
    const int label_value = static_cast<int>(label[n]);

    loss[index] = -log(max(prob_data[n * dim + label_value], Dtype(FLT_MIN)));
    counts[index] = 1;
  }
}