基於vue-cli的vuex學習筆記
前幾天看了動腦學院講的vuex,覺得真心不錯,核心的基本都講到了。這兩天去翻了下官網的文件,然後在vue-cli上實現了那個計數案例。現記錄下一些學習筆記。
首先,借用下官網的經典圖:
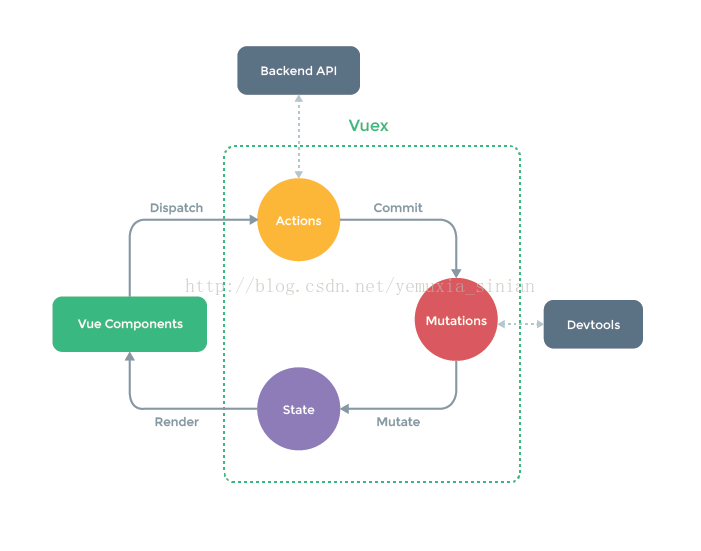
這圖的執行順序是這樣的:
1、元件通過Dispatch觸發Actions裡面的動作;
2、Actions通過Commit提交Mutations
3、Mutations註冊事件,通過這些事件來改變State的狀態
4、最後State狀態改變完後渲染到元件上
接下來來了解一下vuex的一些核心:
1、State
用來儲存一些源資料,然後你可以直接在元件的計算屬性中通過$store.state來獲取資料,如下:
 computed: {
    count () {
      return this.$store.state.count;
    }
}
也可以直接通過mapState來獲取,下面的計數案例就是通過這種方法來獲取的。
2、Getter
這個也可以用來獲取State裡的源資料,如下:
const store = new Vuex.Store({
  state: {
    msg:'hello vue'
  },
  getters: {
    msg: function(state){
      return state.msg;
    }
  }
})Getter還可以用來對資料進行操作後再返回,例如過濾,如下:
這是官網的案例,es6的部分被我改了,它返回todos陣列中done為true的物件。其中的filter它會遍歷陣列的每一項,然後返回其中為true的項並返回新的陣列(不會改變原陣列)。雖然你也可以直接在元件中獲取資料後再對資料進行過濾處理,但是如果多個元件需要用到的話,那麼就要重複寫程式碼了,反之用getter就輕鬆多了。const store = new Vuex.Store({ state: { todos: [ { id: 1, text: '...', done: true }, { id: 2, text: '...', done: false } ] }, getters: { doneTodos: function(state){ return state.todos.filter(function(todo){ return todo.done; }) } } })
Getter可以看做是vuex的計算屬性,getter的返回值會根據他的依賴被快取起來,且只有當它的的依賴值發生改變才會被重新計算。同State一樣,也可以用mapGetters來獲取。如下:
import { mapGetters } from 'vuex'

export default {
  // ...
  computed: {
  // 使用物件展開運算子將 getter 混入 computed 物件中
    ...mapGetters([
      'doneTodos'
      // ...
    ])
  }
}
3、Mutations
mutations用來註冊一些事件,然後通過這些事件來改變state的狀態。接受state為第一引數:如下
const store = new Vuex.Store({
  state: {
    count: 11
  },
  mutations: {
    add(state) {// 變更狀態
      state.count++
    }
  }
})4、Action
改變state狀態的事件註冊完了,那要如何觸發呢?那就是Action啦。如下:
const store = new Vuex.Store({
  state: {
    count: 11
  },
  mutations: {
    add (state) {//變更狀態
      state.count++
    }
  },
  actions: {
    add(context) {
      context.commit('add')
    }
  }
})import { mapActions } from 'vuex'
export default {
// ...
methods: {
...mapActions([
'add', // 將 `this.add()` 對映為 `this.$store.dispatch('add')`
]),
}
}總結:總之整個流程就是,元件中通過dispatch或者mapActions觸發Action,然後Action中通過commit提交mutations來觸發mutations中註冊的事件,最後事件改變state的狀態並更新到元件中。
理解完這些後開始我們的案例:
首先下載vue-cli,之前有說過,這裡就不在說了。
然後是安裝vuex,在命令列中進入自己的vue-cli專案,然後輸入:cnpm install vuex --save
安裝完後就是引入並使用了,我是直接在src資料夾下建立了一個store資料夾和store.js檔案,然後在store.js中引入vue和vuex,然後例項化一個倉庫,主要程式碼如下
import Vue from 'vue'
import Vuex from 'vuex'

Vue.use(Vuex)

const state = {
	count:11
}

const mutations = {	//註冊事件,處理狀態變化
	add:function(state){
		state.count++;
	},
	reduce:function(state){
		state.count--;
	}
}

const actions = {	//處理你要幹什麼
	add(context){
		context.commit('add');
	},
	reduce(context){
		context.commit('reduce');
	}
}

const store = new Vuex.Store({
	state,
	mutations,
	actions
})

export default store
然後在main.js中引入store.js檔案,並注入到vue例項上:
import Vue from 'vue'
import App from './App'
import router from './router'
import store from './store/store.js'

Vue.config.productionTip = false;
//Vue.use(Vuex);

/* eslint-disable no-new */
new Vue({
  el: '#app',
  store,
  router,
  template: '<App/>',
  components: { App }
})
接下來就可以在元件上通過mapActions提交mutations和mapStates來獲取state的狀態了
具體如下:
<template>
<div id="app">
<input type="button" value="add" @click="add" />
<input type="button" value="reduce" @click="reduce" />
<p>當前的數字為:{{count}}</p>
</div>
</template>
<script>
import {mapState,mapActions,mapGetters} from 'vuex'
export default {
name: 'app',
computed:mapState({
count:function(state){
return state.count;
}
}),
methods:{
...mapActions([
'add', // 將 `this.add()` 對映為 `this.$store.dispatch('add')`
'reduce'
])
}
}
</script>
<style>
#app {
font-family: 'Avenir', Helvetica, Arial, sans-serif;
-webkit-font-smoothing: antialiased;
-moz-osx-font-smoothing: grayscale;
text-align: center;
color: #2c3e50;
margin-top: 60px;
}
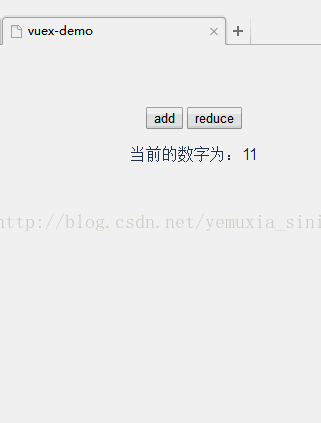
</style>效果如下: