
SpringBoot整合springfox-swagger2構建restful API
上面文章SpringMVC整合springfox-swagger2構建restful API簡單寫了如何在springmvc中整合swagger2。這邊記錄下在springboot中如何整合swagger2。其實使用基本相同。
首先還是引用相關jar包。我使用的maven,在pom.xml中引用相關依賴(原來我使用的是2.2.0的,現在使用2.4.0的):
<dependency>
<groupId>io.springfox</groupId>
<artifactId>springfox-swagger2</artifactId 第二步就是建立swagger的配置類:
這個配置類和springmvc的寫法完全一致。為了區分我又重新命名一個。
package com.xingguo.springboot;
import org.springframework.context.annotation.Bean;
import org.springframework.context.annotation.Configuration;
import springfox.documentation.builders.ApiInfoBuilder;
import springfox.documentation.builders.PathSelectors;
import springfox.documentation.builders 在原來2.2.0的版本中使用new ApiInfo()的方法已經過時,使用new ApiInfoBuilder()進行構造,需要什麼引數就新增什麼引數。當然也可以什麼都新增。如:
private ApiInfo buildApiInfo(){
 return new ApiInfoBuilder().build();
}
那麼頁面顯示的效果如圖:
使用new ApiInfoBuilder().build();

新增屬性:

點選ApiInfoBuilder.java的原始碼可以看到相關方法使用。
第三步就是在自己的controller新增相關的註解:
原來使用在類上使用@controller,現在可以使用@RestController,然後方法的@ResponseBody就可以不用寫了,因為@RestController的註解介面上已經添加了,要求版本在4.0.1之後。
@Target(ElementType.TYPE)
@Retention(RetentionPolicy.RUNTIME)
@Documented
@Controller
@ResponseBody
public @interface RestController {

    /**
     * The value may indicate a suggestion for a logical component name,
     * to be turned into a Spring bean in case of an autodetected component.
     * @return the suggested component name, if any
     * @since 4.0.1
     */
    String value() default "";

}
常用的註解如下:
- @Api()用於類名
- @ApiOperation()用於方法名
- @ApiParam()用於引數說明
- @ApiModel()用於實體類
- @ApiModelProperty用於實體類屬性
更加詳細的含義可以參考官方說明wiki
下面會用程式碼和示例圖說明。
第四部就是在啟動專案在瀏覽器上輸入url:
http://{ip}:{port}/swagger-ui.html#/
我在application.properties中設定的自己的埠號為9090(如果不設定,預設為8080)
server.port=9090如圖:
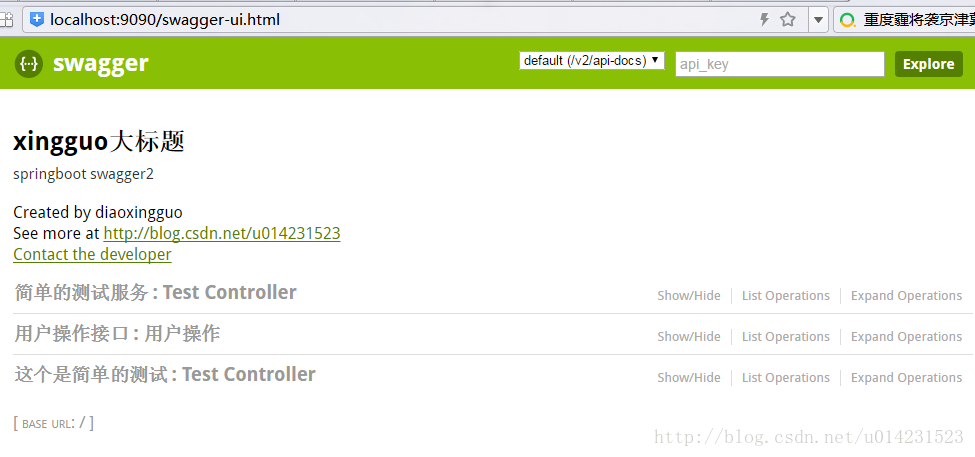
這裡會把相應包下的所有controller按類進行顯示。
我們看下其中一個類UserController.java,(請忽略業務邏輯,只看註解)
package com.xingguo.springboot.controller;

import io.swagger.annotations.Api;
import io.swagger.annotations.ApiOperation;
import io.swagger.annotations.ApiParam;

import javax.annotation.Resource;

import org.springframework.web.bind.annotation.GetMapping;
import org.springframework.web.bind.annotation.PostMapping;
import org.springframework.web.bind.annotation.RequestBody;
import org.springframework.web.bind.annotation.ResponseBody;
import org.springframework.web.bind.annotation.RestController;

import com.xingguo.springboot.model.User;
import com.xingguo.springboot.service.UserService;

/**
 * Created by diaoxingguo on 2016/10/24.
 */
@Api(value="使用者controller",description="使用者操作",tags={"使用者操作介面"})
@RestController
public class UserController {

    @Resource
    private UserService userService;

    @ApiOperation("獲取使用者資訊")
    @GetMapping("/getUserInfo")
    public User getUserInfo(@ApiParam(name="id",value="使用者id",required=true) Long id,@ApiParam(name="username",value="使用者名稱") String username) {
        User user = userService.getUserInfo();
        return user;
    }


    @ApiOperation("更改使用者資訊")
    @PostMapping("/updateUserInfo")
    public int updateUserInfo(@RequestBody @ApiParam(name="使用者物件",value="傳入json格式",required=true) User user){
        int num = userService.updateUserInfo(user);
        return num;
    }

    @ApiOperation("新增使用者資訊")
    @PostMapping("/saveUser")
    public String saveUser(@RequestBody @ApiParam(name="user",value="json fromat",required=true) User user) {
        userService.saveUser(user);
        return "success";
    }
}
這裡說明下,在使用物件作為引數時,可以在物件上新增相應的註解,使用者頁面顯示。
如:
package com.xingguo.springboot.model;

import io.swagger.annotations.ApiModel;
import io.swagger.annotations.ApiModelProperty;

import java.util.List;

/**
 * Created by diaoxingguo on 2016/10/24.
 */
@ApiModel(description="使用者物件user")
public class User {
    @ApiModelProperty(value="使用者名稱",name="username")
    private String username;
    @ApiModelProperty(value="狀態",name="state",required=true)
    private Integer state;
    private String password;
    private String nickName;
    private Integer isDeleted;

    private String[] ids;
    private List<String> idList;

    public String getUsername() {
        return username;
    }

    public void setUsername(String username) {
        this.username = username;
    }

    public Integer getState() {
        return state;
    }

    public void setState(Integer state) {
        this.state = state;
    }

    public String getPassword() {
        return password;
    }

    public void setPassword(String password) {
        this.password = password;
    }

    public String[] getIds() {
        return ids;
    }

    public void setIds(String[] ids) {
        this.ids = ids;
    }

    public List<String> getIdList() {
        return idList;
    }

    public void setIdList(List<String> idList) {
        this.idList = idList;
    }

    public String getNickName() {
        return nickName;
    }

    public void setNickName(String nickName) {
        this.nickName = nickName;
    }

    public Integer getIsDeleted() {
        return isDeleted;
    }

    public void setIsDeleted(Integer isDeleted) {
        this.isDeleted = isDeleted;
    }


}
顯示的效果如圖:
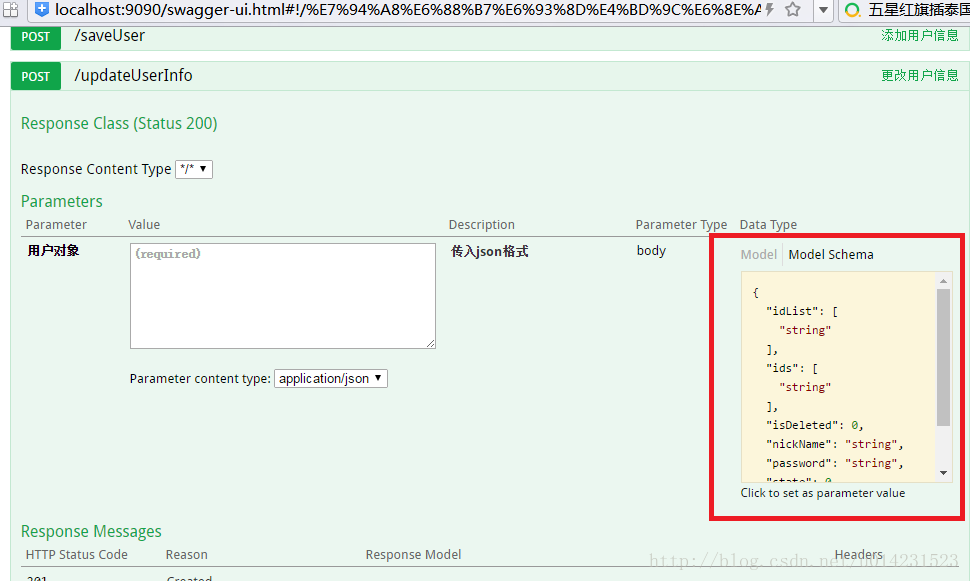
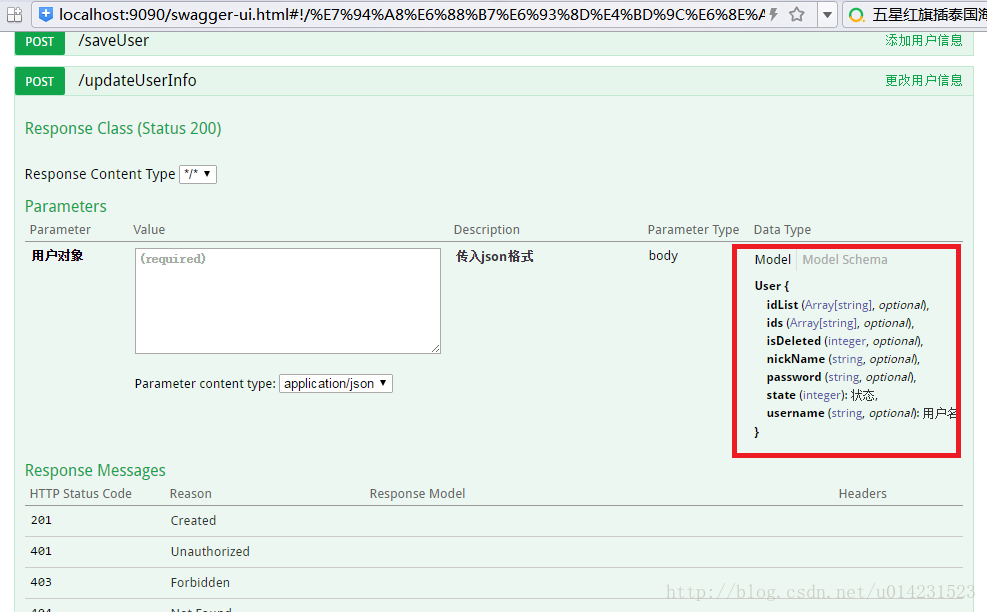
看上圖紅框的部分,其中一個是json格式的點選就可以獲取引數格式。
第二張中可以看到欄位相應的註釋和是否必填。
如果在欄位上添加註釋@ApiModelProperty(required=true)就是必填(預設是false),相應的頁面optional標識也會消失,標識這個欄位必填。
點選下面的try it out按鈕就可以進行除錯。
在使用單個引數時,如上面程式碼中的getUserInfo()方法,對應的效果圖如下:
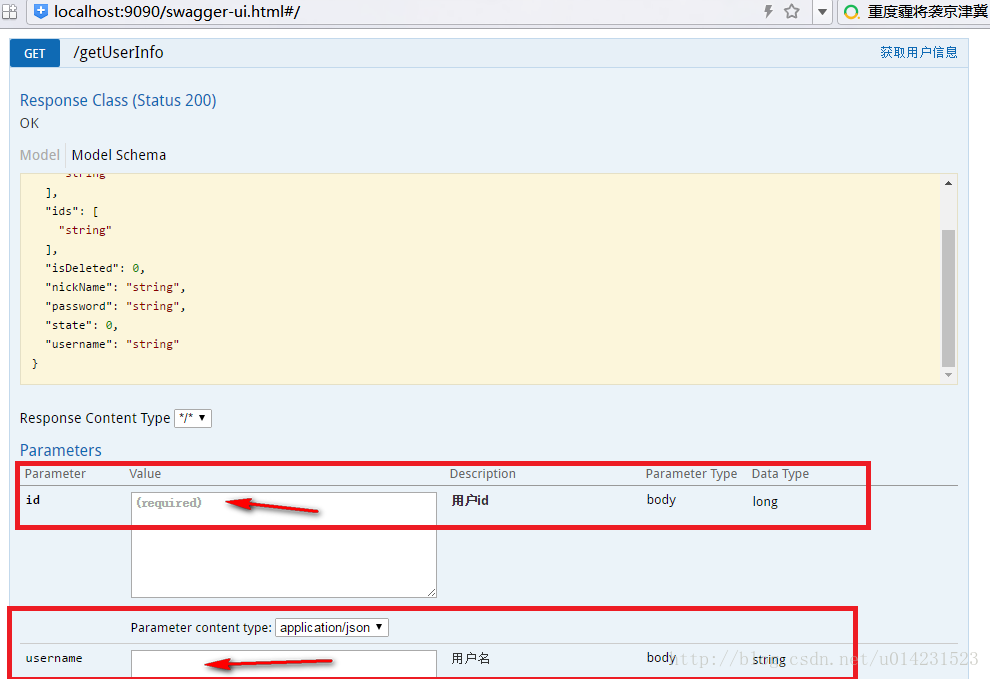
這裡如果是新增required=true,@ApiParam(required=true)則會在頁面上顯示required的標識。同樣預設為false。
其他的使用方式可以自己動手試試。
相關推薦
SpringBoot整合springfox-swagger2構建restful API
上面文章SpringMVC整合springfox-swagger2構建restful API簡單寫了如何在springmvc中整合swagger2。這邊記錄下在springboot中如何整合swagger2。其實使用基本相同。 首先還是引用相關jar包。我使用
[springboot::]整合swagger2,構建RESTful api
1.本來以為會很容易整合的,結果一直報404,試了好久,心累…最後終於找到解決辦法 http://localhost:8080/swagger-ui.html 訪問不到,原因是,是因為 MVC 沒有找到 swagger-ui 包中的 swagger-ui.html 檔案; 但是這個檔案在ja
企業分布式微服務雲SpringCloud SpringBoot mybatis (二十五)集成swagger2構建Restful API
sel ima eth syn conf ring 但是 batis 關註 一、引入依賴 <dependency> <groupId>io.springfox</groupId> <
第六篇:Spring Boot整合Swagger2構建RESTful API文件
由於Spring Boot有快速開發、便捷部署等特性,所以很大一部分Spring Boot的使用者會用來構建RESTfulAPI。而我們構建RESTfulAPI的目的通常都是由於多終端的原因,這些終端會共用很多底層業務邏輯,因此我們會抽象出這樣一層來同時服務於多個移動端或者Web前端。
整合swagger2構建Restful API
整合swagger2構建Restful API 在pom.xml中進行版本管理 <swagger.version>2.8.0</swagger.version> 給taosir-api的pom.xml中新增依賴配置 <!-- swagger start -
Springboot 學習筆記 之 Day 5 如何加密,以及用Swagger2構建Restful API
先看一下使用Swagger2構建Restful API效果圖 超級簡單的,只需要在pom 中引用如下jar包 <dependency> <groupId>io.springfox</group
SpringBoot+Swagger2構建 RESTful API文件報org.thymeleaf.exceptions.TemplateInputException的錯誤
在是使用Swagger2構建RESTful API時,報TemplateInputException錯誤: org.thymeleaf.exceptions.TemplateInputException: Error resolving template "user/getById/1", t
springboot中使用swagger2構建restful介面文件
最近幾年網際網路專案、移動應用越來越多,不同於之前的企業內部應用,該類專案通常就是好幾個應用互相呼叫,我們一般會使用word或者excel來記錄介面的相應描述,但是這樣會有一些問題,比如更新困難,不易管理。 Swagger 是一款RESTFUL介面的文件線上自動生成+功能測試功能軟體,它既能
Spring boot 使用Swagger2構建RESTful API文件
前言 SwaggerUI可以說是一個非常好用的API文件工具,是前後端分離開發模式下的必備工具、具體實現及部分乾貨知識如下 匯入依賴 <!-- RESTful APIs swagger2 --> <dependency> <
Spring Boot 中使用 Swagger2 構建 RESTFUL API 文件
由於Spring Boot能夠快速開發、便捷部署等特性,相信有很大一部分Spring Boot的使用者會用來構建RESTful API。而我們構建RESTful API的目的通常都是由於多終端的原因,這些終端會共用很多底層業務邏輯,因此我們會抽象出這樣一層來同時服務於多個移動端或者Web前端。
Spring MVC中使用 Swagger2 構建Restful API
0.Spring MVC配置檔案中的配置 <!-- 設定使用註解的類所在的jar包,只加載controller類 --> <span style="white-space:pre"> </span><context:compone
dubbo2.5-spring4-mybastis3.2-springmvc4-mongodb3.4-redis3(十)之Spring MVC中使用 Swagger2 構建Restful API
1、Swagger2是什麼? Swagger 是一款RESTFUL介面的文件線上自動生成+功能測試功能軟體。 Swagger 是一個規範和完整的框架,用於生成、描述、呼叫和視覺化 RESTful 風格的 Web 服務。總體目標是使客戶端和檔案系統作為伺服器以
SpringBoot整合CXF,實現Restful api 與 WebService api dao層使用Mybatis
1、本demo目的查詢學生資訊【為了方便沒有寫批量查詢,也就是說以下getAllStudents也是一個一個查詢【而且沒有測試該方法正確性,之所以寫只是為了規範,返回Student的集合Students也是一個獨立的實體,非必需,請忽略】2、主要是網上好多不全,整合的時候各種
SpringBoot整合Springfox-Swagger2
前言 不管Spring Boot整合還是SpringMVC整合Swagger都基本類似,重點就在於配置Swagger,它的精髓所在就在於配置。 @目錄1、Swagger簡介2、整合前可能遇到的問題3、SpringBoot整合Swagger4、配置Swagger4.1、Swagger四部分佈局4.2、第二部分:
企業分布式微服務雲SpringCloud SpringBoot mybatis (二十一)構建restful API
tis lis bind strong img tro entity 數據源 host 引入依賴 在pom文件引入mybatis-spring-boot-starter的依賴: <dependency> <groupId>o
基於dubbo的分散式專案框架搭建 開發工具idea (springboot+dubbo+zookeeper+redis+rabbitmq+基於Swagger2的restful api) --(二)
1.dubbo-admin 2.5.8的安裝 http://dubbo.apache.org/en-us/index.html 點選GITHUB 跳轉到github下載dubbo原始碼 點選Branch切換到Tags,找到對應的2.5.8版本,下載該版本,下載解壓完以後
基於dubbo的分散式專案框架搭建 開發工具idea (springboot+dubbo+zookeeper+redis+rabbitmq+基於Swagger2的restful api) --(一)
1. spring-boot web框架下載配置 https://start.spring.io/ 點選Switch to the full version 勾選詳細的配置 根據需要更改group atrifact...等資訊 &nb
基於dubbo的分散式專案框架搭建 開發工具idea (springboot+dubbo+zookeeper+redis+rabbitmq+基於Swagger2的restful api) --(四)
1.rabbitmq的整合 首先在配置檔案裡增加 #rabbitMQ spring.rabbitmq.host=127.0.0.1 spring.rabbitmq.port=5672 spring.rabbitmq.username=root spring.rabbitmq.password
基於dubbo的分散式專案框架搭建 開發工具idea (springboot+dubbo+zookeeper+redis+rabbitmq+基於Swagger2的restful api) --(三)
1.dubbo註冊中心zookeeper 的安裝 http://mirrors.shu.edu.cn/apache/zookeeper/ 選擇對應的版本下載即可 修改zoo_sample.cfg為zoo.cfg(可以先備份一份) 在安裝目錄新建data和log目錄 修改zo
整合swagger2生成Restful Api介面文件 webapi文件描述-swagger
整合swagger2生成Restful Api介面文件 swagger Restful文件生成工具 2017-9-30 官方地址:https://swagger.io/docs/specification/about/ 官方Github:https://github.com/swagger-