
基於Eclipse搭建SSH框架:第四篇 使用SSH開發一個小程式
阿新 • • 發佈:2019-01-29
本文將介紹如何使用SSH框架開發一個簡單的使用者註冊程式。
注:由於在開發本註冊程式的時候,報出了 java.lang.ClassNotFoundException: org.hibernate.service.jta.platform.spi.JtaPlatform等錯誤,網上說的是spring3與hibernate4的整合的確會有錯誤。,所以本專案中使用的hibernate修改為使用hibernate3.6.7
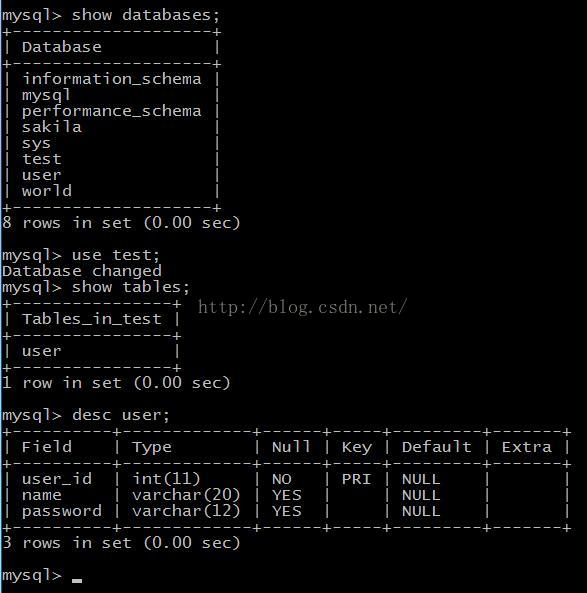
1.在mysql資料庫中建立資料庫test ,並在test中建立user資料表
2.在src目錄下建立com.integration.entity包,然後在該包下建立持久化類以及對映檔案
package com.integration.entity;

public class User implements java.io.Serializable{

	private int id;
	private String name;
	private String password;

	public User(){


	}
	public User(int id, String name, String password) {
		this.id = id;
		this.name = name;
		this.password = password;

	}
	public int getId() {
		return id;
	}
	public void setId(int id) {
		this.id = id;
	}
	public String getName() {
		return name;
	}
	public void setName(String name) {
		this.name = name;
	}
	public String getPassword() {
		return password;
	}
	public void setPassword(String password) {
		this.password = password;
	}


}
<?xml version="1.0" encoding="UTF-8"?>

<!DOCTYPE hibernate-mapping PUBLIC
     "-//Hibernate/Hibernate Mapping DTD 3.0//EN"
     "http://hibernate.sourceforge.net/hibernate-mapping-3.0.dtd">


<hibernate-mapping>
   <class name="com.hibernate.entity.User" table="user">
      <id name="id" column="user_id" type="java.lang.Integer">
          <generator class="increment"/>
      </id>
      <property name="name" type="java.lang.String" column="name" length="20"></property>
      <property name="password" type="java.lang.String" column="password" length="12"></property>
    </class>
</hibernate-mapping>
3.在src目錄下建立com.integration.dao包,然後在該包下建立DAO介面UserDAO.java、DAO實現類UserDAOImpl.java
package com.integration.dao;
import com.integration.entity.User;
public interface UserDAO {

	void save(User user);

}
package com.integration.dao;

import org.hibernate.SessionFactory;
import org.springframework.orm.hibernate3.HibernateTemplate;

import com.integration.entity.User;

public class UserDAOImpl implements UserDAO {

	private SessionFactory sessionFactory;
	private HibernateTemplate hibernatetemplate;

	public void setSessionFactory(SessionFactory sessionFactory) {
		this.sessionFactory = sessionFactory;

	}

	private HibernateTemplate getHibernateTemplate() {
		if (hibernatetemplate == null)
			hibernatetemplate = new HibernateTemplate(sessionFactory);
		System.out.println("here");
		return hibernatetemplate;
	}

	@Override
	public void save(User user){

		getHibernateTemplate().save(user);

	}


}
4.在src目錄下建立com.integration.action包,然後在該包下建立RegisterAction類,如下:
package com.integration.action;

import com.integration.dao.UserDAO;
import com.integration.entity.User;
import com.opensymphony.xwork2.ActionSupport;

public class RegisterAction extends ActionSupport{

	private String userName;
	private String pwd;
	private UserDAO userDAO;
	public UserDAO getUserDAO() {
		return userDAO;
	}
	public void setUserDAO(UserDAO userDAO) {
		this.userDAO = userDAO;
	}
	public String getUserName() {
		return userName;
	}
	public void setUserName(String userName) {
		this.userName = userName;
	}
	public String getPwd() {
		return pwd;
	}
	public void setPwd(String pwd) {
		this.pwd = pwd;
	}

	public String execute() throws Exception{
	    User user=new User();
	    user.setId(1);
	    user.setName(this.userName);
	    user.setPassword(this.pwd);
		userDAO.save(user);
		return "success";
	}
}
5.1web.xml
<?xml version="1.0" encoding="UTF-8"?>
<web-app xmlns:xsi="http://www.w3.org/2001/XMLSchema-instance"
	xmlns="http://java.sun.com/xml/ns/javaee"
	xsi:schemaLocation="http://java.sun.com/xml/ns/javaee http://java.sun.com/xml/ns/javaee/web-app_2_5.xsd"
	id="WebApp_ID" version="2.5">
	 <display-name>S2SH</display-name>
	 <context-param>
	 	<param-name>contextConfigLocation</param-name>
		<param-value>/WEB-INF/classes/applicationContext.xml</param-value>
	 </context-param>
		<listener>
		    <listener-class>org.springframework.web.context.ContextLoaderListener</listener-class>
		</listener>
	<filter>
		<!-- Filter名字 -->
		<filter-name>struts2</filter-name>
		<!-- Filter入口 -->
		<filter-class>org.apache.struts2.dispatcher.ng.filter.StrutsPrepareAndExecuteFilter</filter-class>
	</filter>
	<filter-mapping>
		<!-- Filter名字 -->
		<filter-name>struts2</filter-name>
		<!-- 截獲的URL -->
		<url-pattern>/*</url-pattern>
	</filter-mapping>


	<welcome-file-list>
		<welcome-file>index.jsp</welcome-file>
		<welcome-file>index.html</welcome-file>
		<welcome-file>index.htm</welcome-file>
	</welcome-file-list>
</web-app>
5.2 struts.xml
<?xml version="1.0" encoding="UTF-8"?>
<!DOCTYPE struts PUBLIC "-//Apache Software Foundation//DTD Struts Configuration 2.0//EN"
    "http://struts.apache.org/dtds/struts-2.0.dtd">
<!-- 指定struts.xml檔案的根元素 -->
<struts>
	<constant name="struts.i18n.encoding" value="UTF-8"></constant>
<!-- 	<constant name="struts.objectFactory" value="spring" />
  - -->
	<!-- 定義包 -->
	<package name="default" namespace="/" extends="struts-default">


		<action name="register" class="registerService">
			<result name="success">/success2.jsp</result>
		</action>


	</package>

</struts>
5.3applicationContext.xml
<?xml version="1.0" encoding="UTF-8"?>

<beans xmlns="http://www.springframework.org/schema/beans"
	xmlns:xsi="http://www.w3.org/2001/XMLSchema-instance" xmlns:p="http://www.springframework.org/schema/p"
	xmlns:aop="http://www.springframework.org/schema/aop"
	xsi:schemaLocation="http://www.springframework.org/schema/beans
	    http://www.springframework.org/schema/beans/spring-beans-3.0.xsd
	    http://www.springframework.org/schema/aop
	        http://www.springframework.org/schema/aop/sping-aop-3.0.xsd">


	<!-- 定義資料來源org.springframework.jdbc.dataSource.DriverManagerDataSource -->
	<bean id="dataSource" class="org.apache.commons.dbcp.BasicDataSource">
		<!-- 指定連線資料庫的驅動 -->
		<property name="driverClassName">
			<value>com.mysql.jdbc.Driver</value>
		</property>
		<!-- 指定連線資料庫的URL -->
		<property name="url">
			<value>jdbc:mysql://localhost:3306/test</value>
		</property>

		<!-- 指定連線資料庫的使用者名稱 -->
		<property name="username">
			<value>root</value>
		</property>
		<!-- 指定連線資料庫的密碼 -->
		<property name="password">
			<value>toor</value>
		</property>
	</bean>

	<!-- 定義Hibernare的sessionFactory -->
	<bean id="sessionFactory"
		class="org.springframework.orm.hibernate3.LocalSessionFactoryBean">
		<!-- 依賴注入已配置好的資料來源dataSource -->
		<property name="dataSource">
			<ref local="dataSource" />
		</property>
		<!-- 指定Hibernate所有對映檔案的路徑 -->
		<property name="mappingResources">
			<list>
		  <value>com/integration/entity/User.hbm.xml</value>
			</list>
		</property>

		<!-- 設定Hibernate的屬性 -->
		<property name="hibernateProperties">
			<props>
				<!-- 配置Hibernate的資料庫方言 -->
				<prop key="hibernate.dialect">
					org.hibernate.dialect.MySQLDialect
				</prop>
				<!-- 設定是否在控制檯輸出由Hibernate生成的SQL語句 -->

				<prop key="show_sql">true</prop>
			</props>

		</property>
	</bean>
        	<bean id="userDAO" class="com.integration.dao.UserDAOImpl">
		<property name="sessionFactory">
			<ref local="sessionFactory" />
		</property>

	</bean>
	<bean id="registerService" class="com.integration.action.RegisterAction">
	    <property name="userDAO">
	       <ref local="userDAO"/>
	    </property>
	</bean>

</beans>
6.專案概覽

7.register.jsp與success2.jsp的內容分別如下:
<%@ page language="java" contentType="text/html; charset=UTF-8"
	pageEncoding="UTF-8"%>
<!DOCTYPE html PUBLIC "-//W3C//DTD HTML 4.01 Transitional//EN" "http://www.w3.org/TR/html4/loose.dtd">
<html>
<head>
<meta http-equiv="Content-Type" content="text/html; charset=UTF-8">
<title>Insert title here</title>
</head>
<body>
<form name="input" action="register" method="get">
使用者名稱: <input type="text" name="userName"><br/>
密碼:<input type="password" name="pwd"><br/>

<input type="submit" value="提交">
</form>
</body>
</html>
<%@ page language="java" contentType="text/html; charset=UTF-8"
pageEncoding="UTF-8"%>
<!DOCTYPE html PUBLIC "-//W3C//DTD HTML 4.01 Transitional//EN" "http://www.w3.org/TR/html4/loose.dtd">
<html>
<head>
<meta http-equiv="Content-Type" content="text/html; charset=UTF-8">
<title>Insert title here</title>
</head>
<body>
註冊成功了!!
</body>
</html>success.jsp用不到。
8.執行專案

在位址列輸入

輸入資訊並提交


看一下資料庫

至此,如何使用SSH開發程式就介紹完了!!
完整的原始碼在這裡