
Nexus私服使Maven更加強大
前邊簡單介紹了Maven,而Maven預設提供的中央倉庫是在遠端網路服務Appache提供的,這對於我們開發時不合理的。如果我們沒網了或者什麼情況,我們怎麼辦?也就是說我們隊中央倉庫的依賴性太大。而Nexus私服則可以解決我們這個問題。先看下這張圖應該大家就非才明白了:
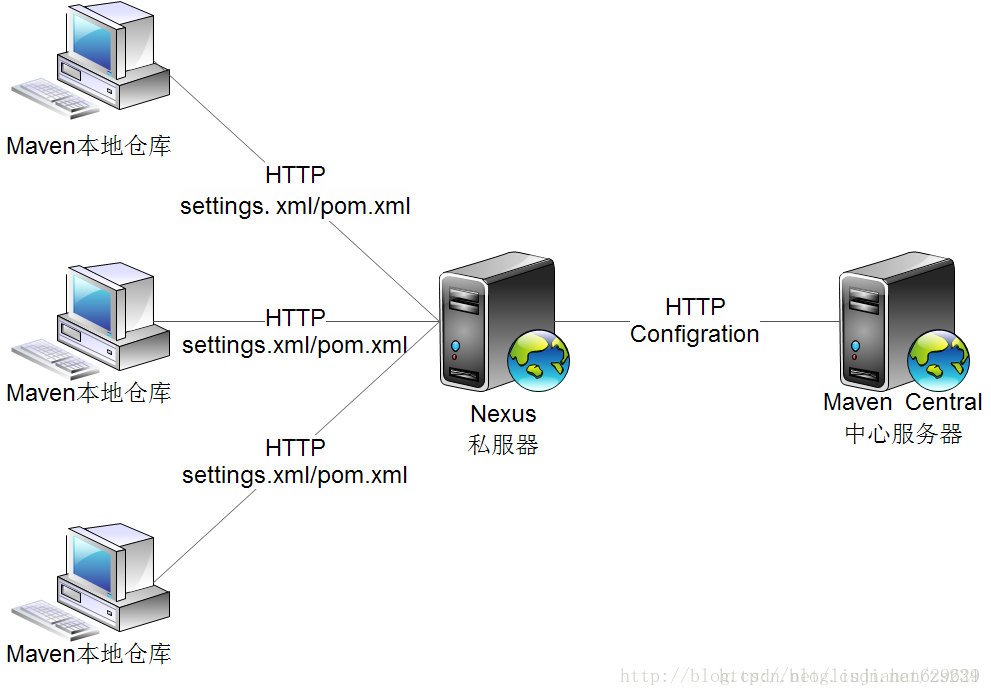
這樣就相當於在我們本地的區域網搭建了一個類似中央倉庫的伺服器,我們開始將中央倉庫的一些資料下載到私伺服器上,然後平時我們的maven專案就是直接訪問區域網內的私服即可,既節省了網路頻寬也會加速專案搭建的程序,這樣對我們開發來說,對公司來說都是非常好的選擇。下邊簡單看一下Nexus私服的簡單使用:
1、Nexus下載
2、Nexus啟動
我下載的是zip包,解壓後進入\nexus-2.1.2-bundle\nexus-2.1.2\bin\jsw\,根據作業系統型別選擇資料夾,我選的是windows-x86-32資料夾,進入後可看到如下所示bat檔案。
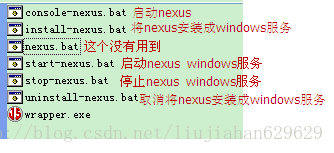
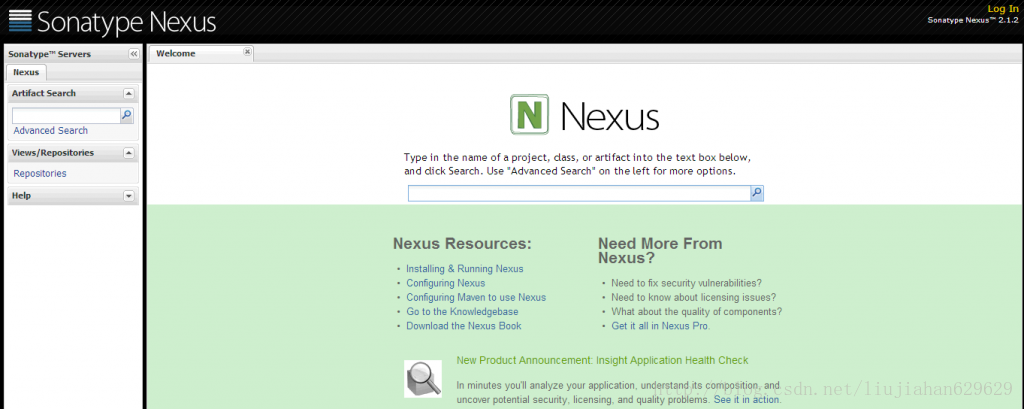
雙擊console-nexus.bat執行。遊覽器中輸入http://127.0.0.1:8081/nexus/,出現如下圖所示就代表nexus已經啟動成功。
8081為預設的埠號,要修改埠號可進入nexus-2.1.2-bundle\nexus-2.1.2\conf\開啟nexus.properties檔案,修改application-port屬性值就可以了。
預設的使用者名稱和密碼:admin/admin123,登入後看到如下圖所示:
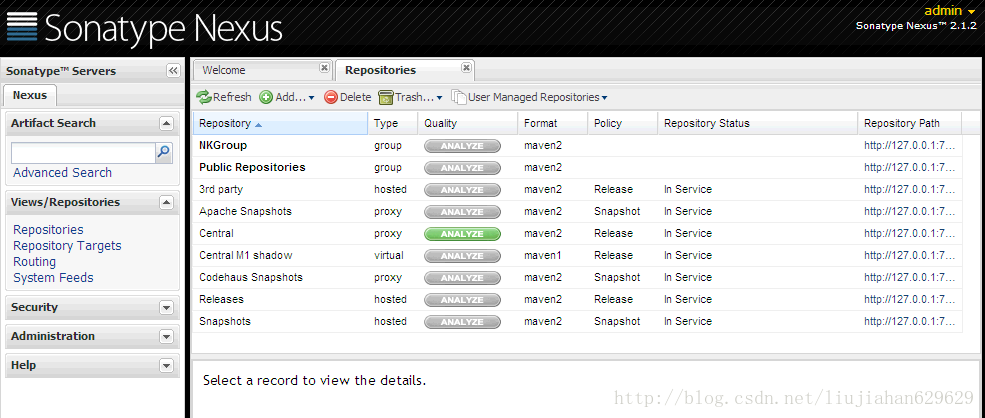
3、Nexus倉庫
nexus的倉庫型別分為以下四種:
group: 倉庫組
hosted:宿主
proxy:代理
virtual:虛擬
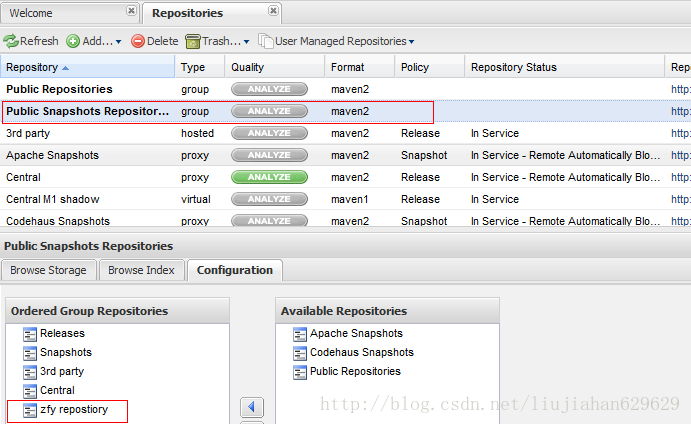
首次登陸nexus後可以看到以下一個倉庫組和多個倉庫。
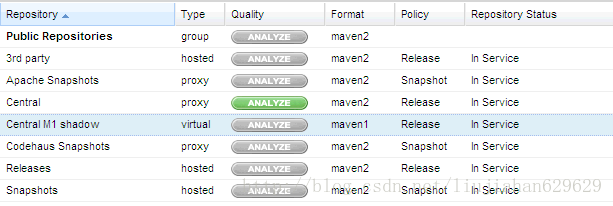
PublicRepositories: 倉庫組
3rd party: 無法從公共倉庫獲得的第三方釋出版本的構件倉庫
Apache Snapshots: 用了代理ApacheMaven倉庫快照版本的構件倉庫
Central: 用來代理maven中央倉庫中釋出版本構件的倉庫
Central M1 shadow: 用於提供中央倉庫中M1格式的釋出版本的構件映象倉庫
Codehaus Snapshots: 用來代理CodehausMaven 倉庫的快照版本構件的倉庫
Releases: 用來部署管理內部的釋出版本構件的宿主型別倉庫
Snapshots:用來部署管理內部的快照版本構件的宿主型別倉庫
4、配置nexus
4.1、開啟遠端索引
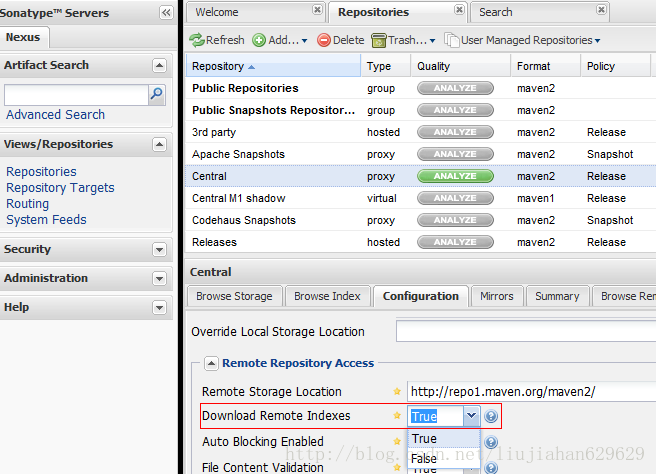
新搭建的neuxs環境只是一個空的倉庫,需要手動和遠端中心庫進行同步,nexus預設是關閉遠端索引下載,最重要的一件事情就是開啟遠端索引下載。登陸nexus系統,預設使用者名稱密碼為admin/admin123。
點選左邊Administration選單下面的Repositories,找到右邊倉庫列表中的三個倉庫Apache Snapshots,Codehaus Snapshots和Maven Central,然後再沒有倉庫的configuration下把Download Remote Indexes修改為true。如下圖
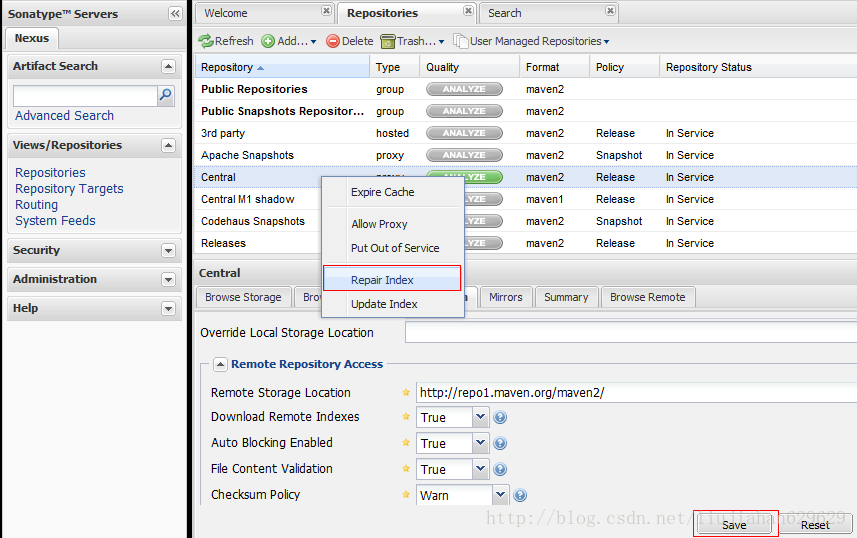
然後在Apache Snapshots,Codehaus Snapshots和Maven Central這三個倉庫上分別右鍵,選擇Repari Index,這樣Nexus就會去下載遠端的索引檔案。
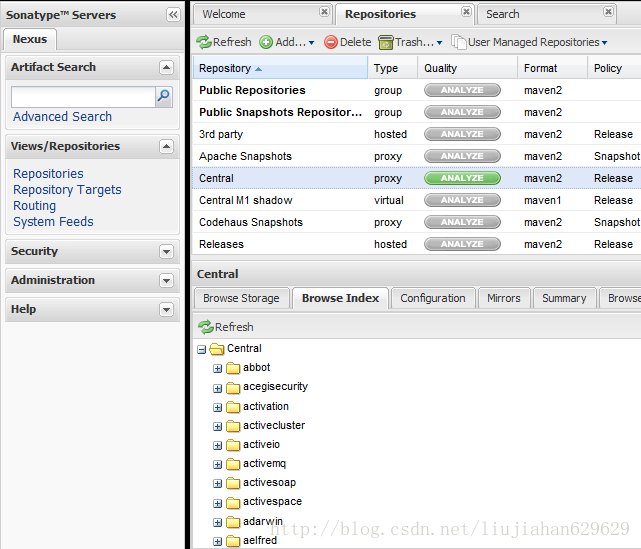
這樣設定以後, Nexus會自動從遠端中央倉庫下載索引檔案, 為了檢驗索引檔案自動下載是否生效,可以卻換到Browse Index
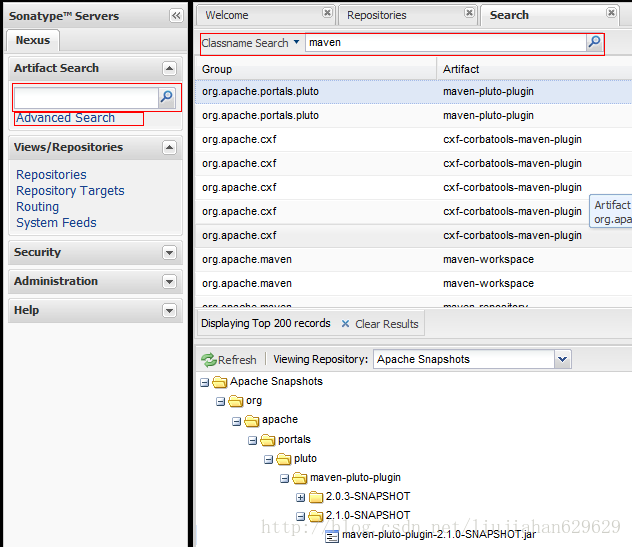
在左邊選單欄裡面有個Artifact Search, 在輸入框裡面輸入你想要搜尋的構件名字,比如:maven, 那麼查詢結果如下:
4.2建立宿主倉庫
新 建公司的內部倉庫,步驟為Repositories –> Add –>Hosted Repository,在頁面的下半部分輸入框中填入Repository ID和Repository Name即可,比如分別填入zfy 和 zfy repostiory,另外把Deployment Policy設定為Allow Redeploy,點選save就建立完成了。
這裡我點選新增宿主型別的倉庫,在倉庫列表的下方會出現新增倉庫的配置,如下所示:
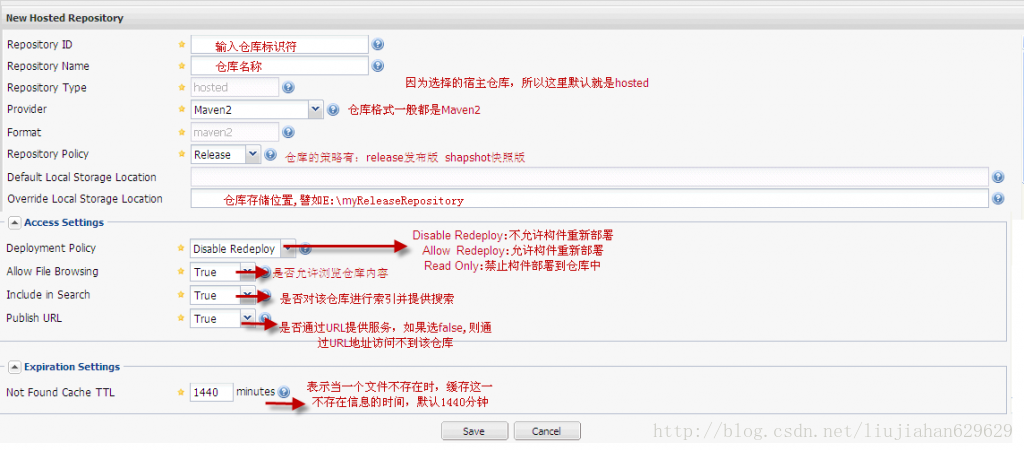
點選save按鈕後就會在倉庫列表中看到剛才新增的倉庫。
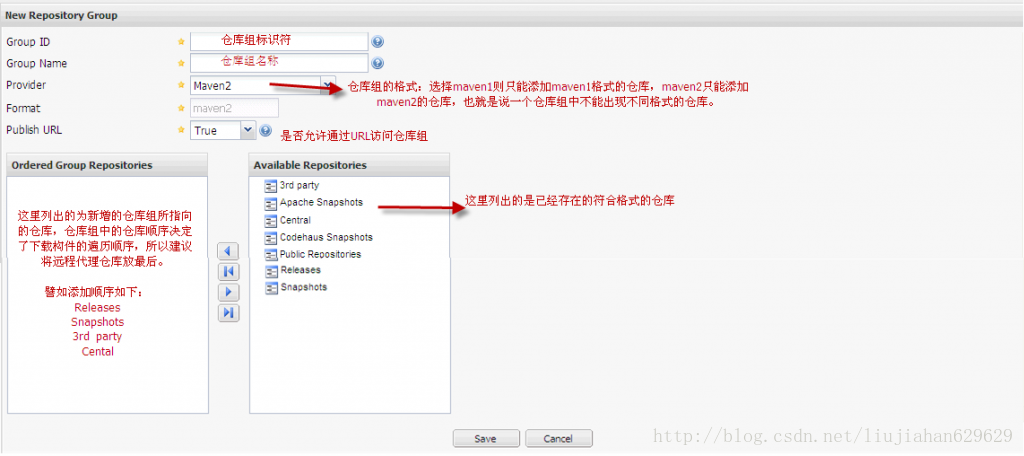
4.3、建立Nexus倉庫組
Nexus 中倉庫組的概念是Maven沒有的,在Maven看來,不管你是hosted也好,proxy也好,或者group也好,對我都是一樣的,我只管根據 groupId,artifactId,version等資訊向你要構件。為了方便Maven的配置,Nexus能夠將多個倉庫,hosted或者 proxy合併成一個group,這樣,Maven只需要依賴於一個group,便能使用所有該group包含的倉庫的內容。
neuxs- 1.9.2.3中預設自帶了一個名為“Public Repositories”組,點選該組可以對他保護的倉庫進行調整,把剛才建立的公司內部倉庫zfy repostiory加入其中,這樣就不需要再在maven中明確指定內部倉庫 的地址了。同時建立一個Group ID為public-snapshots、Group Name為Public SnapshotsRepositories的組,把Apache Snapshots、Codehaus Snapshots、Snapshots和zfy repostiory加入其中。
到這裡neuxs的安裝配置就完成了,下面介紹如何在maven中使用自己的私服。
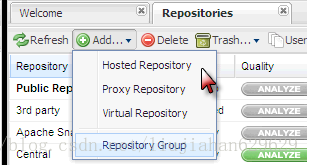
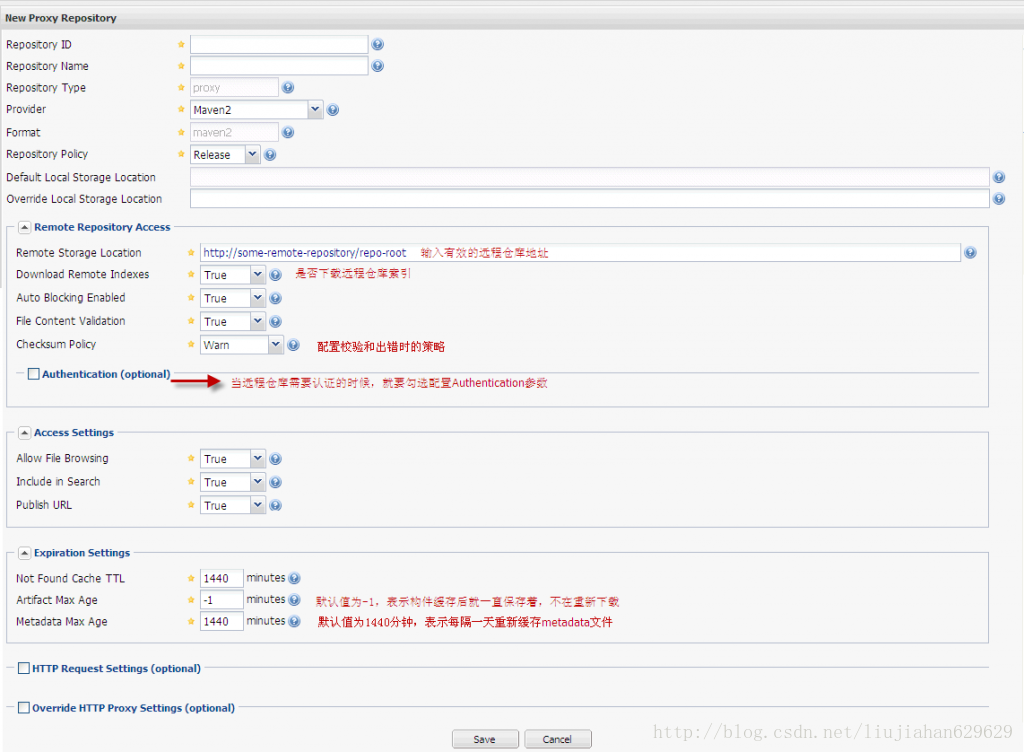
4.4、建立Nexus代理倉庫
點選選單欄上的Add按鈕後選擇Proxy Repository,看到如下所示配置介面:
5、settings.xml的配置
1.	<?xml version="1.0" encoding="UTF-8"?>
2.	<settings xmlns="http://maven.apache.org/SETTINGS/1.0.0"
3.	          xmlns:xsi="http://www.w3.org/2001/XMLSchema-instance"
4.	          xsi:schemaLocation="http://maven.apache.org/SETTINGS/1.0.0 http://maven.apache.org/xsd/settings-1.0.0.xsd">
5.
6.	  <pluginGroups></pluginGroups>
7.	  <proxies></proxies>
8.
9.	  <servers>
10.	      <server>
11.	      <id>nexus-releases</id>
12.	      <username>admin</username>
13.	      <password>admin123</password>
14.	    </server>
15.	    <server>
16.	      <id>nexus-snapshots</id>
17.	      <username>admin</username>
18.	      <password>admin123</password>
19.	    </server>
20.	  </servers>
21.
22.	  <mirrors>
23.	    <mirror>
24.	      <id>nexus-releases</id>
25.	      <mirrorOf>*</mirrorOf>
26.	      <url>http://localhost:8081/nexus/content/groups/public</url>
27.	    </mirror>
28.	    <mirror>
29.	      <id>nexus-snapshots</id>
30.	      <mirrorOf>*</mirrorOf>
31.	      <url>http://localhost:8081/nexus/content/groups/public-snapshots</url>
32.	    </mirror>
33.	  </mirrors>
34.
35.	  <profiles>
36.	   <profile>
37.	      <id>nexus</id>
38.	      <repositories>
39.	        <repository>
40.	          <id>nexus-releases</id>
41.	          <url>http://nexus-releases</url>
42.	          <releases><enabled>true</enabled></releases>
43.	          <snapshots><enabled>true</enabled></snapshots>
44.	        </repository>
45.	        <repository>
46.	          <id>nexus-snapshots</id>
47.	          <url>http://nexus-snapshots</url>
48.	          <releases><enabled>true</enabled></releases>
49.	          <snapshots><enabled>true</enabled></snapshots>
50.	        </repository>
51.	      </repositories>
52.	      <pluginRepositories>
53.	         <pluginRepository>
54.	                <id>nexus-releases</id>
55.	                 <url>http://nexus-releases</url>
56.	                 <releases><enabled>true</enabled></releases>
57.	                 <snapshots><enabled>true</enabled></snapshots>
58.	               </pluginRepository>
59.	               <pluginRepository>
60.	                 <id>nexus-snapshots</id>
61.	                  <url>http://nexus-snapshots</url>
62.	                <releases><enabled>true</enabled></releases>
63.	                 <snapshots><enabled>true</enabled></snapshots>
64.	             </pluginRepository>
65.	         </pluginRepositories>
66.	    </profile>
67.	  </profiles>
68.
69.	  <activeProfiles>
70.	      <activeProfile>nexus</activeProfile>
71.	  </activeProfiles>
72.
73.	</settings>
6、 maven 專案的pom.xml配置
1.	<pre class="html" name="code"> <distributionManagement>
2.	        <!-- 兩個ID必須與 setting.xml中的<server><id>nexus-releases</id></server>保持一致-->
3.	        <repository>
4.	            <id>nexus-releases</id>
5.	            <name>Nexus Release Repository</name>
6.	            <url>http://localhost:8081/nexus/content/repositories/releases</url>
7.	        </repository>
8.	        <snapshotRepository>
9.	            <id>nexus-snapshots</id>
10.	            <name>Nexus Snapshot Repository</name>
11.	            <url>http://localhost:8081/nexus/content/repositories/snapshots</url>
12.	        </snapshotRepository>
13.	    </distributionManagement></pre><pre class="html" name="code"> </pre><pre class="html" name="code">8、mvn:deploy命令上傳包,會發現下載路徑必不是中央庫的路徑,而是nexus裡面的倉庫組路徑。這個說明配置環境成功。</pre><pre class="html" name="code"><img alt="" src="http://img.my.csdn.net/uploads/201301/10/1357787083_3866.png"><img alt="" src="http://img.my.csdn.net/uploads/201301/10/1357787109_8992.png"></pre><pre class="html" name="code"> </pre>
14.	<pre></pre>
15.	<pre></pre>
嗯,以後部分是來自網路資料,總而言之知道了其中的原理,Nexus只不過是一個工具而已,我們搭建使用實踐即可。學習中……