
Android入門——Bitmap和BitmapFactory
引言
我們都知道一個App的成敗,首先取決於是否具有優秀的UI,而除了互動功能之外還需要豐富的圖片背景和動畫去支撐。在開發中我們應用到的圖片不僅僅包括.png、.gif、.9.png、.jpg和各種Drawable系物件,還包括點陣圖Bitmap,而且圖片的處理也經常是影響著一個程式的高效性和健壯性。
一、Bitmap概述
Bitmap代表一張點陣圖,副檔名可以是.bmp或者.dib。點陣圖是Windows標準格式圖形檔案,它將影象定義為由點(畫素)組成,每個點可以由多種色彩表示,包括2、4、8、16、24和32位色彩。例如,一幅1024×768解析度的32位真彩圖片,其所佔儲存位元組數為:1024×768×32/8=3072KB,雖然點陣圖檔案影象效果好,但是非壓縮格式的,需要佔用較大儲存空間,不利於在網路上傳送Android系統當中,Bitmap是影象處理最重要的中轉類之一。用它可以獲取影象檔案資訊,藉助Matrix進行影象剪下、旋轉、縮放等操作,再以指定格式儲存影象檔案。
二、構造Bitmap物件
通常我們構造一個類的物件,都是可以通過其對應的構造方法。然而Bitmap是採用了工廠的設計模式,所以一般不會直接呼叫構造方法。
1、通過Bitmap的靜態方法static Bitmap createBitmap()系
| 方法名(只列出部分方法) | 用法說明 |
|---|---|
| createBitmap(Bitmap src) | 複製點陣圖 |
| createBitmap(Bitmap src,int x ,int y,int w,int h) | 從源點陣圖src的指定座標(x,y)開始,擷取寬w,高h的部分,用於建立新的點陣圖物件 |
| createScaledBitmap |
對源點陣圖src縮放成寬為w,高為h的新點陣圖 |
| createBitmap(int w ,int h,Bitmap.Config config) | 建立一個寬w,高h的新點陣圖(config為點陣圖的內部配置列舉類) |
| createBitmap(Bitmap src,int x ,int y,int w,int h,Matrix m,boolean filter) | 從源點陣圖src的指定座標(x,y)開始,擷取寬w,高h的部分,按照Matrix變換建立新的點陣圖物件 |
2、通過BitmapFactory工廠類的static Bitmap decodeXxx()系
| 方法名(只列出部分方法) | 引數及解釋 |
|---|---|
| decodeByteArray(byte[] data, int offset, int length) | 從指定位元組陣列的offset位置開始,將長度為length的資料解析成點陣圖 |
| decodeFile(String pathName) | 從pathName對應的檔案解析成的點陣圖物件 |
| decodeFileDescriptor(FileDescriptor fd) | 從FileDescriptor中解析成的點陣圖物件 |
| decodeResource(Resource res,int id) | 根據給定的資源Id解析成點陣圖 |
| decodeStream(InputStream in) | 把輸入流解析成點陣圖 |
三、Bitmap相關類之Path、Matrix
1、Path類的應用
有使用PS經驗的都知道”路徑”這麼一個概念,可以把幾個點連成一條“路徑”,Android裡的Path也是如此。在實際應用中我們可以呼叫Canvas的drawPath方法即可繪製圖形,為了實現豐富的繪製效果,Android還定義了一個PathEffect系列類(ComposePathEffect, CornerPathEffect, DashPathEffect, DiscretePathEffect, PathDashPathEffect, SumPathEffect)
1.1、Path類的構造方法
Path();
Path(Path src);
1.2、Path類的一些常用方法
| 部分方法 | 用法說明 |
|---|---|
| public void addArc (RectF oval, float startAngle, float sweepAngle) | 繪製弧形路徑 |
| public void addCircle (float x, float y, float radius, Path.Direction dir) | 繪製圓形路徑 |
| public void addOval (RectF oval, Path.Direction dir) | 繪製橢圓路徑 |
| public void lineTo (float x, float y) | 把(x,y)連線到一起成為一條折線 |
| public void moveTo (float x, float y) |
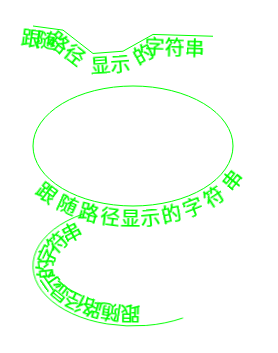
1.3、Path的實際應用
繪製跟隨路徑顯示的字串
package com.crazymo.graphicsdemo;

public class MyPathView extends View {
    final String STR_TITLE="跟隨路徑顯示的字串";
    Path[] paths=new Path[3];
    Paint paint;
    public MyPathView(Context ctx){
        super(ctx);
        paths[0]=new Path();
        paths[0].moveTo(0,0);
        for(int i=1;i<7;i++){
            //隨機生成7個點的Y座標並將他們煉成一條路徑
            paths[0].lineTo(i*30,(float)Math.random()*30);
        }
        paths[1]=new Path();
        RectF rectF=new RectF(0,0,200,120);
        paths[1].addOval(rectF,Path.Direction.CCW);

        paths[2]=new Path();
        paths[2].addArc(rectF,60,180);
        //初始化畫筆
        paint=new Paint();
        paint.setAntiAlias(true);
        paint.setColor(Color.GREEN);
        paint.setStrokeWidth(1);
    }

    @Override
    protected void onDraw(Canvas canvas) {
        canvas.drawColor(Color.WHITE);
        canvas.translate(40, 40);
        //從右邊開始繪製即右對齊
        paint.setTextAlign(Paint.Align.RIGHT);
        paint.setTextSize(20);
        //繪製路徑
        paint.setStyle(Paint.Style.STROKE);
        canvas.drawPath(paths[0], paint);
        paint.setStyle(Paint.Style.FILL);
        canvas.drawTextOnPath(STR_TITLE, paths[0], -8, 20, paint);//沿著路徑繪製文字
        //畫布下移120
        canvas.translate(0,60);
        paint.setStyle(Paint.Style.STROKE);
        canvas.drawPath(paths[1], paint);
        paint.setStyle(Paint.Style.FILL);
        canvas.drawTextOnPath(STR_TITLE, paths[1], -20,20,paint);

        canvas.translate(0,120);
        paint.setStyle(Paint.Style.STROKE);
        canvas.drawPath(paths[2], paint);
        paint.setStyle(Paint.Style.FILL);
        canvas.drawTextOnPath(STR_TITLE,paths[2],-10,20,paint);
    }
}
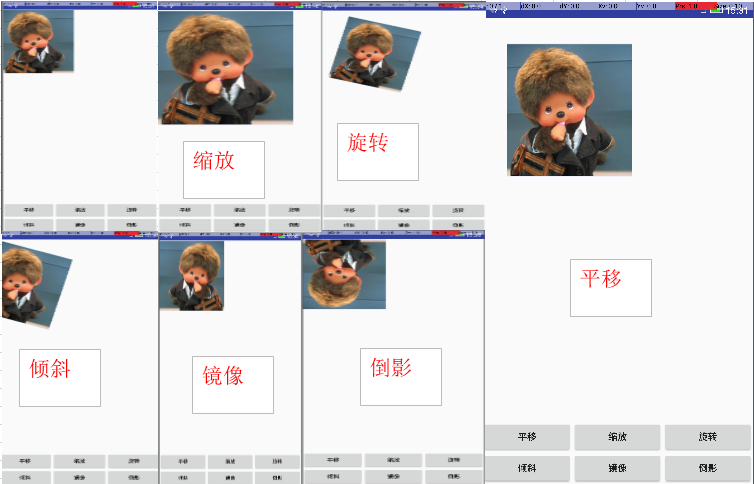
2、使用Matrix控制圖片和View的平移、旋轉、縮放等。
2.1、構造Matrix物件
public Matrix();
public Matrix(Matrix src);
2.2、Matrix一些常用的方法
| 部分方法 | 用法說明 |
|---|---|
| public void setTranslate(float dx, float dy) | 繪製弧形路徑 |
| public void setSkew(float kx, float ky, float px, float py) | 控制Matrix以(px,py)為軸心進行傾斜,kx,ky為X,Y方向上的傾斜距離 |
| public void setSkew(float px, float py) | kx,ky為X,Y方向上的傾斜距離 |
| public void setRotate(float degree) | 控制Matrix旋轉degree度 |
| public void setRotate(float degree,float px,float py) | 控制Matrix以軸心(px,py)旋轉degree度 |
| setScale(float sx, float sy, float px, float py) | 控制Matrix以(px,py)為軸心縮放,sx,sy為X,Y方向上的縮放距離 |
| void setScale(float sx, float sy) |
2.3、Marix的簡單應用
自定義一個使用Matrix的View
/**
 * Created by cmo on 16-4-1.
 */
import android.content.Context;
import android.graphics.Bitmap;
import android.graphics.Canvas;
import android.graphics.Matrix;
import android.util.AttributeSet;

public class CostomView extends View {

    private Bitmap mBitmap;
    private Matrix matrix;

    public CostomView(Context context) {
        super(context);
        matrix = new Matrix();
    }

    public CostomView(Context context, AttributeSet attrs, int defStyleAttr) {
        super(context, attrs, defStyleAttr);
        matrix = new Matrix();
    }

    public CostomView(Context context, AttributeSet attrs) {
        super(context, attrs);
        matrix = new Matrix();
    }

    public Bitmap getmBitmap() {
        return mBitmap;
    }

    public void setmBitmap(Bitmap mBitmap) {
        this.mBitmap = mBitmap;
        invalidate();
    }

    @Override
    protected void onDraw(Canvas canvas) {
        super.onDraw(canvas);
        if (mBitmap != null) {
            canvas.drawBitmap(mBitmap, matrix, null);
        }
    }

    public void rotate(float degree) {
        if (mBitmap != null) {
            matrix.preRotate(degree, mBitmap.getWidth() / 2,
                    mBitmap.getHeight() / 2);
            invalidate();
        }

    }
    //平移
    public void translate(float dx, float dy) {
        if (mBitmap != null) {
            matrix.postTranslate(dx, dy);
            invalidate();
        }
    }
    //縮放
    public void scale(float sx, float sy) {
        if (mBitmap != null) {
            matrix.postScale(sx, sy);
            invalidate();
        }
    }
    //映象(相當於是照鏡子裡的自己)
    public void mirror() {
        if (mBitmap != null) {
            matrix.postScale(-1, 1);
            matrix.postTranslate(mBitmap.getWidth(), 0);
            invalidate();
        }
    }
    //倒影
    public void shadow() {
        if (mBitmap != null) {
            matrix.postScale(1, -1);
            matrix.postTranslate(0, mBitmap.getHeight());
            invalidate();
        }
    }
    public void skew(float kx, float ky){
        if (mBitmap != null) {
            matrix.postSkew(kx, ky);
            invalidate();
        }
    }
}
<?xml version="1.0" encoding="utf-8"?>
<LinearLayout xmlns:android="http://schemas.android.com/apk/res/android"
android:layout_width="match_parent" android:layout_height="match_parent" android:orientation="vertical">
<com.crazymo.matrixdemo.CostomView
android:id="@+id/costomview"
android:layout_width="match_parent"
android:layout_height="0dp"
android:layout_weight="1"/>
<LinearLayout
android:layout_width="match_parent"
android:layout_height="wrap_content"
android:orientation="horizontal">
<Button
android:id="@+id/btn_translate"
android:layout_width="wrap_content"
android:layout_height="wrap_content"
android:layout_weight="1"
android:text="平移"/>
<Button
android:id="@+id/btn_scale"
android:layout_width="wrap_content"
android:layout_height="wrap_content"
android:layout_weight="1"
android:text="縮放"/>
<Button
android:id="@+id/btn_rotate"
android:layout_width="wrap_content"
android:layout_height="wrap_content"
android:layout_weight="1"
android:text="旋轉"/>
</LinearLayout>
<LinearLayout
android:layout_width="match_parent"
android:layout_height="wrap_content"
android:orientation="horizontal">
<Button
android:id="@+id/btn_skew"
android:layout_width="wrap_content"
android:layout_height="wrap_content"
android:layout_weight="1"
android:text="傾斜"/>
<Button
android:id="@+id/btn_mirro"
android:layout_width="wrap_content"
android:layout_height="wrap_content"
android:layout_weight="1"
android:text="映象"/>
<Button
android:id="@+id/btn_shadow"
android:layout_width="wrap_content"
android:layout_height="wrap_content"
android:layout_weight="1"
android:text="倒影"/>
</LinearLayout>
</LinearLayout>package com.crazymo.matrixdemo;
/**
* Created by cmo on 16-4-1.
*/
public class CostViewActivity extends Activity {
private CostomView mCostomView;
@Override
protected void onCreate(Bundle savedInstanceState) {
super.onCreate(savedInstanceState);
setContentView(R.layout.activity_cotomview);
mCostomView = (CostomView) findViewById(R.id.costomview);
Bitmap bitmap = BitmapFactory.decodeResource(getResources(),
R.mipmap.bcg);
mCostomView.setmBitmap(bitmap);
((Button) findViewById(R.id.btn_rotate))
.setOnClickListener(new OnClickListener() {
@Override
public void onClick(View v) {
mCostomView.rotate(15);
}
});
((Button) findViewById(R.id.btn_scale))
.setOnClickListener(new OnClickListener() {
@Override
public void onClick(View v) {
mCostomView.scale(1.8f, 1.8f);
}
});
((Button) findViewById(R.id.btn_translate))
.setOnClickListener(new OnClickListener() {
@Override
public void onClick(View v) {
mCostomView.translate(100, 100);
}
});
((Button) findViewById(R.id.btn_skew))
.setOnClickListener(new OnClickListener() {
@Override
public void onClick(View v) {
mCostomView.skew(-0.3f, 0.3f);
}
});
((Button) findViewById(R.id.btn_mirro))
.setOnClickListener(new OnClickListener() {
@Override
public void onClick(View v) {
mCostomView.mirror();
}
});
((Button) findViewById(R.id.btn_shadow))
.setOnClickListener(new OnClickListener() {
@Override
public void onClick(View v) {
mCostomView.shadow();
}
});
}
}
四、Bitmap的簡單應用
1、從資原始檔中獲取Bitmap
Bitmap rawBitmap = BitmapFactory.decodeResource(getResources(),R.mipmap.bcg); 2、從SD卡里獲取Bitmap
String SDCarePath=Environment.getExternalStorageDirectory().toString();
String filePath=SDCarePath+"/"+"demo.jpg";
Bitmap rawBitmap1 = BitmapFactory.decodeFile(filePath, null);
InputStream inputStream=getBitmapInputStreamFromSDCard("demo.jpg");
Bitmap rawBitmap2 = BitmapFactory.decodeStream(inputStream);3、設定圖片的圓角,返回設定後的Bitmap
public Bitmap toRoundCorner(Bitmap bitmap, int pixels) {
    Bitmap roundCornerBitmap = Bitmap.createBitmap(bitmap.getWidth(),
            bitmap.getHeight(), Config.ARGB_8888);
    Canvas canvas = new Canvas(roundCornerBitmap);
    int color = 0xff424242;// int color = 0xff424242;
    Paint paint = new Paint();
    paint.setColor(color);
    // 防止鋸齒
    paint.setAntiAlias(true);
    Rect rect = new Rect(0, 0, bitmap.getWidth(), bitmap.getHeight());
    RectF rectF = new RectF(rect);
    float roundPx = pixels;
    // 相當於清屏
    canvas.drawARGB(0, 0, 0, 0);
    // 先畫了一個帶圓角的矩形
    canvas.drawRoundRect(rectF, roundPx, roundPx, paint);
    paint.setXfermode(new PorterDuffXfermode(Mode.SRC_IN));
    // 再把原來的bitmap畫到現在的bitmap!!!注意這個理解
    canvas.drawBitmap(bitmap, rect, rect, paint);
    return roundCornerBitmap;
 }
4、將圖片高寬和的大小kB壓縮
//得到圖片原始的高寬
int rawHeight = rawBitmap.getHeight();
int rawWidth = rawBitmap.getWidth();
// 設定圖片新的高寬
int newHeight = 500;
int newWidth = 500;
// 計算縮放因子
float heightScale = ((float) newHeight) / rawHeight;
float widthScale = ((float) newWidth) / rawWidth;
// 新建立矩陣
Matrix matrix = new Matrix();
matrix.postScale(heightScale, widthScale);
// 設定圖片的旋轉角度
// matrix.postRotate(-30);
// 設定圖片的傾斜
// matrix.postSkew(0.1f, 0.1f);
// 將圖片大小壓縮
// 壓縮後圖片的寬和高以及kB大小均會變化
Bitmap newBitmap = Bitmap.createBitmap(rawBitmap, 0, 0, rawWidth,rawWidth, matrix, true);
5、將Bitmap轉換為Drawable Drawable轉Bitmap
Drawable newBitmapDrawable = new BitmapDrawable(Bitmap);
//如果要獲取BitMapDrawable中所包裝的BitMap物件,可以用getBitMap()方法;
Bitmap  bitmap = newBitmapDrawable.getBitmap();