
記錄Android-Studio遇到的各種坑
開此文章,主要是為了記錄在使用虐我千百遍,我還待他如初戀的AS的過程中所遇到的各種坑,一來是希望做個記錄,方便查詢,防止再次踏入同樣的坑;二來也希望能幫助到有遇到有跟我相同問題的人。
1,首先每次匯入一個新的AS工程的時候,肯定會有各種gradle配置問題,只要把build.gradle改為與自己系統相匹配即可,如果報
Error:(1, 0) Plugin is too old, please update to a more recent version, or set ANDROID_DAILY_OVERRIDE environment variable to "f3cec24ce64772515843ff5f88a0005c31cdbe71"
把project的build.gradle裡面的2.0.0-alpha3改為 1.5.0 即可
E:\android-studio-2.0-preview4\android-studio\gradle\m2repository\com\android\tools\build\gradle
這個目錄下面有當前安裝的版本,都可以試試
再把其他build.gradle裡面的 compileSdkVersion 和 buildToolsVersion 和 依賴的support包版本改為自己常用的版本一般就可正常除錯了。
2,如果在下載程式的時候,報了以下錯誤
Error:Could not create the Java Virtual Machine. Invalid maximum heap size:4g
這個錯誤我找了很久,最後還是在萬能的stackoverflow裡找到了答案,其實就是專案的build.gradle被配置了
dexOptions {
    incremental true
    javaMaxHeapSize "4g"
}
把4g 改為1024m問題解決
3,快速將一個專案轉換為lib專案:
① 修改build.gradle,把 applyplugin:'com.android.application'改為applyplugin:'com.android.library'
然後去掉 defaultConfig裡面的applicationId
② 清空AndroidManifest裡面的內容留下最外層manifest即可,如下:
<manifest xmlns:android="http://schemas.android.com/apk/res/android"
          package="***">
</manifest>
4,AS專案的包名是在build.gradle檔案裡面的applicationId配置的,在mainfest配置將不生效。
5,eclipse專案轉為android studio : 在eclipse中Export,匯出gradle專案,選擇需要匯出的專案及libProject,隨便找個正常的as工程的gradle資料夾,覆蓋剛剛匯出專案的gradle資料夾,然後根據 1 進行配置即可。(注:匯出的專案會覆蓋原工程使得此專案可以同時在eclipse和android studio中使用,as比ec檢測嚴格,會檢測到所有重複的資源,許可權,假冒的.9,jar,以及中文亂碼,根據對應提示進行刪除)
6,大坑:
Warning:Ignoring InnerClasses attribute for an anonymous inner class
(com.tencent.mm.sdk.b.b) that doesn't come with an
associated EnclosingMethod attribute. This class was probably produced by a
compiler that did not target the modern .class file format. The recommended
solution is to recompile the class from source, using an up-to-date compiler
and without specifying any "-target" type options. The consequence of ignoring
this warning is that reflective operations on this class will incorrectly
indicate that it is *not* an inner class.
Warning:Ignoring InnerClasses attribute for an anonymous inner class
(com.tencent.mm.sdk.openapi.WXApiImplV10$ActivityLifecycleCb$2) that doesn't come with an
associated EnclosingMethod attribute. This class was probably produced by a
compiler that did not target the modern .class file format. The recommended
solution is to recompile the class from source, using an up-to-date compiler
and without specifying any "-target" type options. The consequence of ignoring
this warning is that reflective operations on this class will incorrectly
indicate that it is *not* an inner class.
UNEXPECTED TOP-LEVEL ERROR:
Error:Execution failed for task ':DLNA_DMC:transformClassesWithDexForDebug'.
> com.android.build.api.transform.TransformException: com.android.ide.common.process.ProcessException: org.gradle.process.internal.ExecException: Process 'command 'C:\Program Files\Java\jdk1.8.0_73\bin\java.exe'' finished with non-zero exit value 3
出現型別警告和錯誤,那麼jar重複,沒有用到的jar,jar裡面的包名與xxx的包名重複,或者是jar版本太老等,反正是jar裡面的class檔案轉為dex的時候出錯,解決辦法是刪除jar包,網上找對應的原始碼,或者用工具把jar轉為原始碼形式來呼叫解決掉所有警告,然後加上multidex處理65536的問題,因為方法越界也會出現類似此錯誤,完了即可編譯通過。。
7,類似如下錯誤
> Duplicate files copied in APK META-INF/NOTICE.txt
    File 1: F:\android_studio_project\nizaoma\app\libs\httpmime-4.2.4.jar
    File 2: F:\android_studio_project\nizaoma\app\libs\httpmime-4.2.4.jarDuplicate files copied in APK META-INF/NOTICE.txt
    File 1: F:\android_studio_project\nizaoma\app\libs\httpmime-4.2.4.jar
    File 2: F:\android_studio_project\nizaoma\app\libs\httpmime-4.2.4.jar
build.gradle android{}裡新增:packagingOptions {
exclude 'META-INF/DEPENDENCIES.txt'
exclude 'META-INF/LICENSE.txt'
exclude 'META-INF/NOTICE.txt'
exclude 'META-INF/NOTICE'
exclude 'META-INF/LICENSE'
exclude 'META-INF/DEPENDENCIES'
exclude 'META-INF/notice.txt'
exclude 'META-INF/license.txt'
exclude 'META-INF/dependencies.txt'
exclude 'META-INF/LGPL2.1'
}8,出現-Xmx128m -Xmx512m -Xmx1024m類似字樣的錯誤,在.gradle的gradle.properties新增一項 org.gradle.jvmargs=-Xmx512m,若無此檔案,則新建
9,as正確匯入和刪除module方式:
① 匯入:File→New→import module 選中module所在目錄,可改名確定即可,開啟專案目錄可以看到已經自動把module複製到目錄中,所以無需手動複製module到專案目錄,否則匯入時會報已經存在一個同名的project的錯誤
② 刪除:File→Project Structure 選中需要刪除的module 點選“—”,確定回到專案目錄找到要刪除的module右鍵刪除即可
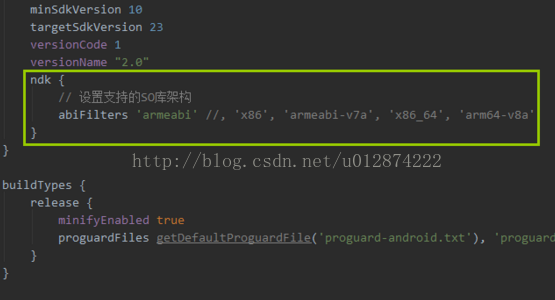
10.報錯 :/lib/arm64, /vendor/lib64, /system/lib64]]] couldn't find "libgotyeapi.so"
原因是在64位手機上會自動尋找jni裡面arm64-v8a資料夾裡面的so檔案,如果找不到則報這個錯誤,如果把32位的so放進去則報位數不匹配的錯誤,解決方法是放入64位的so或者刪除該資料夾,只留armeabi,然後在配置
如果在新增“abiFilter”之後Android Studio出現以下提示:
NDK integration is deprecated in the current plugin. Consider trying the new experimental plugin.
則在專案根目錄的gradle.properties檔案中新增:
android.useDeprecatedNdk=true
11. debug - unaligned .apk 無法刪除,as每次編譯的時候需要更新build檔案,如果無法刪除build裡面的檔案,那麼編譯將會報錯,遇到這種情況,其實不管你是直接在資料夾,還是在as裡面刪除build,或者直接用第三方粉碎檔案都是刪除不了的,此時需重啟,完成之後你會發現檔案已經被刪除,所以重啟可解決此檔案錯亂的問題。若重啟也刪除不了那麼把此專案複製,debug - unaligned .apk會提示無法複製,跳過,然後再開啟即可 ,經查,這是金山毒霸搞得鬼,解除安裝可根除此問題
12.一個開發過程中比較少遇到的錯誤:java.lang.NoSuchFieldError: ***R$id***
造成此問題的原因在於庫檔案的xml與主檔案的xml同名了,作修改即可
13.終於我也更新了AS2.1stable版本,據說其Instant Run功能可以大大提高編譯速度,在Run和Debug的時候,只有在第一次build會花費大量的時間,之後再次Run或者Debug的時候會直接把變化的程式碼更新到手機,再上面生成一個新的APK直接執行,這樣就能很快的顯示出更改程式碼之後的變化,加快了開發效率和除錯效率。當我懷著期待的心情更新了gradle為2.1,然後run了一下專案,既遭提示:
Instant Run is disabled: Instant Run does not support deploying build variants with multidex enabled, to a targetwith API level 20 or below. To use Instant Run with a multidex enabled build variant, deploy to a target with API level 21 or higher.經查,當專案開啟了multidex,Instant Run需要在5.0手機(既是minSdkVersion是21以上)才能正常使用。
14.
出現如下錯誤:

解決方法:
dexOptions {
javaMaxHeapSize"5120"
preDexLibraries =false
}
15.出現如下錯誤:
Error:Execution failed for task ':app:transformClassesWithDexForDebug'.
>com.android.build.api.transform.TransformException: com.android.ide.common.process.ProcessException:java.util.concurrent.ExecutionException:
java.lang.OutOfMemoryError: GC overhead limit exceeded
解決方法:
在.gradle的gradle.properties的 org.gradle.jvmargs=-Xmx512m調大點,我的調為4g即可,若無此檔案,則新建
16.出現如下錯誤:
Error:trouble processing "java/lang/AutoCloseable.class":
Error:Ill-advised or mistaken usage of a core class (java.* or javax.*)
Error:when not building a core library.
Error:This is often due to inadvertently including a core library file
Error:in your application's project, when using an IDE (such as
Error:Eclipse). If you are sure you're not intentionally defining a
Error:core class, then this is the most likely explanation of what's
Error:going on.
Error:However, you might actually be trying to define a class in a core
Error:namespace, the source of which you may have taken, for example,
Error:from a non-Android virtual machine project. This will most
Error:assuredly not work. At a minimum, it jeopardizes the
Error:compatibility of your app with future versions of the platform.
Error:It is also often of questionable legality.
原因是專案中引用了以java開頭包名的程式碼,jar裡的包名也算,修改包名即可
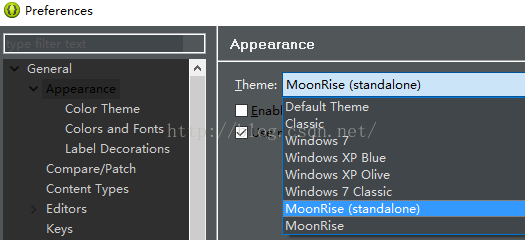
17.有些專案還是用到eclipse的,每次用eclipse新開一個workspace的時候應該先調環境:
①,設定主題:
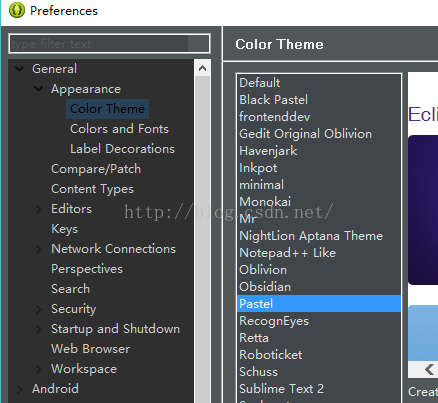
②,顏色主題:
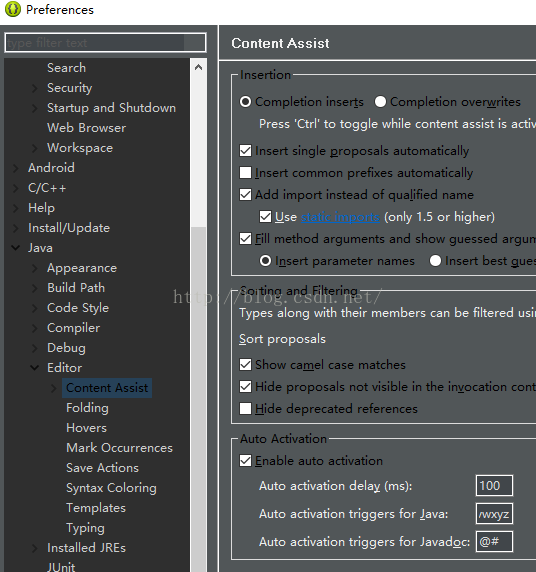
3,設定程式碼提示:
④,設定字型大小
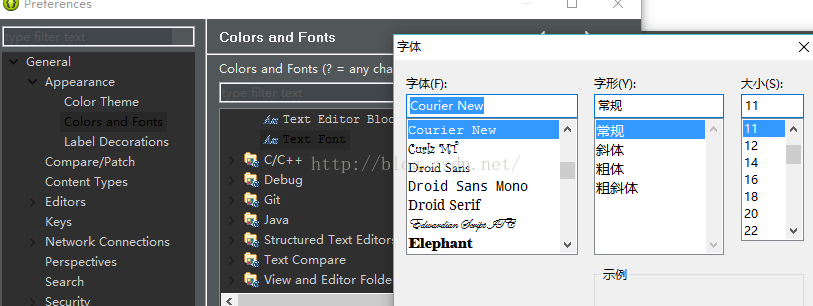
⑤,設定logcat字型顏色

18:zip file is empty:
一般你刪除了jar包 撤回的時候會造成此問題,重新把有效的jar包覆蓋進去即可解決此問題
19:檔案編碼問題,報如下錯誤:
Error:(23, 48) 閿欒: 緙栫爜UTF-8鐨勪笉鍙槧灝勫瓧絎?
Error:(23, 49) 閿欒: 緙栫爜UTF-8鐨勪笉鍙槧灝勫瓧絎?
Error:(23, 50) 閿欒: 緙栫爜UTF-8鐨勪笉鍙槧灝勫瓧絎?
Error:(23, 51) 閿欒: 緙栫爜UTF-8鐨勪笉鍙槧灝勫瓧絎?
錯誤檔案比較少的話可以手動複製內容過去即可解決問題,如果錯誤檔案比較多需要批量轉換請移至以下文章
http://blog.csdn.net/u012874222/article/details/77367464
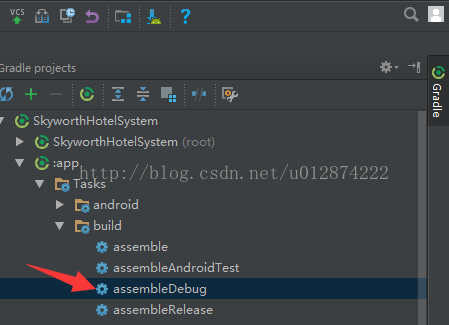
20:INSTALL_FAILED_TEST_ONLY
升級到AS3.0後,每次除錯生成debug包MainFest的Application標籤自帶testOnly=true屬性,即使你沒在MainFest裡設定此項,導致將此APK複製出來安裝會報此錯誤,解決方法就是通過Gradle裡的build來生成,如下圖
21:
Error:Could not create service of type FileCollectionSnapshotterRegistry using TaskExecutionServices.createFileCollectionSnapshotterRegistry().
> Could not create service of type CachingFileHasher using TaskExecutionServices.createFileSnapshotter().
解決方法:刪除專案根目錄下的.gradle資料夾即可
22:如何利用AS建立Java專案?
首先AS預設沒有建立Java專案的選項,所以直接建立一個Android專案,然後把專案轉為Java即可,那怎麼轉呢?經過以下兩個步驟即可實現:
①Android專案的build.gradle(非根目錄的build.gradle)改為如下:
apply plugin: 'java'

dependencies {
    compile fileTree(include: ['*.jar'], dir: 'libs')
}

sourceCompatibility = "1.7"
targetCompatibility = "1.7"
②刪除一些檔案和資料夾,然後建立一個Java檔案即可執行除錯,最終檔案結構如下

23、AS打Jar包(在對應的build.gradle下新增如下程式碼):
①java工程:
task makeJar(type: Jar, dependsOn: ['build']) {
    archiveName = 'mtapm-inject.jar'//生成的jar包檔名
    from('build/classes/java/main')//需要打包的class檔案
    from(project.zipTree("libs/antlr-runtime-3.5.2.jar"))//需要合併的jar
    from(project.zipTree("libs/guava-18.0.jar"))
    from(project.zipTree("libs/support-annotations-25.3.1.jar"))
    from(project.zipTree("libs/SignatureAPI.jar"))
    destinationDir = file('build/libs')//jar資料夾生成路徑
    manifest {//配置MAIN-INF
        attributes(
                'Manifest-Version': '1.0',
                'Main-Class': "mt.apm.inject.MtApmInjector")
    }
}
②Android Module工程:
task makeDebugJar(type: Jar, dependsOn: ['bundleDebug']) {//若打包Release,則引數為bundleRelease
    archiveName = 'mtapm_debug.jar'//生成的jar包檔名
    from zipTree('build/intermediates/packaged-classes/debug/classes.jar')//源Jar
    destinationDir = file('build/libs')//jar資料夾生成路徑
}
如為混淆打包,需要對應的buildType開啟 minifyEnabled true