Android單選按鈕自定義列
阿新 • • 發佈:2019-02-12
手裡有個專案,看設計原型,像是使用單選按鈕來實現選擇條件,但是又是排列整齊的按鈕。記得單選RadioGroup只有縱橫排列,並不支援九宮格的排列,但是要實現九宮格的排列樣式,也未嘗不可,可以在<RaidoGroup>標籤中使用其他的佈局來輔助實現,只可惜這樣做會留下一個很不爽的結果,同一行的RadioButton都變成了CheckedBox,可多選,很明顯,這個並不是我們想要的結果。要解決這種窘境,也是有辦法的,那就是用一個標誌位,只允許選擇一個按鈕;只是博文裡,我並不想用這種辦法,一方面,控制麻煩,如果頁面裡有多個這樣的佈局,那個程式碼量可是相當的不爽,另一方面,我是新人,所以想嘗試自定義控制元件來實現,以便累積點技能經驗。(程式碼拙劣,大俠們請包涵,)
實現主要分為三部分,第一部分:自定義按鈕;第二部分:自定義按鈕容器;第三部分:按鈕的背景。
首先,第一部分,程式碼:
在按鈕原始碼中,使用touch變數來記錄當前按鈕被按下的次數,同時實現Touch監聽,以此來改變touch變數來改變按鈕狀態,過載OnDraw,在函式中修改按鈕背景,介面OnValueChangedListener用於資料回撥。import android.content.Context; import android.graphics.Canvas; import android.util.AttributeSet; import android.view.MotionEvent; import android.view.View; import android.widget.Button; import cn.leungyong.app.R; /** * * Description: * Created by L.Y * Date:2015-10-20 * Time:14:48 * Copyright :c */ public class MyRadio extends Button implements View.OnTouchListener{ private boolean isTouched = false;//是否被按下 private int touch = 1;//按鈕被按下的次數 public MyRadio(Context context){ super(context); init(); } public MyRadio(Context context, AttributeSet attributeSet){ super(context,attributeSet); init(); } public MyRadio(Context context, AttributeSet attributeSet, int defStyle){ super(context, attributeSet, defStyle); init(); } protected void init(){ setOnTouchListener(this); } public void setTouch(int touch){ this.touch = touch; } @Override protected void onDraw(Canvas canvas) { super.onDraw(canvas); if(0 == touch%2){ this.setBackgroundResource(R.drawable.myradio_active); }else { this.setBackgroundResource(R.drawable.myradio_inactive); } invalidate(); } public void setTouched(boolean isTouched){ this.isTouched = isTouched; } @Override public boolean onTouch(View v, MotionEvent event) { switch (event.getAction()){ case MotionEvent.ACTION_DOWN: onValueChangedListner.OnValueChanged(this.getText().toString()); isTouched = true; touch ++; break; case MotionEvent.ACTION_UP: isTouched = false; break; } return true; } public interface OnValueChangedListner{ void OnValueChanged(String value); } //實現介面,方便將當前按鈕的值回撥 OnValueChangedListner onValueChangedListner; public void setOnValueChangedListner(OnValueChangedListner onValueChangedListner){ this.onValueChangedListner = onValueChangedListner; } }
第二部分,容器:
import android.content.Context;
import android.graphics.Color;
import android.util.AttributeSet;
import android.view.Gravity;
import android.view.ViewGroup;
import android.widget.Button;
import android.widget.LinearLayout;

import java.util.ArrayList;
import java.util.HashMap;
import java.util.List;
import java.util.Map;

/**
 * Description:
 * Created by L.Y
 * Date:2015-10-20
 * Time:11:26
 * Copyright :
 */
public class ChoiceGroup extends LinearLayout {

    private int column = 0;//列數

    private int currentIndex = 0;//當前按鈕下標

    private String currentValue = "";//當前按鈕值

    private List<String> values = new ArrayList<>();//按鈕文字列表

    private Map<Integer, Button> map = new HashMap<>();//按鈕map

    public ChoiceGroup(Context context){
        super(context);
        init(context);
    }

    public ChoiceGroup(Context context,AttributeSet attributeSet){
        super(context,attributeSet);
        init(context);
    }

    public ChoiceGroup(Context context, AttributeSet attributeSet, int defStyle){
        super(context, attributeSet, defStyle);
        init(context);
    }

    //初始化容器
    public void init(Context context){
        setGravity(Gravity.CENTER);
        setOrientation(VERTICAL);
        setBackgroundColor(Color.WHITE);
    }

    //設定當前被選下按鈕
    public void setInitChecked(int index){
        ((MyRadio)map.get(index)).setTouch(2);
        setCurrentValue(((MyRadio)map.get(index)).getText().toString());
    }

    public void setColumn(int column){
        this.column = column;
    }

    public void setCurrentValue(String value){
        this.currentValue = value;
    }

    public String getCurrentValue(){
        return this.currentValue;
    }

    public void setValues(List<String> values){
        this.values = values;
    }
    //初始化容器所有檢視
    public void setView(final Context context){
        int size = values.size();
        int row = size/column;
        int leftSize = size%column;
        for(int i=0;i<row;i++){
            LinearLayout linearLayout = new LinearLayout(context);
            linearLayout.setOrientation(HORIZONTAL);
            linearLayout.setLayoutParams(new LinearLayout.LayoutParams(LinearLayout.LayoutParams.MATCH_PARENT, 0, 1));
            for(int j=0;j<column;j++){
                final MyRadio button = new MyRadio(context);
                button.setGravity(Gravity.CENTER);
                LinearLayout.LayoutParams layoutParams = new LinearLayout.LayoutParams(0, ViewGroup.LayoutParams.WRAP_CONTENT,1);
                layoutParams.setMargins(8, 8, 8, 8);
                button.setLayoutParams(layoutParams);
                button.setText(values.get(column * i + j));
                currentIndex = column * i + j;
                button.setOnValueChangedListner(new MyRadio.OnValueChangedListner() {
                    @Override
                    public void OnValueChanged(String value) {
                        setCurrentValue(value);
                        clearSelected(currentIndex);
                    }
                });
                map.put(column * i + j,button);
                linearLayout.addView(button);
            }
            addView(linearLayout);
        }
        if(leftSize != 0){
            LinearLayout linearLayout = new LinearLayout(context);
            linearLayout.setOrientation(HORIZONTAL);
            linearLayout.setLayoutParams(new LinearLayout.LayoutParams(LinearLayout.LayoutParams.MATCH_PARENT, 0, 1));
            for(int m=0;m<column;m++){
                if(m<leftSize) {
                    final MyRadio button = new MyRadio(context);
                    LinearLayout.LayoutParams layoutParams = new LinearLayout.LayoutParams(0, ViewGroup.LayoutParams.WRAP_CONTENT, 1);
                    layoutParams.setMargins(8, 8, 8, 8);
                    button.setGravity(Gravity.CENTER);
                    button.setLayoutParams(layoutParams);
                    button.setText(values.get(size - leftSize + m));
                    currentIndex = size - leftSize + m;
                    button.setOnValueChangedListner(new MyRadio.OnValueChangedListner() {
                        @Override
                        public void OnValueChanged(String value) {
                            setCurrentValue(value);
                            clearSelected(currentIndex);
                        }
                    });
                    map.put(size - leftSize + m,button);
                    linearLayout.addView(button);
                }else {
                    LinearLayout.LayoutParams layoutParamsV = new LinearLayout.LayoutParams(0, ViewGroup.LayoutParams.WRAP_CONTENT, 1);
                    layoutParamsV.setMargins(8, 8, 8, 8);
                    Button view = new Button(context);
                    view.setLayoutParams(layoutParamsV);
                    view.setGravity(Gravity.CENTER);
                    view.setText("123");
                    view.setVisibility(INVISIBLE);
                    view.setBackgroundColor(Color.RED);
                    linearLayout.addView(view);
                }
            }
            addView(linearLayout);
        }
    }

    //清除所有選擇
    private void clearSelected(int Index){
        System.out.println("length = "+map.size());
        for(int index = 0;index < map.size(); index ++){

            ((MyRadio)map.get(index)).setTouch(1);
        }
    }

}
容器繼承自LinearLayout,裡面自定義的LinearLayout,將控制元件按權重排列,按鈕實現OnValueChangedListener,將其值回撥。
第三部分:背景(貼上去,充充字數吧,另一個實現也是一樣的,不貼了)
<?xml version="1.0" encoding="utf-8"?>
<shape xmlns:android="http://schemas.android.com/apk/res/android">
    <corners android:radius="3dp"></corners>
    <solid android:color="@color/lightblue"></solid>
    <stroke android:color="@color/lightblue" android:width="1dp"></stroke>
</shape>
最後,定義好了空間,自然就是怎樣去引用了,在Activity的佈局xml中:
<cn.leungyong.app.ui.view.ChoiceGroup
      android:id="@+id/choiceGroup"
      android:background="@color/white"
      android:layout_width="match_parent"
      android:layout_height="wrap_content">
</cn.leungyong.app.ui.view.ChoiceGroup>
在java原始碼中實現:
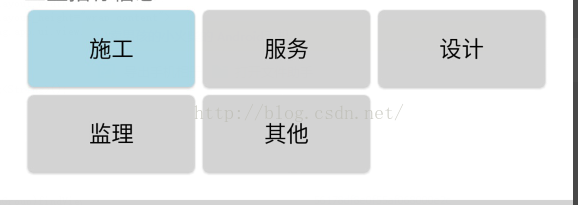
List<String> list = new ArrayList<String>();
list.add("施工");
list.add("服務");
list.add("設計");
list.add("監理");
list.add("其他");


ChoiceGroup choiceGroup = (ChoiceGroup)findViewById(R.id.choiceGroup)
choiceGroup.setColumn(3);//設定列數
choiceGroup.setValues(list);//設定記錄列表
choiceGroup.setView(this);//設定檢視
choiceGroup.setInitChecked(0);//設定最初預設被選按鈕


choiceGroup.getCurrentValue();//獲取當前被選擇的按鈕值
最後結果: