
iOS 漸變色 以及 鏤空效果的實現(Mask的妙用)以及鏤空文字的實現
實現起來也很簡單,主要分3個步驟:
1.建立一個鏤空的路徑:
UIBezierPath 有個原生的方法- (void)appendPath:(UIBezierPath *)bezierPath, 這個方法作用是倆個路徑有疊加的部分則會鏤空.
這個方法實現原理應該是path的FillRule 預設是FillRuleEvenOdd(CALayer 有一個fillRule屬性的規則就有kCAFillRuleEvenOdd), 而EvenOdd 是一個奇偶規則,奇數則顯示,偶數則不顯示.疊加則是偶數故不顯示.
2.建立CAShapeLayer 將鏤空path賦值給shapeLayer
3.將shapeLayer 設定為背景檢視的Mask
UIView *backgroundView = [[UIViewalloc]init];
backgroundView.frame =self.view.bounds;
backgroundView.backgroundColor = [UIColorcolorWithWhite:0alpha:0.7];
[self.viewaddSubview:backgroundView];
// 建立一個全屏大的path
UIBezierPath *path = [UIBezierPathbezierPathWithRect
// 建立一個圓形path
UIBezierPath *circlePath = [UIBezierPathbezierPathWithArcCenter:CGPointMake(self.view.center.x,self.view.center.y - 25)
radius:50
startAngle:0
endAngle:2 *M_PI
clockwise:NO];
[path appendPath:circlePath];
CAShapeLayer *shapeLayer = [CAShapeLayerlayer];
shapeLayer.
backgroundView.layer.mask = shapeLayer;
順便提下,在實際開發中可能遇到這種需求,當tableView 滑動到某個位置的時候才顯示新手引導.
這時候就需要將tableView上的座標轉化為相對於螢幕的座標. 可用原生的方法:
- (CGRect)convertRect:(CGRect)rect toView:(nullable UIView *)view;
- (CGRect)convertRect:(CGRect)rect fromView:(nullable UIView *)view;
漸變進度條:
2.簡單實用為
self.view.backgroundColor = [UIColor whiteColor];
UIView *backgroundView = [[UIViewalloc]init];
backgroundView.frame = self.view.bounds;
backgroundView.backgroundColor = [UIColor redColor];
[self.view addSubview:backgroundView];
CAShapeLayer *shapeLayer = [CAShapeLayerlayer];
// 這個路徑是決定這個layer的位置的
shapeLayer.path = [UIBezierPath bezierPathWithRect:CGRectMake(0,100,150,150)].CGPath;
backgroundView.layer.mask = shapeLayer;
分析一下蒙板的原理:我們都知道控制元件view有一個alpha屬性用來設定透明度,預設alpha=1,只有當alpha不為0是我們才能正常的看到View的樣子,alpha其實改變的是mask和background layer的透明度,來實現透明效果。而mask是控制元件view上的一層layer,mask也有一個alpha,要想看到view,只有當mask的透明度不為0時,我們才能看到mask後面的view的樣子,view自帶的masklayer是不透明的。新建立的masklayer的是透明的,因此,我們只需要給新建立的masklayer一個顏色,使他不透明就能看見蒙板後的View了,而蒙板外是透明的,這樣就能實現蒙板效果了。3.鏤空文字
@interface LouKongText : UILabel
@end
- (void)drawRect:(CGRect)rect {
// Make sure the UIView's background is set to clear either in code or in a storyboard/nib
CGContextRef context =UIGraphicsGetCurrentContext();
//[[UIColor whiteColor] setFill];
//CGContextAddArc(context, CGRectGetMidX(rect), CGRectGetMidY(rect), CGRectGetWidth(rect)/2, 0, 2*M_PI, YES);
//CGContextFillPath(context);
// Manual offset may need to be adjusted depending on the length of the text
[selfdrawSubtractedText:@"123"inRect:rectinContext:context];
}
- (void)drawSubtractedText:(NSString *)text inRect:(CGRect)rect inContext:(CGContextRef)context {
// Save context state to not affect other drawing operations
CGContextSaveGState(context);
// Magic blend mode
CGContextSetBlendMode(context,kCGBlendModeDestinationOut);
// This seemingly random value adjusts the text
// vertically so that it is centered in the circle.
//CGFloat Y_OFFSET = -2 * (float)[text length] + 5;
// Context translation for label
CGFloat LABEL_SIDE =CGRectGetWidth(rect);
//CGContextTranslateCTM(context, 0, CGRectGetHeight(rect)/2-LABEL_SIDE/2+Y_OFFSET);
// Label to center and adjust font automatically
UILabel *label = [[UILabelalloc]initWithFrame:CGRectMake(0,0, LABEL_SIDE, LABEL_SIDE)];
label.font = [UIFontboldSystemFontOfSize:120];
label.adjustsFontSizeToFitWidth =YES;
label.text = text;
label.textAlignment =NSTextAlignmentCenter;
// 這個顏色是可以改的 可以改成黃色
label.backgroundColor = [UIColorblackColor];
[label.layerdrawInContext:context];
// Restore the state of other drawing operations
CGContextRestoreGState(context);
}
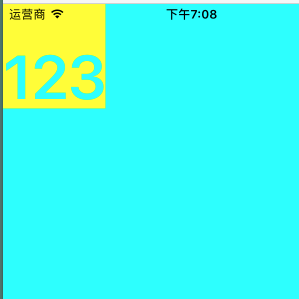
使用:UIView *bg = [[UIViewalloc]initWithFrame:CGRectMake(0,0,300,300)];
bg.backgroundColor = [UIColorcyanColor];
[self.viewaddSubview:bg];
LouKongText *lk = [[LouKongTextalloc]initWithFrame:CGRectMake(0,0,100,100)];
// 其實這個顏色有沒有 都沒有關係
lk.backgroundColor = [UIColorblackColor];
[bg addSubview:lk];
===================================================================
第一講是來自 BubbleTransition 中最奪人眼球的形變動畫。這個效果在 StarWars.iOS轉場動效有兩次應用,非常地炫酷;Raywenderlich.com 也出過一個教程來實現這種效果。
BubbleTransition
一般而言,這種效果會使用 UIBezierPath + CAShapeLayer + maskLayer 搞定,但是我去看了看程式碼,上面的效果其實是下面這樣實現的。
BubbleTransition 慢放
Are you kidding me? Are you kidding me? 不知道我為何說兩遍的請去欣賞《拯救呆萌》三部曲最終篇《火星救援》。這個效果的開發者真是太有才了,僅僅通過組合檢視+縮放這麼簡單的方法就實現了這個效果,天才。
在上面提到的另外兩種效果則是使用提到的 UIBezierPath + CAShapeLayer + maskLayer 套路,關於 UIBezierPath + CAShapeLayer,簡書上有一篇寫得還不錯,就是標題太炫酷,這篇文章示範了使用 UIBezierPath + CAShapeLayer 實現不規則檢視,也可以使用上面的簡單組合手法輕鬆實現,但如果面對更加複雜的圖形,還是得靠 UIBezierPath + CAShapeLayer。
也許你聽說過貝塞爾曲線,但在 iOS 裡,UIBezierPath 不僅僅用於生成一條曲線,常規的矩形、圓形、圓角矩形以及橢圓都不在話下,是個普適性的圖形物件。而 CAShapeLayer 則是 CALayer 的子類,正如類名描述一樣,通過其path屬性搭配 UIBezierPath 可以實現多種用普通手段難以實現的外形,以及一些線條動畫(可以去看看上面提到的標題很炫酷的文章)。
而 maskLayer,你可能聽說過遮罩之類的概念,很像你玩遊戲探索地圖時的效果,這裡實際上指的是CALayer類的mask屬性,也是個CALayer物件,UIView類有個maskView的屬性,作用相似。其實 BubbleTransition 裡作者的實現手法本身就是對 mask 這一概念的應用,真的是太天才了。
使用 UIBezierPath + CAShapeLayer + maskLayer 套路實現上面的效果慢放後是下面這樣的,不知道原作者有沒有對這兩種效果進行過對比,老實說,我覺得原作者的手法實現的效果更好:
NewBubbleTransition
上面方法的核心程式碼:
| 1 2 3 4 5 6 7 8 9 10 11 12 13 14 |
//利用 UIBezierPath 生成一大一小兩條橢形路徑,ovalInRect 意思是生成緊貼矩形內部的橢圓,bubble 是 BubbleTransition 中的新增的背景檢視,
let circleMaskPathInitial = UIBezierPath(ovalInRect: bubble.frame)
let finalRect = CGRectInset(bubble.frame, -1000, -1000)
let circleMaskPathFinal = UIBezierPath(ovalInRect: finalRect)
//用 CAShapeLayer 作為 mask
let maskLayer = CAShapeLayer()
maskLayer.path = circleMaskPathFinal.CGPath
presentedControllerView.layer.mask = maskLayer
//對 CAShapeLayer 的 path 屬性進行動畫
let maskLayerAnimation = CABasicAnimation(keyPath: "path")
maskLayerAnimation.fromValue = circleMaskPathInitial.CGPath
maskLayerAnimation.toValue = circleMaskPathFinal.CGPath
maskLayerAnimation.duration = self.transitionDuration(transitionContext)
maskLayer.addAnimation(maskLayerAnimation, forKey: "path")
|
來點不一樣的形狀,當然從效果上來講這個形狀放在這裡不好看。該例子僅作示範。

quincunx.gif
生成梅花形狀曲線的程式碼:
| 1 2 3 4 5 6 7 8 9 10 11 12 13 14 15 16 17 18 |
let width = presentedControllerView.frame.width
let height = presentedControllerView.frame.height
let circleMaskPathInitial = UIBezierPath()
circleMaskPathInitial.moveToPoint(CGPoint(x: 0, y: height))
circleMaskPathInitial.addArcWithCenter(CGPoint(x: width / 4, y: height), radius: width / 4, startAngle: CGFloat(M_PI), endAngle: CGFloat(M_PI * 3 / 2), clockwise: true)
circleMaskPathInitial.addArcWithCenter(CGPoint(x: width / 2, y: height - width / 4), radius: width / 4, startAngle: CGFloat(M_PI), endAngle: CGFloat(M_PI * 2), clockwise: true)
circleMaskPathInitial.addArcWithCenter(CGPoint(x: width * 3 / 4, y: height), radius: width / 4, startAngle: CGFloat(M_PI * 3 / 2), endAngle:CGFloat(M_PI * 2), clockwise: true)
circleMaskPathInitial.moveToPoint(CGPoint(x: 0, y: height))
circleMaskPathInitial.closePath()
let circleMaskPathFinal = UIBezierPath()
circleMaskPathFinal.moveToPoint(CGPoint(x: -width, y: height))
circleMaskPathFinal.addArcWithCenter(CGPoint(x: 0, y: height), radius: height, startAngle: CGFloat(M_PI), endAngle: CGFloat(M_PI * 3 / 2), clockwise: true)
circleMaskPathFinal.addArcWithCenter(CGPoint(x: width / 2, y: 0), radius: width / 2, startAngle: CGFloat(M_PI), endAngle: CGFloat(M_PI * 2), clockwise: true)
circleMaskPathFinal.addArcWithCenter(CGPoint(x: width, y: height), radius: height, startAngle: CGFloat(M_PI * 3 / 2), endAngle: CGFloat(M_PI * 2), clockwise: true)
circleMaskPathFinal.moveToPoint(CGPoint(x: -width, y: height))
|