java基於servlet的檔案上傳
阿新 • • 發佈:2019-02-17
研究了一天終於將java上傳檔案看懂了,當然懂的僅僅是皮毛,不妨記下來防止以後忘了。
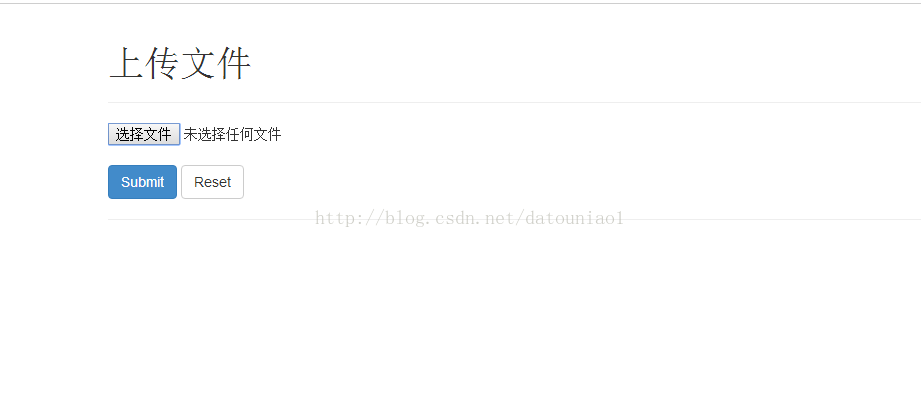
我們在網上看關於檔案的上傳有很多的介紹,當然有的可以使用有的則不合適:我們首先來看前臺的介面
這個地方是為了好看使用了Bootstrap進行佈局,如下:<!DOCTYPE html> <html lang="en"> <head> <meta charset="UTF-8" /> <title>上傳檔案</title> <link href="../css/bootstrap.min.css" rel="stylesheet"> <script src="../js/jquery.min.js"></script> <script src="../js/bootstrap.min.js" type="text/javascript"></script> </head> <body> <div class="container kv-main"> <div class="page-header"> <h1>上傳檔案</h1> </div> <form enctype="multipart/form-data" action="../upload?method=uploadPic" method="post"> <input name="file-1" type="file"><br> <button type="submit" class="btn btn-primary">Submit</button> <button type="reset" class="btn btn-default">Reset</button> </form> <hr> <br> </div> </body> </html>
在做好前臺的頁面之後,我們開看後臺的程式碼,在看servlet之前我們首先來看看web.xml的配置:
為什麼要配置web.xml,是因為我們在servlet有一個要獲取檔案存放的路徑,我們不妨將這個路徑存放到web.xml這個我們當我們的專案進行平臺的遷移的時候,我們需要改動的只是web.xml不需要給java內部的核心的程式碼。<?xml version="1.0" encoding="UTF-8"?> <web-app xmlns:xsi="http://www.w3.org/2001/XMLSchema-instance" xmlns="http://java.sun.com/xml/ns/javaee" xsi:schemaLocation="http://java.sun.com/xml/ns/javaee http://java.sun.com/xml/ns/javaee/web-app_3_0.xsd" id="WebApp_ID" version="3.0"> <display-name>myShop</display-name> <welcome-file-list> <welcome-file>index.html</welcome-file> <welcome-file>index.htm</welcome-file> <welcome-file>index.jsp</welcome-file> <welcome-file>default.html</welcome-file> <welcome-file>default.htm</welcome-file> <welcome-file>default.jsp</welcome-file> </welcome-file-list> <servlet> <servlet-name>upload</servlet-name> <servlet-class>com.epoint.shop.fileupload.UpLoadServlet</servlet-class> <init-param> <param-name>filePath</param-name> <param-value>E://workspace1/myShop/WebContent/upload</param-value> </init-param> <init-param> <param-name>tempFilePath</param-name> <param-value>temp</param-value> </init-param> </servlet> <servlet-mapping> <servlet-name>upload</servlet-name> <url-pattern>/upload</url-pattern> </servlet-mapping> </web-app>
然後我們來看servlet的程式碼:
在今天上午我在編寫的過程中遇到一個問題,就是有一個package com.epoint.shop.fileupload; import java.io.File; import java.io.IOException; import java.io.PrintWriter; import java.lang.reflect.Method; import java.util.List; import javax.servlet.ServletConfig; import javax.servlet.ServletException; import javax.servlet.annotation.WebServlet; import javax.servlet.http.HttpServlet; import javax.servlet.http.HttpServletRequest; import javax.servlet.http.HttpServletResponse; import org.apache.commons.fileupload.FileItem; import org.apache.commons.fileupload.disk.DiskFileItemFactory; import org.apache.commons.fileupload.servlet.ServletFileUpload; @WebServlet("/UpLoad") public class UpLoadServlet extends HttpServlet { private static final long serialVersionUID = 1L; private static String TEMP_FOLDER="/upload"; // 上傳配置 private static final int MEMORY_THRESHOLD = 1024 * 1024 * 3; // 3MB private static final int MAX_FILE_SIZE = 1024 * 1024 * 40; // 40MB private static final int MAX_REQUEST_SIZE = 1024 * 1024 * 50; // 50MB private String filePath; //存放上傳檔案的目錄 private String tempFilePath; //存放臨時檔案的目錄 public UpLoadServlet() { super(); } public void init(ServletConfig config)throws ServletException { super.init(config); filePath=config.getInitParameter("filePath"); System.out.println(filePath); } protected void doGet(HttpServletRequest request, HttpServletResponse response) throws ServletException, IOException { doPost(request, response); } protected void doPost(HttpServletRequest request, HttpServletResponse response) throws ServletException, IOException { request.setCharacterEncoding("utf-8"); response.setCharacterEncoding("utf-8"); String methodName=request.getParameter("method"); if(methodName!=null){ try { Method method=this.getClass().getDeclaredMethod(methodName,HttpServletRequest.class,HttpServletResponse.class); method.invoke(this, request,response); } catch (Exception e) { e.printStackTrace(); } } } public void uploadPic(HttpServletRequest request, HttpServletResponse response) throws Exception{ //檢測是否為多媒體上傳 if(!ServletFileUpload.isMultipartContent(request)){ //如果不是就停止 PrintWriter writer=response.getWriter(); writer.println("表單中必須包含enctype=multipart/form-data"); writer.flush(); return; } DiskFileItemFactory factory = new DiskFileItemFactory(); // 建立檔案專案工廠物件 factory.setRepository(new File(savePath)); //設定臨時資料夾為TEMP_FOLDER factory.setSizeThreshold(1024 * 1024); // 設定緩衝區大小為 1M // 構造臨時路徑來儲存上傳的檔案 ServletFileUpload upload = new ServletFileUpload(factory);//用工廠例項化上傳元件,ServletFileUpload用來解析檔案上傳請求 // 設定最大檔案上傳值 upload.setFileSizeMax(MAX_FILE_SIZE); // 設定最大請求值 (包含檔案和表單資料) upload.setSizeMax(MAX_REQUEST_SIZE); upload.setHeaderEncoding("UTF-8"); @SuppressWarnings("unchecked") List<FileItem> list = upload.parseRequest(request); if (list != null && list.size() > 0) { for (FileItem item : list) { if (!item.isFormField()) { String fileName = new File(item.getName()).getName(); File storeFile = new File(filePath,fileName); // 儲存檔案到硬碟 item.write(storeFile); request.setAttribute("message","檔案上傳成功!"); } } } } }
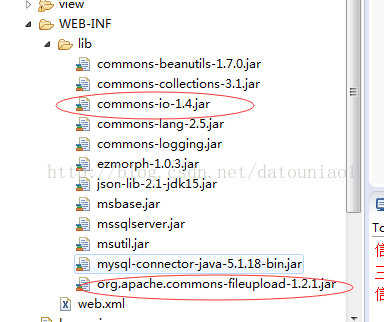
List<FileItem> list = upload.parseRequest(request);還有檔案的上傳需要兩個包,別忘了
上面畫圓圈的就是了,希望對你有所幫助