
Flask原始碼解讀 --- 淺談Flask基本工作流程
網站寫了蠻長時間了,一直想具體分析分析Flask的執行機制,但是原始碼看得斷斷續續,不過最近狀態不錯,進度上來了點,這裡先新建一個類別,專門來說說Flask和原始碼有關係的內容, 這篇準備粗略說一下應用Flask框架的時候,從HTTP請求開始到響應的流程
前置技能 --- WSGI
在具體讀原始碼之前,這裡先需要說一個概念,什麼是WSGI。
WSGI,全稱 Web Server Gateway Interface,或者 Python Web Server Gateway Interface ,是為 Python 語言定義的 Web 伺服器和 Web 應用程式或框架之間的一種簡單而通用的介面。自從 WSGI 被開發出來以後,許多其它語言中也出現了類似介面。
WSGI 的官方定義是,the Python Web Server Gateway Interface。從名字就可以看出來,這東西是一個Gateway,也就是閘道器。閘道器的作用就是在協議之間進行轉換。
WSGI 是作為 Web 伺服器與 Web 應用程式或應用框架之間的一種低級別的介面,以提升可移植 Web 應用開發的共同點。WSGI 是基於現存的 CGI 標準而設計的。
很多框架都自帶了 WSGI server ,比如 Flask,webpy,Django、CherryPy等等。當然效能都不好,自帶的 web server 更多的是測試用途,釋出時則使用生產環境的 WSGI server或者是聯合 nginx 做 uwsgi 。
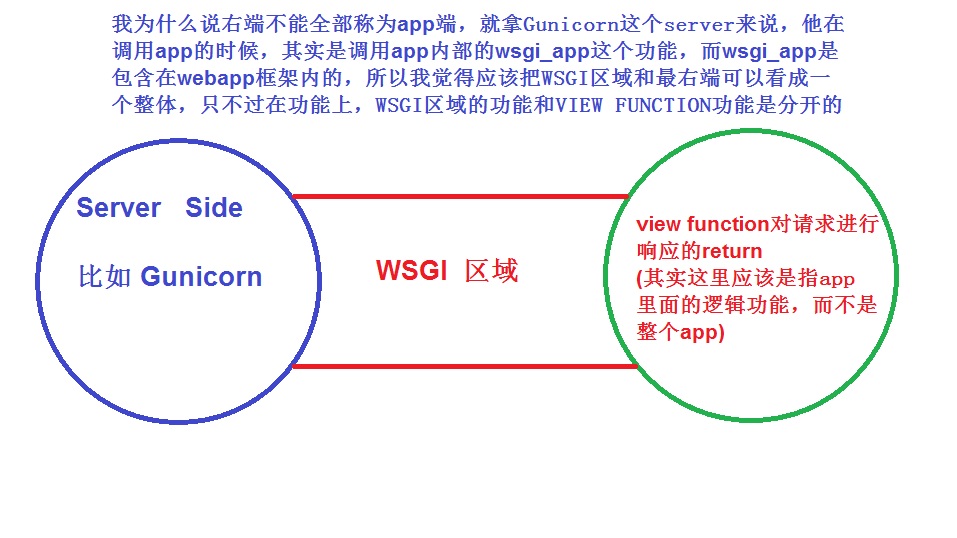
在網上搜過WSGI的人應該會看到一個圖,左邊是Server,右邊是APP,中間有一個連線紐帶是WSGI。
不過,我看了原始碼以後的理解和這個有些不同,我個人覺得,實際上不應該單獨寫一個APP,因為,這個WSGI的使用方法實際上也是包含在APP裡面的,最右端的app實際上應該指的是邏輯功能,包括URL和view function的對應關係。
所以我個人的理解如下自己畫的圖
WSGI其實是作為一個介面,來接受Server傳遞過來的資訊, 然後通過這個介面呼叫後臺app裡的view function進行響應。
WSGI具體的功能
上面講到了WSGI可以起到一個介面的功能,前面對接伺服器,後面對接app的具體功能
我們先來看看最簡單的一個wsgi_app的實現
def application(environ, start_response):               #一個符合wsgi協議的應用程式寫法應該接受2個引數
    start_response('200 OK', [('Content-Type', 'text/html')])  #environ為http的相關資訊,如請求頭等 start_response則是響應資訊
    return [b'<h1>Hello, web!</h1>']        #return出來是響應內容
但是,作為app本身,你就算啟動了程式,你也沒辦法給application傳遞引數?
所以,實際上,呼叫application和傳遞2個引數的動作,是伺服器來進行的,比如Gunicorn.
而這個叫做application的東西,在Flask框架內部的名字,叫做wsgi_app,請看下面章節的原始碼。
Flask和WSGI
生成Flask例項
我們再來看下生成flask應用的操作寫法,用過的人肯定都非常熟悉。
from flask import Flask

app = Flask(__name__)         #生成app例項

@app.route('/')
def index():
        return 'Hello World'
這樣,一個flask app就生成了
但是這裡有一個概念必須要搞清楚,就是當你的gunicorn收到http請求,去呼叫app的時候,他實際上是用了Flask 的 __call__方法,這點非常重要!!!
因為__call__方法怎麼寫,決定了你整個流程從哪裡開始。
那我們來看下Flask類的__call__方法的原始碼
class Flask(_PackageBoundObject):        #Flask類

#中間省略一些程式碼

    def __call__(self, environ, start_response):    #Flask例項的__call__方法
        """Shortcut for :attr:`wsgi_app`."""
return self.wsgi_app(environ, start_response) #注意他的return,他返回的時候,實際上是呼叫了wsgi_app這個功能如此一來,我們便知道,當http請求從server傳送過來的時候,他會啟動__call__功能,最終實際是呼叫了wsgi_app功能並傳入environ和start_response
Flask的wsgi_app定義
class Flask(_PackageBoundObject):

#中間省略一些程式碼
					            #請注意函式的說明,說得非常準確,這個wsgi_app是一個真正的WSGI應用
    def wsgi_app(self, environ, start_response):    #他扮演的是一箇中間角色
        """The actual WSGI application.  This is not implemented in
        `__call__` so that middlewares can be applied without losing a
        reference to the class.  So instead of doing this::

            app = MyMiddleware(app)

        It's a better idea to do this instead::

            app.wsgi_app = MyMiddleware(app.wsgi_app)

        Then you still have the original application object around and
        can continue to call methods on it.

        :param environ: a WSGI environment
        :param start_response: a callable accepting a status code,
                               a list of headers and an optional
                               exception context to start the response
        """
        ctx = self.request_context(environ)
        ctx.push()
        error = None
        try:
            try:
                response = self.full_dispatch_request()    #full_dispatch_request起到了預處理和錯誤處理以及分發請求的作用
            except Exception as e:
                error = e
                response = self.make_response(self.handle_exception(e))  #如果有錯誤發生,則生成錯誤響應
            return response(environ, start_response)       #如果沒有錯誤發生,則正常響應請求,返回響應內容
        finally:
            if self.should_ignore_error(error):
                error = None
            ctx.auto_pop(error)
Ok, 這個wsgi_app的函式定義,基本上包含了整個流程的功能
WSGI_APP的內部流程
第一步:生成request請求物件和請求上下文環境
首先,你會看到ctx = self.request_context(environ)的語句,這個涉及到Flask使用了請求上下文和應用上下文的概念,結構為棧結構,這部分比較難,後面第二篇會單獨寫。
這裡只需要理解為,上面語句產生的所用是生成了一個request請求物件以及包含請求資訊在內的request context
第二部:請求進入預處理,錯誤處理及請求轉發到響應的過程
進入wsgi_app的函式內部,生成了request物件和上下文環境之後,進入到try
response = self.full_dispatch_request() 我們看到,響應被賦值成了full_dispatch_request()方法的返回內容,所以我們來看一下full_dispatch_request方法
class Flask(_PackageBoundObject):

#此處省略一些程式碼

    def full_dispatch_request(self):
        """Dispatches the request and on top of that performs request
        pre and postprocessing as well as HTTP exception catching and
        error handling.

        .. versionadded:: 0.7
        """
        self.try_trigger_before_first_request_functions()  #進行發生真實請求前的處理
        try:
            request_started.send(self)                     #socket部分的操作
            rv = self.preprocess_request()                 #進行請求的預處理
            if rv is None:
                rv = self.dispatch_request()
        except Exception as e:
            rv = self.handle_user_exception(e)
        response = self.make_response(rv)
        response = self.process_response(response)
        request_finished.send(self, response=response)
        return response
他首先會觸發 try_trigger_before_first_request_function()方法
在方法內部 ---------->會觸發 _got_first_request 屬性,這個屬性的返回值是True或者False. True的話就代表了程式開始處理請求了.
來看看 try_trigger_before_first_request_function()的程式碼,他的目的是,最後將_got_first_request屬性置為True.
class Flask(_PackageBoundObject):

#省略一些程式碼

    def try_trigger_before_first_request_functions(self):
        """Called before each request and will ensure that it triggers
        the :attr:`before_first_request_funcs` and only exactly once per
        application instance (which means process usually).

        :internal:
        """
        if self._got_first_request:
            return
        with self._before_request_lock:
            if self._got_first_request:
                return
            for func in self.before_first_request_funcs:
                func()
            self._got_first_request = True
再來看看_got_first_request 的定義,他的預設值是False
他的定義中可以明顯看到, if the application started,this attribute is set to True.
class Flask(_PackageBoundObject):

#省略一些程式碼

    @property
    def got_first_request(self):
        """This attribute is set to ``True`` if the application started
        handling the first request.

        .. versionadded:: 0.8
        """
        return self._got_first_request
接著,當_got_first_request 屬性被設定完以後,我們就需要再次回到 full_dispatch_request函式內部,繼續往下走
下面一段程式碼是request_started.send(),他是繼承自signal模組,大致作用是進行socket部分的功能,暫時不詳細追溯。
preprocess_request()方法的話,主要是進行flask的hook鉤子, before_request功能的實現,也就是在真正發生請求之前,有些事情需要提前做
Flask一共有4個hook鉤子,另外再寫吧
隨後,繼續往下走,來到了一個至 關 重 要的功能 dispatch_request()
        try:
            request_started.send(self)
            rv = self.preprocess_request()
            if rv is None:
                rv = self.dispatch_request()
為什麼說至關重要,因為一個http請求到了這裡,實際上已經完成了從wsgi部分的過渡,進入到了尋找響應的階段了,一個請求通過url進來以後,app怎麼知道要如何響應呢?
就是通過dispatch_request方法來進行請求判定和分發。
第三步:請求分發 dispatch_request
來看原始碼
class Flask(_PackageBoundObject):

#省略一些程式碼

    def dispatch_request(self):   #看函式定義,matches the URL and returns the value of the view or error.
        """Does the request dispatching.  Matches the URL and returns the
        return value of the view or error handler.  This does not have to
        be a response object.  In order to convert the return value to a
        proper response object, call :func:`make_response`.

        .. versionchanged:: 0.7
           This no longer does the exception handling, this code was
           moved to the new :meth:`full_dispatch_request`.
        """
        req = _request_ctx_stack.top.request
        if req.routing_exception is not None:
            self.raise_routing_exception(req)
        rule = req.url_rule
        # if we provide automatic options for this URL and the
        # request came with the OPTIONS method, reply automatically
        if getattr(rule, 'provide_automatic_options', False) \
           and req.method == 'OPTIONS':
            return self.make_default_options_response()
        # otherwise dispatch to the handler for that endpoint
        return self.view_functions[rule.endpoint](**req.view_args)   #最終進入view_functions,取出url對應的檢視函式的返回值
中間不需要過多考慮,req = _request_ctx_stack.top.request 可以暫時理解為,將請求物件賦值給req
這裡先簡單講下,每個url進來以後,他都會對應一個view_function
比如下面的一個簡單檢視函式,路徑 '/' 對應的是index函式
但是,實際上當中是分2步走的,第一步是'/'對應的endpoint為'index' ,第二部是endpoint 'index' 對應到index()檢視函式
這個也是放在第二篇文章裡面具體寫flask 路由的實現,這裡暫時可以忽略中間步驟,只要知道URL----------->VIEW FUNCTION的邏輯步驟就ok
@app.route('/')
def index():
    return 'Hello world'
另外說下view_functions 是一個字典形式,他的key和value的關係是endpoint ------> view function
所以每個有效的URL進來,都能找到他對應的檢視函式view function,取得返回值並賦值給 rv
比如上面簡單的index,他取得的就是 'Hello world' 值
請求分發完成後,已經取得了返回的值,再看下一步是如何做
我們再次回到 full_dispatch_request方法內往下走
        response = self.make_response(rv)
        response = self.process_response(response)
        request_finished.send(self, response=response)
        return response
這時候,通過make_response函式,將剛才取得的 rv 生成響應,重新賦值response
再通過process_response功能主要是處理一個after_request的功能,比如你在請求後,要把資料庫連線關閉等動作,和上面提到的before_request對應和類似。
之後再進行request_finished.send的處理,也是和socket處理有關,暫時不詳細深入。
之後返回新的response物件
這裡特別需要注意的是,make_response函式是一個非常重要的函式,他的作用是返回一個response_class的例項物件,也就是可以接受environ和start_reponse兩個引數的物件
非 常 重 要!!!
Converts the return value from a view function to a real response object that is an instance of :attr:`response_class
class Flask(_PackageBoundObject):   #注意函式說明,converts the return value from view function to a real response object

    #省略一部分程式碼

    def make_response(self, rv):
        """Converts the return value from a view function to a real
        response object that is an instance of :attr:`response_class`.

        The following types are allowed for `rv`:

        .. tabularcolumns:: |p{3.5cm}|p{9.5cm}|

        ======================= ===========================================
        :attr:`response_class`  the object is returned unchanged
        :class:`str`            a response object is created with the
                                string as body
        :class:`unicode`        a response object is created with the
                                string encoded to utf-8 as body
        a WSGI function         the function is called as WSGI application
                                and buffered as response object
        :class:`tuple`          A tuple in the form ``(response, status,
                                headers)`` or ``(response, headers)``
                                where `response` is any of the
                                types defined here, `status` is a string
                                or an integer and `headers` is a list or
                                a dictionary with header values.
        ======================= ===========================================

        :param rv: the return value from the view function

        .. versionchanged:: 0.9
           Previously a tuple was interpreted as the arguments for the
           response object.
        """
        status_or_headers = headers = None
        if isinstance(rv, tuple):
            rv, status_or_headers, headers = rv + (None,) * (3 - len(rv))

        if rv is None:
            raise ValueError('View function did not return a response')

        if isinstance(status_or_headers, (dict, list)):
            headers, status_or_headers = status_or_headers, None

        if not isinstance(rv, self.response_class):
            # When we create a response object directly, we let the constructor
            # set the headers and status.  We do this because there can be
            # some extra logic involved when creating these objects with
            # specific values (like default content type selection).
            if isinstance(rv, (text_type, bytes, bytearray)):
                rv = self.response_class(rv, headers=headers,
                                         status=status_or_headers)
                headers = status_or_headers = None
            else:
                rv = self.response_class.force_type(rv, request.environ)

        if status_or_headers is not None:
            if isinstance(status_or_headers, string_types):
                rv.status = status_or_headers
            else:
                rv.status_code = status_or_headers
        if headers:
            rv.headers.extend(headers)

        return rv
第四步:返回到wsgi_app內部
終於快進行到了最後一步,流程走回到了wsgi_app的內部
下面這段是wsgi_app內部的程式碼
try:
try:
response = self.full_dispatch_request()
except Exception as e:
error = e
response = self.make_response(self.handle_exception(e))
return response(environ, start_response)
finally:
if self.should_ignore_error(error):
error = None
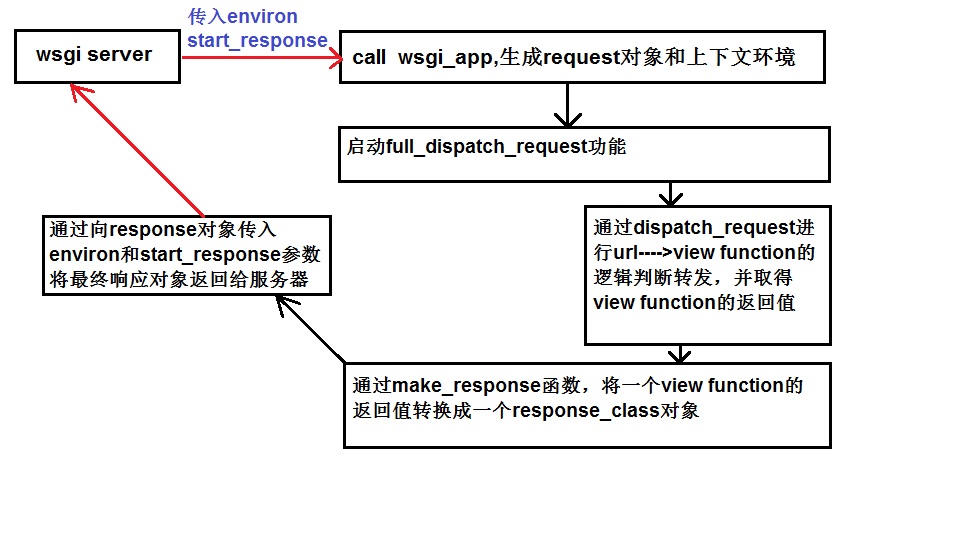
ctx.auto_pop(error)當response從剛剛的full_dispatch_request功能返回之後,函式會對這個response加上environ, start_response的引數並返回給Gunicorn
至此,一個HTTP從請求到響應的流程就完畢了.
總的來說,一個流程的關鍵步驟可以簡單歸結如下:
後一篇,將會記錄一下flask的route實現,裡面的url如何和endpoint對應起來,endpoint和view function又是如何對應起來
本篇參考資料: