
Dom解析和生成XML文件
一、前言
Dom即檔案物件模型(Document Object Model),是W3C組織推薦的使用可擴充套件標記性語言的標準介面, 它主要用於讀寫xml文件,使用起來還是非常不錯的。 另外Dom將整個xml檔案對映成一個有層次的節點的結構,分別1級、2級到多級,這樣子使整個繁瑣的文件數量大但是依然很清晰,然後就可以非常方便的方便讀寫xml文件了。
二、準備條件
因為Dom是jdk自帶的解析方式,所以不用新增jar包引用。
三、使用Dom實戰
1、解析xml文件
實現思路:
<1>根據讀取的xml路徑,傳遞給DocumentBuilder之後 返回一個Document文件物件;
<2>然後操作這個Document物件,獲取它下面的節點以及子節點的資訊;
具體程式碼如下:
上面程式碼簡單解析了一個xml,server01.xml檔案的內容如下:import java.io.File; import java.io.FileInputStream; import java.io.FileNotFoundException; import java.io.FileOutputStream; import java.io.IOException; import java.io.InputStream; import java.io.PrintWriter; import javax.xml.parsers.DocumentBuilder; import javax.xml.parsers.DocumentBuilderFactory; import javax.xml.parsers.ParserConfigurationException; import javax.xml.transform.Transformer; import javax.xml.transform.TransformerConfigurationException; import javax.xml.transform.TransformerException; import javax.xml.transform.TransformerFactory; import javax.xml.transform.dom.DOMSource; import javax.xml.transform.stream.StreamResult; import org.w3c.dom.Document; import org.w3c.dom.Element; import org.w3c.dom.NamedNodeMap; import org.w3c.dom.Node; import org.w3c.dom.NodeList; import org.xml.sax.InputSource; import org.xml.sax.SAXException; /** * 使用dom解析和生成xml文件 * @author Administrator * */ public class DomOperateXmlDemo { public void parseXml01(){ try { //建立DocumentBuilder工廠例項 DocumentBuilderFactory dbf = DocumentBuilderFactory.newInstance(); //new一個新的DocumentBuilder DocumentBuilder db = dbf.newDocumentBuilder(); String xmlPath = "D:\\project\\dynamicWeb\\src\\resource\\server01.xml"; String xmlName = xmlPath.substring(xmlPath.lastIndexOf("\\")); //解析xml轉換為document文件物件,該方法支援過載 //1、直接指定xml的絕對路徑可以完成 //Document document = db.parse(xmlPath); //2、使用InputStream輸入流讀取xml檔案,然後把這個輸入流傳遞進去 InputStream inputStream = this.getClass().getResourceAsStream(xmlName); //3、也可以指定路徑完成InputStream輸入流的例項化操作 //InputStream inputStream = new FileInputStream(new File(xmlPath)); //4、使用InputSource輸入源作為引數也可以轉換xml //InputSource inputSource = new InputSource(inputStream); //Document document = db.parse(inputSource); Document document = db.parse(inputStream); //獲取當前物件的子節點列表,返回的是一個根節點集合 NodeList nodeList = document.getChildNodes(); //獲取根節點可以用NodeList集合返回它的第一個元素,並且它的型別是org.w3c.dom.Node的 //Node rootNode = nodeList.item(0); Element rootNode = document.getDocumentElement(); //上面的返回型別是Element,也可以使用 Node接收,因為Element介面繼承Node介面,使用Node只不過方法沒有Element多,可以自己嘗試一下就知道了 System.out.println("根節點的節點名稱:" + rootNode.getNodeName()); System.out.println("根節點的標籤名稱:" + rootNode.getTagName()); System.out.println("根節點的節點型別:" + rootNode.getNodeType()); System.out.println("根節點的節點值:" + rootNode.getFirstChild().getNodeValue());//rootNode.getNodeValue();返回的一直是null,因為程式不知道你到底要獲取的哪個節點的value,所以只能獲取子節點的value System.out.println("根節點的節點文字內容:" + rootNode.getTextContent());//返回當前節點下所有子標籤的文字內容,並且換行是因為xml中有換行符 System.out.println("根節點的指定屬性的值:" + rootNode.getAttribute("port")); //直接獲取所有屬性的集合 NamedNodeMap nameNodeMap = rootNode.getAttributes(); for (int i = 0; i < nameNodeMap.getLength(); i++) { System.out.println("根節點屬性" + nameNodeMap.item(i).getNodeName() + ":" + rootNode.getAttribute(nameNodeMap.item(i).getNodeName())); } //獲取根節點的子節點集合資訊 NodeList subNodeList = rootNode.getChildNodes(); for (int i = 0; i < subNodeList.getLength(); i++) { System.out.println("子節點的節點名稱:" + subNodeList.item(i).getNodeName()); System.out.println("子節點的節點文字內容:" + subNodeList.item(i).getTextContent()); } } catch (ParserConfigurationException e) { e.printStackTrace(); } catch (SAXException e) { e.printStackTrace(); } catch (IOException e) { e.printStackTrace(); } } public static void main(String[] args) { DomOperateXmlDemo demo = new DomOperateXmlDemo(); demo.parseXml01(); } }
<?xml version="1.0" encoding="UTF-8"?>
<Server port="8005" id="server">
	Server標籤內的內容
	<ServerName>服務名稱內容</ServerName>
</Server>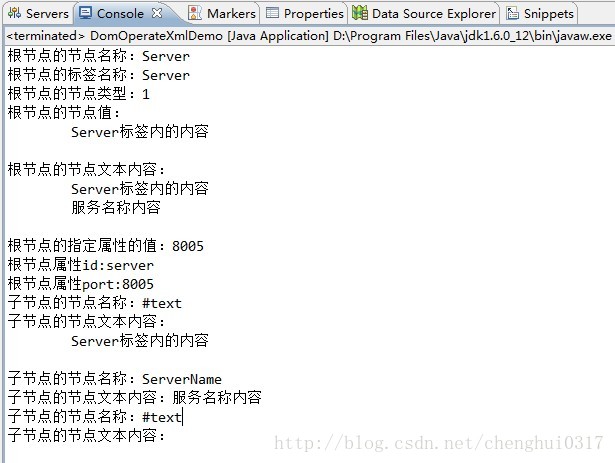
由此可知:
<1>根據控制檯顯示可知,根節點獲取的子節點集合也包含文字內容,返回的標籤節點名稱是#text這樣;
<2>另外getTextContent()獲取的是該節點下所有的子節點的文字資訊,而getNodeValue()只是獲取當前節點的文字資訊,如果是標籤則返回null。
上面只是簡單的獲取了xml的根目錄的元素,接下來使用Document自帶的方法檢索節點以及修改節點內的內容。
具體程式碼如下:
	public void parseXml02(){
		try{
			//建立DocumentBuilder工廠例項
			DocumentBuilderFactory dbf = DocumentBuilderFactory.newInstance();
			//new一個新的DocumentBuilder
			DocumentBuilder db = dbf.newDocumentBuilder();
			InputStream inputStream = this.getClass().getResourceAsStream("server02.xml");

			Document document = db.parse(inputStream);
			//根據節點名稱獲取節點集合
			NodeList nodeList = document.getElementsByTagName("Service");
			for (int i = 0; i < nodeList.getLength(); i++) {
				System.out.println("節點" + nodeList.item(i).getNodeName() + ":" + nodeList.item(i).getTextContent() + ",它的"
						+ nodeList.item(i).getAttributes().item(0).getNodeName() + "屬性值是:" + nodeList.item(i).getAttributes().item(0).getTextContent());
			}

			Element element = document.getElementById("server"); //不知道為什麼總是返回null,費解
			System.out.println(element);

			//修改子元素的標籤名稱以及標籤內容
			Node node = nodeList.item(0);
			node.getFirstChild().setNodeValue("這個是修改之後的內容..");
			//輸出一下檢視效果
			System.out.println("修改之後的Node的nodeValue:" + node.getFirstChild().getNodeValue());
		} catch (ParserConfigurationException e) {
			e.printStackTrace();
		} catch (SAXException e) {
			e.printStackTrace();
		} catch (IOException e) {
			e.printStackTrace();
		}
}<?xml version="1.0" encoding="UTF-8"?>
<Server port="8005" shutdown="SHUTDOWN" id="server">
<Service name="Catalina" id="aa">第一個服務配置</Service>
<Service name="Catalina01">第二個服務配置</Service>
</Server>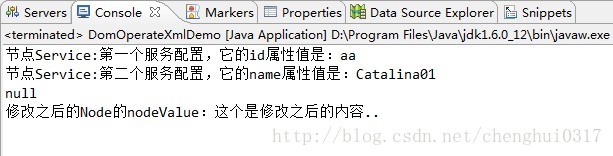
由此可知:
但是上面只是簡單的獲取了子節點元素,但是如果xml規則比較複雜,比如接下來要測試的server03.xml,具體如下:
<?xml version="1.0" encoding="UTF-8"?>
<Server port="8005" shutdown="SHUTDOWN">
	<Service name="Catalina">
	    <Connector>第一個聯結器</Connector>
		<Connector>第二個聯結器
			<open>開啟服務</open>
			<init>初始化一下</init>
			<service>執行請求服務</service>
			<destory>銷燬一下</destory>
			<close>關閉服務</close>
		</Connector>
  	</Service>
</Server> public void parseXml03(){
try{
//建立DocumentBuilder工廠例項
DocumentBuilderFactory dbf = DocumentBuilderFactory.newInstance();
//new一個新的DocumentBuilder
DocumentBuilder db = dbf.newDocumentBuilder();
InputStream inputStream = this.getClass().getResourceAsStream("server03.xml");
Document document = db.parse(inputStream);
//根據節點名稱獲取節點集合
NodeList nodeList = document.getDocumentElement().getChildNodes();
for (int i = 0; i < nodeList.getLength(); i++) {
Node node = nodeList.item(i);
if(!"#text".equals(node.getNodeName())){
System.out.println("【1】" + node.getNodeName() + ":" + node.getFirstChild().getNodeValue());
}
NodeList subNodeList = node.getChildNodes();
for (int j = 0; j < subNodeList.getLength(); j++) {
Node subNode = subNodeList.item(j);
if(!"#text".equals(subNode.getNodeName())){
System.out.println(" 【2】" + subNode.getNodeName() + ":" + subNode.getFirstChild().getNodeValue());
}
NodeList subSubNodeList = subNode.getChildNodes();
for (int k = 0; k < subSubNodeList.getLength(); k++) {
Node subSubNode = subSubNodeList.item(k);
if(!"#text".equals(subSubNode.getNodeName())){
System.out.println(" 【3】" + subSubNode.getNodeName() + ":" + subSubNode.getFirstChild().getNodeValue());
}
}
}
}
} catch (ParserConfigurationException e) {
e.printStackTrace();
} catch (SAXException e) {
e.printStackTrace();
} catch (IOException e) {
e.printStackTrace();
}
}接下來執行該類的main方法,console效果如下:
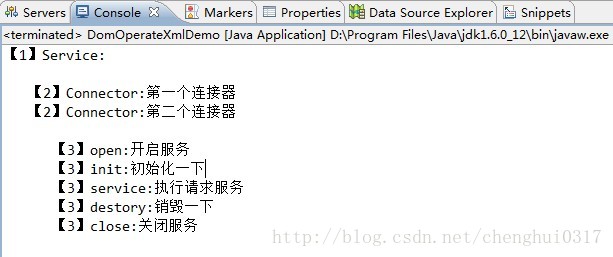
由此可知:
<2>因為標籤與標籤之前的字串也算是節點,然後獲取node.getFirstChild()肯定返回空,所以可以使用!"#text".equals(node.getNodeName())過濾掉不是標籤內容的節點。
<3>根據上面的程式碼可知 dom取值非常的不方便,很容易空引用,並且每次讀取都要全部載入,萬一檔案很大,就全部都要執行在記憶體之中,容易造成記憶體溢位。
2、生成xml文件
dom能夠解析xml,同樣肯定能生成xml,而且使用起來更加簡單方便。
實現思路:
<1>DocumentBuilder提供了建立Document物件的方法;
<2>操作這個Document物件,新增節點以及節點下的文字、名稱和屬性值;
<3>然後利用PrintWriter寫入器把封裝的document物件寫入到磁碟中;
具體程式碼如下: public void buildXml01(){
try {
DocumentBuilderFactory dbf = DocumentBuilderFactory.newInstance();
DocumentBuilder db = dbf.newDocumentBuilder();
//建立一個新的document文件物件,這裡返回的document是 org.w3c.dom.Document
Document document = db.newDocument();
//document.setXmlVersion("UTF-8");//預設UTF-8
Element root = document.createElement("root");
root.setTextContent("根節點內容");
root.setAttribute("attr", "nothing");
document.appendChild(root);//這一步必不可少,繫結父子標籤的關聯關係
//TransformerFactory這個工廠專門生產Transformer的例項,Transformer例項就可以把封裝好的document變成xml格式的文件了
TransformerFactory tf = TransformerFactory.newInstance();
Transformer transformer = tf.newTransformer();
DOMSource source = new DOMSource(document);
//檔案寫入器
PrintWriter printWriter = new PrintWriter(new FileOutputStream("c:\\server.xml"));
StreamResult result = new StreamResult(printWriter);
//執行寫入操作
transformer.transform(source, result);
System.out.println("生成xml檔案成功");
printWriter.close();
} catch (ParserConfigurationException e) {
e.printStackTrace();
} catch (TransformerConfigurationException e) {
e.printStackTrace();
} catch (FileNotFoundException e) {
e.printStackTrace();
} catch (TransformerException e) {
e.printStackTrace();
}
}

結果顯示 與自己期望的內容一樣。