
Linux系統實現ansible自動化安裝配置httpd
1、使用ansible的playbook實現自動化安裝httpd
1)首先配置好ansible的hosts檔案,讓其對應主機能夠受ansible控制

提示:我們在主機清單上配置了所管控的主機地址,但是直接用ansible的ping模組去探測主機的存活情況,卻顯示許可權拒絕。從提示上說讓我們要指定用什麼驗證。預設情況ansible是通過ssh的key驗證的,所以我們在ansible的主機清單中配置了管控主機的ip是不夠的,還要配置ssh基於KEY驗證
2)配置管控主機能夠基於SSH key驗證
[root@test ~]# ip a s enp2s0
2: enp2s0: <BROADCAST,MULTICAST,UP,LOWER_UP> mtu 1500 qdisc pfifo_fast state UP group default qlen 1000
    link/ether 00:30:18:51:af:3c brd ff:ff:ff:ff:ff:ff
    inet 192.168.0.99/24 brd 192.168.0.255 scope global noprefixroute enp2s0
       valid_lft forever preferred_lft forever
    inet 172.16.1.2/16 brd 172.16.255.255 scope global noprefixroute enp2s0:0
       valid_lft forever preferred_lft forever
    inet6 fe80::230:18ff:fe51:af3c/64 scope link
       valid_lft forever preferred_lft forever
[root@test ~]# ssh-keygen
Generating public/private rsa key pair.
Enter file in which to save the key (/root/.ssh/id_rsa):
Created directory '/root/.ssh'.
Enter passphrase (empty for no passphrase):
Enter same passphrase again:
Your identification has been saved in /root/.ssh/id_rsa.
Your public key has been saved in /root/.ssh/id_rsa.pub.
The key fingerprint is:
SHA256:UORxi5JhiKDBOhZP3FsbsZfyCjqUcjwqdl1qcnTyGsw root@test
The key's randomart image is:
+---[RSA 2048]----+
|+.....oo= .      |
|.+.o.o B.+..     |
|o +   *o=o.      |
|o..... ++        |
|.o * + oS.       |
|  = B B .        |
|.o = E o         |
|o . = o          |
|     .           |
+----[SHA256]-----+
[root@test ~]# ssh-copy-id 192.168.0.99 -p 41319
/bin/ssh-copy-id: INFO: Source of key(s) to be installed: "/root/.ssh/id_rsa.pub"
The authenticity of host '[192.168.0.99]:41319 ([192.168.0.99]:41319)' can't be established.
ECDSA key fingerprint is SHA256:W2pD2PA2K9tGKGVK+weiINcVESkUaHjsTI263OVqBh4.
ECDSA key fingerprint is MD5:3a:f8:c9:b1:63:c6:c1:ae:e0:6e:e2:ca:17:4a:20:7a.
Are you sure you want to continue connecting (yes/no)? yes
/bin/ssh-copy-id: INFO: attempting to log in with the new key(s), to filter out any that are already installed
/bin/ssh-copy-id: INFO: 1 key(s) remain to be installed -- if you are prompted now it is to install the new keys
[email protected]'s password:

Number of key(s) added: 1

Now try logging into the machine, with:   "ssh -p '41319' '192.168.0.99'"
and check to make sure that only the key(s) you wanted were added.

[root@test ~]# scp -r .ssh 192.168.0.10:~/
The authenticity of host '192.168.0.10 (192.168.0.10)' can't be established.
ECDSA key fingerprint is SHA256:EG9nua4JJuUeofheXlgQeL9hX5H53JynOqf2vf53mII.
ECDSA key fingerprint is MD5:57:83:e6:46:2c:4b:bb:33:13:56:17:f7:fd:76:71:cc.
Are you sure you want to continue connecting (yes/no)? yes
Warning: Permanently added '192.168.0.10' (ECDSA) to the list of known hosts.
[email protected]'s password:
id_rsa                                                              100% 1675   677.0KB/s   00:00
id_rsa.pub                                                          100%  391   207.6KB/s   00:00
known_hosts                                                         100%  356    12.2KB/s   00:00
authorized_keys                                                     100%  391    12.6KB/s   00:00
[root@test ~]#
提示:做ssh基於key驗證需要在ansible主機上做,我上面是現在ansible主機上生成一對ssh金鑰,然後通過ssh-copy-id 把公鑰複製給本機生成authorized_keys檔案,然後在把.ssh目錄複製給遠端客戶機,這樣一來ansible主機可以通過ssh基於key免密登入遠端客戶機,同時遠端客戶機也可以通過ssh免密登入ansible主機,這樣就實現了雙向的ssh基於key驗證,如果你只想單向的通過ssh基於key認證,你可以在ansible主機上生成金鑰對,然後把公鑰發給對方即可。有關ssh基於key認證的詳細說明請參考本人部落格https://www.cnblogs.com/qiuhom-1874/p/11783371.html
測試:用ansible主機通過ssh遠端客戶端主機
[root@test ~]# ssh 192.168.0.10
Last login: Mon Jan 27 04:58:46 2020 from 192.168.0.99
[root@test-centos7-node1 ~]# ip a
1: lo: <LOOPBACK,UP,LOWER_UP> mtu 65536 qdisc noqueue state UNKNOWN qlen 1
    link/loopback 00:00:00:00:00:00 brd 00:00:00:00:00:00
    inet 127.0.0.1/8 scope host lo
       valid_lft forever preferred_lft forever
    inet6 ::1/128 scope host
       valid_lft forever preferred_lft forever
2: ens33: <BROADCAST,MULTICAST,UP,LOWER_UP> mtu 1500 qdisc pfifo_fast state UP qlen 1000
    link/ether 00:0c:29:f2:82:0c brd ff:ff:ff:ff:ff:ff
    inet 192.168.0.10/24 brd 192.168.0.255 scope global ens33
       valid_lft forever preferred_lft forever
    inet6 fe80::20c:29ff:fef2:820c/64 scope link
       valid_lft forever preferred_lft forever
[root@test-centos7-node1 ~]# exit
登出
Connection to 192.168.0.10 closed.
[root@test ~]#
提示:可以看到ansible主機能夠正常免密登入遠端主機,接下我們在用ansible的ping模組去探測下被管控主機的存活
[root@test ~]# ansible websers -m ping
192.168.0.10 | SUCCESS => {
    "changed": false,
    "ping": "pong"
}
[root@test ~]#
提示:能夠看到用ansible的ping模組去探測遠端主機的存活,返回的狀態是SUCCESS,資料是pong說明對端主機上存活的
到此ansible的環境就準備好了,接下來寫playbook來安裝httpd
[root@test ~]# cat install_httpd.yml
---
  - hosts: websers
    remote_user: root

    tasks:
      - name: copy epel file
        copy: src=/etc/yum.repos.d/CentOS-Base.repo dest=/etc/yum.repos.d/CentOS-Base.repo
      - name: install httpd
        yum: name=httpd
      - name: start httpd
        service: name=httpd state=started enabled=yes


[root@test ~]# ansible-playbook -C install_httpd.yml

PLAY [websers] ***********************************************************************************************************

TASK [copy epel file] ****************************************************************************************************
changed: [192.168.0.10]

TASK [install httpd] *****************************************************************************************************
changed: [192.168.0.10]

TASK [start httpd] *******************************************************************************************************
changed: [192.168.0.10]

PLAY RECAP ***************************************************************************************************************
192.168.0.10               : ok=3    changed=3    unreachable=0    failed=0

[root@test ~]#
提示:以上playbook的主要內容是把本機的yum源複製到遠端伺服器上,然後通過yum去安裝httpd包,最後啟動httpd;在寫好playbook後,我們用ansible-playbook -C install_httpd.yml 命令對我們寫的playbook進行了測試,沒有問題,接下來我們使用ansible-playbook來安裝httpd
[root@test ~]# ansible-playbook  install_httpd.yml

PLAY [websers] ***********************************************************************************************************

TASK [copy epel file] ****************************************************************************************************
changed: [192.168.0.10]

TASK [install httpd] *****************************************************************************************************
changed: [192.168.0.10]

TASK [start httpd] *******************************************************************************************************
changed: [192.168.0.10]

PLAY RECAP ***************************************************************************************************************
192.168.0.10               : ok=3    changed=3    unreachable=0    failed=0

[root@test ~]#
提示:從ansible-playbook 對playbook的執行狀態來看是成功了,接下來我們直接使用瀏覽器來訪問192.168.0.10,看看httpd是否已經能夠正常訪問,如果能正常訪問說明httpd已經安裝好了

提示:可以看到我們用瀏覽器是直接可以訪問到192.168.0.10的測試頁面,說明httpd在192.168.0.10上安裝成功
2、建立httpd伺服器,要求提供兩個基於名稱的虛擬主機:
(1)www.X.com,頁面檔案目錄為/web/vhosts/x;錯誤日誌為/var/log/httpd/x.err,訪問日誌為/var/log/httpd/x.access
新建虛擬主機www.X.com的配置檔案
[root@test ~]# cat x_com.conf
<VirtualHost *:80>
        ServerName www.X.com
        DocumentRoot "/web/vhosts/x"
        <Directory "/web/vhosts/x">
                Options None
                AllowOverride None
                Require all granted
        </Directory>
        ErrorLog "logs/x.err"
        CustomLog "logs/x.access" combined
</VirtualHost>
[root@test ~]#
提示:我們在ansible主機上把配置檔案建立好,待會直接用ansible把檔案推送到對應主機的對應目錄下即可使用
(2)www.Y.com,頁面檔案目錄為/web/vhosts/y;錯誤日誌為 /var/log/httpd/www2.err,訪問日誌為/var/log/httpd/y.access
新建虛擬主機www.Y.com的配置檔案
[root@test ~]# cat y_com.conf
<VirtualHost *:80>
        ServerName www.Y.com
        DocumentRoot "/web/vhosts/y"
        <Directory "/web/vhosts/y">
                Options None
                AllowOverride None
                Require all granted
        </Directory>
        ErrorLog "logs/www2.err"
        CustomLog "logs/y.access" combined
</VirtualHost>
[root@test ~]#
(3)為兩個虛擬主機建立各自的主頁檔案index.html,內容分別為其對應的主機名
[root@test ~]# cat x_index.html
<h1> www.X.com</h1>
[root@test ~]# cat y_index.html
<h1> www.Y.com</h1>
[root@test ~]#
提示:以上檔案在ansible主機上準備好了以後,我們接下來寫一個playbook把對應的檔案直接推送到遠端主機即可
[root@test ~]# cat set_virtualhost_conf_file.yml
---
  - hosts: websers
    remote_user: root

    tasks:
    - name: mkdir virtualhost documentroot directory
      shell: mkdir -p /web/vhosts/{x,y}

    - name: copy x_com.conf to remotehost
      copy: src=/root/x_com.conf dest=/etc/httpd/conf.d/x_com.conf
    - name: copy x_com index file
      copy: src=/root/x_index.html dest=/web/vhosts/x/index.html

    - name: copy y_com.conf to remotehost
      copy: src=/root/y_com.conf dest=/etc/httpd/conf.d/y_com.conf
    - name: copy y_com index file
      copy: src=/root/y_index.html dest=/web/vhosts/y/index.html

[root@test ~]#
提示:以上檔案的內容主要把我們建立好的配置檔案推送到對應主機的對應目錄,接下來我們來檢查下我們寫的playbook是否語法問題
[root@test ~]# ansible-playbook -C set_virtualhost_conf_file.yml

PLAY [websers] ***********************************************************************************************************

TASK [mkdir virtualhost documentroot directory] **************************************************************************
skipping: [192.168.0.10]

TASK [copy x_com.conf to remotehost] *************************************************************************************
changed: [192.168.0.10]

TASK [copy x_com index file] *********************************************************************************************
changed: [192.168.0.10]

TASK [copy y_com.conf to remotehost] *************************************************************************************
changed: [192.168.0.10]

TASK [copy y_com index file] *********************************************************************************************
changed: [192.168.0.10]

PLAY RECAP ***************************************************************************************************************
192.168.0.10               : ok=4    changed=4    unreachable=0    failed=0

[root@test ~]#
提示:測試playbook沒有問題,接下來我們來執行playbook,把對應的檔案推送到httpd伺服器上,然後在伺服器上檢查我們寫的配置檔案是否正確
[root@test ~]# ansible-playbook set_virtualhost_conf_file.yml

PLAY [websers] ***********************************************************************************************************

TASK [mkdir virtualhost documentroot directory] **************************************************************************
 [WARNING]: Consider using file module with state=directory rather than running mkdir

changed: [192.168.0.10]

TASK [copy x_com.conf to remotehost] *************************************************************************************
changed: [192.168.0.10]

TASK [copy x_com index file] *********************************************************************************************
changed: [192.168.0.10]

TASK [copy y_com.conf to remotehost] *************************************************************************************
changed: [192.168.0.10]

TASK [copy y_com index file] *********************************************************************************************
changed: [192.168.0.10]

PLAY RECAP ***************************************************************************************************************
192.168.0.10               : ok=5    changed=5    unreachable=0    failed=0

[root@test ~]#
提示:從上面的返回狀態看,都是成功的,只是第一個任務提示我們使用file模組去建立目錄會更好一些,接下來我們使用ansible的shell模組去檢查遠端伺服器上的配置檔案的語法是否正確
[root@test ~]# ansible websers -m shell -a 'httpd -t'
192.168.0.10 | SUCCESS | rc=0 >>
AH00558: httpd: Could not reliably determine the server's fully qualified domain name, using fe80::20c:29ff:fef2:820c. Set the 'ServerName' directive globally to suppress this message
Syntax OK

[root@test ~]#
提示:我們利用ansible在遠端主機上檢查httpd的配置檔案語法是沒有問題,它提示我們沒有servername,這個提示可以不用管它,如果你覺得非要處理一下也可以,在httpd的主配置檔案中找到ServerName 把對應的servername配置上就好了;接下來我們重啟httpd,然後在客戶機上訪問兩個虛擬主機
[root@test ~]# ansible websers -m shell -a 'systemctl restart httpd'
192.168.0.10 | SUCCESS | rc=0 >>


[root@test ~]#
在客戶端上更改/etc/hosts檔案,讓其訪問www.X.com 和www.Y.com 能夠解析到遠端主機
[root@test ~]# cat /etc/hosts
127.0.0.1   localhost localhost.localdomain localhost4 localhost4.localdomain4
::1         localhost localhost.localdomain localhost6 localhost6.localdomain6
192.168.0.10 www.X.com www.Y.com
[root@test ~]#
測試:利用curl 分別訪問兩個虛擬主機,看看對應的主頁檔案內容是否不同
[root@test ~]# curl http://www.X.com/index.html
<h1> www.X.com</h1>
[root@test ~]# curl http://www.Y.com/index.html
<h1> www.Y.com</h1>
[root@test ~]#
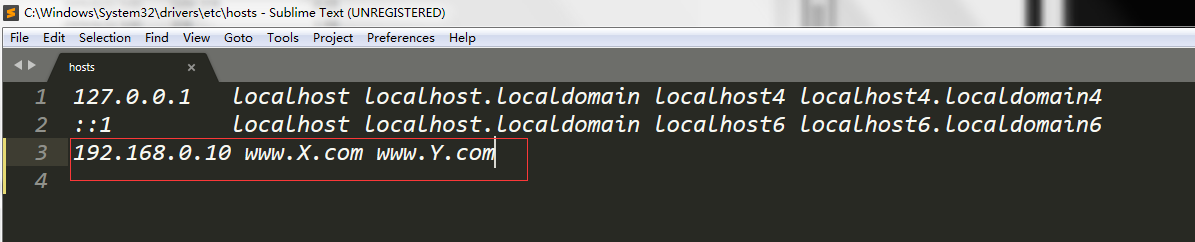
提示:我們利用curl對其各自虛擬主機的主頁檔案訪問,都能看到對應的主頁檔案內容,當然你也可以更改Windows的hosts檔案,把對應的解析內容寫進去,然後通過Windows瀏覽器也是可以的,如下所示:

提示:在windows上找到hosts檔案,然後把對應的記錄新增進去,如下
提示:接下來我們利用Windows的瀏覽器來訪問下兩個虛擬主機


接下我們在看看httpd伺服器的日誌是否都已生成
[root@test ~]# ansible websers -m shell -a 'ls -l /var/log/httpd'
192.168.0.10 | SUCCESS | rc=0 >>
總用量 16
-rw-r--r--. 1 root root 2668 1月  27 06:30 access_log
-rw-r--r--. 1 root root 2940 1月  27 07:34 error_log
-rw-r--r--. 1 root root    0 1月  27 07:38 www2.err
-rw-r--r--. 1 root root  500 1月  27 07:52 x.access
-rw-r--r--. 1 root root    0 1月  27 07:38 x.err
-rw-r--r--. 1 root root  500 1月  27 07:52 y.access

[root@test ~]# ansible websers -m shell -a 'cat  /var/log/httpd/x.access'
192.168.0.10 | SUCCESS | rc=0 >>
192.168.0.99 - - [27/Jan/2020:07:39:15 -0500] "GET /index.html HTTP/1.1" 200 20 "-" "curl/7.29.0"
192.168.0.232 - - [27/Jan/2020:07:52:31 -0500] "GET / HTTP/1.1" 200 20 "-" "Mozilla/5.0 (Windows NT 6.1; WOW64) AppleWebKit/537.36 (KHTML, like Gecko) Chrome/69.0.3497.100 Safari/537.36"
192.168.0.232 - - [27/Jan/2020:07:52:31 -0500] "GET /favicon.ico HTTP/1.1" 404 209 "http://www.x.com/" "Mozilla/5.0 (Windows NT 6.1; WOW64) AppleWebKit/537.36 (KHTML, like Gecko) Chrome/69.0.3497.100 Safari/537.36"

[root@test ~]# ansible websers -m shell -a 'cat  /var/log/httpd/y.access'
192.168.0.10 | SUCCESS | rc=0 >>
192.168.0.99 - - [27/Jan/2020:07:39:19 -0500] "GET /index.html HTTP/1.1" 200 20 "-" "curl/7.29.0"
192.168.0.232 - - [27/Jan/2020:07:52:48 -0500] "GET / HTTP/1.1" 200 20 "-" "Mozilla/5.0 (Windows NT 6.1; WOW64) AppleWebKit/537.36 (KHTML, like Gecko) Chrome/69.0.3497.100 Safari/537.36"
192.168.0.232 - - [27/Jan/2020:07:52:48 -0500] "GET /favicon.ico HTTP/1.1" 404 209 "http://www.y.com/" "Mozilla/5.0 (Windows NT 6.1; WOW64) AppleWebKit/537.36 (KHTML, like Gecko) Chrome/69.0.3497.100 Safari/537.36"

[root@test ~]#
提示:可以看到httpd伺服器上都已經生成了對應名稱的日誌檔案。有關ansible的用法可以參考本人部落格https://www.cnblogs.com/qiuhom-1874/category/1642813.html