
使用java反射,自定義springMvc簡單案例
阿新 • • 發佈:2018-11-13
目前javaWeb開發領域,SpringMvc已經是絕大部分中小公司必選框架,那麼springMvc是如何實現的呢。這裡通過一個簡單的小案例來演示一下。
首先看一下案例的結構圖

目前springBoot專案比較流行,這裡新建一個springBoot專案,先引入專案依賴
<?xml version="1.0" encoding="UTF-8"?>
<project xmlns="http://maven.apache.org/POM/4.0.0" xmlns:xsi="http://www.w3.org/2001/XMLSchema-instance"
         xsi:schemaLocation="http://maven.apache.org/POM/4.0.0 http://maven.apache.org/xsd/maven-4.0.0.xsd">
    <modelVersion>4.0.0</modelVersion>

    <groupId>com.example</groupId>
    <artifactId>refect</artifactId>
    <version>0.0.1-SNAPSHOT</version>
    <packaging>jar</packaging>

    <name>refect</name>
    <description>Demo project for Spring Boot</description>

    <parent>
        <groupId>org.springframework.boot</groupId>
        <artifactId>spring-boot-starter-parent</artifactId>
        <version>2.0.5.RELEASE</version>
        <relativePath/> <!-- lookup parent from repository -->
    </parent>

    <properties>
        <project.build.sourceEncoding>UTF-8</project.build.sourceEncoding>
        <project.reporting.outputEncoding>UTF-8</project.reporting.outputEncoding>
        <java.version>1.8</java.version>
    </properties>

    <dependencies>
        <dependency>
            <groupId>org.springframework.boot</groupId>
            <artifactId>spring-boot-starter</artifactId>
        </dependency>

        <dependency>
            <groupId>org.springframework.boot</groupId>
            <artifactId>spring-boot-starter-test</artifactId>
            <scope>test</scope>
        </dependency>
    </dependencies>

    <build>
        <plugins>
            <plugin>
                <groupId>org.springframework.boot</groupId>
                <artifactId>spring-boot-maven-plugin</artifactId>
            </plugin>
        </plugins>
    </build>


</project>
1、新建AopMethod註解,這個註解可以理解為RequestMapping
package com.example.refect.aop.core;


import java.lang.annotation.*;


/**
 * 方法註解,這裡類似RequestMapping
 */
@Documented
@Target(ElementType.METHOD)
@Retention(RetentionPolicy.RUNTIME)
public @interface AopMethod {

    String value() default "";
}
2、新建攔截器介面AopIntercepter,這裡可以理解為SpringMvc攔截器
package com.example.refect.aop.core;


/**
 * 攔截器
 */
public abstract  class AopIntercepter {


    abstract void before();


    abstract void after();
}
3、新建攔截器實現類AopIntercepterImp
package com.example.refect.aop.core;


/**
 * 攔截器實現
 */
public class AopIntercepterImp extends AopIntercepter {


    @Override
    public void before() {
        System.out.println("呼叫前執行:before");
    }


    @Override
    public void after() {
        System.out.println("呼叫後執行:after");
    }
}
4、新建aop核心介面 AopInter
package com.example.refect.aop.core;


import java.lang.reflect.Method;
import java.util.List;

/**
 * aop核心介面
 */
public interface AopInter {

    List<Method> getMethods(Class<?> annotation, String[] packagePath);


    void invoke(Class<? extends AopIntercepter> clazz, Method method,Object args);


}
5、新建核心介面實現類AopCore
package com.example.refect.aop.core;


import org.springframework.util.StringUtils;

import java.io.File;
import java.io.IOException;
import java.lang.reflect.InvocationTargetException;
import java.lang.reflect.Method;
import java.net.URL;
import java.net.URLDecoder;
import java.util.*;


/**
 * aop核心實現,主要通過包路徑掃描包下AopMethods的方法,獲取方法集合
 *
 * 然後通過反射呼叫該方法
 */
public class AopCore implements AopInter{

    @Override
    public List<Method> getMethods(Class<?> annotationClass, String[] packagePath) {
        Set<Class> classSet = new HashSet<>();
        List<Method> functions = new ArrayList<>();
        for(String path : packagePath){
            String pack = path.replace(".","/");
            try{
                Enumeration<URL> url = getUrl(pack);
                if(url==null){
                    return null;
                }
                while(url.hasMoreElements()){
                    URL u  = url.nextElement();
                    String pro = u.getProtocol();
                    if("file".equals(pro)){
                        String filePath = URLDecoder.decode(u.getFile(),"UTF-8");
                        findAndAddClassesInPackageByFile(path,filePath,classSet);
                    }
                }
            }catch (Exception e){
                e.printStackTrace();
            }
        }
        if(!classSet.isEmpty()){
            for(Class clazz: classSet){
                Method[] methods = clazz.getMethods();
                for(Method method : methods){
                    AopMethod aopMethod = method.getAnnotation(AopMethod.class);
                    if(!StringUtils.isEmpty(aopMethod)){
                        functions.add(method);
                    }
                }
            }
        }
        return functions;
    }

    @Override
    public void invoke(Class<? extends AopIntercepter> clazz, Method method,Object args) {
        Method[] interMethods = clazz.getMethods();
        Method before = null;
        Method after = null;
        for(Method m :interMethods){
            if(m.getName().equals("before")){
                before = m;
            }else if(m.getName().equals("after")){
                after = m;
            }
        }

        try {
            before.invoke(getClass().getClassLoader().loadClass(clazz.getName()).newInstance());
            method.invoke(method.getDeclaringClass().newInstance(),args);
            after.invoke(getClass().getClassLoader().loadClass(clazz.getName()).newInstance());
        } catch (IllegalAccessException e) {
            e.printStackTrace();
        } catch (InvocationTargetException e) {
            e.printStackTrace();
        } catch (ClassNotFoundException e) {
            e.printStackTrace();
        } catch (InstantiationException e) {
            e.printStackTrace();
        }
    }


    private void findAndAddClassesInPackageByFile(String packagePath, String filePath, Set<Class> classSet) {
        File fileDir = new File(filePath);
        if(!fileDir.exists() || !fileDir.isDirectory()){
            return;
        }
        File[] files = fileDir.listFiles(f->f.isDirectory() || f.getName().endsWith(".class"));

        for(File file : files){
            if(file.isDirectory()){
                findAndAddClassesInPackageByFile(packagePath+"."+file.getName(),
                        file.getAbsolutePath(),classSet);
            }else{
                String className = packagePath+"."+file.getName().substring(0,file.getName().length()-6);
                try {
                    classSet.add(Thread.currentThread().getContextClassLoader().loadClass(className));
                } catch (ClassNotFoundException e) {
                    e.printStackTrace();
                    throw new RuntimeException(e.getMessage());
                }
            }
        }

    }


    private Enumeration<URL> getUrl(String packagePath){
        try {
            Enumeration<URL> enumeration = AopCore.class.getClassLoader().getResources(packagePath);
            if(!enumeration.hasMoreElements()){
                enumeration = Thread.currentThread().getContextClassLoader().getResources(packagePath);
                if(!enumeration.hasMoreElements()){
                    return enumeration;
                }
            }
            return enumeration;
        } catch (IOException e) {
            e.printStackTrace();
        }
        return null;
    }
}
6、然後我們新建AopUser測試介面類,類似於Controller
package com.example.refect.aop.demo;

import com.example.refect.aop.core.AopMethod;

public class AopUser {

    @AopMethod("/demo")
    public String getStr(String str){
        System.out.println("AopUser.getStr正在執行,"+str);
        return str;
    }


    @AopMethod("/user")
    public String getUser(String user){
        System.out.println("AopUser.getUser:正在執行,"+user);
        return user;
    }
}
7、最後我們定義主方法Base,在主方法中呼叫AopUser中的介面方法
package com.example.refect.aop;

import com.example.refect.aop.core.AopCore;
import com.example.refect.aop.core.AopIntercepterImp;
import com.example.refect.aop.core.AopMethod;

import java.lang.reflect.Method;
import java.util.List;

/**
 * 本包主要實現自定義攔截aop
 *
 * 簡單實現 針對被註解的類中的方法被執行前,執行後呼叫自定義aop切面方法。
 *
 * 使用者可以指定包路徑  和  aop註解名稱進行aop切面
 */
public class Base {

    public static void main(String[] args) {
        request("/user","張三");
    }

    private static void request(String mapping,Object args){
        AopCore core = new AopCore();
        List<Method> methodList = load();

        for(Method method :methodList){
            AopMethod annotation = method.getAnnotation(AopMethod.class);
            String value = annotation.value();
            if(value.equals(mapping)){
                core.invoke(AopIntercepterImp.class,method,args);
            }
        }
    }

    private static List<Method> load(){
        String[] paths = new String[]{"com.example.refect.aop.demo"};
        List<Method> methodList = new AopCore().getMethods(AopMethod.class,paths);
        return methodList;
    }
}
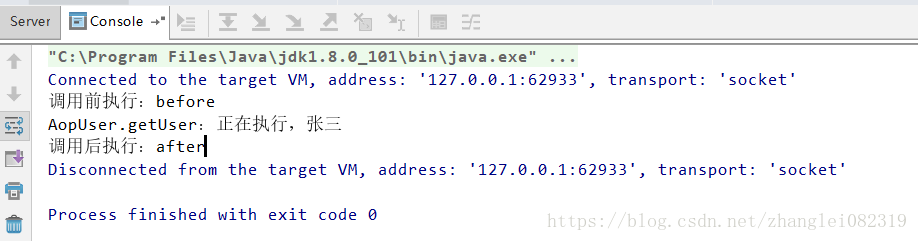
執行主方法,控制檯列印:
斷點:

到此為止,簡單的SpringMvc案例算是搭建完畢