
擴充套件分割槽和檔案系統_Linux資料盤
擴容雲盤(ResizeDisk)只是擴大雲盤的儲存容量,不會擴容ECS例項的檔案系統,您需要按照本文步驟擴容檔案系統,實現ECS例項儲存空間的擴充套件。
前提條件
- 已建立快照備份資料。
為防止操作失誤導致資料丟失,建議您操作前使用快照備份資料。具體操作請參見建立普通快照。
- 已在控制檯上擴容雲盤。
若尚未擴容,請參見線上擴容雲盤(Linux系統)或離線擴容雲盤(Linux系統)。
- 遠端連線ECS例項。連線方式請參見連線方式概述。
背景資訊
本文示例中使用的配置如下:
- ECS例項的作業系統:公共映象Alibaba Cloud Linux 2.1903 LTS 64位
- 資料盤:高效雲盤
- 資料盤裝置名:/dev/vdb
若您使用的作業系統和資料盤裝置名與本文示例不同,請根據實際情況調整命令或引數配置。
確認分割槽表格式和檔案系統
- 執行以下命令確認資料盤的分割槽表格式。
本示例中,原有的資料盤空間已做分割槽/dev/vdb1。fdisk -lu /dev/vdb- 如果
"System"="Linux",說明資料盤使用的是MBR分割槽表格式。 - 如果
"System"="GPT",說明資料盤使用的是GPT分割槽表格式。
[root@ecshost ~]# fdisk -lu /dev/vdb Disk /dev/vdb: 42.9 GB, 42949672960 bytes, 83886080 sectors Units = sectors of 1 * 512 = 512 bytes Sector size (logical/physical): 512 bytes / 512 bytes I/O size (minimum/optimal): 512 bytes / 512 bytes Disk label type: dos Disk identifier: 0x9277b47b Device Boot Start End Blocks Id System /dev/vdb1 2048 41943039 20970496 83 Linux - 如果
- 執行以下命令確認已有分割槽的檔案系統型別。
本示例中,/dev/vdb1的檔案系統型別為ext4。blkid /dev/vdb1[root@ecshost ~]# blkid /dev/vdb1 /dev/vdb1: UUID="e97bf1e2-fc84-4c11-9652-73********24" TYPE="ext4" - 執行以下命令確認檔案系統的狀態。
- ext*檔案系統:
e2fsck -n/dev/vdb1 - xfs檔案系統:
xfs_repair -n/dev/vdb1
[root@ecshost ~]# e2fsck -n /dev/vdb1 Warning! /dev/vdb1 is mounted. Warning: skipping journal recovery because doing a read-only filesystem check. /dev/vdb1: clean, 11/1310720 files, 126322/5242624 blocks - ext*檔案系統:
選擇擴容分割槽或檔案系統的方式
根據您查詢到的分割槽格式和檔案系統情況確定操作選項。
| 擴容場景 | 相關操作 |
|---|---|
| 資料盤已分割槽並建立檔案系統 |
|
| 全新資料盤,未分割槽,未建立檔案系統 | 在控制檯擴容資料盤空間後,請參見分割槽並格式化資料盤或者分割槽格式化大於2 TiB資料盤。 |
| 資料盤是裸裝置,已建立檔案系統,未分割槽 | 在控制檯擴容資料盤空間後,請參見選項五:擴容裸裝置檔案系統。 |
| 資料盤未掛載到例項上 | 掛載資料盤到例項後,參見本文件的操作步驟完成擴容。 |
- 如果一個已有分割槽採用了MBR分割槽格式,則不支援擴容到2TiB及以上。為避免造成資料丟失,建議您建立一塊大於2TiB的雲盤,格式化一個GPT分割槽,再將MBR分割槽中的資料拷貝到GPT分割槽中。具體操作,請參見分割槽格式化大於2 TiB資料盤。
- 當出現因擴容格式化工具問題導致的擴容失敗時,您可以提前升級工具版本,或者解除安裝工具後重新安裝。
選項一:擴充套件已有MBR分割槽
說明為了防止資料丟失,不建議擴容已掛載的分割槽和檔案系統。請先取消掛載(umount)分割槽,完成擴容並正常使用後,重新掛載(mount)。針對不同的Linux核心版本,推薦以下操作方式:- 例項核心版本小於3.6:先取消掛載該分割槽,再修改分割槽表,最後擴容檔案系統。
- 例項核心版本大於等於3.6:先修改對應分割槽表,再通知核心更新分割槽表,最後擴容檔案系統。
如果新增空間用於擴容已有的MBR分割槽,按照以下步驟在例項中完成擴容:
- 修改分割槽表。擴容檔案系統。
- 執行以下命令檢視分割槽資訊,並記錄舊分割槽的起始和結束的扇區位置。
fdisk -lu /dev/vdb本示例中,分割槽/dev/vdb1的起始扇區是2048,結束扇區是41943039。
[root@ecshost ~]# fdisk -lu /dev/vdb Disk /dev/vdb: 42.9 GB, 42949672960 bytes, 83886080 sectors Units = sectors of 1 * 512 = 512 bytes Sector size (logical/physical): 512 bytes / 512 bytes I/O size (minimum/optimal): 512 bytes / 512 bytes Disk label type: dos Disk identifier: 0x9277b47b Device Boot Start End Blocks Id System /dev/vdb1 2048 41943039 20970496 83 Linux - 檢視資料盤的掛載路徑,根據返回的檔案路徑解除安裝分割槽,直至完全解除安裝已掛載的分割槽。
[root@ecshost ~]# mount | grep "/dev/vdb" /dev/vdb1 on /mnt type ext4 (rw,relatime,data=ordered) [root@ecshost ~]# umount /dev/vdb1 [root@ecshost ~]# mount | grep "/dev/vdb" - 使用fdisk工具刪除舊分割槽。
警告刪除舊分割槽如果出錯,可能會刪除分割槽內的資料。如有重要資料(例如資料庫中的使用者資料),請在操作前進行備份,避免因刪除舊分割槽而造成資料丟失。
- 執行
fdisk -u /dev/vdb:分割槽資料盤。 - 輸入p:列印分割槽表。
- 輸入d:刪除分割槽。
- 輸入p:確認分割槽已刪除。
- 輸入w:儲存修改並退出。
[root@ecshost ~]# fdisk -u /dev/vdb Welcome to fdisk (util-linux 2.23.2). Changes will remain in memory only, until you decide to write them. Be careful before using the write command. Command (m for help): p Disk /dev/vdb: 42.9 GB, 42949672960 bytes, 83886080 sectors Units = sectors of 1 * 512 = 512 bytes Sector size (logical/physical): 512 bytes / 512 bytes I/O size (minimum/optimal): 512 bytes / 512 bytes Disk label type: dos Disk identifier: 0x9277b47b Device Boot Start End Blocks Id System /dev/vdb1 2048 41943039 20970496 83 Linux Command (m for help): d Selected partition 1 Partition 1 is deleted Command (m for help): p Disk /dev/vdb: 42.9 GB, 42949672960 bytes, 83886080 sectors Units = sectors of 1 * 512 = 512 bytes Sector size (logical/physical): 512 bytes / 512 bytes I/O size (minimum/optimal): 512 bytes / 512 bytes Disk label type: dos Disk identifier: 0x9277b47b Device Boot Start End Blocks Id System Command (m for help): w The partition table has been altered! Calling ioctl() to re-read partition table. Syncing disks. - 執行
- 使用fdisk命令新建分割槽。
- 執行
fdisk -u /dev/vdb:分割槽資料盤。 - 輸入p:列印分割槽表。
- 輸入n:新建分割槽。
- 輸入p:選擇分割槽型別為主分割槽。
- 輸入<分割槽號>:選擇分割槽號。本示例選取了1。
- 設定新分割槽的起始位置和結束位置。 警告新分割槽的起始位置必須和舊分割槽的起始位置相同,結束位置必須大於舊分割槽的結束位置,否則會導致擴容失敗。具體問題與解決方案請參見使用fdisk擴容新分割槽起始位置無法與擴容前保持一致。
- 輸入w:儲存修改並退出。
本示例中,將/dev/vdb1由20GiB擴容到40GiB。
[root@ecshost ~]# fdisk -u /dev/vdb Welcome to fdisk (util-linux 2.23.2). Changes will remain in memory only, until you decide to write them. Be careful before using the write command. Command (m for help): p Disk /dev/vdb: 42.9 GB, 42949672960 bytes, 83886080 sectors Units = sectors of 1 * 512 = 512 bytes Sector size (logical/physical): 512 bytes / 512 bytes I/O size (minimum/optimal): 512 bytes / 512 bytes Disk label type: dos Disk identifier: 0x9277b47b Device Boot Start End Blocks Id System Command (m for help): n Partition type: p primary (0 primary, 0 extended, 4 free) e extended Select (default p): p Partition number (1-4, default 1): 1 First sector (2048-83886079, default 2048): Using default value 2048 Last sector, +sectors or +size{K,M,G} (2048-83886079, default 83886079): Partition 1 of type Linux and of size 40 GiB is set Command (m for help): w The partition table has been altered! Calling ioctl() to re-read partition table. Syncing disks. - 執行
- 通知核心更新分割槽表。
執行
partprobe/dev/vdb或者partx -u/dev/vdb1,通知核心資料盤的分割槽表已經修改,需要同步更新。 - 執行
lsblk/dev/vdb確保分割槽表已經增加。 - 執行
e2fsck -f/dev/vdb1再次檢查檔案系統,確認擴容分割槽後的檔案系統狀態為clean。
- 執行以下命令檢視分割槽資訊,並記錄舊分割槽的起始和結束的扇區位置。
-
- ext*檔案系統(例如ext3和ext4):依次執行以下命令調整ext*檔案系統大小並重新掛載分割槽。
[root@ecshost ~]# resize2fs /dev/vdb1 resize2fs 1.43.5 (04-Aug-2017) Resizing the filesystem on /dev/vdb1 to 7864320 (4k) blocks. The filesystem on /dev/vdb1 is now 7864320 blocks long. [root@ecshost ~]# mount /dev/vdb1 /mnt - xfs檔案系統:依次執行以下命令先重新掛載分割槽,再調整xfs檔案系統大小。
說明新版xfs_growfs根據掛載點識別待擴容裝置,例如
xfs_growfs /mnt。您可以執行xfs_growfs --help檢視不同版本xfs_growfs的使用方法。[root@ecshost ~]# mount /dev/vdb1 /mnt/ [root@ecshost ~]# xfs_growfs /mnt meta-data=/dev/vdb1 isize=512 agcount=4, agsize=1310720 blks = sectsz=512 attr=2, projid32bit=1 = crc=1 finobt=0 spinodes=0 data = bsize=4096 blocks=5242880, imaxpct=25 = sunit=0 swidth=0 blks naming =version 2 bsize=4096 ascii-ci=0 ftype=1 log =internal bsize=4096 blocks=2560, version=2 = sectsz=512 sunit=0 blks, lazy-count=1 realtime =none extsz=4096 blocks=0, rtextents=0 data blocks changed from 5242880 to 7864320
- ext*檔案系統(例如ext3和ext4):依次執行以下命令調整ext*檔案系統大小並重新掛載分割槽。
選項二:新增並格式化MBR分割槽
如果新增空間用於增加新的MBR分割槽,按照以下步驟在例項中完成擴容:
- 執行
fdisk -u/dev/vdb命令新建分割槽。本示例中,為新增的20GiB新建分割槽,作為/dev/vdb2使用。
[root@ecshost ~]# fdisk -u /dev/vdb Welcome to fdisk (util-linux 2.23.2). Changes will remain in memory only, until you decide to write them. Be careful before using the write commad. Command (m for help): p Disk /dev/vdb: 42.9 GB, 42949672960 bytes, 83886080 sectors Units = sectors of 1 * 512 = 512 bytes Sector size (logical/physical): 512 bytes / 512 bytes I/O size (minimum/optimal): 512 bytes / 512 bytes Disk label type: dos Disk identifier: 0x2b31a2a3 Device Boot Start End Blocks Id System /dev/vdb1 2048 41943039 20970496 83 Linux Command (m for help): n Partition type: p primary (1 primary, 0 extended, 3 free) e extended Select (default p): p Partition number (2-4, default 2): 2 First sector (41943040-83886079, default 41943040): Using default value 41943040 Last sector, +sectors or +size{K,M,G} (41943040-83886079, default 83886079): Using default value 83886079 Partition 2 of type Linux and of size 20 GiB is set Command (m for help): w The partition table has been altered! Calling ioctl() to re-read partition table. Syncing disks. - 執行命令
lsblk /dev/vdb檢視分割槽。[root@ecshost ~]# lsblk /dev/vdb NAME MAJ:MIN RM SIZE RO TYPE MOUNTPOINT vdb 253:16 0 40G 0 disk ├─vdb1 253:17 0 20G 0 part └─vdb2 253:18 0 20G 0 part - 格式化新的分割槽。
- 建立ext4檔案系統:
mkfs.ext4 /dev/vdb2。[root@ecshost ~]# mkfs.ext4 /dev/vdb2 Filesystem label= OS type: Linux Block size=4096 (log=2) Fragment size=4096 (log=2) Stride=0 blocks, Stripe width=0 blocks 1310720 inodes, 5242880 blocks 262144 blocks (5.00%) reserved for the super user First data block=0 Maximum filesystem blocks=2153775104 160 block groups 32768 blocks per group, 32768 fragments per group 8192 inodes per group Superblock backups stored on blocks: 32768, 98304, 163840, 229376, 294912, 819200, 884736, 1605632, 2654208, 4096000 Allocating group tables: done Writing inode tables: done Creating journal (32768 blocks): done Writing superblocks and filesystem accounting information: done [root@ecshost ~]# blkid /dev/vdb2 /dev/vdb2: UUID="e3f336dc-d534-4fdd-****-b6ff1a55bdbb" TYPE="ext4" - 建立ext3檔案系統:
mkfs.ext3 /dev/vdb2。 - 建立xfs檔案系統:
mkfs.xfs -f /dev/vdb2。 - 建立btrfs檔案系統:
mkfs.btrfs /dev/vdb2。
- 建立ext4檔案系統:
- 執行
mount /dev/vdb2 /mnt掛載分割槽。 - 執行
df -h檢視目前資料盤空間和使用情況。 顯示新建檔案系統的資訊,表示掛載成功。[root@ecshost ~]# df -h Filesystem Size Used Avail Use% Mounted on /dev/vda1 40G 1.6G 36G 5% / devtmpfs 3.9G 0 3.9G 0% /dev tmpfs 3.9G 0 3.9G 0% /dev/shm tmpfs 3.9G 460K 3.9G 1% /run tmpfs 3.9G 0 3.9G 0% /sys/fs/cgroup /dev/vdb2 9.8G 37M 9.2G 1% /mnt tmpfs 783M 0 783M 0% /run/user/0
選項三:擴充套件已有GPT分割槽
如果新增空間用於擴容已有的GPT分割槽,按照以下步驟在例項中完成擴容:
- 檢視資料盤的掛載路徑,根據返回的檔案路徑解除安裝分割槽,直至完全解除安裝已掛載的分割槽。
[root@ecshost ~]# mount | grep "/dev/vdb" /dev/vdb1 on /mnt type ext4 (rw,relatime,data=ordered) [root@ecshost ~]# umount /dev/vdb1 [root@ecshost ~]# mount | grep "/dev/vdb" - 使用Parted工具為現有GPT分割槽分配容量。執行
fsck -f/dev/vdb1確認檔案系統一致性。- 執行
parted /dev/vdb命令進入parted分割槽工具。如需檢視parted工具使用說明,執行
help命令。 - 執行
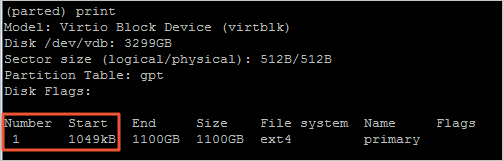
print檢視分割槽資訊,並記錄現有分割槽的分割槽號和起始扇區的值。若介面提示
Fix/Ignore/Cancel?和Fix/Ignore?,均輸入Fix即可。本示例中,現有分割槽大小為1TiB,分割槽號(即
Number的值)為1,起始扇區(即Start)的值為1049kB。 - 執行
rm <分割槽號>命令刪除現有分割槽。本示例中,現有分割槽的分割槽號為
1,因此命令為:rm 1 - 執行
mkpart primary <原分割槽的起始扇區> <容量分配百分比>命令重新建立主分割槽。本示例中,原分割槽的起始扇區為
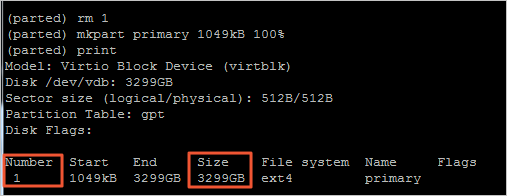
1049kB,且要將擴容後的總容量(即3TiB)全部分配給該分割槽,因此命令為:mkpart primary 1049kB 100% - 執行
print命令檢視新分割槽是否建立成功。如下圖所示,新的GPT分割槽仍為1號分割槽,容量已變更為3TiB。
- 執行
quit退出Parted分割槽工具。
[root@ecshost ~]# parted /dev/vdb GNU Parted 3.1 Using /dev/vdb Welcome to GNU Parted! Type 'help' to view a list of commands. (parted) print Error: The backup GPT table is not at the end of the disk, as it should be. This might mean that another operating system believes the disk is smaller. Fix, by moving the backup to the end (and removing the old backup)? Fix/Ignore/Cancel? Fix Warning: Not all of the space available to /dev/vdb appears to be used, you can fix the GPT to use all of the space (an extra 4294967296 blocks) or continue with the current setting? Fix/Ignore? Fix Model: Virtio Block Device (virtblk) Disk /dev/vdb: 3299GB Sector size (logical/physical): 512B/512B Partition Table: gpt Disk Flags: Number Start End Size File system Name Flags 1 1049kB 1100GB 1100GB ext4 primary (parted) rm 1 (parted) mkpart primary 1049kB 100% (parted) print Model: Virtio Block Device (virtblk) Disk /dev/vdb: 3299GB Sector size (logical/physical): 512B/512B Partition Table: gpt Disk Flags: Number Start End Size File system Name Flags 1 1049kB 3299GB 3299GB ext4 primary (parted) quit Information: You may need to update /etc/fstab. - 執行
-
[root@ecshost ~]# fsck -f /dev/vdb1 fsck from util-linux 2.23.2 e2fsck 1.43.5 (04-Aug-2017) Pass 1: Checking inodes, blocks, and sizes Pass 2: Checking directory structure Pass 3: Checking directory connectivity Pass 4: Checking reference counts Pass 5: Checking group summary information /dev/vdb1: 11/67108864 files (0.0% non-contiguous), 4265369/268434944 blocks - 擴充套件分割槽對應的檔案系統並重新掛載分割槽。
- ext*檔案系統(例如ext3和ext4):依次執行以下命令調整新分割槽的ext*檔案系統大小並重新掛載分割槽。
[root@ecshost ~]# resize2fs /dev/vdb1 resize2fs 1.43.5 (04-Aug-2017) Resizing the filesystem on /dev/vdb1 to 805305856 (4k) blocks. The filesystem on /dev/vdb1 is now 805305856 blocks long. [root@ecshost ~]# mount /dev/vdb1 /mnt - xfs檔案系統:依次執行以下命令先重新掛載分割槽再調整xfs檔案系統大小。
說明新版xfs_growfs根據掛載點識別待擴容裝置,例如
xfs_growfs /mnt。您可以執行xfs_growfs --help檢視不同版本xfs_growfs的使用方法。[root@ecshost ~]# mount /dev/vdb1 /mnt/ [root@ecshost ~]# xfs_growfs /mnt
- ext*檔案系統(例如ext3和ext4):依次執行以下命令調整新分割槽的ext*檔案系統大小並重新掛載分割槽。
選項四:新增並格式化GPT分割槽
如果新增空間用於增加新的分割槽並希望使用GPT分割槽格式,按照以下步驟在例項中完成擴容。示例採用一塊32 TiB的資料盤,已有一個4.8TiB的分割槽/dev/vdb1,此次新建了一個/dev/vdb2分割槽。
- 使用fdisk工具檢視資料盤中已有分割槽的資訊。
[root@ecshost ~]# fdisk -l Disk /dev/vda: 42.9 GB, 42949672960 bytes, 83886080 sectors Units = sectors of 1 * 512 = 512 bytes Sector size (logical/physical): 512 bytes / 512 bytes I/O size (minimum/optimal): 512 bytes / 512 bytes Disk label type: dos Disk identifier: 0x000b1b45 Device Boot Start End Blocks Id System /dev/vda1 * 2048 83875364 41936658+ 83 Linux WARNING: fdisk GPT support is currently new, and therefore in an experimental phase. Use at your own discretion. Disk /dev/vdb: 35184.4 GB, 35184372088832 bytes, 68719476736 sectors Units = sectors of 1 * 512 = 512 bytes Sector size (logical/physical): 512 bytes / 512 bytes I/O size (minimum/optimal): 512 bytes / 512 bytes Disk label type: gpt Disk identifier: BCE92401-F427-45CC-8B0D-B30EDF279C2F # Start End Size Type Name 1 2048 10307921919 4.8T Microsoft basic mnt - 使用parted工具建立新分割槽並分配容量。為新分割槽建立檔案系統。
- 執行
parted /dev/vdb進入分割槽工具。 - 執行
print free檢視資料盤待分配的容量,記錄已有分割槽的扇區位置和容量。 示例中/dev/vdb1的起始位置為1049KB,結束扇區為5278GB,容量為5278GiB。(parted) print free Model: Virtio Block Device (virtblk) Disk /dev/vdb: 35.2TB Sector size (logical/physical): 512B/512B Partition Table: gpt Disk Flags: Number Start End Size File system Name Flags 17.4kB 1049kB 1031kB Free Space 1 1049kB 5278GB 5278GB ext4 mnt 5278GB 35.2TB 29.9TB Free Space - 執行
mkpart <分割槽名稱> <起始扇區> <容量分配百分比>。示例新建了一個名為test的/dev/vdb2分割槽,起始扇區為上一個分割槽的結束扇區,並將所有新增空間分配給該分割槽。
- 執行
print檢視容量(Size)是否發生變化。(parted) mkpart test 5278GB 100% (parted) print Model: Virtio Block Device (virtblk) Disk /dev/vdb: 35.2TB Sector size (logical/physical): 512B/512B Partition Table: gpt Disk Flags: Number Start End Size File system Name Flags 1 1049kB 5278GB 5278GB ext4 mnt 2 5278GB 35.2TB 29.9TB test - 執行
quit退出parted分割槽工具。
- 執行
-
- 建立ext4檔案系統:
mkfs.ext4 /dev/vdb2。 - 建立ext3檔案系統:
mkfs.ext3 /dev/vdb2。 - 建立xfs檔案系統:
mkfs.xfs -f /dev/vdb2。 - 建立btrfs檔案系統:
mkfs.btrfs /dev/vdb2。
[root@ecshost ~]# mkfs -t xfs /dev/vdb2 meta-data=/dev/vdb2 isize=512 agcount=28, agsize=268435455 blks = sectsz=512 attr=2, projid32bit=1 = crc=1 finobt=0, sparse=0 data = bsize=4096 blocks=7301444096, imaxpct=5 = sunit=0 swidth=0 blks naming =version 2 bsize=4096 ascii-ci=0 ftype=1 log =internal log bsize=4096 blocks=521728, version=2 = sectsz=512 sunit=0 blks, lazy-count=1 realtime =none extsz=4096 blocks=0, rtextents=0 - 建立ext4檔案系統:
- 執行
fdisk -l檢視分割槽容量變化。[root@ecshost ~]# fdisk -l Disk /dev/vda: 42.9 GB, 42949672960 bytes, 83886080 sectors Units = sectors of 1 * 512 = 512 bytes Sector size (logical/physical): 512 bytes / 512 bytes I/O size (minimum/optimal): 512 bytes / 512 bytes Disk label type: dos Disk identifier: 0x000b1b45 Device Boot Start End Blocks Id System /dev/vda1 * 2048 83875364 41936658+ 83 Linux WARNING: fdisk GPT support is currently new, and therefore in an experimental phase. Use at your own discretion. Disk /dev/vdb: 35184.4 GB, 35184372088832 bytes, 68719476736 sectors Units = sectors of 1 * 512 = 512 bytes Sector size (logical/physical): 512 bytes / 512 bytes I/O size (minimum/optimal): 512 bytes / 512 bytes Disk label type: gpt Disk identifier: BCE92401-F427-45CC-8B0D-B30EDF279C2F # Start End Size Type Name 1 2048 10307921919 4.8T Microsoft basic mnt 2 10307921920 68719474687 27.2T Microsoft basic test - 執行blkid檢視儲存裝置的檔案系統型別。
[root@ecshost ~]# blkid /dev/vda1: UUID="ed95c595-4813-480e-****-85b1347842e8" TYPE="ext4" /dev/vdb1: UUID="21e91bbc-7bca-4c08-****-88d5b3a2303d" TYPE="ext4" PARTLABEL="mnt" PARTUUID="576235e0-5e04-4b76-****-741cbc7e98cb" /dev/vdb2: UUID="a7dcde59-8f0f-4193-****-362a27192fb1" TYPE="xfs" PARTLABEL="test" PARTUUID="464a9fa9-3933-4365-****-c42de62d2864" - 掛載新分割槽。
[root@ecshost ~]# mount /dev/vdb2 /mnt
選項五:擴容裸裝置檔案系統
當資料盤沒有建立分割槽,並且在裸裝置上建立了檔案系統時,您可以參見以下步驟直接擴容檔案系統。
- 檢視資料盤的掛載路徑,根據返回的檔案路徑解除安裝。
[root@ecshost ~]# mount | grep "/dev/vdb" /dev/vdb on /mnt type ext4 (rw,relatime,data=ordered) [root@ecshost ~]# umount /dev/vdb [root@ecshost ~]# mount | grep "/dev/vdb" - 根據檔案系統的型別,執行不同的擴容命令。
- ext*:使用root許可權執行resize2fs命令擴容檔案系統,例如:
resize2fs /dev/vdb - xfs:使用root許可權執行xfs_growfs命令擴容檔案系統。
說明新版xfs_growfs根據掛載點識別待擴容裝置,例如
xfs_growfs /mnt。您可以執行xfs_growfs --help檢視不同版本xfs_growfs的使用方法。- 新版xfs_growfs
xfs_growfs /mnt - 未更新版xfs_growfs
xfs_growfs /dev/vdb
- 新版xfs_growfs
- ext*:使用root許可權執行resize2fs命令擴容檔案系統,例如:
- 將雲盤掛載至掛載點。
mount /dev/vdb /mnt - 執行
df -h檢視資料盤擴容結果。 顯示容量完成擴充,表示擴容成功。[root@ecshost ~]# df -h Filesystem Size Used Avail Use% Mounted on /dev/vda1 40G 1.6G 36G 5% / devtmpfs 3.9G 0 3.9G 0% /dev tmpfs 3.9G 0 3.9G 0% /dev/shm tmpfs 3.9G 460K 3.9G 1% /run tmpfs 3.9G 0 3.9G 0% /sys/fs/cgroup /dev/vdb 98G 37G 61G 37% /mnt tmpfs 783M 0 783M 0% /run/user/0
相關推薦
擴充套件分割槽和檔案系統_Linux資料盤
擴容雲盤(ResizeDisk)只是擴大雲盤的儲存容量,不會擴容ECS例項的檔案系統,您需要按照本文步驟擴容檔案系統,實現ECS例項儲存空間的擴充套件。
資料系統的基石:可靠性、可擴充套件性和可維護性+資料儲存與檢索的模型
互聯⽹做得太棒了,以⾄於⼤多數⼈將它看作像太平洋這樣的⾃然資源,⽽不是什麼⼈⼯產物。
磁碟分割槽與檔案系統
一:磁碟分割槽 二:檔案系統 三:修改檔案系統屬性 1.1檢視當前系統識別了幾塊硬碟[[email protected]/]#fdisk-l
管理磁碟和檔案系統
檢測並確認新硬碟 <?xml:namespace prefix = o ns = "urn:schemas-microsoft-com:office:office" />
linux磁碟和檔案系統管理(二)
實驗要求: 1.新增兩塊10G的SCSI硬碟(sdb sdc),配置名為mbox的邏輯卷。 2.建立/mailbox/目錄,掛載mbox的分割槽。
linux磁碟和檔案系統管理之LVM卷
LVM卷 檢視電腦中的硬碟資訊 建立PV卷 將硬碟轉化為物理卷 建立 Vg卷 建立 lv 卷 為新劃分的區建立檔案系統
linux系統掛載資料盤的方法
今天領導讓我在阿里伺服器上掛一個硬碟 注意:注意:本文中的磁碟/dev/vdb 為作者測試伺服器上的命名,在您的伺服器中可能是 /dev/sdb /dev/xvdb 等等,請按您的磁碟名稱修改
11.第九章 磁碟儲存和檔案系統管理
第一部分 1、建立一個2G的檔案系統,塊大小為2048byte,預留1%可用空間,檔案系統ext4,卷標為TEST,要求此分割槽開機後自動掛載至/test目錄,且預設有acl掛載選項
linux磁碟分割槽、檔案系統格式化、掛載與解除安裝
磁碟管理 塊裝置:block,存取單位\"塊\",磁碟 裝置檔案:關聯至一個裝置驅動程式,進而能夠與之對應硬體裝置進行通訊
磁碟儲存和檔案系統
1.機械磁碟和固態硬碟 機械硬碟:傳統普通硬碟,主要由:碟片,磁頭,碟片轉軸及控制電機等,每張碟片之間是平行的,在每個碟片的儲存面上有一個磁頭,磁頭與碟片之間的距離比頭髮絲的直徑還小。磁頭可沿碟片的半徑方
第七週磁碟儲存和檔案系統
技術標籤:linuxlvmlinux 1、破壞mbr表並修復 (1)備份MBR分割槽表 dd if=/dev/sda of=/data/dpt.img bs=1 count=64 skip=446
Docker檔案系統 & 資料卷
docker檔案系統&資料卷 docker檔案系統UnionFS和容器資料卷 docker映象 之前的文章中,我們一直在使用docker命令,第一步就是通過docker pull ,那麼問題來了,到底什麼是映象呢?
Linux磁碟和檔案系統知識總結
硬碟操作 為什麼要給硬碟分割槽? 如果你需要在一塊硬碟上用到多個檔案系統,那麼你就需要對硬碟進行分割槽,以便用不同的分割槽支援不同的檔案系統。(但一個硬碟只能有一個分割槽表!)反過來說,如果你整塊硬碟都
Linux下對LVM邏輯卷分割槽大小調整 [針對xfs和ext4檔案系統]
當我們在安裝系統的時候,由於沒有合理分配分割槽空間,在後續維護過程中,發現有些分割槽空間不夠使用,而有的分割槽空間卻有很多剩餘空間。如果這些分割槽在裝系統的時候使用了lvm(前提是這些分割槽要是lvm邏輯卷
lvextend和resize2fs命令擴充套件邏輯卷空間 調整ext檔案系統的空間大小
lvextend命令用於線上擴充套件邏輯卷的空間大小,而不中斷應用程式對邏輯卷的訪問。使用lvextend命令動態線上擴充套件磁碟空間,整個空間擴充套件過程對於應用程式來說是完全透明的。
【檔案系統】各檔案系統的檔案大小限制和資料夾內檔案數量限制
各檔案系統允許的單個資料夾最大檔案數量和最大檔案大小: FAT4GB Max File Size4GB Max Volume Size512 Files Per FolderFAT324GB Max File Size2TB Max Volume Size65,534 Files Per FolderNTFSNo limit on Max
python 擴充套件print列印檔案路徑和當前時間資訊的例項程式碼
pinrt函式我們經常使用,但是有時候python自帶的print函式列印的資訊不夠詳細,我們可以擴充套件一下,列印更多的資訊,例如程式檔案絕對路徑、當前日期時間、訊息等等。這裡我參考了ydf網友寫的猴子補丁(monkey pat
Python 獲取指定資料夾下的目錄和檔案的實現
經常有需要掃描目錄,對檔案做批量處理的需求,所以對目錄處理這塊做了下學習和總結。Python 中掃描目錄有兩種方法:os.listdir 和 os.walk。
C# FileSystemWatcher 在監控資料夾和檔案時的使用方法
概述 最近學習FileSystemWatcher的用法,它主要是監控一個資料夾,當資料夾內的檔案要是有更改就要記錄下來,我就整理下我對FileSystemWatcher 的理解和用法.
Win10系統中C盤檔案不能儲存沒許可權如何解決
有win10系統反映說要修改C盤檔案的時候,發現不能儲存,並提示你沒有許可權在此位置中儲存檔案,這是怎麼回事,由於使用者開啟了以管理員批准模式執行所有管理員導致的使用者賬戶降權,現在給大家分享一下具體的操作