
PyTorch 自定義model簡單示例
技術標籤:音訊編解碼技術windows編輯器音訊編碼解碼.net
.NET NAudio音訊錄製方法
寫在前面
這是NAudio作者在https://channel9.msdn.com/coding4fun/articles/NET-Voice-Recorder上發表的一篇關於NAudio的使用方法的一篇文章轉錄於此並翻譯成漢語(有道字典翻譯)的有很多地方可能不對,現將中英文對照一起附上。文章最後是網友提問一併附上。
.NET Voice Recorder
2009年10月08日
10月 08, 2009 at 11:29上午
作者:Mark Heath
文章主要內容
說明
在這篇文章中,我演示瞭如何在。net中從麥克風錄製,支援設定錄製級別,從開始到結束裁剪噪音,在WPF中視覺化波形和轉換為MP3。
In this article I demonstrate how to record from the microphone in .NET, with support for setting the recording level, trimming noise from the start and end, visualizing the waveform in WPF and converting to MP3.
Audio Recording in .NET
. net框架沒有提供任何對錄製音訊的直接支援,因此我將使用開放原始碼的NAudio專案,該專案包括許多Windows音訊錄製api的包裝器。
The .NET framework does not provide any direct support for recording audio, so I will make use of the open source NAudio project, which includes wrappers for a number of Windows audio recording APIs.
Note: It is important to point out that .NET is not an appropriate choice for high sample rate and low latency audio recording, such as that found in Digital Audio Workstation software used in recording studios. This is because the .NET garbage collector can interrupt the process at any point. However, for purposes of recording speech from the microphone, the .NET framework is more than capable. By default, NAudio asks the soundcard to give us data every 100ms, which gives plenty of time for the garbage collector to run as well as our own code.
我們將使用waveIn API的包裝器,因為它們是最普遍支援的,並且允許我們自由選擇取樣率。我們將以8kHz的16位單聲道錄製,這對於語音來說已經足夠好了,而且不會讓處理器負擔過重,因為我們想要視覺化波形,這一點很重要。
We will make use of the wrappers for the waveIn API’s, as these are the most universally supported, and allow us freedom to choose the sample rate. We will record in mono, 16 bit at 8kHz, which is more than good enough audio quality for speech, and will not overly tax the processor, which is important as we want to visualize the waveform as well.
選擇捕獲裝置
Choosing a Capture Device
通常情況下,你可以毫無困難地使用預設的音訊捕獲裝置,但如果你需要為使用者提供選擇,NAudio會允許你這麼做。你可以使用WaveIn。DeviceCount WaveIn。GetDeviceCapabilities查詢存在多少錄音裝置,並查詢它們的名稱和支援的通道數量。
Normally, you will be able to use the default audio capture device without any difficulties, but should you need to offer the user a choice, NAudio will allow you to do so. You can use the WaveIn.DeviceCount and WaveIn.GetDeviceCapabilities to find out how many recording devices are present, and query for their name and number of supported channels.
在我的計算機上,我有一個單一的waveIn裝置(麥克風陣列),直到我插入我的耳機,這時,一個新的裝置出現併成為預設(裝置0總是預設)。
On my computer, I have a single waveIn device (Microphone Array) until I plug my headset in, at which point, a new device appears and becomes the default (device 0 is always the default).
int waveInDevices = WaveIn.DeviceCount;
for (int waveInDevice = 0; waveInDevice < waveInDevices; waveInDevice++)
{
    WaveInCapabilities deviceInfo = WaveIn.GetCapabilities(waveInDevice);
    Console.WriteLine("Device {0}: {1}, {2} channels",
        waveInDevice, deviceInfo.ProductName, deviceInfo.Channels);
}
這將在我的計算機上產生以下輸出:
This produces the following output on my computer:
裝置0:麥克風/線路插入(SigmaTel, 2通道
Device 0: Microphone / Line In (SigmaTel , 2 channels
裝置1:麥克風陣列(SigmaTel高,2通道
Device 1: Microphone Array (SigmaTel High, 2 channels
不幸的是,這些裝置名被截斷,因為WAVEINCAPS結構只支援31個字元。有一種方法可以獲得完整的裝置名,但它相當複雜。
Unfortunately these device names are truncated because the WAVEINCAPS structure only supports 31 characters. There is a way of getting the full device name, but it is rather convoluted.
通常,你會選擇裝置0(預設值),但是如果你想選擇一個不同的輸入裝置,只需在你的WaveIn物件上設定DeviceNumber屬性為你想要的數字。
Normally, you will choose Device 0 (the default), but if you wish to select a different input device, simply set the DeviceNumber property on your WaveIn object to the desired number.
檢測錄音電平
Checking the Recording Level
錄音的第一步通常是幫助使用者確定他們的麥克風是否工作。如果使用者的音效卡上有多個輸入,這一點尤其重要。我們實現這一點的方式很簡單,通過開始記錄和顯示音訊水平檢測到使用者與音量計。waveIn api不會把任何東西寫到磁碟上,所以在這一點上沒有音訊被“錄製”,我們只是檢查輸入電平,然後扔掉捕獲的音訊樣本。
The first step in recording is usually to help the user determine if their microphone is working or not. This is especially important if the user has more than one input on their soundcard. The way we achieve this is simply by starting recording and displaying the level of audio detected to the user with a volume meter. The waveIn APIs do not write anything to disk, so no audio is actually being ‘recorded’ at this point, we are simply examining the input level and then throwing the captured audio samples away.
為了開始從音效卡捕獲音訊,我們使用了NAudio中的WaveIn類。在呼叫StartRecording之前,我們將其配置為我們想要記錄的波形格式(在我們的例子中是8kHz單聲道),以開始從裝置捕獲音訊。
To begin capturing audio from the soundcard, we use the WaveIn class in NAudio. We configure it with the WaveFormat in which we would like to record (in our case 8kHz mono), before calling StartRecording, to start capturing audio from the device.
waveIn = new WaveIn();
waveIn.DeviceNumber = selectedDevice;
waveIn.DataAvailable += waveIn_DataAvailable;
int sampleRate = 8000; // 8 kHz
int channels = 1; // mono
waveIn.WaveFormat = new WaveFormat(sampleRate, channels);
waveIn.StartRecording();
當音訊緩衝區從音效卡返回給我們時,DataAvailable事件處理程式將通知我們。資料以位元組陣列的形式返回,表示PCM示例資料。如果我們計劃將音訊直接寫入磁碟,這沒問題,但如果我們希望檢視音訊資料本身呢?每個音訊樣本都是16位,也就是兩個位元組,這意味著我們需要將位元組對轉換成短位元組,以便能夠理解資料。
The DataAvailable event handler will notify us whenever a buffer of audio has been returned to us from the sound card. The data comes back as an array of bytes, representing PCM sample data. This is fine if we are planning to write the audio directly to disk, but what if we wish to have a look at the audio data itself? Each audio sample is 16 bits, i.e. two bytes, meaning that we will need to convert pairs of bytes into shorts to be able to make sense of the data.
注意:如果我們用立體聲記錄,16位的樣本會成對出現,首先是左樣本,然後是右樣本。
Note: if we were recording in stereo, the 16 bit samples would themselves come in pairs, first the left sample, then the right sample.
下面的程式碼展示了我們如何處理DataAvailable事件中的原始位元組,並將單個音訊樣本讀取出來。注意,我們使用的是BytesRecorded欄位,而不是緩衝區的Length屬性。此外,我選擇將樣本轉換為32位浮點格式,並縮放它們,使最大體積為1.0f。這使得通過效果處理和視覺化它們變得更加容易。
The following code shows how we might process the raw bytes in the DataAvailable event, and read the individual audio samples out. Notice that we use the BytesRecorded field, not the buffer’s Length property. Also, I have chosen to convert the samples to 32 bit floating point format and scaled them so the maximum volume is 1.0f. This makes processing them through effects and visualizing them much easier.
void waveIn_DataAvailable(object sender, WaveInEventArgs e)
{
    for (int index = 0; index < e.BytesRecorded; index += 2)
    {
        short sample = (short)((e.Buffer[index + 1] << 8) |
                                e.Buffer[index + 0]);
        float sample32 = sample / 32768f;
        ProcessSample(sample32);
    }
}
注意:使用waveIn和waveOut api的一個複雜之處是決定回撥機制。NAudio提供了三種選擇。首先是函式回撥。這意味著waveIn API被賦予了一個(固定的)函式指標,並被它呼叫。這意味著DataAvailable回撥將在後臺執行緒中進入。在某種程度上,這是最乾淨的方法,但你需要小心使用函式回撥時可能掛起對waveOutReset呼叫的惡意音效卡驅動程式(在許多膝上型電腦上發現的SoundMAX晶片組特別容易出現這個問題)。
Note: One complication of using the waveIn and waveOut APIs is deciding on a callback mechanism. NAudio offers three options. First is function callbacks. This means that the waveIn API is given a (pinned) function pointer which it calls back onto. This means that your DataAvailable callback will come in on a background thread. In some ways this is the cleanest approach, but you need to beware of rogue soundcard drivers that can hang in calls to waveOutReset when using function callbacks (the SoundMAX chipset found on a lot of laptops is particularly prone to this problem).
第二種方法是提供視窗控制代碼。waveIn api會在視窗控制代碼的訊息佇列中返回一個待處理的訊息。這種方法往往是最可靠和最常用的。需要注意的一個問題是,如果您停止錄製並立即重新啟動,來自舊錄製會話的訊息可能會在新會話中處理,從而導致嚴重的異常。
The second is to supply a window handle. The waveIn APIs will post a message back to be handled on the message queue of that window handle. This method tends to be the most reliable and most commonly used. One gotcha to watch out for is that if you stop recording and immediately restart, a message from the old recording session could get handled in the new session resulting in a nasty exception.
第三是讓NAudio建立自己的新視窗並向其釋出訊息。這避免了來自一個錄音會話的訊息與另一個會話混淆的危險。如果你呼叫預設的WaveIn建構函式,NAudio會預設使用這個回撥方法。但不要在後臺執行緒或控制檯應用程式中使用這個,或者NAudio建立的新視窗實際上不會去處理它的訊息佇列。
The third is to let NAudio create its own new window and post messages to that. This gets round any danger of messages from one recording session getting muddled up with another. This is the callback method that NAudio will use by default if you call the default WaveIn constructor. But don’t use this from a background thread or from a console application, or the new window that NAudio creates won’t actually get round to processing its message queue.
視覺化的記錄電平
Visualizing the Recording Level
我們已經看到了如何開始從音效卡捕獲音訊,以檢查錄音級別。現在我們需要給使用者一些視覺反饋。我們將使用WPF作為示例記錄應用程式。我們可用來以圖形方式顯示單個數值的最簡單控制元件是ProgressBar。因為它是WPF,所以我們可以完全自定義進度條的圖形化外觀,讓它看起來更像一個音量計。我用了一個從綠色到紅色的漸變來顯示當前的音量等級。你可以在這裡閱讀更多關於我如何建立這個ProgressBar模板的內容。
We have seen how we can begin to capture audio from the soundcard for the purposes of checking the recording level. Now we need to give the user some visual feedback. We will use WPF for our sample recording application. The simplest control we have available to display a single numeric value graphically is the ProgressBar. And because it is WPF, we can fully customize the graphical appearance of the progress bar to look a little more like a volume meter. I have used a gradient going from green to red to show the current volume level. You can read more about how I created this ProgressBar template here.

圖1-顯示當前麥克風音量級別的進度條
Figure 1 - A Progress Bar Showing the Current Microphone Volume Level
為了幫助提供要顯示的音量級別,我建立了一個SampleAggregator類。它會傳遞給我們接收到的每個音訊取樣值,並跟蹤最大值和最小值。然後,在指定數量的樣本之後,它會引發一個事件,允許GUI元件響應。我們需要小心,不要提出太多的這些事件或效能將受到嚴重影響。我每800個樣本就增加一個,這意味著我們每秒鐘會得到10個螢幕更新。因為我使用的是資料繫結,當其中一個更新觸發時,我必須在DataContext物件(在MVVM模式中也稱為“ViewModel”)上引發PropertyChangedEvent。以下是繫結到我的CurrentInputLevel屬性的XAML語法:
To help provide the volume level to display, I have created a SampleAggregator class. This is passed every audio sample value we receive and keeps track of the maximum and minimum values. Then, after a specified number of samples, it raises an event allowing the GUI components to respond. We need to be careful not to raise too many of these events or performance will be badly affected. I am raising one every 800 samples, meaning we get 10 updates per second to the screen.
Because I am using data binding, when one of these updates fires, I must raise a PropertyChangedEvent on my DataContext object (also known as the “ViewModel” in the MVVM pattern). Here’s the XAML syntax for binding to my CurrentInputLevel property:
<ProgressBar Orientation="Horizontal"
    Value="{Binding CurrentInputLevel, Mode=OneWay}"
    Height="20" />
下面是ViewModel中的程式碼,確保每當我們計算一個新的最大輸入級別時,GUI都會更新:
And here’s the code in the ViewModel that ensures that the GUI updates whenever we calculate a new maximum input level:
private float lastPeak;

void recorder_MaximumCalculated(object sender, MaxSampleEventArgs e)
{
    lastPeak = Math.Max(e.MaxSample, Math.Abs(e.MinSample));
    RaisePropertyChangedEvent("CurrentInputLevel");
}
乘以100,因為進度條的預設最大值是100
// multiply by 100 because the Progress bar's default maximum value is 100
public float CurrentInputLevel { get { return lastPeak * 100; } }
注意:模型檢視檢視模型(MVVM)是一種在WPF和Silverlight開發人員中越來越流行的模式。其基本思想是,檢視(即xaml標記檔案)背後沒有任何程式碼,只是通過資料繫結的方式指定與業務邏輯的所有通訊。ViewModel充當介面卡,以簡化資料繫結的過程。這種方法很好地分離了外觀和行為。在大多數情況下,這個模式工作得很好,但是有一些棘手的領域,您需要在後面編寫幾行程式碼,或者使用一些巧妙的技巧,如附加依賴屬性或自定義觸發器。有幾個優秀的開源助手庫可以幫助您啟動和執行MVVM應用程式。這裡有一個全面的列表。
Note: Model View ViewModel (MVVM) is a pattern that is growing in popularity amongst WPF and Silverlight developers. The basic idea is that you have no code behind whatsoever on your View (i.e. your xaml markup file), and simply specify all communications with your business logic by means of data binding. The ViewModel serves as an adapter to ease the process of data binding. This approach gives very good separation of appearance and behavior. For the most part, this pattern works very well, but there are a few tricky areas, for which you will need to either write a few lines of code behind, or make use of some cunning tricks such as attached dependency properties or custom triggers. There are several excellent open source helper libraries that can take some of the work out of getting an MVVM application up and running. Have a look here for a comprehensive list.
調節錄音電平
假設當前輸入電平過高或過低。我們希望能夠支援修改記錄級別。同樣,我們希望使用資料繫結來實現這一點,因此我們將在XAML中新增一個音量滑塊:
Adjusting the Recording Level
Suppose the current input level is too high or too soft. We would like to be able to support modifying the recording level. Again, we would like to use data binding to do so, so we will add a volume slider to our XAML:
<Slider Orientation="Horizontal"
    Value="{Binding MicrophoneLevel, Mode=TwoWay}"
    Maximum="100"
    Margin="5" />
現在我們必須掌握MixerLine,它將允許我們訪問我們的waveIn裝置的輸入音量控制。這要求我們使用Windows mixer api,它在NAudio中也有包裝器。獲得這個音量控制並不總是像你可能希望的那樣簡單(並且可能需要不同的方法為XP和Vista),但以下是程式碼,似乎在大多數系統上工作:
Now we have to get hold of the MixerLine that will allow us to access the input volume control for our waveIn device. This requires us to make use of the Windows mixer APIs, which also have wrappers in NAudio. Getting hold of this volume control is not always as straightforward as you might hope (and can require different approaches for XP and Vista), but the following is code that seems to work on most systems:
private void TryGetVolumeControl()
{
    int waveInDeviceNumber = 0;
    var mixerLine = new MixerLine((IntPtr)waveInDeviceNumber,
                                   0, MixerFlags.WaveIn);
    foreach (var control in mixerLine.Controls)
    {
        if (control.ControlType == MixerControlType.Volume)
        {
            volumeControl = control as UnsignedMixerControl;
            break;
        }
    }
}
現在我們可以使用UnsignedMixerControl的Percent屬性將volume設定為0到100之間的任何一個值。
Now we can use the Percent property on the UnsignedMixerControl to set volume to a value anywhere between 0 and 100.
開始錄音
Starting Recording
現在我們已經正確地設定了我們的記錄級別,我們已經準備好真正開始記錄了。但是由於我們已經打開了waveIn裝置,我們所需要做的就是開始將我們接收到的資料寫入一個檔案。
NAudio有一個名為WaveFileWriter的類,它允許我們將記錄的資料寫入檔案。現在,我們將它以PCM格式寫入一個臨時檔案,然後將其轉換為更好的壓縮格式,如MP3。下面的程式碼建立了一個新的WAV檔案:
Now we have got our recording levels set up correctly, we are ready to actually start recording. But since we have already opened our waveIn device, all we need to do is start writing the data we have received into a file.
NAudio has a class called WaveFileWriter which will allow us to write our recorded data to a file. For now, we will write it to a temporary file in PCM format, and convert it later into a better compressed format such as MP3. The following code creates a new WAV file:
writer = new WaveFileWriter(waveFileName, recordingFormat);
Now we can write to the file as we receive notifications from the waveIn device:
void waveIn_DataAvailable(object sender, WaveInEventArgs e)
{
    if (recordingState == RecordingState.Recording)
        writer.WriteData(e.Buffer, 0, e.BytesRecorded);

   // ...
}
注意:有三個主要選擇如何儲存音訊,而它是被記錄。首先,您可以將它寫入一個記憶體流。這減少了處理臨時檔案的不便,但是您需要小心,不要耗盡記憶體。而且,如果你的錄音程式在進行到一半的時候崩潰了,你就失去了一切。以我們在演示中使用的取樣速率,一分鐘的音訊只需要不到1mb的記憶體,但如果您使用44.1kHz的立體聲(音樂的標準)錄製,那麼您每分鐘大約需要10mb記憶體。
Note: There are three main options for how to store audio while it is being recorded. First, you can write it to a MemoryStream. This saves the inconvenience of dealing with a temporary file, but you need to be careful not to run out of memory. Also, if your recording program crashes half way through, you have lost everything. At the sample rate we are using for this demo, one minute of audio takes just under 1 MB of memory, but if you were recording at 44.1kHz stereo (the standard for music), you would need about 10 MB per minute.
其次,您可以寫入一個臨時WAV檔案,以便稍後轉換成另一種格式,就像我們在這裡所做的那樣。雖然這不是一種有效節省磁碟空間的格式,但它非常容易使用,如果你計劃在錄製後應用任何效果或編輯音訊,它特別有用。
Second, you can write to a temporary WAV file to be converted to another format later, as we are doing here. While this is not a disk space efficient format, it is very easy to work with, and particularly useful if you are planning to apply any effects or edit the audio in any way after recording.
第三,在錄音時,你可以直接將音訊傳送到編碼器(如WMA或MP3)。這可能是最好的選擇,如果你正在製作一個較長的錄音,並且不需要在錄音後編輯它。
Third, you can pass the audio directly to an encoder (such as WMA or MP3) as it is being recorded. This might be the best option if you are making a longer recording, and have no need to edit it after recording.
停止記錄
顯然,當用戶單擊stop recording按鈕時,我們將停止,但我們也可能希望設定一個最大的記錄持續時間,以阻止使用者無意中填滿他們的硬碟。在這個例子中,我們將允許一分鐘的錄音。
Stopping Recording
Obviously we will stop when the user clicks the stop recording button, but we might also want to set a maximum recording duration to stop the user inadvertently filling up their hard disk. For this example, we will allow one minute of recording.
long maxFileLength = this.recordingFormat.AverageBytesPerSecond * 60;

int toWrite = (int)Math.Min(maxFileLength - writer.Length, bytesRecorded);
if (toWrite > 0)
    writer.WriteData(buffer, 0, bytesRecorded);
else
    Stop();
注意:可以稍微令人困惑的是,當用戶使用與WaveIn視窗回撥,音訊你記錄的最後一點要求錄音停止後,所以確保你不要關閉該檔案儲存直到你得到所有的音訊。WaveIn物件上的FinishedRecording事件將幫助您確定何時關閉wave檔案寫入器並清理您的資源是安全的。
Note: Something that can be slightly confusing for users is that when using window callbacks with WaveIn, the last bit of audio you recorded comes in after you have asked recording to stop, so make sure you don’t close the file you are saving to until you have got all the audio back. The FinishedRecording event on the WaveIn object will help you determine when it is safe to close the WaveFileWriter and clean up your resources.
視覺化波形
通常希望將音訊波形顯示給使用者。當你在錄音時顯示波形有時被稱為“置信度錄音”,因為它允許你看到音訊被錄製的預期和水平仍然是正確的。
Visualizing the Wave Form
It is often desirable to display the audio waveform to the user. Displaying the waveform while you are recording is sometimes called “confidence recording”, because it allows you to see that audio is being recorded as expected and the levels are still right.
有多種可能的方法來繪製音訊波形。最簡單的方法是在每次聚合器觸發時畫一條垂直線顯示最小值和最大值:
There are a variety of possible approaches for drawing audio waveforms. The simplest is to draw a vertical line showing the minimum and maximum values every time our sample aggregator fires:

圖2 -使用垂直線的音訊波形
乍一看,在WPF中實現這一點似乎是微不足道的,但這確實有消耗過多資源的危險。例如,每次計算一個新的最大樣本時,簡單地在畫布上新增一個新行,執行起來非常糟糕,所以最好使用固定數量的垂直線,並動態地調整它們的大小。
Figure 2 - Audio Waveform using vertical lines
At first glance it may seem that this would be trivial to implement in WPF, but there is a real danger of consuming too many resources. For example, simply adding a new line to a Canvas every time a new maximum sample is calculated performs very badly, so it is better to have a fixed number of vertical lines and resize them dynamically.
另一種方法是建立一個多邊形。這要求我們每次收到一個新樣本時,都要在一個多邊形的點集合中新增兩個點。訣竅是在點集合的中間新增這些點,而不是在最後,這樣最終的結果就是一個單一的形狀。這意味著我們的波形可以有不同的輪廓顏色和填充顏色。為了防止邊緣出現鋸齒狀,我們在X軸上繪製兩個單位的點。
Another approach is to create a polygon. This requires us to add two points to a Polygon’s Points collection every time we receive a new sample. The trick is to add these points in the middle of the Points collection, rather than at the end, so that the end result is a single shape. This means our waveform can have a different outline color and fill color. To stop the edges from appearing too jagged, we plot points two units apart along on the X axis.

圖3 -使用多邊形渲染的音訊波形
與麥克風音量計一樣,波形繪製控制需要每秒接收幾個由SampleAggregator接收到的最大和最小取樣值的通知。當接收到每個樣本值時,我們要麼在多邊形中插入新的點,要麼(如果整個螢幕已經滿了)返回到左邊的邊緣,並從那裡繼續繪圖。
Figure 3 - Audio Waveform rendered using a Polygon
Like the microphone volume meter, the waveform drawing control needs to receive several notifications a second of the maximum and minimum sample values received by the SampleAggregator. When each sample value is received, we either insert new points into our polygon, or, if the whole screen is full, we go back to the left-hand edge and continue drawing from there.
對於置信度記錄顯示,我使用了Polygon方法,它在一個名為PolygonWaveFormControl的類中。下面是當我們收到一個新的最大樣本時計算新點或更新點位置的程式碼:
For the confidence recording display I have used the Polygon method, which is in a class called PolygonWaveFormControl. Here’s the code which calculates the new points or updated point locations as we receive a new maximum sample:
public void AddValue(float maxValue, float minValue)
{
    int visiblePixels = (int)(ActualWidth / xScale);
    if (visiblePixels > 0)
    {
        CreatePoint(maxValue, minValue);

        if (renderPosition > visiblePixels)
        {
            renderPosition = 0;
        }
        int erasePosition = (renderPosition + blankZone) % visiblePixels;
        if (erasePosition < Points)
        {
            double yPos = SampleToYPosition(0);
            waveForm.Points[erasePosition] =
               new Point(erasePosition * xScale, yPos);
            waveForm.Points[BottomPointIndex(erasePosition)] =
               new Point(erasePosition * xScale, yPos);
        }
    }
}

private void CreatePoint(float topValue, float bottomValue)
{
    double topYPos = SampleToYPosition(topValue);
    double bottomYPos = SampleToYPosition(bottomValue);
    double xPos = renderPosition * xScale;
    if (renderPosition >= Points)
    {
        int insertPos = Points;
        waveForm.Points.Insert(insertPos, new Point(xPos, topYPos));
        waveForm.Points.Insert(insertPos + 1, new Point(xPos, bottomYPos));
    }
    else
    {
        waveForm.Points[renderPosition] = new Point(xPos, topYPos);
        waveForm.Points[BottomPointIndex(renderPosition)] =
              new Point(xPos, bottomYPos);
    }
    renderPosition++;
}
erase position的計算是為了將之前的一些示例值清空,以便在我們繞完一次後,新資料出現的地方更加明顯:
The erase position calculation is to blank out some previous sample values to make it obvious where the new data is appearing after we have wrapped around once:

圖4 polygon波形控制的“空白區域”
Figure 4 PolygonWaveForm control’s “blank zone”
注意:在WPF中有更快的渲染方法。一種選擇是使用WriteableBitmap類並直接在其上繪圖。如果您使用的是垂直線渲染方法,那麼這可能是一種很好的方法。第二種是使用DrawingVisual物件,這是一種輕量級的繪圖物件,比使用Shape派生的類提供更好的效能。缺點是失去了資料繫結和在XAML中全面描述影象的能力等特性,但對於波形繪製來說,這並不是一個缺點。我在這個應用程式的音訊儲存部分使用了DrawingVisual方法。
Note: There are faster ways to perform rendering in WPF. One option is to use the WriteableBitmap class and draw directly onto it. This could be a good approach if you were using the vertical lines method of rendering. The second is to use DrawingVisual objects, which are lightweight drawing objects offering better performance than using classes derived from Shape. The down-side is the loss of features such as DataBinding and the ability to fully describe the picture in XAML, but for WaveForm drawing this is not really a drawback. I use the DrawingVisual method in the Save Audio part of this application.
另一個挑戰是波形繪製控制如何接收通知,因為我使用MVVM,所以我沒有直接訪問SampleAggregator。一個簡單的方法是在PolygonWaveFormControl上建立一個依賴屬性:
Another challenge was how the waveform drawing control could receive notifications since I am using MVVM so I have no direct access to the SampleAggregator. A simple way around this was to create a Dependency Property on PolygonWaveFormControl:
public static readonly DependencyProperty SampleAggregatorProperty =
       DependencyProperty.Register(
          "SampleAggregator",
          typeof(SampleAggregator),
          typeof(PolygonWaveFormControl),
          new PropertyMetadata(null, OnSampleAggregatorChanged));

public SampleAggregator SampleAggregator
{
    get { return (SampleAggregator)this.GetValue(SampleAggregatorProperty); }
    set { this.SetValue(SampleAggregatorProperty, value); }
}

private static void OnSampleAggregatorChanged(object sender, DependencyPropertyChangedEventArgs e)
{
    PolygonWaveFormControl control = (PolygonWaveFormControl)sender;
    control.Subscribe();
}
這允許我們將PolygonWaveFormControl繫結到DataContext上公開的SampleAggregator上:
This allows us to bind the PolygonWaveFormControl to the SampleAggregator made public on our DataContext:
<my:PolygonWaveFormControl
    Height="40"
    SampleAggregator="{Binding SampleAggregator}" />
調整音訊
Trimming the Audio
我們已經建立了一個臨時的WAV檔案,但是在使用者將它儲存到他們所選擇的檔案之前,我們希望允許他們從錄音的開始和結束刪去任何不需要的部分。為了做到這一點,我想顯示整個記錄波形,與選擇矩形疊加在上面,以允許子範圍被選擇。
We have created a temporary WAV file, but before the user saves it to a file of their choosing, we want to allow them to trim off any unwanted parts from the start and end of the recording. To do this I would like to display the entire recorded waveform, with a selection rectangle superimposed on top to allow a sub-range to be selected.
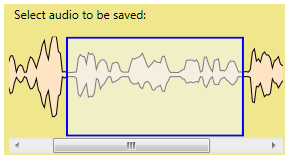
圖5 - GUI允許選擇錄製音訊的一部分
Figure 5 - GUI to allow selection of a portion of the recorded audio
要完成這種介面,我們需要三個元件。第一個是滾動檢視器。ScrollViewer允許我們在波形太大而不適合螢幕的情況下左右滾動,這很可能是在錄製超過幾秒鐘的音訊時發生的。
To accomplish this kind of interface we need three components. The first is a ScrollViewer. The ScrollViewer allows us to scroll left and right through the WaveForm if it is too big to fit onto a screen, which is likely if you record more than a few seconds of audio.
第二種是一種新型波形渲染器,它將渲染整個檔案,而不是我的PolygonWaveFormControl,它在螢幕填滿時從左邊開始。為此,我建立了WaveFormVisual,它使用DrawingVisual objects來繪製整個波形。顯然,如果我們想要長時間記錄,這種方法就需要進行優化,因為它建立的多邊形將擁有數千個點,但對於短記錄來說,它的效果很好。
The second is a new type of WaveForm renderer that will render an entire file, rather than my PolygonWaveFormControl which started again at the left when the screen filled up. For this I created WaveFormVisual which uses DrawingVisual objects to draw the entire WaveForm. Obviously if we wanted to record for a long period, this approach would need to be optimised as the polygon it creates would have thousands of points, but for short recordings, it works fine.
The third piece was the hardest to get right – the selection rectangle to support mouse dragging selection of the waveform. For this I created the RangeSelectionControl.
RangeSelectionControl
只是一個帶有實體輪廓和半透明填充的藍色矩形,放置在畫布上。魔術發生在滑鼠處理程式中。我們需要檢測使用者何時將滑鼠懸停在矩形的左邊緣或右邊緣,並將游標設定為顯示水平大小調整圖示。這可以在MouseMove事件中完成,檢查X座標,然後設定游標屬性:
The RangeSelectionControl is simply a blue rectangle with a solid outline and semi-transparent fill sitting on a Canvas. The magic occurs in the mouse handler. We need to detect when the user hovers over the left or right edge of the rectangle, and set the cursor to show a horizontal resizing icon. This can be done in the MouseMove event, checking the X coordinate and then setting the Cursor property:
Cursor = Cursors.SizeWE;
當用戶在邊緣上點選左鍵時,我們開始拖動。關鍵是呼叫canvas。capturemouse。如果我們不這樣做,當您試圖將矩形拖大時,滑鼠移動事件將丟失給下面的其他控制元件。
When the user clicks the left-button while over the edge, we begin to drag. Key to this is calling Canvas.CaptureMouse. If we don’t do this, as soon as you try to drag the rectangle bigger, the mouse move events are lost to other controls underneath.
void RangeSelectionControl_MouseDown(object sender, MouseButtonEventArgs e)
{
    if (e.LeftButton == MouseButtonState.Pressed)
    {
        Point position = e.GetPosition(this);
        Edge edge = EdgeAtPosition(position.X);
        DragEdge = edge;
        if (DragEdge != Edge.None)
        {
            mainCanvas.CaptureMouse();
        }
    }
}
現在在MouseMove方法中,我們可以改變畫布。屬性來調整矩形的大小。
Now in the MouseMove methods, we can change the Canvas.Left and Width properties of the rectangle to resize it.
ScrollViewer非常容易使用,但必須記住將CanContentScroll屬性設定為true,並正確設定ScrollViewer中專案的大小。
The ScrollViewer is quite straightforward to use, but you must remember to set CanContentScroll property to true, and also to set the size of the items within the ScrollViewer correctly.
<ScrollViewer CanContentScroll="True"
         HorizontalScrollBarVisibility="Visible"
         VerticalScrollBarVisibility="Hidden">
   <Grid>
       <my:WaveFormVisual Height="100"
           HorizontalAlignment="Left"
           x:Name="waveFormRenderer"/>
       <my:RangeSelectionControl
           HorizontalAlignment="Left"
           x:Name="rangeSelection" />
   </Grid>
</ScrollViewer>
我們根據波形中繪製的點的總數來設定波形visual和RangeSelectionControl的適當寬度。
We set the appropriate Width of the WaveFormVisual and RangeSelectionControl based on the total number of points we have drawn in the waveform.
儲存音訊
Saving the Audio
我們終於準備好儲存音訊了。我們將為使用者提供兩種儲存格式的選擇。第一個方法是簡單地儲存為WAV檔案。如果使用者選擇了整個錄音,我們只需要將音訊複製到他們想要的位置。然而,如果使用者選擇了一個子範圍,那麼我們需要修剪WAV檔案。這可以通過使用TrimWavFile實用功能快速完成,該功能從WAV檔案閱讀器複製到WAV檔案寫入器,從開始到結束跳過一定數量的位元組。
So we are finally ready to save the audio. We will offer the user two choices of format to save in. The first is simply to save as a WAV file. If the user has selected the entire recording, we only need to copy the audio across to their desired location. If, however, the user has selected a sub-range, then we need to trim the WAV file. This can be quickly accomplished using a TrimWavFile utility function that copies from a WAV file reader to a WAV file writer, skipping over a certain number of bytes from the beginning and end.
public static void TrimWavFile(string inPath, string outPath,
                TimeSpan cutFromStart, TimeSpan cutFromEnd)
{
    using (WaveFileReader reader = new WaveFileReader(inPath))
    {
        using (WaveFileWriter writer =
               new WaveFileWriter(outPath, reader.WaveFormat))
        {
            int bytesPerMillisecond =
                reader.WaveFormat.AverageBytesPerSecond / 1000;

            int startPos = (int)cutFromStart.TotalMilliseconds *
                           bytesPerMillisecond;
            startPos = startPos - startPos % reader.WaveFormat.BlockAlign;

            int endBytes = (int)cutFromEnd.TotalMilliseconds *
                           bytesPerMillisecond;
            endBytes = endBytes - endBytes % reader.WaveFormat.BlockAlign;
            int endPos = (int)reader.Length - endBytes;

            TrimWavFile(reader, writer, startPos, endPos);
        }
    }
}

private static void TrimWavFile(WaveFileReader reader,
                    WaveFileWriter writer, int startPos, int endPos)
{
    reader.Position = startPos;
    byte[] buffer = new byte[1024];
    while (reader.Position < endPos)
    {
        int bytesRequired = (int)(endPos - reader.Position);
        if (bytesRequired > 0)
        {
            int bytesToRead = Math.Min(bytesRequired, buffer.Length);
            int bytesRead = reader.Read(buffer, 0, bytesToRead);
            if (bytesRead > 0)
            {
                writer.WriteData(buffer, 0, bytesRead);
            }
        }
    }
}
我們還想提供儲存為MP3的功能。建立MP3檔案最簡單的方法是使用開源的LAME MP3編碼器(如果你還沒有這個應用程式,可以在web上搜索LAME .exe來獲得它)。我們的應用程式將在當前目錄中查詢,並提示使用者找到lame.exe(如果它不存在),因為我們沒有將它包含在應用程式下載中。假設您確實提供了一個有效的路徑,那麼我們就可以通過使用適當的引數呼叫lame.exe將我們的(修改過的)WAV檔案轉換為MP3。
We also want to offer the ability to save as MP3. The easiest way to create MP3 files is to use the open source LAME MP3 encoder (do a web search for lame.exe to get hold of this application if you haven’t already got it). Our application will look in the current directory, and prompt the user to find lame.exe if it is not present, as we do not include it in the application download. Assuming you do provide a valid path, we can then convert our (trimmed) WAV file to MP3 by simply calling lame.exe with the appropriate parameters.
public static void ConvertToMp3(string lameExePath,
     string waveFile, string mp3File)
{
   Process converter = Process.Start(lameExePath, "-V2 \"" + waveFile
                            + "\" \"" + mp3File + "\"");
   converter.WaitForExit();
}
最後,我們得到了一個很好的MP3檔案,其中包含選定的麥克風錄音部分。
We end up with a nice compact MP3 file containing the selected portion of our microphone recording.
探索示例程式碼解決方案
Exploring the Sample Code Solution
主要的WPF示例應用程式可以在VoiceRecorder專案中找到。它包含了主視窗以及三個檢視及其關聯的檢視模型。VoiceRecorder。Core包含一些WPF helper類和使用者控制元件,以幫助處理應用程式的管道和GUI,而VoiceRecorder。Audio包含實際執行音訊錄製、編輯和轉換的類。
The main WPF sample application is found in the VoiceRecorder project. This contains the main window along with the three views and their associated ViewModels. VoiceRecorder.Core contains some WPF helper classes and user controls to help with the plumbing and GUI of the application, while VoiceRecorder.Audio contains the classes that actually perform the recording, editing and converting of audio.
關於作者
About the Author
Mark Heath是一名軟體開發者,目前在英國南安普頓的NICE CTI系統公司工作。他專門從事。net開發,特別關注客戶端技術和音訊播放。他在http://mark-dot-net.blogspot.com上有關於音訊、WPF、Silverlight和軟體工程最佳實踐的部落格。他是CodePlex上幾個開源專案的作者,其中包括NAudio,一個底層的。net音訊工具包(http://www.codeplex.com/naudio)。
Mark Heath is a software developer currently working for NICE CTI Systems in Southampton, UK. He specializes in .NET development with a particular focus on client side technologies and audio playback. He blogs about audio, WPF, Silverlight and software engineering best practices at http://mark-dot-net.blogspot.com. He is the author of several open source projects hosted at CodePlex, including NAudio, a low-level .NET audio toolkit (http://www.codeplex.com/naudio).
標記:
Audio、Model-View-ViewModel、MVVM、WPF
rss
討論
SomeONe
我喜歡你不掩飾架構的事實。有人可能會認為,因為它是Coding4Fun,所以它的設計將是扁平和單一的。您有單獨的程式集來公開不同級別的功能。您還擁有各種實現或一些通用設計模式的開端。如IoC、命令中介、助手/服務、MVVP等。除了在MVVP上的一個小宣傳外,這是沒有說太多關於它的事情。偉大的工作!
I like the fact that you don’t gloss over architecture. One might think that because it is Coding4Fun that the design would be flat and monolithic. You have separate assemblies exposing different levels of functionality. You also have various implementations or the start of some common design patterns. Like IoC, Command Mediator, Helper/Services, MVVP, etc. This is being done without saying to much about it other than a small blurb on MVVP. Great Job!
上次修改時間: 10月 08, 2009 at 9:00下午
Clint
內特·格林伍德,我們可能會也可能不會就此發表文章
@Nate Greenwood, we may or may not have an article in the works for that
上次修改時間: 10月 08, 2009 at 9:00下午
Nate Greenwood
太棒了。這是一篇很棒的文章,正好趕上我正在考慮一個專案來學習如何利用我內建的監控攝像頭和麥克風。
Awesome. Great article, and just in time as I was pondering a project to learn to take advantage of my built-in monitor webcam and microphone.
上次修改時間: 10月 08, 2009 at 9:00下午
Adrian
震驚
amazing!!
你做了一份不可思議的工作,我是你的粉絲!!
you make an incredible job, im your fans!!
上次修改時間: 10月 08, 2009 at 9:00下午
Clint
感謝你朋友,我們努力使文章既有用又展示做事情的有用方法。也許不總是成功,但我們努力了。
@SomeONe Thanks man, we try to make the articles both useful and show useful ways of doing stuff. May not always be successful but we try.
上次修改時間: 10月 09, 2009 at 9:00下午
Robson Felix
這可以在XAML瀏覽器應用程式(XBAP)中使用嗎?
謝謝,
Can this be used inside an XAML Browser Application (XBAP)?
Thanks,
上次修改時間: 3月 16, 2010 at 9:00下午
Alejandro
如何將錄音時間修改為大於60秒???
How can I change the recording time to a value bigger than 60 seconds???
上次修改時間: 1月 12, 2011 at 9:00下午
gr33x
你做的最好的教程…這是很好的解釋…恭喜奧特
you do the best tutorials… that was really nice explained… congrats to autors
上次修改時間: 6月 04, 2011 at 7:03上午
FedeLasse
對於c#程式設計師來說,這是關於音訊最有用的一篇文章。非常感謝!它肯定會幫助我開發我的程式。
This has to be the most useful article on audio there has come to exist for C# programmers. Thanks a LOT for it! It’ll help me develop my program for sure.
上次修改時間: 7月 23, 2011 at 3:15下午
Bram Osterhout
我想儲存一系列的音符/聲音,我有一個數組,儲存每個音符的頻率,振幅和持續時間。實現這一目標的程式是什麼?
I want to save a series of notes/sounds which I had in an array which stored each note’s frequency, amplitude, and duration. What would be the procedure for accomplishing this?
Thanks!
上次修改時間: 9月 03, 2011 at 5:35下午
samzhang
Microsoft.DirectX
上次修改時間: 9月 10, 2011 at 5:44上午
Miran
重播的人問如何刪除限制60秒。
Replay at person asking how to remove limit of 60 seconds.
在專案的AudioRecorder.cs中,將writetofile函式更改為following。
in AudioRecorder.cs of the project change the writetofile Function to following.
private void WriteToFile(byte[] buffer, int bytesRecorded)
{
if (recordingState == RecordingState.Recording
|| recordingState == RecordingState.RequestedStop)
{

writer.WriteData(buffer, 0, bytesRecorded);
}
}
REBUILD THE SOLUTION !!!
進入您的解決方案並刪除voicerecorder。音訊和核心dll。
Go to your solution and delete voicerecorder.audio and core DLLs.
新增引用並瀏覽到構建的voicerecorder專案的bin位置,並匯入這些DLL。看到voicerecorder專案是如何在我的桌面dll位置是。
Add refrences and Browse to bin location of the built voicerecorder project and import those DLL. Seeing how the voicerecorder project was on my desktop the dll location is.
C:\Users—\Desktop\voicerecorder_8c1b2512cf5a\bin\Debug
瞧,極限完全被去掉了。
Voila the limit is totaly removed.
上次修改時間: 10月 08, 2011 at 8:52上午
Denis
謝謝你!這正是我所需要的!
Thank you! It is exactly what I’ve needed!
上次修改時間: 10月 13, 2011 at 12:21上午
john
So what happened to: waveIn.DeviceNumber = selectedDevice;
我一直在想怎麼選裝置。我以為NAudio會讓捕捉麥克風音訊變得容易。不幸的是,似乎所有的示例都是在對DLL進行更改之前編寫的。
I’ve been trying to figure out how to select a device. I thought NAudio would make capturing mic audio easy. Unfortunately, it appears that all the examples were written befor the changes to the DLL.
好的,現在我該如何選擇音效卡呢?
OK, how do I select my sound card now?
上次修改時間: 1月 03, 2012 at 12:33下午
Daniel
@John -如果你注意到,在第一部分他給出了一個例子,如何看當前可用的裝置,之後,您可以使用他們的“id”返回waveInDevice方法,對於第一個示例,在大多數情況下是0(預設裝置)所以你需要設定waveIn。DeviceNumber = 0;在您的程式碼中。
@John - if you noticed, in the first part he gives an example of how to see the devices currently available, after that you can use their “id’s” returned by waveInDevice method in that for at the beginning of the example, in most of the cases will be 0 (default device) so actually you’ll need to set waveIn.DeviceNumber = 0; in your code.
上次修改時間: 1月 18, 2012 at 5:56上午
Ryan Smith
可能是一個非常無知的問題,但這是我第一次在這個網站上,有人能告訴我什麼是wavin,它從哪裡來的?非常感謝。
Probably a really really ignorant question but this is the first time I’ve been on this site, could someone please tell me what wavein is and where it has come from? Would be much appreciated.
上次修改時間: 1月 29, 2012 at 8:20上午