
IDEA springboot整合ueditor百度富文字編輯器詳細教程
第一步:建立 Mysql資料庫
注意:需要上傳多個檔案跟視訊的欄位名 型別要用 == text == (否則:會出現超出欄位名 儲存長度)
第二步:逆向工程 在IDEA 建立專案
這個就是普通的逆向生成 跟 IDEA建立專案
第三步:官網下載ueditor jsp版
解壓放在專案 目錄 static 下
第四步:把這段程式碼引入前端頁面
<!DOCTYPE html PUBLIC "-//W3C//DTD HTML 4.01 Transitional//EN" "http://www.w3.org/TR/html4/loose.dtd">

<html>
<head>
    <meta charset="UTF-8">
    <title>Title</title>
    <script type="text/javascript" src="/js/jquery.min.js"></script>
    <script type="text/javascript" charset="utf-8" src="/ueditor/ueditor.config.js"></script>
    <script type="text/javascript" charset="utf-8" src="/ueditor/ueditor.all.min.js"></script>
    <script type="text/javascript" charset="utf-8" src="/ueditor/lang/zh-cn/zh-cn.js"></script>


    <title>百度編輯器</title>

    <script type="text/javascript">
        //例項化編輯器
        //建議使用工廠方法getEditor建立和引用編輯器例項,如果在某個閉包下引用該編輯器,直接呼叫UE.getEditor('editor')就能拿到相關的例項
        UE.getEditor('editor');
    </script>
</head>
<body>

<h1>百度編輯器</h1>
<form action="save1" method="post" >
    <label>標題:</label>
    <input type="text" id="title" name="userName" >
    <strong><textarea id="editor" name="userPwd" style="width: 70%;height:400px;" > </textarea>
    </strong>    <input type="submit" id="Submit" value="提交">
</form>

</body>
</html>
第五步:修改原始碼,因為官方提供的是JSP,所以引入之後圖片上傳等一些功能無法使用
1.修改ueditor.config.js,防止大家懶得自己寫,給大家貼一下程式碼
var server_url = window.location.protocol+"//"+window.location.hostname+":"+window.location.port
serverUrl: server_url+"/config"
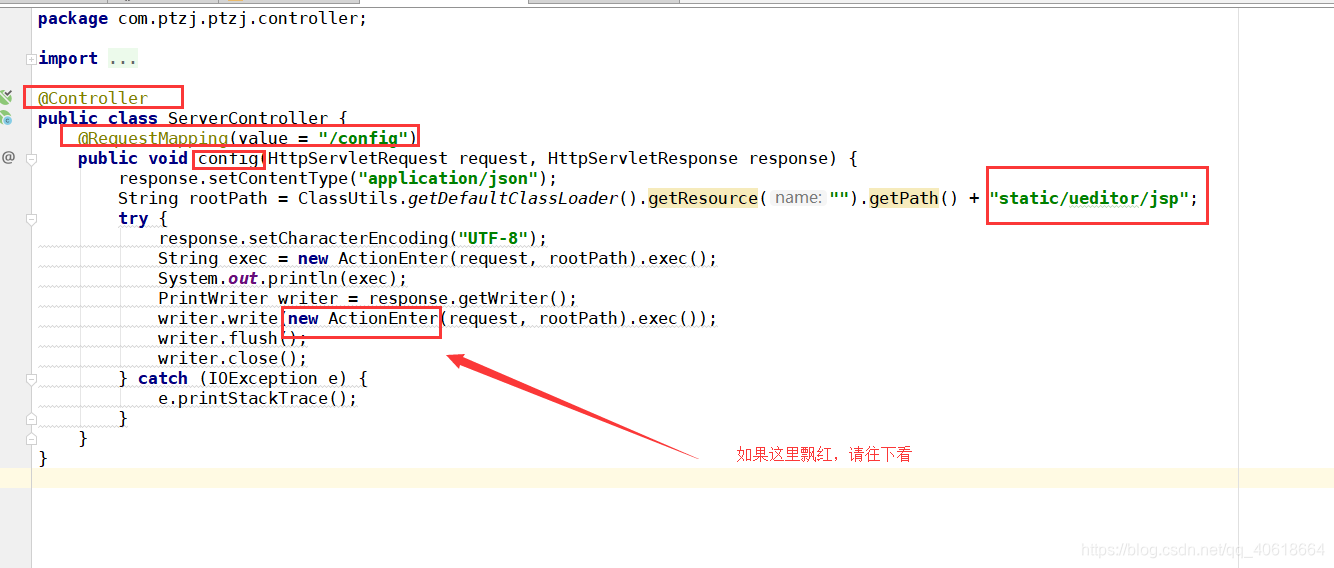
2.新增一個ServerController(一定要單獨建一個,不要在其他Controller裡寫)
程式碼:
@Controller
public class ServerController {
@RequestMapping(value = "/config")
public void config(HttpServletRequest request, HttpServletResponse response) {
response.setContentType("application/json");
String rootPath = ClassUtils.getDefaultClassLoader().getResource("").getPath() + "static/ueditor/jsp";
try {
response.setCharacterEncoding("UTF-8");
String exec = new ActionEnter(request, rootPath).exec();
System.out.println(exec);
PrintWriter writer = response.getWriter();
writer.write(new ActionEnter(request, rootPath).exec());
writer.flush();
writer.close();
} catch (IOException e) {
e.printStackTrace();
}
}
注意:
ActionEnter類是ueditor裡一個jar包的,新增以下依賴
<dependency>
<groupId>com.gitee.qdbp.thirdparty</groupId>
<artifactId>ueditor</artifactId>
<version>1.4.3.3</version>
</dependency>
需要匯入依賴的jar 包
最後一步:
填寫所有圖片訪問路徑字首為“/ueditor/jsp”,大概有七八個地方,否則多圖上傳,檔案上傳那些也是不可以使用