
[醫療資訊化][DICOM教程]1.使用Java的DICOM基礎-理解DICOM檔案-DICOM Basics using Java - Making Sense of the DICOM File
[醫療資訊化][DICOM教程]1.使用Java的DICOM基礎-理解DICOM檔案-DICOM Basics using Java - Making Sense of the DICOM File
使用Java的DICOM基礎-理解DICOM檔案
內容
- 介紹
- DICOM檔案內部的外觀
- 這些術語在DICOM中到底意味著什麼-SCU,SCP,SOP和IOD?
- PixelMed Java DICOM工具包-快速概述
- 在我們開始之前...
- 列出要控制檯的DICOM檔案的各種標籤
- 將所有DICOM檔案的標籤列出到控制檯
- 使用DICOM測試工具
- 結論
介紹
這是我有關DICOM標準的系列文章的一部分
我以為我將以DICOM檔案格式的非常高階的介紹開始有關DICOM的程式設計教程系列。請方便地使用此連結的官方DICOM標準文件,因為我在本教程中介紹的許多內容都在此處進行了詳細說明。
正如您在我的入門DICOM教程中所回憶的那樣,DICOM檔案通常使用標籤的概念(將在後面進行解釋)像其他影象格式(例如TIFF)一樣,在同一檔案中包含影象資料和有關患者的資料。但是,以DICOM詞典的形式儲存在DICOM檔案中的資訊比其他標準結構化和多樣化得多
大多數DICOM檔案(有時帶有'.dcm'副檔名-參見本文的腳註)通常包含影象資料,有時甚至可能包含多個影象(或在DICOM中通常稱為“幀”)以啟用以下功能:稱為電影迴圈,使DICOM觀看者可以將整個影象序列視覺化為電影。但是,DICOM檔案並不一定像大多數人所想的那樣是關於影象的,它還可以用於儲存其他資訊,例如報告,ECG訊號甚至音訊(我們將在後面介紹)。
“寫作是大自然的一種讓您知道自己的想法多麼草率的方式”〜理查德·金登(Richard Guindon)
在以下各節中,我們將首先了解DICOM檔案的基本結構(和語法),該檔案使可能在不同作業系統和裝置上執行的應用程式可以輕鬆地相互交換影象和與影象有關的資訊。然後,我們將使用免費提供但功能非常強大的DICOM工具箱,稱為PixelMed Java DICOM工具箱。來解析實際的DICOM檔案,並檢視其中的內容與我們所涵蓋的概念有關,從而有助於加深我們對所涵蓋概念的理解。請注意,DICOM檔案比我在這裡討論的要多得多,但是對於像我這樣的大多數使用工具箱或庫來處理DICOM檔案的開發人員來說,本教程和後面的其他資訊應包括足以快速啟動並執行。但是,如果您有興趣從頭開始編寫自己的DICOM解析器,則應詳細閱讀本文件。
DICOM檔案內部的外觀
每個DICOM檔案都由三個主要部分組成,現在我們來看一下每個部分在整體方案中所扮演的角色。
第一部分,檔案頭,由128位元組的檔案前導碼和4位元組的字首組成。這種方法在您可能已經看到/使用過的許多其他影象標準(例如TIFF)中非常普遍。4位元組字首由大寫字元“ DICM”組成(注意,它不是“ DICOM”,而是“ DICM”)。該標準不關心前導碼應如何構造以及應在其中儲存什麼。根據我的理解,使用檔案序言是為了確保處理應用程式像處理其他幾種現有影象檔案格式一樣處理DICOM檔案的相容性或一致性。該標準並不關心您在其中儲存的內容或使用方式。因此,從理論上講,如果您選擇解析DICOM檔案,則您的應用程式可以完全跳過此資料。
在檢視DICOM檔案的下一部分之前,需要先談談傳輸語法的概念及其在DICOM標準中的作用。如果您從我以前的教程中回想起,即使裝置執行在不同的作業系統上,DICOM標準也使裝置之間能夠相互傳輸資訊。不同的作業系統和裝置在儲存二進位制資料時遵循不同的格式來儲存資料,例如位元組順序。由於需要大量網路來交換由CT或MR等掃描方式生成的大影象,因此該標準還規定在必要時/在使用壓縮時交換影象資料。在我的DICOM入門教程中,我們還了解了隱式和顯式VR編碼也是如此。必須首先理解並達成所有三個標準(VR編碼的型別,位元組排序的型別和所使用的壓縮),以確保兩個交換資訊的DICOM系統在它們之間的任何通訊期間都能相互理解。傳輸語法是一組編碼規則,可通過使用UID來幫助指定此條件,我們在DICOM入門教程中也瞭解到。例如,隱式VR小端(由UID值1.2.840.10008.1.2表示),顯式VR小端(值-1.2.840.10008.1.2.1),顯式VR大端(值-1.2.840.10008 .1.2.2)和JPEG無損(值-1.2.840.10008.1.2.4.57)是DICOM處理可用的一些傳輸語法。在我的DICOM系列的後續教程中討論影象畫素資料處理時,我將更詳細地介紹這些內容。
既然我們已經瞭解了傳輸語法的簡要含義(還有更多內容,包括演示上下文,我將在以後的教程中介紹),讓我們看一下檔案的下一部分,即檔案元資訊標頭。本節緊隨檔案頭之後,由一個數據集組成,該資料集由一系列標記資訊(稱為“ Dicom元素”)組成,該序列指定諸如傳輸語法(如上所解釋)之類的詳細資訊以及有關裝置或實現的其他資訊建立此檔案的物件以及為誰建立此資訊的物件(接收應用程式)。有關詳細資訊,請參見本文件的第32頁。
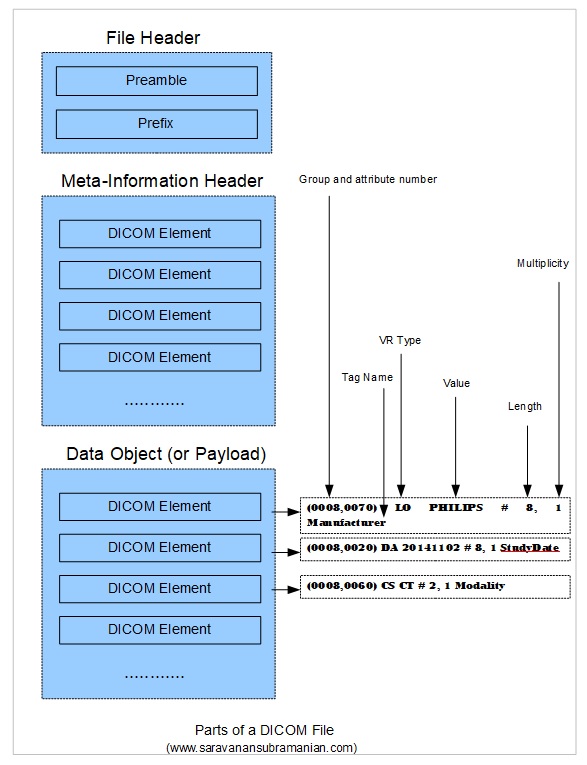
本節之後的內容是DICOM檔案的第三部分也是最後一部分,它是資料物件。DICOM檔案的此部分也以資料集的形式指定,該資料集由一系列標籤組成,這些標籤又可以巢狀並自身攜帶其他子標籤。這些標籤有助於攜帶有關SOP例項的資訊(請參閱我的入門教程對於SOP意味著什麼),例如研究,系列,其所屬的患者以及其他有關影象的細節,例如影象畫素資料,掃描位置資料等。研究,系列和患者資訊通常用於在大多數PACS系統中為影象建立索引,以便更快地檢索資料。我的下面的插圖有望提供整個檔案結構的概要,還顯示了各個DICOM元素(每個元素包括標籤和相關資訊)如何成為整個結構的一部分。
例如,在上面的插圖中所示的資料物件部分中的三個DICOM元素的第一個中,“(0008,0070)”表示屬於組號0008的標籤,其屬性號為0070,“ LO”表示資料型別或值表示(VR),DICOM稱之為它(LO表示長字串資料型別),“ PHILIPS”是標記的實際值,“#8”有助於指定值8的長度(請注意,DICOM始終使用偶數個字元對文字進行編碼,因此即使PHILIPS值只有7個字元長,也會使用一個額外的填充字元-稍後將對此進行詳細說明,1表示值的多重性此處(可以重複一些資料),“製造商”是DICOM詞典中指定的實際標籤名稱。組合的組和屬性編號,VR,值,值多重性和標籤名稱稱為DICOM元素。自DICOM字典以來(請參閱第23頁及以後)隱式定義與每個標籤關聯的VR,VR是多餘的,有時會被省略。儘管如此,一種常見的做法和建議是在將DICOM物件序列化為檔案或在網路上交換DICOM資訊時明確指定VR。當我在以後的教程中更詳細地討論傳輸語法時,將更詳細地介紹隱式傳輸語法(省略VR)和顯式傳輸語法(其中VR與標記一起指定)。現在,我們可以更好地瞭解什麼是IOD(資訊物件定義)。讓我們繼續。
這些術語在DICOM中到底意味著什麼-SCU,SCP,SOP和IOD?
DICOM定義了服務和服務使用或對其進行操作的資料的概念。服務的示例可以是CT儲存服務,它負責將從CT模態生成的影象儲存到PACS伺服器。服務分為兩部分,服務的使用者也稱為服務類使用者或SCU,服務的提供者也稱為服務類提供者或SCP。例如,在CT儲存操作中,生成影象的模態用作C儲存SCU並將要儲存的資料傳輸到PACS伺服器播放的C-Store SCP。在DICOM標準中,服務類和那些服務所涉及的物件的組合稱為服務物件對或SOP。SOP的抽象定義稱為SOP類,它們由唯一的識別符號(稱為UID)定義,我稍後將介紹(請參閱此連結以獲取SOP列表)。因此,由1.2.840.10008.5.1.4.1.1.2的SOP類UID標識的SOP CT影象儲存可幫助識別這是CT影象儲存操作。在所涉及的機器之間進行此操作期間,會交換命令(稱為DIMSE(我將在後面介紹)以及一些資料,其中包括影象畫素資訊以及其他識別資訊,例如患者,研究,系列和裝置資訊。這些操作的具體細節一起被稱為SOP例項。這些SOP例項中的每個例項也由唯一識別符號標識,但由負責傳輸它們的應用程式生成。這些識別符號稱為SOP例項UID。此SOP涉及的實際資料由IOD(資訊物件定義)定義,該IOD指定了要成功完成處理需要呈現哪些DICOM模組(模組本質上是DICOM元素組)。
IOD物件本身分為稱為資訊實體(縮寫為IE)的子組,而資訊實體又分為資訊模組的小組。資訊模組由我們已經看到的一系列DICOM元素組成。DICOM定義了有關強制性模組,有條件性模組和可選模組的規則。IOD本身分為歸一化IOD和複合IOD。標準化IOD僅表示與一個實體有關的資料,而複合IOD表示來自彼此相關的各種實體的混合物的資料,如下圖所示。總之,這本質上是DICOM資訊模型的整體結構。綜上所述,您現在將看到,到目前為止,我們處理的任何DICOM檔案實際上都是IOD(資訊的序列化版本)的例項,該IOD還在任何成像工作流程中在兩臺機器之間傳輸。在我們正在研究的情況下,該操作有助於將CT模態生成的影象儲存到PACS伺服器上。DICOM IOD和編碼要比這裡介紹的更多,但是在討論建立DICOM檔案和目錄時,我們將處理這些領域。我不想讓你無聊
PixelMed Java DICOM工具包-快速概述
為了說明我計劃在本教程系列中涵蓋的DICOM的許多方面,我將使用一個稱為PixelMed Java DICOM Toolkit的免費可用且功能強大的DICOM工具包。這是一個完全獨立的DICOM工具包,為DICOM檔案和目錄處理,影象檢視以及與DICOM網路相關的操作提供功能。該工具包對於商業或非營利性用途都是完全免費的。它有充分的文件記錄,還為使用者提供了一個小型討論論壇和一個郵件列表。該工具包中包含的功能列表非常全面。請記住,在我的教程中使用此工具包絕不表示我對實現生產應用程式的官方認可。每種情況都是獨特的,只有您最終處於最佳位置才能做出決定。本文也不是該工具包的教程,我在這裡的重點只是將DICOM理論與實際(儘管簡單)的實現方式聯絡起來。因此,如果您的目標是學習如何使用PixelMed庫,我鼓勵您訪問其網站或檢視討論論壇或StackOverflow討論頁面以尋求幫助。
在我們開始之前...
與之前的程式設計示例非常相似,我將使用最簡單的最少程式碼和方法來幫助說明本教程中介紹的概念。這意味著我在這裡編寫的程式碼最適合於簡單地顯示我試圖解釋的概念,並且不一定是在現實生活中和生產應用程式中部署的最有效的程式碼。
首先,您需要在計算機上配置一些東西,包括Java開發環境以及PixelMed工具包,然後才能執行示例(如果您想自己嘗試一下)。
-
從此處下載並安裝Eclipse Java IDE(或使用您喜歡的任何其他IDE)
-
從此處下載PixelMed工具包庫
-
確保Java專案的類路徑中包含PixelMed.jar庫(某些示例可能需要其他執行時依賴項,例如可以在PixelMed軟體下載中找到的JAI Image IO工具。尋找一個名為pixelmedjavadicom_dependencyrelease.YYYYMMDD.tar的tar壓縮檔案。 .bz2或類似名稱)
-
您可以在GitHub上找到本教程中使用的原始碼
-
您可以下載更多的DICOM影象從這個網站,如果你想和
列出要控制檯的DICOM檔案的各種標籤
使用PixelMed工具包讀取和提取DICOM標籤資訊非常簡單。此操作僅需要兩個類,即AttributeList和Attribute。該AttributeList中的類提供了讀取(和寫入)整個DICOM物件從檔案或流的屬性列表的方法。此類的建構函式採用您要處理的DICOM檔案的路徑。另一方面,Attribute類負責讀取和寫入DICOM屬性。下面顯示了使用這些類來顯示我們感興趣的DICOM元素。
    package com.saravanansubramanian.dicom.pixelmedtutorial;

    import com.pixelmed.dicom.Attribute;
    import com.pixelmed.dicom.AttributeList;
    import com.pixelmed.dicom.AttributeTag;
    import com.pixelmed.dicom.TagFromName;

    public class DumpDicomTagsToConsole {

        private static AttributeList list = new AttributeList();

        public static void main(String[] args) {
            String dicomFile = "D:\\JavaProjects\\Sample Images\\MR-MONO2-16-head";
            try {
                list.read(dicomFile);

                System.out.println("Study Instance UID:" + getTagInformation(TagFromName.StudyInstanceUID));
                System.out.println("Series Instance UID:" + getTagInformation(TagFromName.SeriesInstanceUID));
                System.out.println("SOP Class UID:" + getTagInformation(TagFromName.SOPClassUID));
                System.out.println("SOP Instance UID:" + getTagInformation(TagFromName.SOPInstanceUID));
                System.out.println("Transfer Syntax UID:" + getTagInformation(TagFromName.TransferSyntaxUID));

            } catch (Exception e) {
                e.printStackTrace(); //in real life, do something about this exception
            }
        }

        private static String getTagInformation(AttributeTag attrTag) {
            return Attribute.getDelimitedStringValuesOrEmptyString(list, attrTag);
        }

    }
執行以上程式碼的輸出如下所示:
Study Instance UID:1.2.840.113619.2.1.3352.2053053415.834484316
Series Instance UID:1.2.840.113619.2.1.3352.1136944889.4.834485379
SOP Class UID:1.2.840.10008.5.1.4.1.1.4
SOP Instance UID:1.2.840.113619.2.1.3352.1015047400.4.3.834485381
Transfer Syntax UID:1.2.840.10008.1.2
將所有DICOM檔案的標籤列出到控制檯
列出DICOM檔案的全部屬性很好,但是有時候,您只是想只顯示DICOM檔案中包含的特定標籤,包括組和屬性號,值表示(VR),值,值長度,值多重性和我在本教程前面介紹的標籤名稱資訊。通過使用PixelMed庫中包含的AttributeList類的toString方法,可以輕鬆實現此過程。該操作的程式碼說明如下所示。
    package com.saravanansubramanian.dicom.pixelmedtutorial;

    import com.pixelmed.dicom.AttributeList;

    public class DumpDicomFileContentsToConsole {

        public static void main(String[] args) {
            String dicomFile = "D:\\JavaProjects\\Sample Images\\MR-MONO2-16-head";
            try {
                AttributeList list = new AttributeList();
                list.read(dicomFile);
                System.out.println(list.toString());

            } catch (Exception e) {
                e.printStackTrace();
            }
        }
    }
執行以上程式碼的輸出如下所示:
(0x0002,0x0000) FileMetaInformationGroupLength VR=<UL> VL=<0x4> [0xba]
(0x0002,0x0001) FileMetaInformationVersion VR=<OB> VL=<0x2> []
(0x0002,0x0010) TransferSyntaxUID VR=<UI> VL=<0x12> <1.2.840.10008.1.2 >
(0x0002,0x0012) ImplementationClassUID VR=<UI> VL=<0x18> <1.2.276.0.7230010.3.1.2 >
(0x0002,0x0013) ImplementationVersionName VR=<SH> VL=<0x10> <OFFIS-DCMTK-301 >
(0x0008,0x0000) VR=<UN> VL=<0x4> [B@681a9515
(0x0008,0x0008) ImageType VR=<CS> VL=<0x10> <ORIGINAL\PRIMARY>
(0x0008,0x0016) SOPClassUID VR=<UI> VL=<0x1a> <1.2.840.10008.5.1.4.1.1.4 >
(0x0008,0x0018) SOPInstanceUID VR=<UI> VL=<0x30> <1.2.840.113619.2.1.3352.1015047400.4.3.834485381>
(0x0008,0x0020) StudyDate VR=<DA> VL=<0xa> <1996.06.11>
(0x0008,0x0021) SeriesDate VR=<DA> VL=<0xa> <1996.06.11>
(0x0008,0x0023) ContentDate VR=<DA> VL=<0xa> <1996.06.11>
(0x0008,0x0030) StudyTime VR=<TM> VL=<0x8> <09:11:56>
(0x0008,0x0031) SeriesTime VR=<TM> VL=<0x8> <09:29:39>
(0x0008,0x0033) ContentTime VR=<TM> VL=<0x8> <09:29:41>
(0x0008,0x0060) Modality VR=<CS> VL=<0x2> <MR>
(0x0008,0x0070) Manufacturer VR=<LO> VL=<0x12> <GE MEDICAL SYSTEMS>
(0x0008,0x0080) InstitutionName VR=<LO> VL=<0x20> <PALO ALTO MEDICAL FOUNDATION MRI>
(0x0008,0x0090) ReferringPhysicianName VR=<PN> VL=<0xa> <Anonymized>
(0x0008,0x1010) StationName VR=<SH> VL=<0x8> <MROCOC0 >
(0x0008,0x1030) StudyDescription VR=<LO> VL=<0x4> <HEAD>
(0x0008,0x103e) SeriesDescription VR=<LO> VL=<0x6> <FLAIR >
(0x0008,0x1060) NameOfPhysiciansReadingStudy VR=<PN> VL=<0xa> <Anonymized>
(0x0008,0x1070) OperatorsName VR=<PN> VL=<0xa> <Anonymized>
(0x0008,0x1090) ManufacturerModelName VR=<LO> VL=<0xe> <GENESIS_SIGNA >
(0x0010,0x0000) VR=<UN> VL=<0x4> [B@681a9515
(0x0010,0x0010) PatientName VR=<PN> VL=<0xa> <Anonymized>
(0x0018,0x0000) VR=<UN> VL=<0x4> [B@681a9515
(0x0018,0x0010) ContrastBolusAgent VR=<LO> VL=<0x4> <NONE>
(0x0018,0x0020) ScanningSequence VR=<CS> VL=<0x2> <RM>
(0x0018,0x0021) SequenceVariant VR=<CS> VL=<0x4> <NONE>
(0x0018,0x0022) ScanOptions VR=<CS> VL=<0x16> <GRAPH_GEMS\FC\EDR_GEMS>
(0x0018,0x0023) MRAcquisitionType VR=<CS> VL=<0x2> <2D>
(0x0018,0x0024) SequenceName VR=<SH> VL=<0x6> <flair >
(0x0018,0x0025) AngioFlag VR=<CS> VL=<0x2> <Y >
(0x0018,0x0050) SliceThickness VR=<DS> VL=<0x8> <5.000000>
(0x0018,0x0080) RepetitionTime VR=<DS> VL=<0xc> <10002.000000>
(0x0018,0x0081) EchoTime VR=<DS> VL=<0xa> <159.500000>
(0x0018,0x0083) NumberOfAverages VR=<DS> VL=<0x8> <1.000000>
(0x0018,0x0084) ImagingFrequency VR=<DS> VL=<0xe> <63.8609400000 >
(0x0018,0x0085) ImagedNucleus VR=<SH> VL=<0x2> <H1>
(0x0018,0x0086) EchoNumbers VR=<IS> VL=<0x2> <1 >
(0x0018,0x0087) MagneticFieldStrength VR=<DS> VL=<0x6> <15000 >
(0x0018,0x0088) SpacingBetweenSlices VR=<DS> VL=<0x8> <6.000000>
(0x0018,0x0091) EchoTrainLength VR=<IS> VL=<0x2> <0 >
(0x0018,0x0093) PercentSampling VR=<DS> VL=<0xa> <100.000000>
(0x0018,0x0094) PercentPhaseFieldOfView VR=<DS> VL=<0xa> <100.000000>
(0x0018,0x0095) PixelBandwidth VR=<DS> VL=<0xa> <167.187500>
(0x0018,0x1020) SoftwareVersions VR=<LO> VL=<0x2> <04>
(0x0018,0x1050) SpatialResolution VR=<DS> VL=<0x12> <1.145833\0.859375 >
(0x0018,0x1088) HeartRate VR=<IS> VL=<0x2> <0 >
(0x0018,0x1090) CardiacNumberOfImages VR=<IS> VL=<0x2> <0 >
(0x0018,0x1094) TriggerWindow VR=<IS> VL=<0x2> <0 >
(0x0018,0x1100) ReconstructionDiameter VR=<DS> VL=<0xe> <220.0000000000>
(0x0018,0x1250) ReceiveCoilName VR=<SH> VL=<0x4> <HEAD>
(0x0018,0x1251) TransmitCoilName VR=<SH> VL=<0x4> <HEAD>
(0x0018,0x1312) InPlanePhaseEncodingDirection VR=<CS> VL=<0x4> <COL >
(0x0018,0x1314) FlipAngle VR=<DS> VL=<0x2> <90>
(0x0018,0x1315) VariableFlipAngleFlag VR=<CS> VL=<0x2> <N >
(0x0018,0x1316) SAR VR=<DS> VL=<0x8> <0.015446>
(0x0018,0x5100) PatientPosition VR=<CS> VL=<0x4> <HFS >
(0x0020,0x0000) VR=<UN> VL=<0x4> [B@681a9515
(0x0020,0x000d) StudyInstanceUID VR=<UI> VL=<0x2c> <1.2.840.113619.2.1.3352.2053053415.834484316>
(0x0020,0x000e) SeriesInstanceUID VR=<UI> VL=<0x2e> <1.2.840.113619.2.1.3352.1136944889.4.834485379>
(0x0020,0x0011) SeriesNumber VR=<IS> VL=<0x2> <4 >
(0x0020,0x0012) AcquisitionNumber VR=<IS> VL=<0x2> <1 >
(0x0020,0x0013) InstanceNumber VR=<IS> VL=<0x2> <3 >
(0x0020,0x0032) ImagePositionPatient VR=<DS> VL=<0x24> <-110.000000\ -109.800003\-47.500000 >
(0x0020,0x1040) PositionReferenceIndicator VR=<LO> VL=<0x2> <NA>
(0x0020,0x1041) SliceLocation VR=<DS> VL=<0xe> <-47.5000000000>
(0x0028,0x0000) VR=<UN> VL=<0x4> [B@681a9515
(0x0028,0x0002) SamplesPerPixel VR=<US> VL=<0x2> [0x1]
(0x0028,0x0004) PhotometricInterpretation VR=<CS> VL=<0xc> <MONOCHROME2 >
(0x0028,0x0010) Rows VR=<US> VL=<0x2> [0x100]
(0x0028,0x0011) Columns VR=<US> VL=<0x2> [0x100]
(0x0028,0x0030) PixelSpacing VR=<DS> VL=<0x12> <0.859375\0.859375 >
(0x0028,0x0100) BitsAllocated VR=<US> VL=<0x2> [0x10]
(0x0028,0x0101) BitsStored VR=<US> VL=<0x2> [0x10]
(0x0028,0x0102) HighBit VR=<US> VL=<0x2> [0xf]
(0x0028,0x0103) PixelRepresentation VR=<US> VL=<0x2> [0x1]
(0x7fe0,0x0000) VR=<UN> VL=<0x4> [B@681a9515
(0x7fe0,0x0010) PixelData VR=<OW> VL=<0x20000>
使用DICOM測試工具
如果您想深入研究這一領域,可以使用許多有用的DICOM測試工具之一。我過去使用過並喜歡的一個是DCMTK。該工具包附帶許多獨立的測試實用程式,可幫助您通過命令列介面測試與DICOM處理相關的各個方面。在示例DICOM檔案上執行dcmdump命令將導致輸出,如下所示。
c:\DicomTestingTools\DCMTK-3.6.3-Win64-Dynamic\bin>dcmdump.exe sampledicomfile.dcm

# Dicom-File-Format

# Dicom-Meta-Information-Header
# Used TransferSyntax: Little Endian Explicit
(0002,0000) UL 184                                      #   4, 1 FileMetaInformationGroupLength
(0002,0001) OB 00\01                                    #   2, 1 FileMetaInformationVersion
(0002,0002) UI =OphthalmicPhotography8BitImageStorage   #  32, 1 MediaStorageSOPClassUID
(0002,0003) UI [2.25.101703809854595919801950834747690813074] #  44, 1 MediaStorageSOPInstanceUID
(0002,0010) UI =LittleEndianExplicit                    #  20, 1 TransferSyntaxUID
(0002,0012) UI [1.3.6.1.4.1.30071.8]                    #  20, 1 ImplementationClassUID
(0002,0013) SH [fo-dicom 4.0.1]                         #  14, 1 ImplementationVersionName

# Dicom-Data-Set
# Used TransferSyntax: Little Endian Explicit
(0008,0008) CS [ORIGINAL\PRIMARY]                       #  16, 2 ImageType
(0008,0016) UI =OphthalmicPhotography8BitImageStorage   #  32, 1 SOPClassUID
(0008,0018) UI [2.25.101703809854595919801950834747690813074] #  44, 1 SOPInstanceUID
(0008,0020) DA [20200501]                               #   8, 1 StudyDate
(0008,002a) DT [20200501071652]                         #  14, 1 AcquisitionDateTime
(0008,0030) TM [071652]                                 #   6, 1 StudyTime
(0008,0050) SH [125]                                    #   4, 1 AccessionNumber
(0008,0060) CS [US]                                     #   2, 1 Modality
(0008,0061) CS [OP]                                     #   2, 1 ModalitiesInStudy
(0008,0070) LO [Medicolle]                              #  10, 1 Manufacturer
(0008,0080) LO [Test Hospital]                          #  14, 1 InstitutionName
(0008,0081) ST (no value available)                     #   0, 0 InstitutionAddress
(0008,0090) PN [Fergusson^^^Dr]                         #  14, 1 ReferringPhysicianName
(0008,1010) SH [AdvancedCapture]                        #  16, 1 StationName
(0008,1030) LO (no value available)                     #   0, 0 StudyDescription
(0008,1090) LO [AdvancedCapture]                        #  16, 1 ManufacturerModelName
(0010,0010) PN [Bowen^William^^Dr]                      #  18, 1 PatientName
(0010,0020) LO [PAT004]                                 #   6, 1 PatientID
(0010,0030) DA [19560807]                               #   8, 1 PatientBirthDate
(0010,0040) CS [M]                                      #   2, 1 PatientSex
(0010,1030) DS (no value available)                     #   0, 0 PatientWeight
(0018,1000) LO (no value available)                     #   0, 0 DeviceSerialNumber
(0018,1020) LO [AdvancedCapture 3.0.7425.23917]         #  30, 1 SoftwareVersions
(0018,106a) CS [NO TRIGGER]                             #  10, 1 SynchronizationTrigger
(0018,1800) CS [N]                                      #   2, 1 AcquisitionTimeSynchronized
(0020,000d) UI [1.2.826.0.1.3680043.11.106]             #  26, 1 StudyInstanceUID
(0020,000e) UI [2.25.103253814587692535336175589446854494919] #  44, 1 SeriesInstanceUID
(0020,0010) SH [1]                                      #   2, 1 StudyID
(0020,0011) IS [1]                                      #   2, 1 SeriesNumber
(0020,0013) IS [1]                                      #   2, 1 InstanceNumber
(0020,0020) CS [F\A]                                    #   4, 2 PatientOrientation
(0020,0062) CS [R]                                      #   2, 1 ImageLaterality
(0020,0200) UI =UniversalCoordinatedTimeSynchronizationFrameOfReference #  20, 1 SynchronizationFrameOfReferenceUID
(0020,1206) IS [1]                                      #   2, 1 NumberOfStudyRelatedSeries
(0020,1208) IS [1]                                      #   2, 1 NumberOfStudyRelatedInstances
(0020,1209) IS [1]                                      #   2, 1 NumberOfSeriesRelatedInstances
(0022,000a) FL 0                                        #   4, 1 EmmetropicMagnification
(0022,000c) FL 0                                        #   4, 1 HorizontalFieldOfView
(0022,000e) FL 0                                        #   4, 1 DegreeOfDilation
(0022,0015) SQ (Sequence with undefined length #=1)     # u/l, 1 AcquisitionDeviceTypeCodeSequence
  (fffe,e000) na (Item with undefined length #=1)         # u/l, 1 Item
    (0008,0104) LO (no value available)                     #   0, 0 CodeMeaning
  (fffe,e00d) na (ItemDelimitationItem)                   #   0, 0 ItemDelimitationItem
(fffe,e0dd) na (SequenceDelimitationItem)               #   0, 0 SequenceDelimitationItem
(0022,0016) SQ (Sequence with undefined length #=1)     # u/l, 1 IlluminationTypeCodeSequence
  (fffe,e000) na (Item with undefined length #=0)         # u/l, 1 Item
  (fffe,e00d) na (ItemDelimitationItem)                   #   0, 0 ItemDelimitationItem
(fffe,e0dd) na (SequenceDelimitationItem)               #   0, 0 SequenceDelimitationItem
(0022,0019) SQ (Sequence with undefined length #=1)     # u/l, 1 LensesCodeSequence
  (fffe,e000) na (Item with undefined length #=0)         # u/l, 1 Item
  (fffe,e00d) na (ItemDelimitationItem)                   #   0, 0 ItemDelimitationItem
(fffe,e0dd) na (SequenceDelimitationItem)               #   0, 0 SequenceDelimitationItem
(0028,0002) US 3                                        #   2, 1 SamplesPerPixel
(0028,0004) CS [RGB]                                    #   4, 1 PhotometricInterpretation
(0028,0006) US 0                                        #   2, 1 PlanarConfiguration
(0028,0008) IS [1]                                      #   2, 1 NumberOfFrames
(0028,0010) US 1920                                     #   2, 1 Rows
(0028,0011) US 1920                                     #   2, 1 Columns
(0028,0100) US 8                                        #   2, 1 BitsAllocated
(0028,0101) US 8                                        #   2, 1 BitsStored
(0028,0102) US 7                                        #   2, 1 HighBit
(0028,0103) US 0                                        #   2, 1 PixelRepresentation
(0040,0555) SQ (Sequence with undefined length #=1)     # u/l, 1 AcquisitionContextSequence
  (fffe,e000) na (Item with undefined length #=0)         # u/l, 1 Item
  (fffe,e00d) na (ItemDelimitationItem)                   #   0, 0 ItemDelimitationItem
(fffe,e0dd) na (SequenceDelimitationItem)               #   0, 0 SequenceDelimitationItem
(7fe0,0010) OB 00\00\00\00\00\00\00\00\00\00\00\00\00\00\00\00\00\00\00\00\00\00... # 11059200, 1 PixelData

c:\DicomTestingTools\DCMTK-3.6.3-Win64-Dynamic\bin>
結論
這就對了。這就是對DICOM檔案進行一些基本處理的全部。希望本入門教程可以幫助您瞭解DICOM檔案中包含的內容。我沒有涉及如何提取儲存在我們處理過的DICOM檔案中的影象畫素資料。我希望在不久的將來在單獨的教程中進行介紹。但是,在我的下一個DICOM教程中,我將向您展示如何使用影象以及一些相關資訊從頭開始編碼/建立DICOM檔案。如果您對本教程有任何疑問或意見,請隨時給我傳送電子郵件。請注意,由於工作和其他承諾,我可能不會立即與您聯絡。
腳註:DICOM標準將包含在其中的檔名/識別符號限制為8個字元(僅大寫字母字元和數字),以符合傳統/歷史要求。它還指出,不得從這些名稱推斷/提取任何資訊。當檔名儲存為CD或DVD等媒體的一部分時,副檔名通常沒有.dcm副檔名。我使用更長的名稱來防止這些細節現在分散注意力,但是我仍然想提及標準在這裡宣告的內容,以免造成混淆。
DICOM Basics using Java - Making Sense of the DICOM File
CONTENTS
- Introduction
- A Look inside the DICOM File
- What do these terms really mean in DICOM - SCU, SCP, SOP and IOD?
- The PixelMed Java DICOM Toolkit - Quick Overview
- Before We Get Started…
- Listing Various Tags of a DICOM file to Console
- Listing All Tags of a DICOM file to Console
- Using DICOM Testing Tools
- Conclusion
Introduction
This is part ofmy series of articles on the DICOM standard. Before we get started on this tutorial, have a quick look at my earlier article titled“Introduction to the DICOM Standard”for a short and quick introduction to the standard. Please note that this tutorial assumes that you know Java (or any equivalent object-oriented language such as C# or C++).
I thought I will start this programming tutorial series on DICOM with an very high-level introduction to the DICOM file format. Please keep theofficial DICOM standard document at this linkhandy as many things I cover in this tutorial are explained in more detail there.
As you recall from my introductory DICOM tutorial, a DICOM file often contains image data and data about the patient in the same file using the concept oftags(to be explained later) like other image formats such as TIFF. However, the information stored in the DICOM file is far more structured and diverse than other standards in the form of aDICOM Dictionary. This dictionary(see page 23 of this document)to get an idea how comprehensive it is) which contains several thousand of these tags helps us encode information such as when and where the image was taken, who it belongs to, referring physician and even diagnosis information along with core image data. This minimizes the risk of attributing some critical healthcare information to a wrong patient.
Most DICOM files (sometimes seen with a '.dcm' extension - see footnote of this article) usually contain image data, and may sometimes even contain multiple images (or“frames”as they are often referred to in DICOM) to enable what is called acine-loopwhich allows a DICOM viewer to visualize the entire sequence of images as a movie. However, DICOM files don’t necessarily have to be about images as most people assume and may be used to store other information such as reports, ECG signals and even audio (which we will cover later) as well.
“Writing is nature’s way of letting you know how sloppy your thinking is” ~ Richard Guindon
In the sections that follow below, we will first understand the basic structure (and syntax) of the DICOM file which permits applications that may be running on different operating systems and devices to exchange image and image-related information with one another easily. We will then use a freely available but extremely powerful DICOM toolkit calledPixelMed Java DICOM toolkitto parse an actual DICOM file and see the content inside it relating back to the concepts we covered to help reinforce our understanding of the concepts covered. Please note that there is far more to the DICOM file than what I cover here, but for most developers like me who deal with processing of DICOM files using a toolkit or library, the information provided in this tutorial and others that follow should be more than sufficient to be up and running quickly. However, if you are interested in writing your own DICOM parser from scratch, you shouldread this document in detail.
A Look inside the DICOM File
Every DICOM file consists of three major parts, and we will now look at the role that each part plays in the overall scheme of things.
The first part, thefile header, consists of a 128-byte file preamble followed by a 4-byte prefix. This approach is very common in many other image standards such as TIFF that you may have already seen/used. The 4-byte prefix consists of the uppercase characters 'DICM' (note, it is not “DICOM”, but “DICM”). The standard does not care how the preamble should be structured and what should be stored in it. The use of the file preamble from my understanding is to simply ensure compatibility or consistency for the processing application to deal with DICOM files just like several other existing image file formats. The standard does not care about what you store in it or how you use it.So, in theory, your application could completely skip over this data when parsing the DICOM file if you chose to.
Before we look at the next part of the DICOM file, something needs to be said about the concept oftransfer syntaxand its role in the DICOM standard. If you recall from my earlier tutorial, the DICOM standard enables devices to transfer information with each other even if they are running on different operating systems. Different operating systems and devices follow different formats for storing data such asbyte orderingwhen they store binary data. Due to heavy network requirements for exchange of large imagery generated from the scanning modalities such as CT or MR, the standard also has provisions to exchange image data using compression when/if necessary. Inmy introductory tutorial on DICOM, we also learnt about implicit and explicitVR encodingas well. All three criteria (the type of VR encoding, the type of byte ordering and the compression utilized) must first be understood and agreed upon to ensure that the two DICOM systems exchanging information understand each other during any communication between them. The transfer syntax is a set of encoding rules that helps specify this criteria through the use of UIDs which we also learnt about inmy introductory tutorial on DICOM. For example, Implicit VR Little-endian (indicated by an UID value of 1.2.840.10008.1.2), Explicit VR Little-endian (value - 1.2.840.10008.1.2.1), Explicit VR Big-endian (value - 1.2.840.10008.1.2.2) and JPEG Lossless (value - 1.2.840.10008.1.2.4.57) are some of the transfer syntaxes available for DICOM processing. I will cover these in more detail when discussing image pixel data processing in a future tutorial in my DICOM series.
Now that we understand what transfer syntax is in brief (there is more to this includingpresentation contextwhich I will cover in a later tutorial), let us look at the next part of the file namely thefile meta-information header. This section follows immediately after the file header and consists of a data set consisting of a sequence of tagged information (called“Dicom Elements”) which specifies details such as the transfer syntax (explained above) as well as other information regarding the device or implementation that created this file and for whom this information was created for (the receiving application). SeePage 32 of this documentfor detailed information.
Following this section is the third and last part of the DICOM file and is thedata object. This part of the DICOM file is also specified in the form of a data set consisting of a series of tags which may in turn be nested and carry additional child tags themselves. These tags help carry information about the SOP instance (seemy introductory tutorialfor what SOP means) such as the study, the series, the patient that it belongs to as well as other details regarding the image such as image pixel data, scan position data, etc. The study, series and patient information is often used to index the image in most PACS systems for faster retrieval of data. My illustration below should hopefully provide a synopsis of the overall file structure also showing how individual DICOM elements (each element includes the tag and the associated information) are part of the whole structure.
For example, in the first of the three DICOM elements in the data object section shown in my illustration above, ‘(0008, 0070)’ indicates a tag belonging togroup number of 0008 with an attribute number of 0070, the ‘LO’ indicates the data type or theValue Representation (VR)as DICOM calls it (LO refers to theLong Stringdata type), ‘PHILIPS’ is the actual value of the tag, ‘#8’ helps specify the length of the value of 8 (please note that DICOM always encodes data using an even number of characters for text so an extra padding character is used even though the valuePHILIPSis only 7 characters long - more on this later), 1 represents thevalue multiplicityhere (some data can be repeated), and ‘Manufacturer’ is the actual tag name as specified within the DICOM dictionary. The group and attribute number, the VR, the value, the value multiplicity and the tag name combined are referred to as anDICOM Element. Since the DICOM dictionary(see page 23 and onwards)implicitly defines the VR associated with each tag, the VR is redundant and is sometimes omitted. Despite this, a common practice and recommendation is to explicitly specify the VR when serializing DICOM objects into files or when exchanging DICOM information across the network. When I discuss the transfer syntax in more detail in a later tutorial, I will cover both the implicit transfer syntax (where VR is omitted) and the explicit transfer syntax (where the VR is specified along with the tag) in more detail. Now, we are in a better position to understand what anIOD (Information Object Definition)is. Let us proceed.
What do these terms really mean in DICOM - SCU, SCP, SOP and IOD?
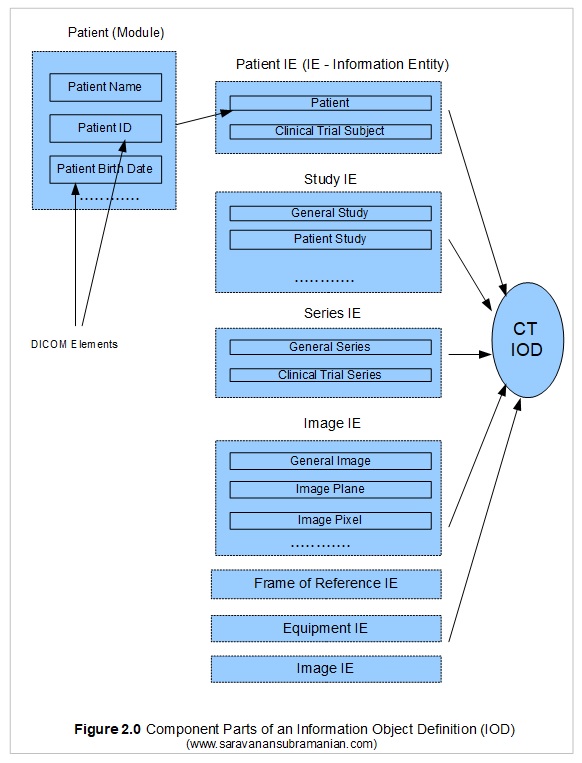
DICOM defines the concepts of services and data that the services use or act upon. An example of a service may be a CT Store service which is responsible for storing an image generated from a CT modality to a PACS server. There are two parts to the service, the consumer of the service also known as aService Class UserorSCU, and the provider of the service also known as aService Class ProviderorSCP. In the CT Store operation for instance, the modality that generates the image acts as aC-Store SCUand transmits the data for storage to the C-Store SCP which is played by the PACS server. In the DICOM standard, the combination of the service classes and the objects that are involved with those services are known asService Object PairsorSOPs. The abstract definition of an SOP is called aSOP Class, and these are defined by unique identifiers (calledUIDs) which I cover soon (see this link for a list of SOPs). So, the SOP CT Image Storage which is identified by a SOP Class UID of 1.2.840.10008.5.1.4.1.1.2 helps identify that this is a CT Image Storage operation. During this operation between the machines involved, there is an exchange of commands (calledDIMSEswhich I cover later) as well as some data which includes the image pixel information along with other identifying information such as patient, study, series and equipment information. Together, these concrete details for that operation are known as aSOP Instance. Each of these SOP instances are also identified by an unique identifier but are generated by the application responsible for transmitting them. These identifiers are calledSOP Instance UIDs. The actual data involved with this SOP is defined by anIOD (Information Object Definition)specifying what DICOM modules (modules are essentially groups of DICOM elements) need to be present for successful completion of processing.
The IOD objects are themselves broken into sub groups calledInformation Entities(abbreviated to IE), and the Information Entities are in return broken into small groups ofInformation Modules. The Information Modules comprise of a series ofDICOM elementswhich we have already seen. DICOM defines rules on what modules are mandatory, what are conditionally present as well as what are optional. The IODs themselves are classified intoNormalized IODsandComposite IODs. Normalized IODs represent data pertaining to one entity only whereas Composite IODs represents data from a mixture of various entities that are related to one another as shown in my illustration below. This is essentially the grand structure of DICOM information model in summary. Putting this all together you will now see that any DICOM file that we have dealt so far is really an instance of an IOD (a serialized version of information) that is also transmitted between two machines during any imaging workflow. And in the case we were looking at, the operation to help store an image generated by a CT modality onto a PACS server. There is more to DICOM IODs and encoding than what is covered here, but we will deal with those areas when discussing creating DICOM files and directories. I didn’t want to bore you to death, but this is all you need to know for now.
The PixelMed Java DICOM Toolkit - Quick Overview
For the purposes of illustrating many aspects of DICOM that I plan to cover in this tutorial series, I will be using a freely available and powerful DICOM toolkit calledPixelMed Java DICOM Toolkit. This is a completely stand-alone DICOM toolkit that provides functionality for DICOM file and directory processing, image viewing as well as DICOM networking-related operations. This toolkit is completely free for both commercial or non-profit use. It iswell documentedand also has asmall discussion forum and mailing list for users. The list of features contained within this toolkit is quite comprehensive. Please keep in mind that the use of this toolkit in my tutorial does not in anyway imply my official endorsement of it for implementing a production application. Every situation is unique, and only you are ultimately in the best position to decide that. This article is also not meant to be a tutorial on this toolkit, and my focus here is simply to tie DICOM theory to what a practical (although simple) implementation might look like. So, if your goal is to learn how to use the PixelMed library, I would encourage you to visitits websiteor check out thediscussion forumorStackOverflow discussion pagesfor any assistance.
Before We Get Started…
Much like my previous programming examples, I will use the most bare minimum code and approach to help illustrate the concepts that I cover in this tutorial. This means that the code I write here is best suited to simply show the concept that I am trying to explain and is not necessarily the most efficient code to deploy in real life and in your production application.
To get started, you will need to configure a few things on your machine including a Java development environment as well as the PixelMed toolkit before you can run the example if you want to try this out yourself.
-
Download and install the Eclipse Java IDEfrom here(or use any other IDE you prefer)
-
Download the PixelMed toolkit library fromhere
-
Ensure that the PixelMed.jar library is included in your Java project’s class path (some examples may require additonalruntime dependenciessuch as JAI Image IO Tools that can be found on PixelMed software download. Look for a tar compressed file called pixelmedjavadicom_dependencyrelease.YYYYMMDD.tar.bz2 or something similar)
-
You can find the source code used in this tutorialon GitHub
-
You can download more DICOM imagesfrom this siteif you want as well
Listing Various Tags of a DICOM file to Console
To read and extract the DICOM tag information using the PixelMed toolkit is pretty straightforward. There are only two classes needed for this operation namelyAttributeListandAttribute. TheAttributeListclass provides methods for reading (and writing) entire DICOM objects as a list of attributes from files or from streams. The constructor of this class takes the path to the DICOM file you want to process. TheAttributeclass on the other hand deals with reading and writing DICOM attributes. The use of these classes to display the DICOM elements that are of interest to us is shown below.
    package com.saravanansubramanian.dicom.pixelmedtutorial;

    import com.pixelmed.dicom.Attribute;
    import com.pixelmed.dicom.AttributeList;
    import com.pixelmed.dicom.AttributeTag;
    import com.pixelmed.dicom.TagFromName;

    public class DumpDicomTagsToConsole {

        private static AttributeList list = new AttributeList();

        public static void main(String[] args) {
            String dicomFile = "D:\\JavaProjects\\Sample Images\\MR-MONO2-16-head";
            try {
                list.read(dicomFile);

                System.out.println("Study Instance UID:" + getTagInformation(TagFromName.StudyInstanceUID));
                System.out.println("Series Instance UID:" + getTagInformation(TagFromName.SeriesInstanceUID));
                System.out.println("SOP Class UID:" + getTagInformation(TagFromName.SOPClassUID));
                System.out.println("SOP Instance UID:" + getTagInformation(TagFromName.SOPInstanceUID));
                System.out.println("Transfer Syntax UID:" + getTagInformation(TagFromName.TransferSyntaxUID));

            } catch (Exception e) {
                e.printStackTrace(); //in real life, do something about this exception
            }
        }

        private static String getTagInformation(AttributeTag attrTag) {
            return Attribute.getDelimitedStringValuesOrEmptyString(list, attrTag);
        }

    }
Output of running the code above is shown below:
Study Instance UID:1.2.840.113619.2.1.3352.2053053415.834484316
Series Instance UID:1.2.840.113619.2.1.3352.1136944889.4.834485379
SOP Class UID:1.2.840.10008.5.1.4.1.1.4
SOP Instance UID:1.2.840.113619.2.1.3352.1015047400.4.3.834485381
Transfer Syntax UID:1.2.840.10008.1.2
Listing All Tags of a DICOM file to Console
Listing the DICOM file’s entire attributes is fine, but sometimes, you simply want to selectively display only specific tags contained in the DICOM file including the group and attribute number, the value representation (VR), the value, the value length, value multiplicity and the tag name information which I described earlier in this tutorial. This process is easily achieved by using thetoStringmethod ofAttributeListclass contained in the PixelMed library. Code illustration of the operation is show below.
    package com.saravanansubramanian.dicom.pixelmedtutorial;

    import com.pixelmed.dicom.AttributeList;

    public class DumpDicomFileContentsToConsole {

        public static void main(String[] args) {
            String dicomFile = "D:\\JavaProjects\\Sample Images\\MR-MONO2-16-head";
            try {
                AttributeList list = new AttributeList();
                list.read(dicomFile);
                System.out.println(list.toString());

            } catch (Exception e) {
                e.printStackTrace();
            }
        }
    }
Output of running the code above is shown below:
(0x0002,0x0000) FileMetaInformationGroupLength VR=<UL> VL=<0x4> [0xba]
(0x0002,0x0001) FileMetaInformationVersion VR=<OB> VL=<0x2> []
(0x0002,0x0010) TransferSyntaxUID VR=<UI> VL=<0x12> <1.2.840.10008.1.2 >
(0x0002,0x0012) ImplementationClassUID VR=<UI> VL=<0x18> <1.2.276.0.7230010.3.1.2 >
(0x0002,0x0013) ImplementationVersionName VR=<SH> VL=<0x10> <OFFIS-DCMTK-301 >
(0x0008,0x0000) VR=<UN> VL=<0x4> [B@681a9515
(0x0008,0x0008) ImageType VR=<CS> VL=<0x10> <ORIGINAL\PRIMARY>
(0x0008,0x0016) SOPClassUID VR=<UI> VL=<0x1a> <1.2.840.10008.5.1.4.1.1.4 >
(0x0008,0x0018) SOPInstanceUID VR=<UI> VL=<0x30> <1.2.840.113619.2.1.3352.1015047400.4.3.834485381>
(0x0008,0x0020) StudyDate VR=<DA> VL=<0xa> <1996.06.11>
(0x0008,0x0021) SeriesDate VR=<DA> VL=<0xa> <1996.06.11>
(0x0008,0x0023) ContentDate VR=<DA> VL=<0xa> <1996.06.11>
(0x0008,0x0030) StudyTime VR=<TM> VL=<0x8> <09:11:56>
(0x0008,0x0031) SeriesTime VR=<TM> VL=<0x8> <09:29:39>
(0x0008,0x0033) ContentTime VR=<TM> VL=<0x8> <09:29:41>
(0x0008,0x0060) Modality VR=<CS> VL=<0x2> <MR>
(0x0008,0x0070) Manufacturer VR=<LO> VL=<0x12> <GE MEDICAL SYSTEMS>
(0x0008,0x0080) InstitutionName VR=<LO> VL=<0x20> <PALO ALTO MEDICAL FOUNDATION MRI>
(0x0008,0x0090) ReferringPhysicianName VR=<PN> VL=<0xa> <Anonymized>
(0x0008,0x1010) StationName VR=<SH> VL=<0x8> <MROCOC0 >
(0x0008,0x1030) StudyDescription VR=<LO> VL=<0x4> <HEAD>
(0x0008,0x103e) SeriesDescription VR=<LO> VL=<0x6> <FLAIR >
(0x0008,0x1060) NameOfPhysiciansReadingStudy VR=<PN> VL=<0xa> <Anonymized>
(0x0008,0x1070) OperatorsName VR=<PN> VL=<0xa> <Anonymized>
(0x0008,0x1090) ManufacturerModelName VR=<LO> VL=<0xe> <GENESIS_SIGNA >
(0x0010,0x0000) VR=<UN> VL=<0x4> [B@681a9515
(0x0010,0x0010) PatientName VR=<PN> VL=<0xa> <Anonymized>
(0x0018,0x0000) VR=<UN> VL=<0x4> [B@681a9515
(0x0018,0x0010) ContrastBolusAgent VR=<LO> VL=<0x4> <NONE>
(0x0018,0x0020) ScanningSequence VR=<CS> VL=<0x2> <RM>
(0x0018,0x0021) SequenceVariant VR=<CS> VL=<0x4> <NONE>
(0x0018,0x0022) ScanOptions VR=<CS> VL=<0x16> <GRAPH_GEMS\FC\EDR_GEMS>
(0x0018,0x0023) MRAcquisitionType VR=<CS> VL=<0x2> <2D>
(0x0018,0x0024) SequenceName VR=<SH> VL=<0x6> <flair >
(0x0018,0x0025) AngioFlag VR=<CS> VL=<0x2> <Y >
(0x0018,0x0050) SliceThickness VR=<DS> VL=<0x8> <5.000000>
(0x0018,0x0080) RepetitionTime VR=<DS> VL=<0xc> <10002.000000>
(0x0018,0x0081) EchoTime VR=<DS> VL=<0xa> <159.500000>
(0x0018,0x0083) NumberOfAverages VR=<DS> VL=<0x8> <1.000000>
(0x0018,0x0084) ImagingFrequency VR=<DS> VL=<0xe> <63.8609400000 >
(0x0018,0x0085) ImagedNucleus VR=<SH> VL=<0x2> <H1>
(0x0018,0x0086) EchoNumbers VR=<IS> VL=<0x2> <1 >
(0x0018,0x0087) MagneticFieldStrength VR=<DS> VL=<0x6> <15000 >
(0x0018,0x0088) SpacingBetweenSlices VR=<DS> VL=<0x8> <6.000000>
(0x0018,0x0091) EchoTrainLength VR=<IS> VL=<0x2> <0 >
(0x0018,0x0093) PercentSampling VR=<DS> VL=<0xa> <100.000000>
(0x0018,0x0094) PercentPhaseFieldOfView VR=<DS> VL=<0xa> <100.000000>
(0x0018,0x0095) PixelBandwidth VR=<DS> VL=<0xa> <167.187500>
(0x0018,0x1020) SoftwareVersions VR=<LO> VL=<0x2> <04>
(0x0018,0x1050) SpatialResolution VR=<DS> VL=<0x12> <1.145833\0.859375 >
(0x0018,0x1088) HeartRate VR=<IS> VL=<0x2> <0 >
(0x0018,0x1090) CardiacNumberOfImages VR=<IS> VL=<0x2> <0 >
(0x0018,0x1094) TriggerWindow VR=<IS> VL=<0x2> <0 >
(0x0018,0x1100) ReconstructionDiameter VR=<DS> VL=<0xe> <220.0000000000>
(0x0018,0x1250) ReceiveCoilName VR=<SH> VL=<0x4> <HEAD>
(0x0018,0x1251) TransmitCoilName VR=<SH> VL=<0x4> <HEAD>
(0x0018,0x1312) InPlanePhaseEncodingDirection VR=<CS> VL=<0x4> <COL >
(0x0018,0x1314) FlipAngle VR=<DS> VL=<0x2> <90>
(0x0018,0x1315) VariableFlipAngleFlag VR=<CS> VL=<0x2> <N >
(0x0018,0x1316) SAR VR=<DS> VL=<0x8> <0.015446>
(0x0018,0x5100) PatientPosition VR=<CS> VL=<0x4> <HFS >
(0x0020,0x0000) VR=<UN> VL=<0x4> [B@681a9515
(0x0020,0x000d) StudyInstanceUID VR=<UI> VL=<0x2c> <1.2.840.113619.2.1.3352.2053053415.834484316>
(0x0020,0x000e) SeriesInstanceUID VR=<UI> VL=<0x2e> <1.2.840.113619.2.1.3352.1136944889.4.834485379>
(0x0020,0x0011) SeriesNumber VR=<IS> VL=<0x2> <4 >
(0x0020,0x0012) AcquisitionNumber VR=<IS> VL=<0x2> <1 >
(0x0020,0x0013) InstanceNumber VR=<IS> VL=<0x2> <3 >
(0x0020,0x0032) ImagePositionPatient VR=<DS> VL=<0x24> <-110.000000\ -109.800003\-47.500000 >
(0x0020,0x1040) PositionReferenceIndicator VR=<LO> VL=<0x2> <NA>
(0x0020,0x1041) SliceLocation VR=<DS> VL=<0xe> <-47.5000000000>
(0x0028,0x0000) VR=<UN> VL=<0x4> [B@681a9515
(0x0028,0x0002) SamplesPerPixel VR=<US> VL=<0x2> [0x1]
(0x0028,0x0004) PhotometricInterpretation VR=<CS> VL=<0xc> <MONOCHROME2 >
(0x0028,0x0010) Rows VR=<US> VL=<0x2> [0x100]
(0x0028,0x0011) Columns VR=<US> VL=<0x2> [0x100]
(0x0028,0x0030) PixelSpacing VR=<DS> VL=<0x12> <0.859375\0.859375 >
(0x0028,0x0100) BitsAllocated VR=<US> VL=<0x2> [0x10]
(0x0028,0x0101) BitsStored VR=<US> VL=<0x2> [0x10]
(0x0028,0x0102) HighBit VR=<US> VL=<0x2> [0xf]
(0x0028,0x0103) PixelRepresentation VR=<US> VL=<0x2> [0x1]
(0x7fe0,0x0000) VR=<UN> VL=<0x4> [B@681a9515
(0x7fe0,0x0010) PixelData VR=<OW> VL=<0x20000>
Using DICOM Testing Tools
If you want to dig deeper into this area, you can use one of the many useful DICOM testing tools out there. The one that I have used in the past and have liked isDCMTK. The toolkit comes with many standalone testing utilities that help you test various aspects related to DICOM processing through a command line interface. Running thedcmdumpcommand on a sample DICOM file results in an output as seen below.
c:\DicomTestingTools\DCMTK-3.6.3-Win64-Dynamic\bin>dcmdump.exe sampledicomfile.dcm

# Dicom-File-Format

# Dicom-Meta-Information-Header
# Used TransferSyntax: Little Endian Explicit
(0002,0000) UL 184                                      #   4, 1 FileMetaInformationGroupLength
(0002,0001) OB 00\01                                    #   2, 1 FileMetaInformationVersion
(0002,0002) UI =OphthalmicPhotography8BitImageStorage   #  32, 1 MediaStorageSOPClassUID
(0002,0003) UI [2.25.101703809854595919801950834747690813074] #  44, 1 MediaStorageSOPInstanceUID
(0002,0010) UI =LittleEndianExplicit                    #  20, 1 TransferSyntaxUID
(0002,0012) UI [1.3.6.1.4.1.30071.8]                    #  20, 1 ImplementationClassUID
(0002,0013) SH [fo-dicom 4.0.1]                         #  14, 1 ImplementationVersionName

# Dicom-Data-Set
# Used TransferSyntax: Little Endian Explicit
(0008,0008) CS [ORIGINAL\PRIMARY]                       #  16, 2 ImageType
(0008,0016) UI =OphthalmicPhotography8BitImageStorage   #  32, 1 SOPClassUID
(0008,0018) UI [2.25.101703809854595919801950834747690813074] #  44, 1 SOPInstanceUID
(0008,0020) DA [20200501]                               #   8, 1 StudyDate
(0008,002a) DT [20200501071652]                         #  14, 1 AcquisitionDateTime
(0008,0030) TM [071652]                                 #   6, 1 StudyTime
(0008,0050) SH [125]                                    #   4, 1 AccessionNumber
(0008,0060) CS [US]                                     #   2, 1 Modality
(0008,0061) CS [OP]                                     #   2, 1 ModalitiesInStudy
(0008,0070) LO [Medicolle]                              #  10, 1 Manufacturer
(0008,0080) LO [Test Hospital]                          #  14, 1 InstitutionName
(0008,0081) ST (no value available)                     #   0, 0 InstitutionAddress
(0008,0090) PN [Fergusson^^^Dr]                         #  14, 1 ReferringPhysicianName
(0008,1010) SH [AdvancedCapture]                        #  16, 1 StationName
(0008,1030) LO (no value available)                     #   0, 0 StudyDescription
(0008,1090) LO [AdvancedCapture]                        #  16, 1 ManufacturerModelName
(0010,0010) PN [Bowen^William^^Dr]                      #  18, 1 PatientName
(0010,0020) LO [PAT004]                                 #   6, 1 PatientID
(0010,0030) DA [19560807]                               #   8, 1 PatientBirthDate
(0010,0040) CS [M]                                      #   2, 1 PatientSex
(0010,1030) DS (no value available)                     #   0, 0 PatientWeight
(0018,1000) LO (no value available)                     #   0, 0 DeviceSerialNumber
(0018,1020) LO [AdvancedCapture 3.0.7425.23917]         #  30, 1 SoftwareVersions
(0018,106a) CS [NO TRIGGER]                             #  10, 1 SynchronizationTrigger
(0018,1800) CS [N]                                      #   2, 1 AcquisitionTimeSynchronized
(0020,000d) UI [1.2.826.0.1.3680043.11.106]             #  26, 1 StudyInstanceUID
(0020,000e) UI [2.25.103253814587692535336175589446854494919] #  44, 1 SeriesInstanceUID
(0020,0010) SH [1]                                      #   2, 1 StudyID
(0020,0011) IS [1]                                      #   2, 1 SeriesNumber
(0020,0013) IS [1]                                      #   2, 1 InstanceNumber
(0020,0020) CS [F\A]                                    #   4, 2 PatientOrientation
(0020,0062) CS [R]                                      #   2, 1 ImageLaterality
(0020,0200) UI =UniversalCoordinatedTimeSynchronizationFrameOfReference #  20, 1 SynchronizationFrameOfReferenceUID
(0020,1206) IS [1]                                      #   2, 1 NumberOfStudyRelatedSeries
(0020,1208) IS [1]                                      #   2, 1 NumberOfStudyRelatedInstances
(0020,1209) IS [1]                                      #   2, 1 NumberOfSeriesRelatedInstances
(0022,000a) FL 0                                        #   4, 1 EmmetropicMagnification
(0022,000c) FL 0                                        #   4, 1 HorizontalFieldOfView
(0022,000e) FL 0                                        #   4, 1 DegreeOfDilation
(0022,0015) SQ (Sequence with undefined length #=1)     # u/l, 1 AcquisitionDeviceTypeCodeSequence
  (fffe,e000) na (Item with undefined length #=1)         # u/l, 1 Item
    (0008,0104) LO (no value available)                     #   0, 0 CodeMeaning
  (fffe,e00d) na (ItemDelimitationItem)                   #   0, 0 ItemDelimitationItem
(fffe,e0dd) na (SequenceDelimitationItem)               #   0, 0 SequenceDelimitationItem
(0022,0016) SQ (Sequence with undefined length #=1)     # u/l, 1 IlluminationTypeCodeSequence
  (fffe,e000) na (Item with undefined length #=0)         # u/l, 1 Item
  (fffe,e00d) na (ItemDelimitationItem)                   #   0, 0 ItemDelimitationItem
(fffe,e0dd) na (SequenceDelimitationItem)               #   0, 0 SequenceDelimitationItem
(0022,0019) SQ (Sequence with undefined length #=1)     # u/l, 1 LensesCodeSequence
  (fffe,e000) na (Item with undefined length #=0)         # u/l, 1 Item
  (fffe,e00d) na (ItemDelimitationItem)                   #   0, 0 ItemDelimitationItem
(fffe,e0dd) na (SequenceDelimitationItem)               #   0, 0 SequenceDelimitationItem
(0028,0002) US 3                                        #   2, 1 SamplesPerPixel
(0028,0004) CS [RGB]                                    #   4, 1 PhotometricInterpretation
(0028,0006) US 0                                        #   2, 1 PlanarConfiguration
(0028,0008) IS [1]                                      #   2, 1 NumberOfFrames
(0028,0010) US 1920                                     #   2, 1 Rows
(0028,0011) US 1920                                     #   2, 1 Columns
(0028,0100) US 8                                        #   2, 1 BitsAllocated
(0028,0101) US 8                                        #   2, 1 BitsStored
(0028,0102) US 7                                        #   2, 1 HighBit
(0028,0103) US 0                                        #   2, 1 PixelRepresentation
(0040,0555) SQ (Sequence with undefined length #=1)     # u/l, 1 AcquisitionContextSequence
  (fffe,e000) na (Item with undefined length #=0)         # u/l, 1 Item
  (fffe,e00d) na (ItemDelimitationItem)                   #   0, 0 ItemDelimitationItem
(fffe,e0dd) na (SequenceDelimitationItem)               #   0, 0 SequenceDelimitationItem
(7fe0,0010) OB 00\00\00\00\00\00\00\00\00\00\00\00\00\00\00\00\00\00\00\00\00\00... # 11059200, 1 PixelData

c:\DicomTestingTools\DCMTK-3.6.3-Win64-Dynamic\bin>
Conclusion
That is it. This is all there is to performing some rudimentary processing of a DICOM file. I hope this introductory tutorial helped you in understanding what is contained within a DICOM file. I didn’t touch on how to extract the image pixel data that is stored inside the DICOM file that we processed. I hope to cover that in a separate tutorial in the near future. But in my next DICOM tutorial I will show you how to encode/create a DICOM file from scratch using an image as well as some associated information. If you have any questions or comments regarding this tutorial, please feel free to send me an email. Please note that I may not get back to you right away due to work and other commitments.
Footnote:The DICOM standard restricts the file names/identifiers contained within to 8 characters (either uppercase alphabetic characters and numbers only) to keep in conformity with legacy/historical requirements. It also states that no information must be inferred/extracted from these names. The file names usually don’t have a .dcm extension when they are stored as part of a media such as CD or DVD. I use longer names to keep these details from being a distraction right now, but I still want to mention what the standard states here so that no confusion arises as a result.