
Redis服務之Redis Cluster(轉載)
在上一篇部落格中我們聊到了redis的高可用元件sentinel的相關配置,回顧請參考https://www.cnblogs.com/qiuhom-1874/p/13429776.html;sentinel在redis主從同步架構中主要起到了監控叢集master是否正常,如果master不正常,或者宕機,那麼sentinel會提升一個slave當選新的master,從而保證了redis服務的正常使用;但對於redis的單機寫入問題還是一直存在;在sentinel+主從同步架構中,程式寫資料,始終是把讀寫請求傳送給master(當然,如果有語句路由器讀寫請求是可以分開的);這樣一來對於master來講它就承擔了所有的寫操作,很顯然這種在寫操作非常的頻繁的場景,單臺master肯定無法承受這麼大的壓力;為了解決單機master寫入資料的瓶頸問題,redis 官方在 redis 3.0 版本之後推出了無中心架構的 redis cluster 機制;所謂無中心架構的cluster意思是叢集中的每一個成員都是中心節點,每個成員擁有整個叢集的狀態元資料,但各自又只儲存整個叢集的部分資料;對於redis cluster這種架構來講,所有redis節點使用(ping機制)互聯,如果叢集中某個節點的失敗,是需要整個叢集中超過半數的節點監測都失效才算真正的失效;客戶端不需要 proxy 即可直接連線 redis,應用程式需要寫全部的 redis 伺服器 IP。redis cluster 把所有的 redis node 對映到 0-16383 個槽位(slot)上,讀寫需要到指定的 redis node 上進行操作,因此有多少個 reids node 相當於 redis 併發擴充套件了多少倍。Redis cluster 預先分配 16384 個(slot)槽位,當需要在 redis 叢集中寫入一個 key -value 的時候,會使用 CRC16(key) mod 16384 之後的值,決定將 key 寫入值哪一個槽位從而決定寫入哪一個 Redis 節點上,從而有效解決redis單機讀寫瓶頸。如下所示
提示:客戶端每次讀寫都要經過CRC16對讀寫的KEY做hash計算,然後把hash後的結果再和16384做取模運算,最終結果會落到0-16383的某一個槽位上;我們事先在定義叢集時,就把0-5460號槽位都分給了master01,意思就是隻要讀寫的資料的KEY通過CRC16hash計算取得的結果%16384,最後的結果在0-5460這個範圍內,就把本次的讀/寫請求排程到master01上;以此類推,範圍在5461-10922就把讀/寫請求排程到master02,範圍在10923-16383就把讀/寫請求排程到master03;通過上面的圖我們也能看出各個master都只儲存整個叢集的一部分資料,如果某一個master宕機,那麼就會導致對應master上分的槽位對應資料丟失;為了解決各個master單點的問題,我們還需要對每個master做主從,如下圖
提示:為了防止某個master宕機後導致資料丟失和寫操作不能執行,對應slave應該能夠及時的提升為master,類似sentinel的功能,但是我們不需要在部署sentinel了,因為redis cluster就支援主從切換;這樣一來我們的叢集就變成了3主3從的叢集;接下我們就準備一個實驗環境來部署上面的架構;
部署redis叢集
環境說明
| 角色 | ip地址 | 埠 |
| Master01 | 192.168.0.41 | 6379 |
| Slave01 | 192.168.0.42 | 6380 |
| Master02 | 192.168.0.42 | 6379 |
| Slave02 | 192.168.0.43 | 6380 |
| Master03 | 192.168.0.43 | 6379 |
| Slave03 | 192.168.0.41 | 6380 |
準備啟動3臺伺服器,每個伺服器上啟動兩個redis例項,埠分別是6379(master)和6380(slave),為了防止master和slave落在同一個節點,有意將他們交叉組合,如上表格;
建立redis cluster我們需要注意每個 redis node 節點儘量採用相同的硬體配置,相同的密碼;所有 redis 伺服器必須沒有任何資料;
在node01上編譯安裝redis,有關redis的編譯安裝和部署請參考https://www.cnblogs.com/qiuhom-1874/p/13378138.html;
建立目錄結構
| 1 2 3 4 5 6 7 8 9 10 11 12 13 14 15 16 17 18 19 20 21 22 23 24 |
[root@node01 ~]# tree /usr/local/redis/
/usr/local/redis/
├── 6379
│ ├── etc
│ │ ├── redis.conf
│ │ └── sentinel.conf
│ ├── logs
│ └── run
├── 6380
│ ├── etc
│ │ ├── redis.conf
│ │ └── sentinel.conf
│ ├── logs
│ └── run
└── bin
├── redis-benchmark
├── redis-check-aof
├── redis-check-rdb
├── redis-cli
├── redis-sentinel -> redis-server
└── redis-server
9 directories, 10 files
[root@node01 ~]#
|
提示:在/usr/local/redis目錄下分別建立6379和6380,然後在其下都建立etc,logs,run 等子目錄,如上所示
修改配置檔案
| 1 2 3 4 5 6 7 8 9 10 11 12 13 |
[root@node01 ~]# grep -E "^(bind|requirepass|masterauth|cluster)" /usr/local/redis/6379/etc/redis.conf
bind 0.0.0.0
masterauth admin
requirepass admin
cluster-enabledyes
cluster-config-fileredis-cluster_6379.conf
[root@node01 ~]# grep -E "^(bind|requirepass|masterauth|cluster)" /usr/local/redis/6380/etc/redis.conf
bind 0.0.0.0
masterauth admin
requirepass admin
cluster-enabledyes
cluster-config-fileredis-cluster_6380.conf
[root@node01 ~]#
|
提示:6379和6380的配置檔案內容都是一樣的,唯一區別是埠不同,主要修改bind 監聽地址,設定密碼,開啟叢集以及指定對應叢集生成的配置檔名稱;
把node01上的/usr/local/redis複製給node02和node03並儲存到/usr/local/目錄下
提示:我上面的三臺主機都是做了免密登入,所以互相拷貝資料不需要輸入密碼;有關免密登入的說明和配置可以參考https://www.cnblogs.com/qiuhom-1874/p/11783371.html;
分別在node01 node02 node03上啟動redis
到此我們就把6個redis例項啟動了;接下來我們來建立叢集;Redis 3 和 4 版本需要使用到叢集管理工具 redis-trib.rb,這個工具是 redis 官方推出的管理 redis 叢集的工具,整合在redis 的原始碼 src 目錄下,是基於 redis 提供的叢集命令封裝成簡單、便捷、實用的操作工具,redis-trib.rb是 redis 作者用 ruby 開發完成的,所以我們要使用redis-trib.rb首先要解決ruby環境的問題;
安裝ruby環境
| 1 2 3 4 5 6 7 8 9 10 11 12 13 14 15 16 17 18 19 20 21 22 23 24 25 26 27 28 29 30 31 32 33 34 35 36 37 38 39 40 41 42 43 44 45 46 47 48 49 50 51 52 53 54 55 56 57 58 59 60 61 62 63 64 65 66 67 68 69 70 71 72 73 74 75 76 77 78 79 80 |
[root@node01 ~]# rz
rz waiting to receive.
zmodem trl+C ȡ
100% 15621 KB 15621 KB/s00:00:01 0 Errors
[root@node01 ~]# ls
redis-4.0.9.tar.gz ruby-2.5.5.tar.gz
[root@node01 ~]# tar xf ruby-2.5.5.tar.gz -C /usr/local/src/
[root@node01 ~]# cd /usr/local/src/
[root@node01 src]# cd ruby-2.5.5/
[root@node01 ruby-2.5.5]# ./configure
checkingforruby...false
checking build systemtype... x86_64-pc-linux-gnu
checking host systemtype... x86_64-pc-linux-gnu
checking target systemtype... x86_64-pc-linux-gnu
checkingforgcc...gcc
checking whether the C compiler works...yes
checkingforC compiler default outputfilename... a.out
checkingforsuffix of executables...
checking whether we are cross compiling... no
checkingforsuffix of object files... o
checking whether we are using the GNU C compiler...yes
checking whethergccaccepts -g...yes
checkingforgccoption to accept ISO C89... none needed
checkingforg++... g++
checking whether we are using the GNU C++ compiler...yes
……省略部分內容……
checkingforsetjmptype... __builtin_setjmp
checkingforprefix of external symbols... NONE
checking pthread.h usability...yes
checking pthread.h presence...yes
checkingforpthread.h...yes
checkingifmakeis GNUmake...yes
.ext/include/x86_64-linux/ruby/config.h updated
configure: ruby library version = 2.5.0
configure: creating ./config.status
config.status: creating GNUmakefile
config.status: creating Makefile
config.status: creating ruby-2.5.pc
---
Configuration summaryforruby version 2.5.5
* Installation prefix:/usr/local
*execprefix: ${prefix}
* arch: x86_64-linux
* site arch: ${arch}
* RUBY_BASE_NAME: ruby
* ruby lib prefix: ${libdir}/${RUBY_BASE_NAME}
* site libraries path: ${rubylibprefix}/${sitearch}
* vendor path: ${rubylibprefix}/vendor_ruby
* target OS: linux
* compiler:gcc
* with pthread:yes
*enableshared libs: no
* dynamic library ext: so
* CFLAGS: ${optflags} ${debugflags} ${warnflags}
* LDFLAGS: -L. -fstack-protector -rdynamic \
-Wl,-export-dynamic
* optflags: -O3
* debugflags: -ggdb3
* warnflags: -Wall -Wextra -Wno-unused-parameter \
-Wno-parentheses -Wno-long-long \
-Wno-missing-field-initializers \
-Wno-tautological-compare \
-Wno-parentheses-equality \
-Wno-constant-logical-operand -Wno-self-assign \
-Wunused-variable -Wimplicit-int -Wpointer-arith \
-Wwrite-strings-Wdeclaration-after-statement \
-Wimplicit-function-declaration \
-Wdeprecated-declarations \
-Wno-packed-bitfield-compat \
-Wsuggest-attribute=noreturn \
-Wsuggest-attribute=format
* stripcommand: strip -S -x
*installdoc:yes
*manpagetype: doc
---
[root@node01 ruby-2.5.5]#
|
提示:redis-trib.rb這個工具在叢集任意一臺安裝即可,不需要每臺都安裝;
編譯
| 1 2 3 4 5 6 7 8 9 10 11 12 13 14 15 16 17 18 19 20 21 22 23 24 25 26 27 28 29 30 31 32 33 34 35 36 37 38 39 40 41 42 43 44 45 46 47 48 49 50 51 52 53 54 55 56 57 58 59 |
[root@node01 ruby-2.5.5]# make -j 2
CC =gcc
LD = ld
LDSHARED =gcc-shared
CFLAGS = -O3 -ggdb3 -Wall -Wextra -Wno-unused-parameter -Wno-parentheses -Wno-long-long -Wno-missing-field-initializers -Wno-tautological-compare -Wno-parentheses-equality -Wno-constant-logical-operand -Wno-self-assign -Wunused-variable -Wimplicit-int -Wpointer-arith -Wwrite-strings-Wdeclaration-after-statement -Wimplicit-function-declaration -Wdeprecated-declarations -Wno-packed-bitfield-compat -Wsuggest-attribute=noreturn -Wsuggest-attribute=format-std=gnu99
XCFLAGS = -D_FORTIFY_SOURCE=2 -fstack-protector -fno-strict-overflow -fvisibility=hidden -fexcess-precision=standard -DRUBY_EXPORT -fPIE
CPPFLAGS = -I. -I.ext/include/x86_64-linux-I./include-I. -I./enc/unicode/10.0.0
DLDFLAGS = -fstack-protector -pie
SOLIBS =
LANG = en_US.UTF-8
LC_ALL =
LC_CTYPE =
gcc(GCC) 4.8.5 20150623 (Red Hat 4.8.5-39)
Copyright (C) 2015 Free Software Foundation, Inc.
This isfreesoftware; see thesourceforcopying conditions. There is NO
warranty; not evenforMERCHANTABILITY or FITNESS FOR A PARTICULAR PURPOSE.
compiling ./main.c
compiling dmydln.c
compiling miniinit.c
compiling dmyext.c
compiling miniprelude.c
making dummy probes.h
compiling bignum.c
compiling class.c
compiling compar.c
compiling compile.c
compiling complex.c
compiling cont.c
compiling debug.c
compiling debug_counter.c
compilingdir.c
compiling dln_find.c
compiling encoding.c
compiling enum.c
compiling enumerator.c
……省略部分內容……
*** Fix the problems,thenremove these directories and try againifyou want.
make[1]: Leaving directory `/usr/local/src/ruby-2.5.5'
Generating RDoc documentation
Parsing sources...
100% [871/871] vsnprintf.c
Generating RIformatinto/usr/local/src/ruby-2.5.5/.ext/rdoc...
Files: 871
Classes: 1324 ( 565 undocumented)
Modules: 286 ( 121 undocumented)
Constants: 2181 ( 555 undocumented)
Attributes: 1066 ( 251 undocumented)
Methods: 10080 (2161 undocumented)
Total: 14937 (3653 undocumented)
75.54% documented
Elapsed: 25.0s
[root@node01 ruby-2.5.5]#
|
安裝ruby環境
| 1 2 3 4 5 6 7 8 9 10 11 12 13 14 15 16 17 18 19 20 21 22 23 24 25 26 27 28 29 30 31 32 33 34 35 36 37 38 39 40 41 42 43 44 45 46 47 48 49 50 51 52 53 54 55 56 57 58 59 60 61 62 63 64 65 66 67 68 69 70 71 72 73 74 75 76 77 78 79 80 81 82 |
[root@node01 ruby-2.5.5]# make install
CC =gcc
LD = ld
LDSHARED =gcc-shared
CFLAGS = -O3 -ggdb3 -Wall -Wextra -Wno-unused-parameter -Wno-parentheses -Wno-long-long -Wno-missing-field-initializers -Wno-tautological-compare -Wno-parentheses-equality -Wno-constant-logical-operand -Wno-self-assign -Wunused-variable -Wimplicit-int -Wpointer-arith -Wwrite-strings-Wdeclaration-after-statement -Wimplicit-function-declaration -Wdeprecated-declarations -Wno-packed-bitfield-compat -Wsuggest-attribute=noreturn -Wsuggest-attribute=format-std=gnu99
XCFLAGS = -D_FORTIFY_SOURCE=2 -fstack-protector -fno-strict-overflow -fvisibility=hidden -fexcess-precision=standard -DRUBY_EXPORT -fPIE
CPPFLAGS = -I. -I.ext/include/x86_64-linux-I./include-I. -I./enc/unicode/10.0.0
DLDFLAGS = -fstack-protector -pie
SOLIBS =
LANG = en_US.UTF-8
LC_ALL =
LC_CTYPE =
gcc(GCC) 4.8.5 20150623 (Red Hat 4.8.5-39)
Copyright (C) 2015 Free Software Foundation, Inc.
This isfreesoftware; see thesourceforcopying conditions. There is NO
warranty; not evenforMERCHANTABILITY or FITNESS FOR A PARTICULAR PURPOSE.
generating enc.mk
making srcs under enc
make[1]: Entering directory `/usr/local/src/ruby-2.5.5'
make[1]: Nothing to bedonefor`srcs'.
make[1]: Leaving directory `/usr/local/src/ruby-2.5.5'
generating transdb.h
transdb.h unchanged
generating makefiles ext/configure-ext.mk
ext/configure-ext.mk updated
make[1]: Entering directory `/usr/local/src/ruby-2.5.5'
make[1]: Leaving directory `/usr/local/src/ruby-2.5.5'
generating makefile exts.mk
exts.mk updated
make[1]: Entering directory `/usr/local/src/ruby-2.5.5'
make[2]: Entering directory `/usr/local/src/ruby-2.5.5/ext/fcntl'
make[2]: Leaving directory `/usr/local/src/ruby-2.5.5/ext/fcntl'
make[2]: Entering directory `/usr/local/src/ruby-2.5.5/ext/rubyvm'
……省略部分內容……
installing binary commands:/usr/local/bin
installing base libraries:/usr/local/lib
installing arch files:/usr/local/lib/ruby/2.5.0/x86_64-linux
installing pkgconfig data:/usr/local/lib/pkgconfig
installingcommandscripts:/usr/local/bin
installing library scripts:/usr/local/lib/ruby/2.5.0
installing common headers:/usr/local/include/ruby-2.5.0
installing manpages:/usr/local/share/man/man1
installing extension objects:/usr/local/lib/ruby/2.5.0/x86_64-linux
installing extension objects:/usr/local/lib/ruby/site_ruby/2.5.0/x86_64-linux
installing extension objects:/usr/local/lib/ruby/vendor_ruby/2.5.0/x86_64-linux
installing extension headers:/usr/local/include/ruby-2.5.0/x86_64-linux
installing extension scripts:/usr/local/lib/ruby/2.5.0
installing extension scripts:/usr/local/lib/ruby/site_ruby/2.5.0
installing extension scripts:/usr/local/lib/ruby/vendor_ruby/2.5.0
installing extension headers:/usr/local/include/ruby-2.5.0/ruby
installing default gems from lib:/usr/local/lib/ruby/gems/2.5.0 (build_info, cache, doc, extensions, gems, specifications)
cmath 1.0.0
csv 1.0.0
fileutils 1.0.2
ipaddr 1.2.0
rdoc 6.0.1
scanf 1.0.0
webrick 1.4.2
installing default gems from ext:/usr/local/lib/ruby/gems/2.5.0 (build_info, cache, doc, extensions, gems, specifications)
bigdecimal 1.3.4
date1.0.0
etc 1.0.0
fcntl 1.0.0
fiddle 1.0.0
io-console 0.4.6
json 2.1.0
psych 3.0.2
sdbm 1.0.0
stringio 0.0.1
strscan 1.0.0
installing bundled gems:/usr/local/lib/ruby/gems/2.5.0 (build_info, cache, doc, extensions, gems, specifications)
minitest 5.10.3
rake 12.3.0
xmlrpc 0.3.0
did_you_mean 1.2.0
net-telnet 0.1.1
power_assert 1.1.1
test-unit 3.2.7
installing rdoc:/usr/local/share/ri/2.5.0/system
installing capi-docs:/usr/local/share/doc/ruby
[root@node01 ruby-2.5.5]#
|
提示:到此ruby環境就安裝好了,這裡注意一點,yum安裝的ruby版本有點低,所以我們這裡選擇編譯安裝;
gem安裝redis包
| 1 2 3 4 5 6 |
[root@node01 ruby-2.5.5]# gem install redis
ERROR: Loadingcommand:install(LoadError)
cannot load suchfile-- zlib
ERROR: While executing gem ... (NoMethodError)
undefined method `invoke_with_build_args'fornil:NilClass
[root@node01 ruby-2.5.5]#
|
提示:gem安裝提示我們沒有zlib,遇到這個問題我們用yum安裝zlib-devel包,然後在把zlib整合到ruby環境即可;
| 1 2 3 4 5 6 7 8 9 10 11 12 13 14 15 16 17 18 19 20 21 22 23 24 25 26 27 28 29 30 31 32 33 34 35 36 37 38 39 40 41 42 43 44 45 46 47 48 49 50 51 52 53 54 55 56 57 |
[root@node01 ruby-2.5.5]# yum install zlib-devel
Loaded plugins: fastestmirror
Loading mirror speeds from cached hostfile
* base: mirrors.aliyun.com
* extras: mirrors.aliyun.com
* updates: mirrors.aliyun.com
Resolving Dependencies
--> Running transaction check
---> Package zlib-devel.x86_64 0:1.2.7-18.el7 will be installed
--> Processing Dependency: zlib = 1.2.7-18.el7forpackage: zlib-devel-1.2.7-18.el7.x86_64
--> Running transaction check
---> Package zlib.x86_64 0:1.2.7-17.el7 will be updated
---> Package zlib.x86_64 0:1.2.7-18.el7 will be an update
--> Finished Dependency Resolution
Dependencies Resolved
===========================================================================================================
Package Arch Version Repository Size
===========================================================================================================
Installing:
zlib-devel x86_64 1.2.7-18.el7 base 50 k
Updatingfordependencies:
zlib x86_64 1.2.7-18.el7 base 90 k
Transaction Summary
===========================================================================================================
Install 1 Package
Upgrade ( 1 Dependent package)
Total download size: 140 k
Is this ok [y/d/N]: y
Downloading packages:
Delta RPMs disabled because/usr/bin/applydeltarpmnot installed.
(1/2): zlib-devel-1.2.7-18.el7.x86_64.rpm | 50 kB 00:00:00
/2): zlib-1.2.7-18.el7.x86_64.rpm | 90 kB 00:00:00
-----------------------------------------------------------------------------------------------------------
Total 509 kB/s| 140 kB 00:00:00
Running transaction check
Running transactiontest
Transactiontestsucceeded
Running transaction
Updating : zlib-1.2.7-18.el7.x86_64 1/3
Installing : zlib-devel-1.2.7-18.el7.x86_64 2/3
Cleanup : zlib-1.2.7-17.el7.x86_64 3/3
Verifying : zlib-devel-1.2.7-18.el7.x86_64 1/3
Verifying : zlib-1.2.7-18.el7.x86_64 2/3
Verifying : zlib-1.2.7-17.el7.x86_64 3/3
Installed:
zlib-devel.x86_64 0:1.2.7-18.el7
Dependency Updated:
zlib.x86_64 0:1.2.7-18.el7
Complete!
[root@node01 ruby-2.5.5]#
|
整合zlib庫到Ruby環境
| 1 2 3 4 5 6 7 8 9 10 11 |
[root@node01 ruby-2.5.5]# cd ext/zlib/
[root@node01 zlib]# ruby extconf.rb
checkingfordeflateReset()in-lz...yes
checkingforzlib.h...yes
checkingforcrc32_combine()inzlib.h...yes
checkingforadler32_combine()inzlib.h...yes
checkingforz_crc_tinzlib.h...yes
creating Makefile
[root@node01 zlib]# make
make: *** No rule tomaketarget `/include/ruby.h', needed by `zlib.o'. Stop.
[root@node01 zlib]#
|
提示:遇到這種問題,我們需要開啟上面生成的Makefile 把zlib.o: $(top_srcdir)/include/ruby.h替換為zlib.o: ../../include/ruby.h即可
提示:修改好Makefile,再次make
| 1 2 3 4 5 6 7 |
"Makefile"282L, 8468C written
[root@node01 zlib]# make
compiling zlib.c
linking shared-object zlib.so
[root@node01 zlib]# make install
/usr/bin/install-c -m 0755 zlib.so/usr/local/lib/ruby/site_ruby/2.5.0/x86_64-linux
[root@node01 zlib]#
|
再次使用gem安裝redis包
| 1 2 3 4 |
[root@node01 zlib]# gem install redis
ERROR: While executing gem ... (Gem::Exception)
Unable to require openssl,installOpenSSL and rebuild Ruby (preferred) or use non-HTTPS sources
[root@node01 zlib]#
|
提示:它提示我們缺少openssl庫,處理方法安裝openssl-devel包,然後把openssl庫整合到ruby環境中;
安裝openssl-devel包
| 1 2 3 4 5 6 7 8 9 10 11 12 13 14 15 16 17 18 19 20 21 22 23 24 25 26 27 28 29 30 31 32 33 |
[root@node01 zlib]# yum install openssl-devel
Loaded plugins: fastestmirror
Loading mirror speeds from cached hostfile
* base: mirrors.aliyun.com
* extras: mirrors.aliyun.com
* updates: mirrors.aliyun.com
Resolving Dependencies
--> Running transaction check
---> Package openssl-devel.x86_64 1:1.0.2k-19.el7 will be installed
--> Processing Dependency: openssl-libs(x86-64) = 1:1.0.2k-19.el7forpackage: 1:openssl-devel-1.0.2k-19.el7.x86_64
--> Processing Dependency: krb5-devel(x86-64)forpackage: 1:openssl-devel-1.0.2k-19.el7.x86_64
--> Running transaction check
---> Package krb5-devel.x86_64 0:1.15.1-46.el7 will be installed
……省略部分內容……
Installed:
openssl-devel.x86_64 1:1.0.2k-19.el7
Dependency Installed:
keyutils-libs-devel.x86_64 0:1.5.8-3.el7 krb5-devel.x86_64 0:1.15.1-46.el7
libcom_err-devel.x86_64 0:1.42.9-17.el7 libkadm5.x86_64 0:1.15.1-46.el7
libselinux-devel.x86_64 0:2.5-15.el7 libsepol-devel.x86_64 0:2.5-10.el7
libverto-devel.x86_64 0:0.2.5-4.el7 pcre-devel.x86_64 0:8.32-17.el7
Dependency Updated:
e2fsprogs.x86_64 0:1.42.9-17.el7 e2fsprogs-libs.x86_64 0:1.42.9-17.el7
krb5-libs.x86_64 0:1.15.1-46.el7 libcom_err.x86_64 0:1.42.9-17.el7
libselinux.x86_64 0:2.5-15.el7 libselinux-python.x86_64 0:2.5-15.el7
libselinux-utils.x86_64 0:2.5-15.el7 libsepol.x86_64 0:2.5-10.el7
libss.x86_64 0:1.42.9-17.el7 openssl.x86_64 1:1.0.2k-19.el7
openssl-libs.x86_64 1:1.0.2k-19.el7
Complete!
[root@node01 zlib]#
|
整合openssl到ruby環境中
| 1 2 3 4 5 6 7 8 9 10 11 12 13 14 15 16 17 18 19 20 21 22 23 24 25 26 27 28 29 30 31 32 33 34 35 36 |
[root@node01 zlib]# cd ..
[root@node01 ext]# ls
bigdecimaldatefcntl json psych ripper Setup.nt -test-
cgi dbm fiber nkf pty rubyvm socket win32
configure-ext.mk digest fiddle objspace racc sdbm stringio win32ole
continuation etc gdbm openssl rbconfig Setup strscan zlib
coverage extmk.rb io pathname readline Setup.atheos syslog
[root@node01 ext]# cd openssl/
[root@node01 openssl]# ls
depend ossl_asn1.c ossl_digest.c ossl_ocsp.c ossl_pkey_rsa.c ossl_x509ext.c
deprecation.rb ossl_asn1.h ossl_digest.h ossl_ocsp.h ossl_rand.c ossl_x509.h
extconf.rb ossl_bio.c ossl_engine.c ossl_pkcs12.c ossl_rand.h ossl_x509name.c
exts.mk ossl_bio.h ossl_engine.h ossl_pkcs12.h ossl_ssl.c ossl_x509req.c
History.md ossl_bn.c ossl.h ossl_pkcs7.c ossl_ssl.h ossl_x509revoked.c
lib ossl_bn.h ossl_hmac.c ossl_pkcs7.h ossl_ssl_session.c ossl_x509store.c
Makefile ossl.c ossl_hmac.h ossl_pkey.c ossl_version.h ruby_missing.h
mkmf.log ossl_cipher.c ossl_kdf.c ossl_pkey_dh.c ossl_x509attr.c
openssl.gemspec ossl_cipher.h ossl_kdf.h ossl_pkey_dsa.c ossl_x509.c
openssl_missing.c ossl_config.c ossl_ns_spki.c ossl_pkey_ec.c ossl_x509cert.c
openssl_missing.h ossl_config.h ossl_ns_spki.h ossl_pkey.h ossl_x509crl.c
[root@node01 openssl]# ruby extconf.rb
checkingfort_open()in-lnsl... no
checkingforsocket()in-lsocket... no
checkingforopenssl/ssl.h...yes
checkingforOpenSSL version is 1.0.1 or later...yes
checkingforRAND_egd()...yes
……省略部分內容……
checkingforX509_get0_notBefore()... no
checkingforSSL_SESSION_get_protocol_version()... no
checkingforEVP_PBE_scrypt()... no
creating extconf.h
creating Makefile
[root@node01 openssl]# make
compiling openssl_missing.c
make: *** No rule tomaketarget `/include/ruby.h', needed by `ossl.o'. Stop.
[root@node01 openssl]#
|
提示:這個錯誤和剛才繼承zlib庫到ruby環境中類似,處理方式同上面的處理方式一樣修改Makefile檔案,在makefile定義變數的位置增加top_srcdir = ../..
再次make
| 1 2 3 4 5 6 7 8 9 10 11 12 13 14 15 16 17 18 19 20 21 22 23 24 25 26 27 28 29 30 31 32 33 34 35 36 37 38 |
Makefile" 1458L, 49182C written
[root@node01 openssl]# make
compiling ossl.c
compiling ossl_asn1.c
compiling ossl_bio.c
compiling ossl_bn.c
compiling ossl_cipher.c
compiling ossl_config.c
compiling ossl_digest.c
compiling ossl_engine.c
compiling ossl_hmac.c
compiling ossl_kdf.c
compiling ossl_ns_spki.c
compiling ossl_ocsp.c
compiling ossl_pkcs12.c
compiling ossl_pkcs7.c
compiling ossl_pkey.c
compiling ossl_pkey_dh.c
compiling ossl_pkey_dsa.c
compiling ossl_pkey_ec.c
compiling ossl_pkey_rsa.c
compiling ossl_rand.c
compiling ossl_ssl.c
compiling ossl_ssl_session.c
compiling ossl_x509.c
compiling ossl_x509attr.c
compiling ossl_x509cert.c
compiling ossl_x509crl.c
compiling ossl_x509ext.c
compiling ossl_x509name.c
compiling ossl_x509req.c
compiling ossl_x509revoked.c
compiling ossl_x509store.c
linking shared-object openssl.so
[root@node01 openssl]# make install
/usr/bin/install-c -m 0755 openssl.so/usr/local/lib/ruby/site_ruby/2.5.0/x86_64-linux
installing default openssl libraries
[root@node01 openssl]#
|
再次用gem安裝redis包
| 1 2 3 4 5 6 7 8 |
[root@node01 openssl]# gem install redis
Fetching: redis-4.2.1.gem (100%)
Successfully installed redis-4.2.1
Parsing documentationforredis-4.2.1
Installing ri documentationforredis-4.2.1
Done installing documentationforredis after 0 seconds
1 gem installed
[root@node01 openssl]#
|
提示:到此ruby環境就準備好了,redis包也安裝好了,接下來我們把redis-trib.rb連線到/usr/bin/下,然後執行redis-trib.rb,如果能夠正常執行說明ruby環境沒有問題,如果不能則還需要調整
軟連線redis-trib.rb到/usr/bin/
| 1 2 3 4 5 6 7 8 9 10 11 12 13 14 15 16 17 18 19 20 21 22 23 24 25 26 27 28 29 30 31 32 33 34 35 36 37 38 39 40 41 |
[root@node01 openssl]# find /usr/local/src/redis-4.0.9/ -name "redis-trib.rb"
/usr/local/src/redis-4.0.9/src/redis-trib.rb
[root@node01 openssl]# ln -s /usr/local/src/redis-4.0.9/src/redis-trib.rb /usr/bin/
[root@node01 openssl]# redis-trib.rb
Usage: redis-trib <command> <options> <arguments ...>
create host1:port1 ... hostN:portN
--replicas <arg>
check host:port
info host:port
fix host:port
--timeout <arg>
reshard host:port
--from <arg>
--to <arg>
--slots <arg>
--yes
--timeout <arg>
--pipeline <arg>
rebalance host:port
--weight <arg>
--auto-weights
--use-empty-masters
--timeout <arg>
--simulate
--pipeline <arg>
--threshold <arg>
add-node new_host:new_port existing_host:existing_port
--slave
--master-id<arg>
del-node host:port node_id
set-timeout host:port milliseconds
call host:portcommandarg arg .. arg
importhost:port
--from <arg>
--copy
--replace
help (show this help)
For check, fix, reshard, del-node,set-timeout you can specify the host and port of any working nodeinthe cluster.
[root@node01 openssl]#
|
提示:可以看到redis-trib.rb可以正常打印出幫助資訊,說明當前ruby環境能夠支援redis-trib.rb執行;
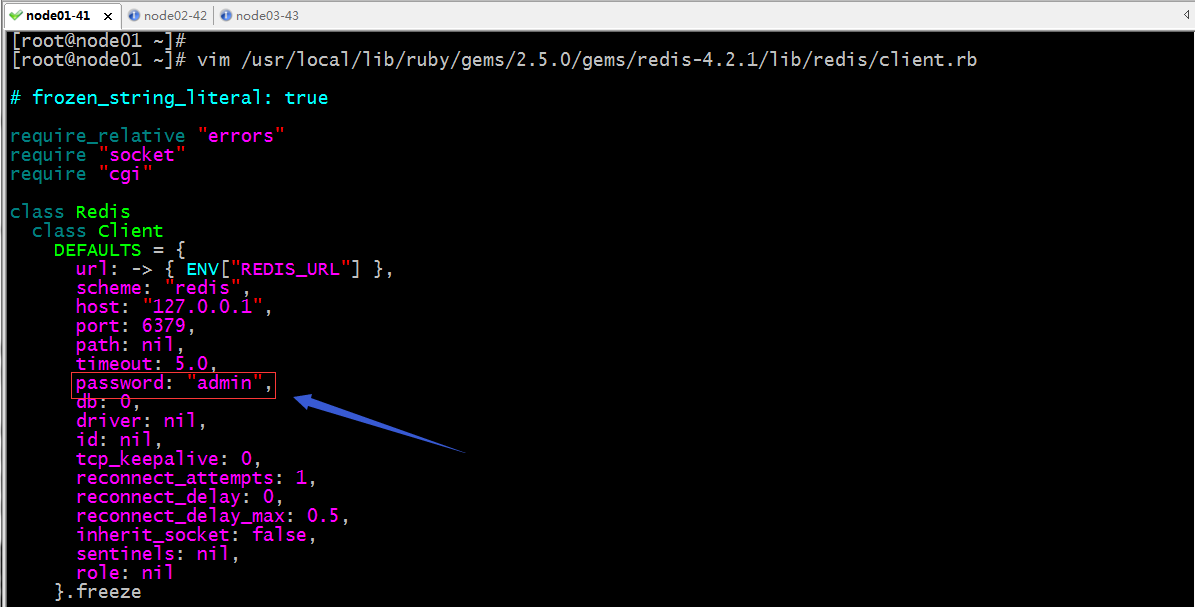
新增密碼到剛才下載的redis包的庫檔案中
提示:這裡需要把對應密碼字串用引號把它引起來;
建立叢集
| 1 2 3 4 5 6 7 8 9 10 11 12 13 14 15 16 17 18 19 20 21 22 23 24 25 26 27 28 29 30 31 32 33 34 35 36 37 38 39 40 41 42 43 44 45 46 47 48 49 50 51 |
[root@node01 ~]# redis-trib.rb create --replicas 1 192.168.0.41:6379 192.168.0.42:6379 192.168.0.43:6379 192.168.0.41:6380 192.168.0.42:6380 192.168.0.43:6380
>>> Creating cluster
>>> Performinghashslots allocation on 6 nodes...
Using 3 masters:
192.168.0.41:6379
192.168.0.42:6379
192.168.0.43:6379
Adding replica 192.168.0.42:6380 to 192.168.0.41:6379
Adding replica 192.168.0.43:6380 to 192.168.0.42:6379
Adding replica 192.168.0.41:6380 to 192.168.0.43:6379
M: 8c785e6ec3f8f7ff4fb7768765da8b8a93f26855 192.168.0.41:6379
slots:0-5460 (5461 slots) master
M: e99b0b450e78719d63520cb6efc068d5e8d4d081 192.168.0.42:6379
slots:5461-10922 (5462 slots) master
M: a7ace08c36f7d55c4f28463d72865aa1ff74829e 192.168.0.43:6379
slots:10923-16383 (5461 slots) master
S: 62ece0b80b83c0f1f078b07fc1687bb8376f76b3 192.168.0.41:6380
replicates a7ace08c36f7d55c4f28463d72865aa1ff74829e
S: dbfff4c49a94c0ee55d14401ccc9245af3655427 192.168.0.42:6380
replicates 8c785e6ec3f8f7ff4fb7768765da8b8a93f26855
S: 91169e71359deed96f8778cf31c823dbd6ded350 192.168.0.43:6380
replicates e99b0b450e78719d63520cb6efc068d5e8d4d081
Can Isetthe above configuration? (type'yes'to accept):yes
>>> Nodes configuration updated
>>> Assign a different config epoch to each node
>>> Sending CLUSTER MEET messages tojointhe cluster
Waitingforthe cluster tojoin......
>>> Performing Cluster Check (using node 192.168.0.41:6379)
M: 8c785e6ec3f8f7ff4fb7768765da8b8a93f26855 192.168.0.41:6379
slots:0-5460 (5461 slots) master
1 additional replica(s)
S: 91169e71359deed96f8778cf31c823dbd6ded350 192.168.0.43:6380
slots: (0 slots) slave
replicates e99b0b450e78719d63520cb6efc068d5e8d4d081
M: e99b0b450e78719d63520cb6efc068d5e8d4d081 192.168.0.42:6379
slots:5461-10922 (5462 slots) master
1 additional replica(s)
M: a7ace08c36f7d55c4f28463d72865aa1ff74829e 192.168.0.43:6379
slots:10923-16383 (5461 slots) master
1 additional replica(s)
S: dbfff4c49a94c0ee55d14401ccc9245af3655427 192.168.0.42:6380
slots: (0 slots) slave
replicates 8c785e6ec3f8f7ff4fb7768765da8b8a93f26855
S: 62ece0b80b83c0f1f078b07fc1687bb8376f76b3 192.168.0.41:6380
slots: (0 slots) slave
replicates a7ace08c36f7d55c4f28463d72865aa1ff74829e
[OK] All nodes agree about slots configuration.
>>> Checkforopenslots...
>>> Check slots coverage...
[OK] All 16384 slots covered.
[root@node01 ~]#
|
提示:從上面的資訊可以瞭解到,我們給指定了6個redis例項的地址和埠,它給我們建立了3個master3個slave,並且在3個master上平均分配了16384個槽位;如果能看到後面的ok all 16384 slots covered,說明叢集建立成功;--replicates用來指定叢集中每個master的副本數量,1表示每個master有一個副本;
檢視叢集狀態資訊
| 1 2 3 4 5 6 7 8 9 10 11 12 13 14 15 16 17 18 19 20 21 22 23 24 25 26 27 28 29 30 31 |
[root@node01 ~]# redis-trib.rb info 192.168.0.41:6379
192.168.0.41:6379 (8c785e6e...) -> 0 keys | 5461 slots | 1 slaves.
192.168.0.42:6379 (e99b0b45...) -> 0 keys | 5462 slots | 1 slaves.
192.168.0.43:6379 (a7ace08c...) -> 0 keys | 5461 slots | 1 slaves.
[OK] 0 keysin3 masters.
0.00 keys per slot on average.
[root@node01 ~]# redis-trib.rb check 192.168.0.41:6379
>>> Performing Cluster Check (using node 192.168.0.41:6379)
M: 8c785e6ec3f8f7ff4fb7768765da8b8a93f26855 192.168.0.41:6379
slots:0-5460 (5461 slots) master
1 additional replica(s)
S: 91169e71359deed96f8778cf31c823dbd6ded350 192.168.0.43:6380
slots: (0 slots) slave
replicates e99b0b450e78719d63520cb6efc068d5e8d4d081
M: e99b0b450e78719d63520cb6efc068d5e8d4d081 192.168.0.42:6379
slots:5461-10922 (5462 slots) master
1 additional replica(s)
M: a7ace08c36f7d55c4f28463d72865aa1ff74829e 192.168.0.43:6379
slots:10923-16383 (5461 slots) master
1 additional replica(s)
S: dbfff4c49a94c0ee55d14401ccc9245af3655427 192.168.0.42:6380
slots: (0 slots) slave
replicates 8c785e6ec3f8f7ff4fb7768765da8b8a93f26855
S: 62ece0b80b83c0f1f078b07fc1687bb8376f76b3 192.168.0.41:6380
slots: (0 slots) slave
replicates a7ace08c36f7d55c4f28463d72865aa1ff74829e
[OK] All nodes agree about slots configuration.
>>> Checkforopenslots...
>>> Check slots coverage...
[OK] All 16384 slots covered.
[root@node01 ~]#
|
提示:從上面的資訊可以看到192.168.0.41/42/43的6379埠都是master,並且都有一個slave節點;
確認master狀態
| 1 2 3 4 5 6 7 8 9 10 11 12 13 14 15 16 17 18 19 20 21 22 23 24 25 26 27 28 29 30 31 32 33 34 35 36 37 38 39 40 41 42 43 44 45 46 47 48 49 50 51 52 53 54 55 56 57 58 59 60 61 62 63 64 65 66 67 68 69 70 71 72 73 74 75 76 77 78 79 80 81 82 83 84 85 86 87 88 89 90 91 92 93 94 95 96 97 98 99 100 101 102 103 104 105 |
[root@node01 ~]# redis-cli -h 192.168.0.41
192.168.0.41:6379> AUTH admin
OK
192.168.0.41:6379> CLUSTER INFO
cluster_state:ok
cluster_slots_assigned:16384
cluster_slots_ok:16384
cluster_slots_pfail:0
cluster_slots_fail:0
cluster_known_nodes:6
cluster_size:3
cluster_current_epoch:6
cluster_my_epoch:1
cluster_stats_messages_ping_sent:606
cluster_stats_messages_pong_sent:586
cluster_stats_messages_sent:1192
cluster_stats_messages_ping_received:581
cluster_stats_messages_pong_received:606
cluster_stats_messages_meet_received:5
cluster_stats_messages_received:1192
192.168.0.41:6379> info replication
# Replication
role:master
connected_slaves:1
slave0:ip=192.168.0.42,port=6380,state=online,offset=854,lag=0
master_replid:303943ae1e9f54e3525abda2fd1efff905bf08e3
master_replid2:0000000000000000000000000000000000000000
master_repl_offset:854
second_repl_offset:-1
repl_backlog_active:1
repl_backlog_size:1048576
repl_backlog_first_byte_offset:1
repl_backlog_histlen:854
192.168.0.41:6379> quit
[root@node01 ~]# redis-cli -h 192.168.0.42
192.168.0.42:6379> auth admin
OK
192.168.0.42:6379> info replication
# Replication
role:master
connected_slaves:1
slave0:ip=192.168.0.43,port=6380,state=online,offset=896,lag=0
master_replid:f4e1b75b8f30be622868814fc4618a4584f3aa32
master_replid2:0000000000000000000000000000000000000000
master_repl_offset:896
second_repl_offset:-1
repl_backlog_active:1
repl_backlog_size:1048576
repl_backlog_first_byte_offset:1
repl_backlog_histlen:896
192.168.0.42:6379> CLUSTER INFO
cluster_state:ok
cluster_slots_assigned:16384
cluster_slots_ok:16384
cluster_slots_pfail:0
cluster_slots_fail:0
cluster_known_nodes:6
cluster_size:3
cluster_current_epoch:6
cluster_my_epoch:2
cluster_stats_messages_ping_sent:662
cluster_stats_messages_pong_sent:645
cluster_stats_messages_meet_sent:5
cluster_stats_messages_sent:1312
cluster_stats_messages_ping_received:644
cluster_stats_messages_pong_received:667
cluster_stats_messages_meet_received:1
cluster_stats_messages_received:1312
192.168.0.42:6379> quit
[root@node01 ~]# redis-cli -h 192.168.0.43
192.168.0.43:6379> AUTH admin
OK
192.168.0.43:6379> CLUSTER INFO
cluster_state:ok
cluster_slots_assigned:16384
cluster_slots_ok:16384
cluster_slots_pfail:0
cluster_slots_fail:0
cluster_known_nodes:6
cluster_size:3
cluster_current_epoch:6
cluster_my_epoch:3
cluster_stats_messages_ping_sent:683
cluster_stats_messages_pong_sent:787
cluster_stats_messages_meet_sent:4
cluster_stats_messages_sent:1474
cluster_stats_messages_ping_received:786
cluster_stats_messages_pong_received:687
cluster_stats_messages_meet_received:1
cluster_stats_messages_received:1474
192.168.0.43:6379> info replication
# Replication
role:master
connected_slaves:1
slave0:ip=192.168.0.41,port=6380,state=online,offset=952,lag=1
master_replid:7cbc7d52452717cd49a0e543f6efdccafe5fe1bd
master_replid2:0000000000000000000000000000000000000000
master_repl_offset:952
second_repl_offset:-1
repl_backlog_active:1
repl_backlog_size:1048576
repl_backlog_first_byte_offset:1
repl_backlog_histlen:952
192.168.0.43:6379> quit
[root@node01 ~]#
|
提示:可以看到叢集狀態都是正常ok的,並且41的6379對應42的6380,42的6379對應43的6380,43的6379對應41的6380,剛好master和slave都是錯開的;
檢視叢集各node對應關係
提示:上面的node對應是依據id號來的。到此redis叢集就正常的跑起來了;
驗證:在master上任意寫入一個數據看看會發生什麼?
提示:在master01上寫入k1,它提示我們到192.168.0.43:6379上去寫;這是因為我們寫入k1計算的槽位是12706,這個槽位是在master03上,所以在master01上就不能正常的寫入;這同時也告訴我們,要使用redis叢集,客戶端還必須能夠智慧去理解redis協議,通過叢集返回的資訊,把對應請求排程到對應master上執行;
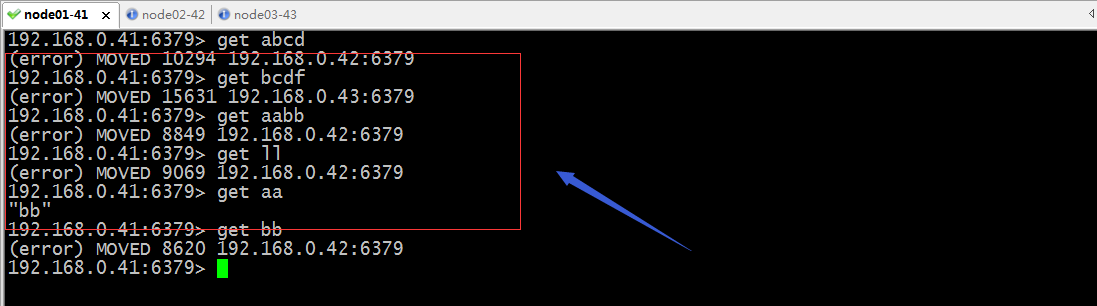
驗證讀請求
提示:從上面的資訊可以確定一點,這三個主節點他們互相資料是完全隔離的,也就說master01不知道master02上到底有沒有對應的資料,它只知道應該去master02上去檢視才知道;這就是我們之前說的,每個節點擁有整個叢集的全部狀態資訊(元資料),而每個節點只擁有部分資料在本節點;
驗證:把任意一個master節點宕機,看看對應slave是否能夠被提升為master,接管master呢?
提示:可以看到當master01宕機以後,對應slave就被提升為master;
檢視master01的配置檔案是否有改動?
| 1 2 3 4 5 6 7 8 9 10 11 12 13 14 15 16 17 18 19 20 21 22 23 24 25 26 27 28 29 30 31 32 33 34 35 36 37 38 39 40 41 42 43 44 45 46 47 48 49 50 51 52 53 54 55 56 |
[root@node01 ~]# cat /usr/local/redis/redis-cluster_6379.conf
91169e71359deed96f8778cf31c823dbd6ded350 192.168.0.43:6380@16380 master - 0 1596648345000 8 connected 5461-10922
dbfff4c49a94c0ee55d14401ccc9245af3655427 192.168.0.42:6380@16380 slave 8c785e6ec3f8f7ff4fb7768765da8b8a93f26855 0 1596648345510 9 connected
62ece0b80b83c0f1f078b07fc1687bb8376f76b3 192.168.0.41:6380@16380 slave a7ace08c36f7d55c4f28463d72865aa1ff74829e 0 1596648343893 4 connected
e99b0b450e78719d63520cb6efc068d5e8d4d081 192.168.0.42:6379@16379 slave 91169e71359deed96f8778cf31c823dbd6ded350 0 1596648344903 8 connected
8c785e6ec3f8f7ff4fb7768765da8b8a93f26855 192.168.0.41:6379@16379 myself,master - 0 1596648345000 9 connected 0-5460
a7ace08c36f7d55c4f28463d72865aa1ff74829e 192.168.0.43:6379@16379 master - 0 1596648345000 3 connected 10923-16383
vars currentEpoch 9 lastVoteEpoch 0
[root@node01 ~]# ps -ef |grep redis
root 15980 1 0 Aug05 ? 00:00:17 redis-server 0.0.0.0:6380 [cluster]
root 30867 1 0 01:19 ? 00:00:02 redis-server 0.0.0.0:6379 [cluster]
root 30949 14690 0 01:30 pts/000:00:00grep--color=auto redis
[root@node01 ~]# redis-cli -a admin
127.0.0.1:6379> info replication
# Replication
role:master
connected_slaves:1
slave0:ip=192.168.0.42,port=6380,state=online,offset=4476,lag=0
master_replid:ed690ba2766e6e334ffc298fc6aba8be80465aa8
master_replid2:776b5f996d78171e7c5ab5419d65c6c14a253bda
master_repl_offset:4476
second_repl_offset:4071
repl_backlog_active:1
repl_backlog_size:1048576
repl_backlog_first_byte_offset:3595
repl_backlog_histlen:882
127.0.0.1:6379> quit
[root@node01 ~]# kill -9 30867
[root@node01 ~]# redis-cli -h 192.168.0.42 -p 6380
192.168.0.42:6380> AUTH admin
OK
192.168.0.42:6380> info replication
# Replication
role:master
connected_slaves:0
master_replid:d46c0a3761b61352b1fc75986ab3343e04a89b83
master_replid2:ed690ba2766e6e334ffc298fc6aba8be80465aa8
master_repl_offset:4518
second_repl_offset:4519
repl_backlog_active:1
repl_backlog_size:1048576
repl_backlog_first_byte_offset:4071
repl_backlog_histlen:448
192.168.0.42:6380> quit
[root@node01 ~]# cat /usr/local/redis/redis-cluster_6379.conf
91169e71359deed96f8778cf31c823dbd6ded350 192.168.0.43:6380@16380 master - 0 1596648345000 8 connected 5461-10922
dbfff4c49a94c0ee55d14401ccc9245af3655427 192.168.0.42:6380@16380 slave 8c785e6ec3f8f7ff4fb7768765da8b8a93f26855 0 1596648345510 9 connected
62ece0b80b83c0f1f078b07fc1687bb8376f76b3 192.168.0.41:6380@16380 slave a7ace08c36f7d55c4f28463d72865aa1ff74829e 0 1596648343893 4 connected
e99b0b450e78719d63520cb6efc068d5e8d4d081 192.168.0.42:6379@16379 slave 91169e71359deed96f8778cf31c823dbd6ded350 0 1596648344903 8 connected
8c785e6ec3f8f7ff4fb7768765da8b8a93f26855 192.168.0.41:6379@16379 myself,master - 0 1596648345000 9 connected 0-5460
a7ace08c36f7d55c4f28463d72865aa1ff74829e 192.168.0.43:6379@16379 master - 0 1596648345000 3 connected 10923-16383
vars currentEpoch 9 lastVoteEpoch 0
[root@node01 ~]# grep slaveof /usr/local/redis/6379/etc/redis.conf
# Master-Slave replication. Use slaveof to make a Redis instance a copy of
# slaveof <masterip> <masterport>
[root@node01 ~]#
|
提示:從上面的資訊可以看到,在master01沒有宕機前和宕機以後slave被提升為master後,對應的配置資訊都沒有發生變化;我上面為了驗證配置檔案是否發生變化,先是把master01上線,然後把對應slave下線在上線,還原master01為master角色;
重新把master上線,看看它的配置檔案有什麼變化?角色還會是master嗎?
| 1 2 3 4 5 6 7 8 9 10 11 12 13 14 15 16 17 18 19 20 21 22 23 24 25 26 27 28 29 30 31 32 33 34 35 36 37 38 39 40 41 42 43 |
[root@node01 ~]# redis-server /usr/local/redis/6379/etc/redis.conf
[root@node01 ~]# ss -tnl
State Recv-Q Send-Q Local Address:Port Peer Address:Port
LISTEN 0 511 *:6379 *:*
LISTEN 0 511 *:6380 *:*
LISTEN 0 128 *:22 *:*
LISTEN 0 100 127.0.0.1:25 *:*
LISTEN 0 511 *:16379 *:*
LISTEN 0 511 *:16380 *:*
LISTEN 0 128 :::22 :::*
LISTEN 0 100 ::1:25 :::*
[root@node01 ~]# cat /usr/local/redis/redis-cluster_6379.conf
91169e71359deed96f8778cf31c823dbd6ded350 192.168.0.43:6380@16380 master - 1596649311329 1596649311326 8 connected 5461-10922
8c785e6ec3f8f7ff4fb7768765da8b8a93f26855 192.168.0.41:6379@16379 myself,slave dbfff4c49a94c0ee55d14401ccc9245af3655427 0 1596649311326 9 connected
e99b0b450e78719d63520cb6efc068d5e8d4d081 192.168.0.42:6379@16379 slave 91169e71359deed96f8778cf31c823dbd6ded350 0 1596649311331 8 connected
a7ace08c36f7d55c4f28463d72865aa1ff74829e 192.168.0.43:6379@16379 master - 0 1596649311332 3 connected 10923-16383
62ece0b80b83c0f1f078b07fc1687bb8376f76b3 192.168.0.41:6380@16380 slave a7ace08c36f7d55c4f28463d72865aa1ff74829e 0 1596649311331 4 connected
dbfff4c49a94c0ee55d14401ccc9245af3655427 192.168.0.42:6380@16380 master - 0 1596649311332 10 connected 0-5460
vars currentEpoch 10 lastVoteEpoch 0
[root@node01 ~]# redis-cli
127.0.0.1:6379> AUTH admin
OK
127.0.0.1:6379> info replication
# Replication
role:slave
master_host:192.168.0.42
master_port:6380
master_link_status:up
master_last_io_seconds_ago:5
master_sync_in_progress:0
slave_repl_offset:4686
slave_priority:100
slave_read_only:1
connected_slaves:0
master_replid:d46c0a3761b61352b1fc75986ab3343e04a89b83
master_replid2:0000000000000000000000000000000000000000
master_repl_offset:4686
second_repl_offset:-1
repl_backlog_active:1
repl_backlog_size:1048576
repl_backlog_first_byte_offset:4519
repl_backlog_histlen:168
127.0.0.1:6379>
|
提示:可以看到,重新把master01上線以後,它自動降級為slave了,並且配置檔案也從master需改成slave了;這應該是redis cluster在檢測到192.168.0.41:6379上線後,觸發把記憶體中的配置同步到對應檔案,使得對應配置檔案也被修改了;到此一個redis cluster 就搭建測試完成了;