
延遲加載
延遲加載圖片
延遲加載也稱為惰性加載,即在長網頁中延遲加載圖像。用戶滾動到它們之前,視口外的圖像不會加載。這與圖像預加載相反,在長網頁上使用延遲加載將使網頁加載更快。在某些情況下,它還可以幫助減少服務器負載。
舉個例子來說明,當打開淘寶首頁的時候,只有在瀏覽器窗口裏的圖片才會被加載,當你滾動首頁向下滑的時候,進入視口內的圖片才會被加載,而其它從未進入視口的圖像不會也不會加載。
好處
- 首先它能提升用戶的體驗,試想一下,如果打開頁面的時候就將頁面上所有的圖片全部獲取加載,如果圖片數量較大,對於用戶來說簡直就是災難,會出現卡頓現象,影響用戶體驗。
- 有選擇性地請求圖片,這樣能明顯減少了服務器的壓力和流量,也能夠減小瀏覽器的負擔。
方法
第一種
首先將頁面上的圖片的 src 屬性設為 loading.gif,而圖片的真實路徑則設置在 data-src 屬性中,頁面滾動的時候計算圖片的位置與滾動的位置,當圖片出現在瀏覽器視口內時,將圖片的 src 屬性設置為 data-src 的值,這樣,就可以實現延遲加載。
        <style>
        img
        {
          height:600px;
        }
        </style>

        <body>
        <img src="images/loading.gif" data-src="images/1.jpg">
        <img src="images/loading.gif" data-src="images/7.jpg">
        <img src="images/loading.gif" data-src="images/8.jpg">
        <img src="images/loading.gif" data-src="images/9.jpg">
        <img src="images/loading.gif" data-src="images/10.jpg">
        </body>

        <script>
            function lazyload() {
                var images = document.getElementsByTagName(‘img‘);
                var len = images.length;
                var n = 0;      //存儲圖片加載到的位置,避免每次都從第一張圖片開始遍歷
                return function () {
                    var seeHeight = document.body.clientHeight;
                    console.log(‘seeHeight:‘ + seeHeight);
                    var scrollTop = document.documentElement.scrollTop || document.body.scrollTop;
                    console.log(‘scrollTop:‘ + scrollTop);

                    for (var i = n; i < len; i++) {
                        if (images[i].offsetTop < seeHeight + scrollTop) {
                            if (images[i].getAttribute(‘src‘) === ‘images/loading.gif‘) {
                                images[i].src = images[i].getAttribute(‘data-src‘);
                            }
                            n = n + 1;
                        }
                    }
                }
            }
            var loadImages = lazyload();
            loadImages();          //初始化首頁的頁面圖片
            window.addEventListener(‘scroll‘, loadImages, false);
        </script>
            //jQuery版

        var n = 0,
            imgNum = $("img").length,
            img = $(‘img‘);
        lazyload();
        $(window).scroll(lazyload);
        function lazyload(event) {
            for (var i = n; i < imgNum; i++) {
                if (img.eq(i).offset().top < parseInt($(window).height()) + parseInt($(window).scrollTop())) {
                    if (img.eq(i).attr("src") == "default.jpg") {
                        var src = img.eq(i).attr("data-src");
                        img.eq(i).attr("src", src);
                        n = i + 1;
                    }
                }
            }
        }
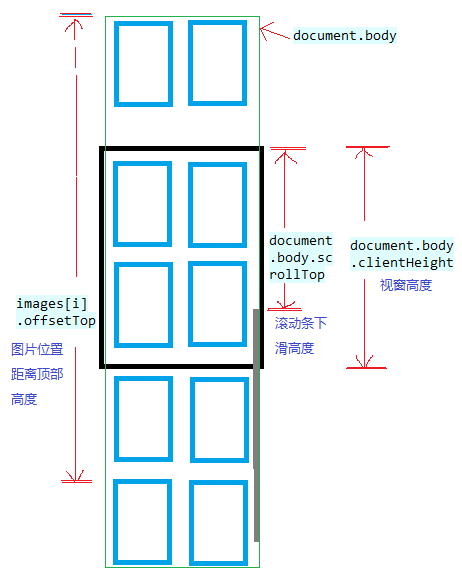
比較 image 的 offsetTop 與 seeHeight + scrollTop 的大小,當小於時則說明圖片已經出現過在視口中,這時候繼續判斷圖片是否已經替換過,如果沒有替換過,則進行替換。
第二種
第一種方法有個局限性,就是圖片的高度必須是是個定值,即高度需設定好,不然在images[i].offsetTop獲取圖片距離頂部的位置會出現差錯。
還有一點就是性能差,函數直接綁定在 scroll 事件上,當頁面滾動時,函數會被高頻觸發,這非常影響瀏覽器的性能。有個解決方案是在做事件綁定的時候,可以對 lazyload 函數進行函數節流(throttle)與函數去抖(debounce)處理,限制觸發頻率,來優化性能。。debounce類似於一部電梯停在某一個樓層,當有一個人進來後,20秒後自動關門,這20秒的等待期間,又一個人按了電梯進來,這20秒又重新計算,直到電梯關門那一刻才算是響應了事件。而Throttle好比一臺自動的飲料機,按拿鐵按鈕,在出飲料的過程中,不管按多少這個按鈕,都不會連續出飲料,中間按鈕的響應會被忽略,必須要等這一杯的容量全部出完之後,再按拿鐵按鈕才會出下一杯。
throttle和debounce均是通過減少實際邏輯處理過程的執行來提高事件處理函數運行性能的手段,並沒有實質上減少事件的觸發次數。
去抖:就是說當調用動作n毫秒後,才會執行該動作,若在這n毫秒內又調用此動作則將重新計算執行時間。
        // debounce函數用來包裹我們的事件
        function debounce(fn, delay) {
          // 持久化一個定時器 timer
          var timer = null;
          // 閉包函數可以訪問 timer
          return function() {
            // 通過 ‘this‘ 和 ‘arguments‘
            // 獲得函數的作用域和參數
            var context = this;
            var args = arguments;
            // 如果事件被觸發,清除 timer 並重新開始計時
            clearTimeout(timer);
            timer = setTimeout(function() {
              fn.apply(context, args);
            }, delay);
          }
        }
        // 實際想綁定在 scroll 事件上的 handler
        function lazyload(event) {}
        // 采用了去抖函數
        window.addEventListener(‘scroll‘,throttle(lazyload,500));
節流函數:就是會說預先設定一個執行周期,當調用動作的時刻大於等於執行周期則執行該動作,然後進入下一個新周期。只允許一個函數在N秒內執行一次。去抖相比較節流函數要稍微簡單一點,去抖是讓函數延遲執行,而節流比去抖多了一個在一定時間內必須要執行一次。
        // 簡單的節流函數
        //fun 要執行的函數
        //delay 延遲
        //time  在time時間內必須執行一次
        function throttle(fun, delay, time) {
            var timeout,
                startTime = new Date();
            return function() {
                var context = this,
                    args = arguments,
                    curTime = new Date();
                clearTimeout(timeout);
                // 如果達到了規定的觸發時間間隔,觸發 handler
                if (curTime - startTime >= time) {
                    fun.apply(context, args);
                    startTime = curTime;
                    // 沒達到觸發間隔,重新設定定時器
                } else {
                    timeout = setTimeout(function(){
        	            fun.apply(context, args);
                    }, delay);
                }
            };
        };
        function throttle(fn, delay, atleast) {
	        var timeout = null,
	    	startTime = new Date();
	        return function() {
	    	var curTime = new Date();
	    	clearTimeout(timeout);
	    	if(curTime - startTime >= atleast) {
	    	    fn();
	    	    startTime = curTime;
	    	}else {
	    	    timeout = setTimeout(fn, delay);
	    	}
	        }
	    }

        window.addEventListener(‘scroll‘, throttle(loadImages, 500, 1000), false);
設置了 500ms 的延遲,和 1000ms 的間隔,當超過 1000ms 未觸發該函數,則立即執行該函數,不然則延遲 500ms 執行該函數。
下面是underscore中的源碼
        _.debounce = function(func, wait, immediate) {
            // immediate默認為false
            var timeout, args, context, timestamp, result;

            var later = function() {
              // 當wait指定的時間間隔期間多次調用_.debounce返回的函數,則會不斷更新timestamp的值,導致last < wait && last >= 0一直為true,從而不斷啟動新的計時   器  延時執行func
              var last = _.now() - timestamp;

              if (last < wait && last >= 0) {
                timeout = setTimeout(later, wait - last);
              } else {
                timeout = null;
                if (!immediate) {
                  result = func.apply(context, args);
                  if (!timeout) context = args = null;
                }
              }
            };

            return function() {
              context = this;
              args = arguments;
              timestamp = _.now();
              // 第一次調用該方法時,且immediate為true,則調用func函數
              var callNow = immediate && !timeout;
              // 在wait指定的時間間隔內首次調用該方法,則啟動計時器定時調用func函數
              if (!timeout) timeout = setTimeout(later, wait);
              if (callNow) {
                result = func.apply(context, args);
                context = args = null;
              }

              return result;
            };
          };
        _.throttle = function(func, wait, options) {
            /* options的默認值
             *  表示首次調用返回值方法時,會馬上調用func;否則僅會記錄當前時刻,當第二次調用的時間間隔超過wait時,才調用func。
             *  options.leading = true;
             * 表示當調用方法時,未到達wait指定的時間間隔,則啟動計時器延遲調用func函數,若後續在既未達到wait指定的時間間隔和func函數又未被調用的情況下調用返回        方法,則被調用請求將被丟棄。
             *  options.trailing = true;
             * 註意:當options.trailing = false時,效果與上面的簡單實現效果相同
             */
            var context, args, result;
            var timeout = null;
            var previous = 0;
            if (!options) options = {};
            var later = function() {
              previous = options.leading === false ? 0 : _.now();
              timeout = null;
              result = func.apply(context, args);
              if (!timeout) context = args = null;
            };
            return function() {
              var now = _.now();
              if (!previous && options.leading === false) previous = now;
              // 計算剩余時間
              var remaining = wait - (now - previous);
              context = this;
              args = arguments;
              // 當到達wait指定的時間間隔,則調用func函數
              // 精彩之處:按理來說remaining <= 0已經足夠證明已經到達wait的時間間隔,但這裏還考慮到假如客戶端修改了系統時間則馬上執行func函數。
              if (remaining <= 0 || remaining > wait) {
                // 由於setTimeout存在最小時間精度問題,因此會存在到達wait的時間間隔,但之前設置的setTimeout操作還沒被執行,因此為保險起見,這裏先清理setT        ut操 作
                if (timeout) {
                  clearTimeout(timeout);
                  timeout = null;
                }
                previous = now;
                result = func.apply(context, args);
                if (!timeout) context = args = null;
              } else if (!timeout && options.trailing !== false) {
                // options.trailing=true時,延時執行func函數
                timeout = setTimeout(later, remaining);
              }
              return result;
            };
          };
利用交叉觀察器IntersectionObserver實現惰性加載
IntersectionObserver是瀏覽器原生提供的構造函數,接受兩個參數:callback是可見性變化時的回調函數,option是配置對象(該參數可選)。
構造函數的返回值是一個觀察器實例。實例的observe方法可以指定觀察哪個 DOM 節點。
        var io = new IntersectionObserver(callback, option);

        // 開始觀察
        io.observe(document.getElementById(‘example‘));

        // 停止觀察
        io.unobserve(element);

        // 關閉觀察器
        io.disconnect();
observe的參數是一個 DOM 節點對象。如果要觀察多個節點,就要多次調用這個方法。
callback一般會觸發兩次。一次是目標元素剛剛進入視口(開始可見),另一次是完全離開視口(開始不可見)。callback函數的參數是一個數組,每個成員都是一個IntersectionObserverEntry對象。IntersectionObserverEntry 對象提供目標元素的信息,一共有六個屬性。
- time: 可見性發生變化的時間,是一個高精度時間戳,單位為毫秒
- target:被觀察的目標元素,是一個 DOM 節點對象
- rootBounds:根元素的矩形區域的信息,getBoundingClientRect()方法的返回值,如果沒有根元素(即直接相對於視口滾動),則返回null
- boundingClientRect:目標元素的矩形區域的信息
- intersectionRect:目標元素與視口(或根元素)的交叉區域的信息
- intersectionRatio:目標元素的可見比例,即intersectionRect占boundingClientRect的比例,完全可見時為1,完全不可見時小於等於0
        var intersectionObserver = new IntersectionObserver(
          function (entries) {
            // 如果不可見,就返回
            if (entries[0].intersectionRatio <= 0) return;
            loadItems(10);
            console.log(‘Loaded new items‘);
          });

        // 開始觀察
        intersectionObserver.observe(
          document.querySelector(‘.scrollerFooter‘)
        );
延遲加載Js
延遲加載javascript,也就是頁面加載完成之後再加載javascript,也叫on demand(按需)加載,一般有一下幾個方法
1.head追加script標簽
        window.onload = function () {
            setTimeout(function () {

                var head = document.getElementsByTagName(‘head‘)[0];

                // a new CSS
                var css = document.createElement(‘link‘);
                css.type = "text/css";
                css.rel = "stylesheet";
                css.href = "new.css";

                // a new JS
                var js = document.createElement("script");
                js.type = "text/javascript";
                js.src = "new.js";

                // preload JS and CSS
                head.appendChild(css);
                head.appendChild(js);

                // preload image
                new Image().src = "new.png";

            }, 1000);
        };
2.和第一種類似,但是script標簽是放到iframe的document裏面。
                window.onload = function () {
        setTimeout(function () {

            // create new iframe
            var iframe = document.createElement(‘iframe‘);
            iframe.setAttribute("width", "0");
            iframe.setAttribute("height", "0");
            iframe.setAttribute("frameborder", "0");
            iframe.setAttribute("name", "preload");
            iframe.id = "preload";
            iframe.src = "about:blank";
            document.body.appendChild(iframe);

            // gymnastics to get reference to the iframe document
            iframe = document.all ? document.all.preload.contentWindow : window.frames.preload;
            var doc = iframe.document;
            doc.open(); doc.writeln("<html><body></body></html>"); doc.close();

            // create CSS
            var css = doc.createElement(‘link‘);
            css.type = "text/css";
            css.rel = "stylesheet";
            css.href = "new.css";

            // create JS
            var js = doc.createElement("script");
            js.type = "text/javascript";
            js.src = "new.js";

            // preload CSS and JS
            doc.body.appendChild(css);
            doc.body.appendChild(js);

            // preload IMG
            new Image().src = "new.png";

        }, 1000);
    };
3.利用document.write
        <script language="javascript" type="text/javascript">
                    function include(script_filename) {
                        document.write(‘<‘ + ‘script‘);
                        document.write(‘ language="javascript"‘);
                        document.write(‘ type="text/javascript"‘);
                        document.write(‘ src="‘ + script_filename + ‘">‘);
                        document.write(‘</‘ + ‘script‘ + ‘>‘);
                    }

                    var which_script = ‘1.js‘;
                    include(which_script);  //可以控制引入時刻
         </script>
4.直接把需要加載東西放到另一個頁面中
        window.onload = function () {
        setTimeout(function () {

            // create a new frame and point to the URL of the static
            // page that has all components to preload
            var iframe = document.createElement(‘iframe‘);
            iframe.setAttribute("width", "0");
            iframe.setAttribute("height", "0");
            iframe.setAttribute("frameborder", "0");
            iframe.src = "preloader.html";
            document.body.appendChild(iframe);

        }, 1000);
    };
5.用ajax下載代碼,然後用eval執行
6.用ajax下載代碼,建立一個空的script tag,設置text屬性為下載的代碼
7. async 屬性(缺點是不能控制加載的順序)<script src="" async="true"/>
延遲加載