
JAVAEE學習——struts2_03:OGNL表達式、OGNL與Struts2的結合和練習:客戶列表
阿新 • • 發佈:2017-06-15
數據 setvalue mage 工作 準備 nor fig 存在 dir 
一、OGNL表達式
1.簡介
OGNL:對象視圖導航語言. ${user.addr.name} 這種寫法就叫對象視圖導航。
OGNL不僅僅可以視圖導航.支持比EL表達式更加豐富的功能。
2.使用OGNL準備工作
2.1導包
struts2 的包中已經包含了.所以不需要導入額外的jar包
2.2代碼準備
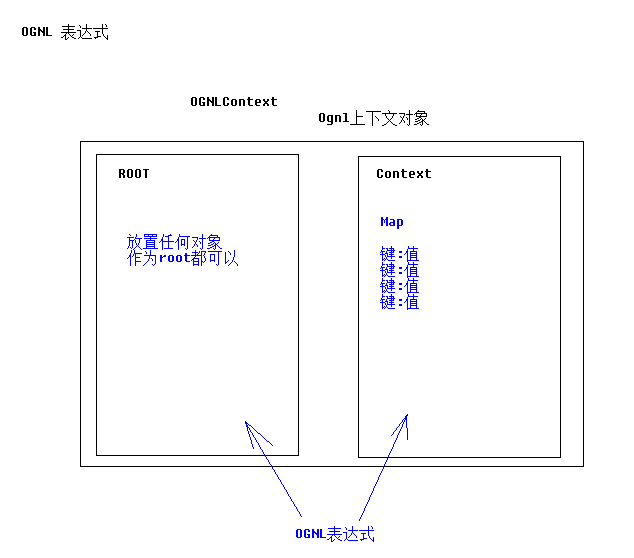

@Test //準備工作 public void fun1() throws Exception{ //準備OGNLContext //準備Root User rootUser = new準備工作User("tom",18); //準備Context Map<String,User> context = new HashMap<String,User>(); context.put("user1", new User("jack",18)); context.put("user2", new User("rose",22)); OgnlContext oc = new OgnlContext(); //將rootUser作為root部分 oc.setRoot(rootUser);//將context這個Map作為Context部分 oc.setValues(context); //書寫OGNL Ognl.getValue("", oc, oc.getRoot()); }
3.基本語法演示
        //取出root中user對象的name屬性
        String name = (String) Ognl.getValue("name", oc, oc.getRoot());
        Integer age = (Integer) Ognl.getValue("age", oc, oc.getRoot());
        System.out.println(name);
        System.out.println(age);
取出root中的屬性值
        //取出context中鍵為user1對象的name屬性
        String name = (String) Ognl.getValue("#user1.name", oc, oc.getRoot());
        String name2 = (String) Ognl.getValue("#user2.name", oc, oc.getRoot());
        Integer age = (Integer) Ognl.getValue("#user2.age", oc, oc.getRoot());
        System.out.println(name);
        System.out.println(name2);
        System.out.println(age);
取出context中的屬性值
        //將root中的user對象的name屬性賦值
        Ognl.getValue("name=‘jerry‘", oc, oc.getRoot());
        String name = (String) Ognl.getValue("name", oc, oc.getRoot());

        String name2 = (String) Ognl.getValue("#user1.name=‘郝強勇‘,#user1.name", oc, oc.getRoot());
        System.out.println(name);
        System.out.println(name2);
為屬性賦值
        //調用root中user對象的setName方法
        Ognl.getValue("setName(‘lilei‘)", oc, oc.getRoot());
        String name = (String) Ognl.getValue("getName()", oc, oc.getRoot());
        String name2 = (String) Ognl.getValue("#user1.setName(‘lucy‘),#user1.getName()", oc, oc.getRoot());

        System.out.println(name);
        System.out.println(name2);
調用方法
String name = (String) Ognl.getValue("@[email protected](‘hello 強勇!‘)", oc, oc.getRoot());
//Double pi = (Double) Ognl.getValue("@[email protected]", oc, oc.getRoot());
Double pi = (Double) Ognl.getValue("@@PI", oc, oc.getRoot());
System.out.println(name);
System.out.println(pi);
調用靜態方法
        //創建list對象
        Integer size = (Integer) Ognl.getValue("{‘tom‘,‘jerry‘,‘jack‘,‘rose‘}.size()", oc, oc.getRoot());
        String name = (String) Ognl.getValue("{‘tom‘,‘jerry‘,‘jack‘,‘rose‘}[0]", oc, oc.getRoot());
        String name2 = (String) Ognl.getValue("{‘tom‘,‘jerry‘,‘jack‘,‘rose‘}.get(1)", oc, oc.getRoot());

        /*System.out.println(size);
        System.out.println(name);
        System.out.println(name2);*/
        //創建Map對象
        Integer size2 = (Integer) Ognl.getValue("#{‘name‘:‘tom‘,‘age‘:18}.size()", oc, oc.getRoot());
        String name3  = (String) Ognl.getValue("#{‘name‘:‘tom‘,‘age‘:18}[‘name‘]", oc, oc.getRoot());
        Integer age  = (Integer) Ognl.getValue("#{‘name‘:‘tom‘,‘age‘:18}.get(‘age‘)", oc, oc.getRoot());
        System.out.println(size2);
        System.out.println(name3);
        System.out.println(age);
ognl創建對象-list|map
二、OGNL與Struts2的結合
1.結合原理

ValueStack中的兩部分

2.棧原理

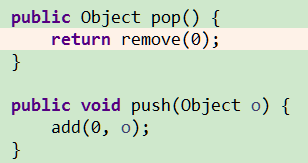
棧是由ArrayList模擬的

棧中的兩個方法的實現
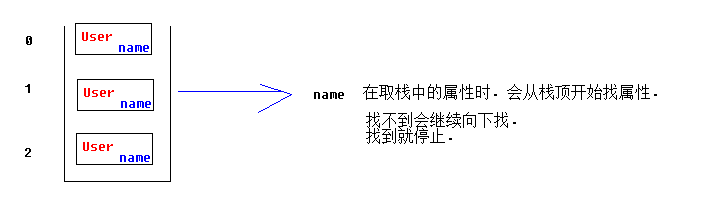
訪問棧中屬性的特點.由上到下
3.查看值棧中兩部分內容(使用DEBUG標簽)
3.1Root
默認情況下,棧中放置當前訪問的Action對象
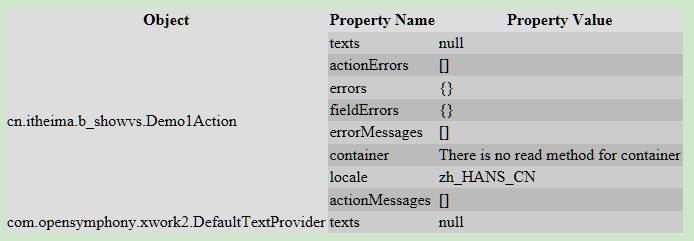
3.2Context
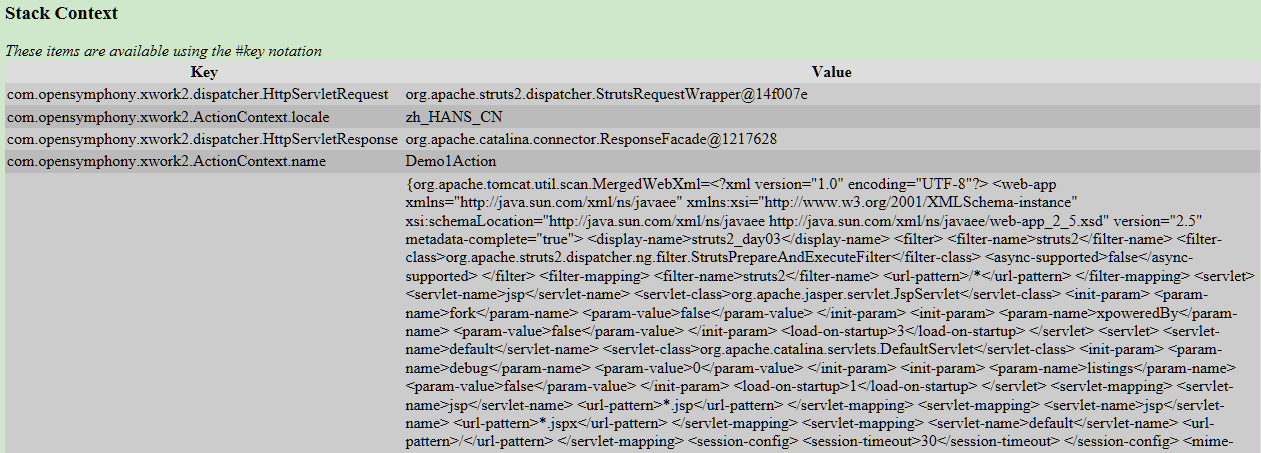

Context部分就是ActionContext數據中心
4.struts2與ognl結合體現
4.1參數接收

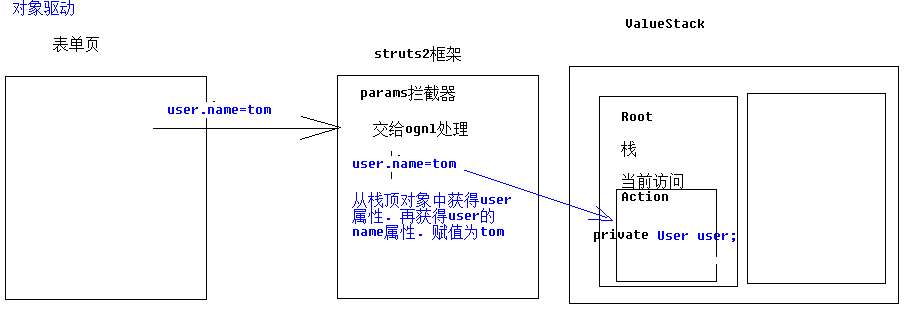

如何獲得值棧對象,值棧對象與ActionContext對象是互相引用的
        //壓入棧頂
        //1獲得值棧
        ValueStack vs = ActionContext.getContext().getValueStack();
        //2將u壓入棧頂
        vs.push(u);
4.2配置文件中
<action name="Demo3Action" class="cn.itheima.d_config.Demo3Action" method="execute" >
            <result name="success" type="redirectAction" >
                <param name="actionName">Demo1Action</param>
                <param name="namespace">/</param>
                <!-- 如果添加的參數struts"看不懂".就會作為參數附加重定向的路徑之後.
                     如果參數是動態的.可以使用${}包裹ognl表達式.動態取值
                 -->
                <param name="name">${name}</param>
            </result>
        </action>
語法:${ognl表達式}
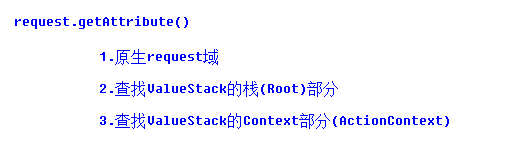
5.擴展:request對象的getAttribute方法
查找順序:
三、練習:客戶列表
    public String list() throws Exception {
        //1 接受參數
        String cust_name = ServletActionContext.getRequest().getParameter("cust_name");
        //2 創建離線查詢對象
        DetachedCriteria dc =DetachedCriteria.forClass(Customer.class);
        //3 判斷參數拼裝條件
        if(StringUtils.isNotBlank(cust_name)){
            dc.add(Restrictions.like("cust_name", "%"+cust_name+"%"));
        }
        //4 調用Service將離線對象傳遞
        List<Customer> list = cs.getAll(dc);
        //5 將返回的list放入request域.轉發到list.jsp顯示

        //ServletActionContext.getRequest().setAttribute("list", list);
        // 放到ActionContext
        ActionContext.getContext().put("list", list);

        return "list";
    }
Action代碼(新增ActionContext存放數據)
<s:iterator value="#list" var="cust" > <TR style="FONT-WEIGHT: normal; FONT-STYLE: normal; BACKGROUND-COLOR: white; TEXT-DECORATION: none"> <TD> <s:property value="#cust.cust_name" /> </TD> <TD> <s:property value="#cust.cust_level" /> </TD> <TD> <s:property value="#cust.cust_source" /> </TD> <TD> <s:property value="#cust.cust_linkman" /> </TD> <TD> <s:property value="#cust.cust_phone" /> </TD> <TD> <s:property value="#cust.cust_mobile" /> </TD> <TD> <a href="${pageContext.request.contextPath }/customerServlet?method=edit&custId=${customer.cust_id}">修改</a> <a href="${pageContext.request.contextPath }/customerServlet?method=delete&custId=${customer.cust_id}">刪除</a> </TD> </TR> </s:iterator> <%-- <s:iterator value="#list" > <TR style="FONT-WEIGHT: normal; FONT-STYLE: normal; BACKGROUND-COLOR: white; TEXT-DECORATION: none"> <TD> <s:property value="cust_name" /> </TD> <TD> <s:property value="cust_level" /> </TD> <TD> <s:property value="cust_source" /> </TD> <TD> <s:property value="cust_linkman" /> </TD> <TD> <s:property value="cust_phone" /> </TD> <TD> <s:property value="cust_mobile" /> </TD> <TD> <a href="${pageContext.request.contextPath }/customerServlet?method=edit&custId=${customer.cust_id}">修改</a> <a href="${pageContext.request.contextPath }/customerServlet?method=delete&custId=${customer.cust_id}">刪除</a> </TD> </TR> </s:iterator> --%>JSP顯示數據的代碼(註釋的是另一種方法)
註意:<s:iterator value="#list" var="cust" > 每次都會把cust存在ActionContext中
JAVAEE學習——struts2_03:OGNL表達式、OGNL與Struts2的結合和練習:客戶列表