使用NFS啟動Tiny4412開發板根文件系統
1、Ubuntu14.04上搭建NFS服務
1.1、安裝NFS服務
$ sudo apt-get install nfs-kernel-server //安裝NFS服務
1.2 創建Tiny4412開發板根文件系統
這部分內容參考《Busybox構建根文件系統和制作Ramdisk》部分。
假設Tiny4412開發板根文件系統路徑為/home/felix/nfs
1.3. 配置NFS服務器
配置NFS主要涉及配置文件/etc/exports,它用於NFS服務器端,其中列出了NFS服務器中要導出的目錄、可以訪問這些目錄的NFS客戶機及其訪問權限。
/etc/exports
dir_to_export NFS_client (permissions) [NFS_client (permissions)…]
例如:
/tmp 192.168.100.0/24(ro) localhost(rw) *(ro,sync)
[分享目錄] [第一個客戶端(權限)] [可用主機名] [可用通配符]
因此,需要在/etc/exports文件中添加如下內容:
/home/felix/nfs *(rw,sync,no_root_squash,no_subtree_check)
/home/felix/nfs
*:允許所有的網段訪問,也可以使用具體的IP
rw:掛接此目錄的客戶端對該共享目錄具有讀寫權限
sync:資料同步寫入內存和硬盤
no_subtree_check:不檢查父目錄的權限。
no_root_squash:root用戶具有對根目錄的完全管理訪問權限。
1.4、啟動NFS服務器。
在命令行終端輸入如下命令:
$ sudo exportfs –rv //使exports 文件生效
$ sudo /etc/init.d/rpcbind restart //重啟rpcbind
$ sudo /etc/init.d/nfs-kernel-server restart //重啟nfs服務
在Ubuntu上執行:
$ showmount -e
顯示出共享的目錄說明搭建成功。
2.配置tiny4412開發板內核,板子啟動自動掛載NFS文件系統
2.1、配置tiny4412開發板內核支持NFS
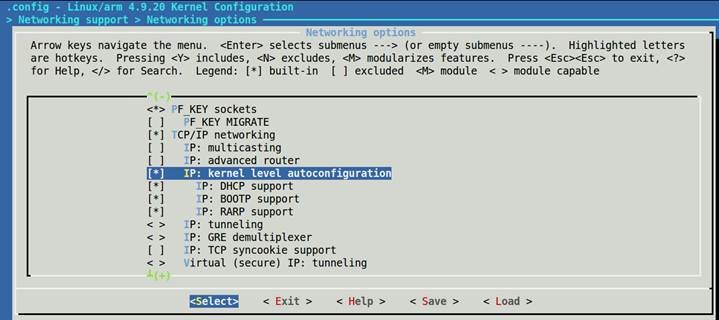
輸入 make ARCH=arm menuconfig 命令進入 linux 內核配置界面,
進入[*] Networking support --->
Networking options --->
選中[*] IP: kernel level autoconfiguration

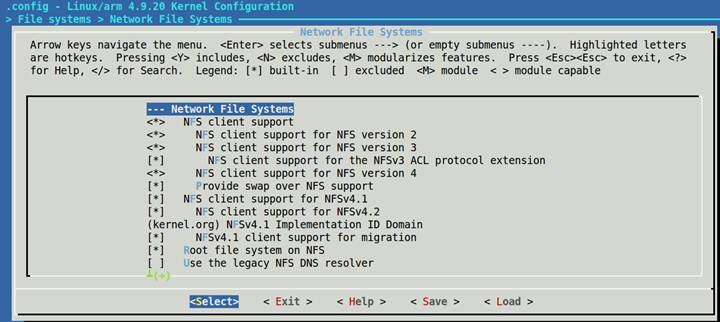
再進入File systems --->
[*] Network File Systems --->
選中如下選項:
<*> NFS client support
<*> NFS client support for NFS version 2
<*> NFS client support for NFS version 3
[*] NFS client support for the NFSv3 ACL protocol extension
<*> NFS client support for NFS version 4
[*] Provide swap over NFS support
[*] NFS client support for NFSv4.1
[*] NFS client support for NFSv4.2
[*] NFSv4.1 client support for migration
[*] Root file system on NFS

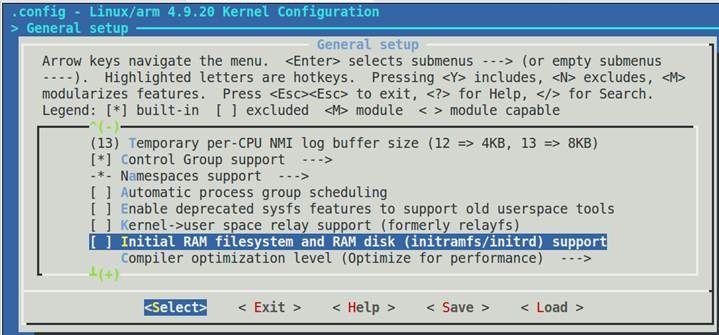
再進入General setup --->
設置Initial RAM filesystem and RAM disk (initramfs/initrd) support項為
[ ] Initial RAM filesystem and RAM disk (initramfs/initrd) support

配置完成後,保存退出並編譯內核。
2.2、配置U-boot啟動參數
2.2.1、設置U-boot的bootargs參數:
# setenv bootargs ‘root=/dev/nfs rw nfsroot=192.168.1.102:/home/felix/nfs ethmac=00:00:ff:ff:00:00 ip=192.168.1.103:192.168.1.102:192.168.1.1:255.255.255.0::eth0:off console=ttySAC0,115200 init=/linuxrc‘
# saveenv
其中關鍵是對ip參數的設置:
ip=<client-ip>:<server-ip>:<gw-ip>:<netmask>:<hostname>:<device>:<autoconf>:<dns0-ip>:<dns1-ip>
bootargs中關於nfs的參數解釋如下:
root=/dev/nfs rw nfsroot=192.168.1.102:/home/felix/nfs 表示掛載的 nfs 服務器 ip 是
192.168.1.102,掛載的目錄是/home/felix/nfs(註意:/home/felix/nfs是前面搭建 nfs 服務器設置的);
ethmac=00:00:ff:ff:00:00表示網卡的地址是00:00:ff:ff:00:00,該地址在網卡驅動加載成功後會打印出來;
ip=192.168.1.103:192.168.1.102:192.168.1.1:255.255.255.0::eth0:off中192.168.1.103是我們開發板的ip地址,192.168.1.102是nfs服務器的ip,192.168.1.1是開發板的網關,255.255.255.0 是子網掩碼,eth0是網卡設備的名稱。
對bootargs的設置可以放在設備樹中或者u-boot中,並且u-boot的bootargs的優先級更高,會將設備樹中的bootargs覆蓋了。具體請參考內核文檔:
Documentation/kernel-parameters.txt
Documentation/filesystems/nfs/nfsroot.txt
2.2.2、設置U-boot的bootcmd參數:
如果用NFS啟動根文件系統的話,使用bootm啟動內核的時候,就不需要傳遞ramdisk的地址了(如:bootm 0x40000000 – 0x4200000 ),否則根文件系統還是ramdisk。U-boot的bootcmd參數設置如下:
# setenv bootcmd ‘usb start; usb reset;tftp 0x40007000 uImage; tftp 0x42000000 exynos4412-tiny4412sdk.dtb;bootm 0x40007000 - 0x42000000; boot‘
# saveenv
關於TFTP的設置參考《X-010 FriendlyARM tiny4412 uboot移植之 uboot移植之移植網卡驅動TFTP用起來》
2.3、配置Linux啟動參數
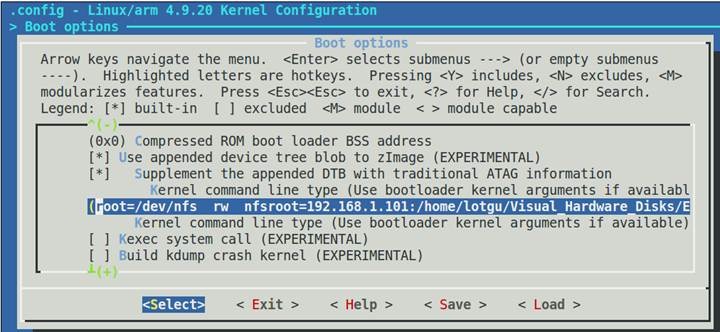
輸入 make ARCH=arm menuconfig 命令進入 linux 內核配置界面,進入Boot options --->
在 Default kernel command 裏面輸入
root=/dev/nfs rw nfsroot=192.168.1.102:/home/felix/nfs ethmac=00:00:ff:ff:00:00 ip=192.168.1.103:192.168.1.102:192.168.1.1:255.255.255.0::eth0:off console=ttySAC0,115200 init=/linuxrc
這個參數和前面設置u-boot的bootargs參數一致

保存配置參數,重新編譯內核。
完成上面的設置,就可以使用NFS啟動Tiny4412開發板的根文件系統。

參考
嵌入式環境搭建之NFS http://blog.csdn.net/tigerjibo/article/details/9748561
[學習嵌入式開發板]iTOP-4412實現NFS網絡文件系統http://www.oschina.net/question/2371345_2158782
Ubuntu14.04和Tiny6410掛載NFS服務http://www.cnblogs.com/cxd2014/p/4178889.html
使用NFS啟動Tiny4412開發板根文件系統
