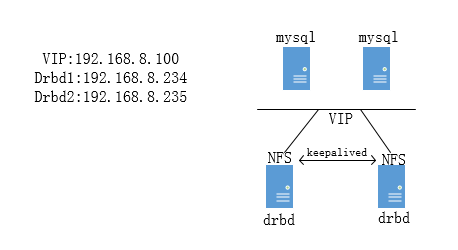
ansible安裝drbd+nfs+keepalived
ansible管理機:192.168.8.35 名稱:kick
tomcat主機: 192.168.8.234,192.168.8.235
VIP : 192.168.8.100
系統版本: Centos7.2

##### 實驗軟件下載地址
配置文件: http://pan.baidu.com/s/1eSou1Bs
NFS: http://pan.baidu.com/s/1kVieBgN
DRBD: http://pan.baidu.com/s/1nvkIxtR
######### 下載drbd 軟件及模塊
wget http://elrepo.reloumirrors.net/elrepo/el7/x86_64/RPMS/kmod-drbd84-8.4.6-1.el7.elrepo.x86_64.rpm
wget http://elrepo.reloumirrors.net/elrepo/el7/x86_64/RPMS/drbd84-utils-8.9.1-1.el7.elrepo.x86_64.rpm
######### 將下載軟件復制到各節點中去,也可以直接下載
[[email protected] ~]# ansible store -m copy -a "src=drbd84-utils-8.9.1-1.el7.elrepo.x86_64.rpm dest=/tmp/"
[[email protected] ~]# ansible store -m copy -a "src=kmod-drbd84-8.4.6-1.el7.elrepo.x86_64.rpm dest=/tmp/"
######### 三步可以合一起直接yum -y install http://elrepo.reloumirrors.net/elrepo/el7/x86_64/RPMS/kmod-drbd84-8.4.6-1.el7.elrepo.x86_64.rpm
[[email protected] ~]# ansible store -m shell -a "yum -y install /tmp/drbd84-utils-8.9.1-1.el7.elrepo.x86_64.rpm"
[[email protected] ~]# ansible store -m shell -a "yum -y reinstall /tmp/kmod-drbd84-8.4.6-1.el7.elrepo.x86_64.rpm"
######### 加載drbd模塊
[[email protected] ~]# ansible store -m shell -a "modprobe drbd"
######### 查看drbd模塊是否已加載上
[[email protected] ~]# ansible store -m shell -a "lsmod | grep drbd"
192.168.8.235 | SUCCESS | rc=0 >>
drbd 392583 0
libcrc32c 12644 2 xfs,drbd
192.168.8.234 | SUCCESS | rc=0 >>
drbd 392583 0
libcrc32c 12644 2 xfs,drbd
# 新加一個磁盤分區不需要格式化
######### 配置drbd全局配置及資源
[[email protected] ~]# ansible store -m copy -a "src=global_common.conf dest=/etc/drbd.d/"
[[email protected] ~]# ansible store -m copy -a "src=mydrbd.res dest=/etc/drbd.d/"
[[email protected] ~]# vim global_common.conf
global {
usage-count no;
}
common {
handlers {
pri-on-incon-degr "/usr/lib/drbd/notify-pri-on-incon-degr.sh; /usr/lib/drbd/notify-emergency-reboot.sh; echo b > /proc/sysrq-trigger ; reboot -f";
pri-lost-after-sb "/usr/lib/drbd/notify-pri-lost-after-sb.sh; /usr/lib/drbd/notify-emergency-reboot.sh; echo b > /proc/sysrq-trigger ; reboot -f";
local-io-error "/usr/lib/drbd/notify-io-error.sh; /usr/lib/drbd/notify-emergency-shutdown.sh; echo o > /proc/sysrq-trigger ; halt -f";
}
startup {
}
options {
}
disk {
on-io-error detach;
}
net {
cram-hmac-alg "sha1";
shared-secret "xiong123";
}
syncer {
rate 1024M;
}
}
################# 資源叫mydrbd,主機名稱一定要在本地的/etc/hosts中增加主機名稱解析否則會報錯
[[email protected] ~]# vim mydrbd.res
resource mydrbd{
device /dev/drbd0;
disk /dev/sdb1;
meta-disk internal;
on store1 {
address 192.168.8.234:7789;
}
on store2 {
address 192.168.8.235:7789;
}
}
# 更改hosts主機名稱
[[email protected] ~]# cat /etc/hosts
127.0.0.1 localhost localhost.localdomain localhost4 localhost4.localdomain4
::1 localhost localhost.localdomain localhost6 localhost6.localdomain6
192.168.8.234 store1
192.168.8.235 store2
[[email protected] ~]# ansible store -m copy -a "src=/etc/hosts dest=/etc/hosts"
######### 配置mydrbd資源並啟動服務,查看資源信息兩個沒有主的時候都是seconary
[[email protected] ~]# ansible store -m shell -a "drbdadm create-md mydrbd"
[[email protected] ~]# ansible store -m shell -a "systemctl start drbd"
[[email protected] ~]# ansible store -m shell -a "drbd-overview"
# 隨便登陸一臺設置成主節點
[[email protected] ~]# drbdadm primary --force mydrbd
# 測試查看
######### 安裝nfs軟件,也可以直接安裝nfs-utils-1.3.0-0.33.el7.x86_64.rpm 這個版本,最後有錯誤記錄
[[email protected] ~]# ansible store -m yum -a "name=nfs-utils state=installed"
######### 配置keepalived,直接使用ansible安裝即可
################# 主庫 ##################################
! Configuration File for keepalived
global_defs {
notification_email {
[email protected]
}
notification_email_from [email protected]
smtp_server 127.0.0.1
smtp_connect_timeout 30
router_id LVS_DEVEL
}
vrrp_script check_run {
script "/etc/keepalived/notify_check.sh"
interval 10
weight 10
}
vrrp_instance nfs {
state MASTER
interface eno16780032
virtual_router_id 70
priority 100
advert_int 1
nopreempt # 不讓它強制搶占資源
authentication {
auth_type PASS
auth_pass PPVk7CXXZ5U
}
track_script {
check_run weight 20 # 檢查節點信息狀態,關閉keepalived,之後它會調取notify_stop
}
notify_stop /etc/keepalived/notify_stop.sh # 當節點stop後停止所有服務
notify_master /etc/keepalived/notify_master.sh # 當節點成為master時開啟所有服務
virtual_ipaddress {
192.168.8.100
}
}
################# 備庫 ##################################
! Configuration File for keepalived
global_defs {
notification_email {
[email protected]
}
notification_email_from [email protected]
smtp_server 127.0.0.1
smtp_connect_timeout 30
router_id LVS_DEVEL
}
vrrp_script check_run {
script "/etc/keepalived/notify_check.sh"
interval 10
weight 10
}
vrrp_instance nfs {
state BACKUP
interface eno16780032
virtual_router_id 70
priority 95
advert_int 1
nopreempt # 不讓它強制搶占資源
authentication {
auth_type PASS
auth_pass PPVk7CXXZ5U
}
track_script {
check_run weight 20
}
notify_stop /etc/keepalived/notify_stop.sh
notify_master /etc/keepalived/notify_master.sh
virtual_ipaddress {
192.168.8.100
}
}
#############################################################
######### 配置NFS
[[email protected] ~]# cat /etc/exports
/data 192.168.8.0/24(rw,async,all_squash,anonuid=2021,anongid=2020)
######### 將配置文件復制到store兩個drbd服務器中
[[email protected] data]# ansible store -m copy -a "src=exports dest=/etc/"
######### 創建mysql用戶mysql組 後續使用
[[email protected] /]# ansible store -m shell -a "groupadd -g 2020 mysql"
[[email protected] /]# ansible store -m shell -a "useradd -g 2020 -u 2021 mysql -s /sbin/nologin"
[[email protected] /]# ansible store -m shell -a "chown mysql.mysql /data/ -R"
######### 復制腳本文件到各節點中
[[email protected] ~]# ansible store -m copy -a "src=notify_master.sh dest=/etc/keepalived/"
[[email protected] ~]# ansible store -m copy -a "src=notify_stop.sh dest=/etc/keepalived/"
[[email protected] ~]# ansible store -m copy -a "src=notify_check.sh dest=/etc/keepalived/"
[[email protected] ~]# ansible store -m copy -a "src=keepalived_store_drbd.conf dest=/etc/keepalived/keepalived.conf"
######################### 腳本內容 #####################################################
[[email protected] ~]# cat notify_master.sh # 當keepalived為主節點時重啟所有服務並設置drbd為主
#!/bin/bash
#
systemctl restart rpcbind &>/dev/null
systemctl restart nfs &>/dev/null
systemctl restart drbd &>/dev/null
/sbin/drbdadm primary mydrbd &>/tmp/node_change.txt
mount /dev/drbd0 /data &>/tmp/node_change.txt
[[email protected] ~]# cat notify_stop.sh # 當檢測節點為back時直接停停止各項服務
#!/bin/bash
#
umount /data
systemctl stop rpcbind &>/dev/null
systemctl stop nfs &>/dev/null
drbdadm secondary mydrbd &>/tmp/node_change.txt
echo -e "\n" &> /tmp/node_change.txt
systemctl stop drbd &>/dev/null
[[email protected] ~]# cat notify_check.sh # 檢查服務的正常性 當NFS服務不正常時直接停止keepalived然後再調取notify_stop腳本
#!/bin/sh
###檢查nfs可用性:進程和是否能夠掛載
systemctl status nfs &>/dev/null
if [ $? -ne 0 ];then
###如果服務狀態不正常,先嘗試重啟服務
systemctl restart restart
systemctl status nfs &>/dev/null
if [ $? -ne 0 ];then
###若重啟nfs服務後,仍不正常
###卸載drbd設備
umount /dev/drbd0
###將drbd主降級為備
drbdadm secondary r0
#關閉keepalived
systemctl stop keepalived
fi
fi
################################ 檢查三項服務正常,當其中的任何一個不正常都直接幹掉 ##################
#/bin/bash
systemctl status rpcbind &>/dev/null
VAR1=$?
systemctl status nfs &>/dev/null
VAR2=$?
systemctl status drbd &>/dev/null
VAR3=$?
if [ $VAR1 -ne 0 || $VAR2 -ne 0 || $VAR -ne 0 ];then
systemctl stop rpcbind &>/dev/null
systemctl stop nfs &>/dev/null
umount /data
drbdadm secondary mydrbd &>/tmp/node_change.txt
echo -e "\n" >> /tmp/node_change.txt
systemctl stop drbd &>/dev/null
systemctl stop keepalived
fi
##########################################################################################
############## 啟動服務 ###########
[[email protected] data]# ansible store -m shell -a "systemctl start keepalived"
[[email protected] data]# ansible store -m shell -a "systemctl start rpcbind"
[[email protected] data]# ansible store -m shell -a "systemctl start nfs"
############### 配合日誌查看 ############
[[email protected] data]# ansible store -m shell -a "systemctl status keepalived"
[[email protected] data]# ansible store -m shell -a "systemctl status nfs"
[[email protected] data]# ansible store -m shell -a "cat /var/log/message"
##########################################################################################
# 檢查VIP地址以及NFS是否掛載
[[email protected] ~]# showmount -e 192.168.8.100
Export list for 192.168.8.100:
/data 192.168.8.0/24
################################## NFS 出現的一些錯誤 #################################
[[email protected] ~]# mount -t nfs 192.168.8.234:/data /data
mount.nfs: access denied by server while mounting 192.168.8.234:/data
#在/etc/exports中增加insecure,http://blog.chinaunix.net/uid-20554957-id-3444786.html
/data 192.168.8.0(rw,insecure,no_root_squash,async)
[[email protected] data]# systemctl restart nfs
###### 一直報這個錯 ###### 排查確認是 centos7 關於nfs 1.3.0-0.21.el7_2 版本的bug
Jun 27 09:29:52 store1 nfsdcltrack[12174]: sqlite_insert_client: insert statement prepare failed: table clients has 2 columns but 3 values were supplied
# 將版本直接升級至nfs-utils-1.3.0-0.33.el7.x86_64
# 需要的軟件包 libtirpc需要大於0.2.4-0.7,libtirpc-devel,nfs-utils-1.3.0-0.33.el7
[[email protected] ~]# ansible store -m copy -a "src=libtirpc-0.2.4-0.8.el7.x86_64.rpm dest=/tmp"
[[email protected] ~]# ansible store -m copy -a "src=libtirpc-devel-0.2.4-0.8.el7.x86_64.rpm dest=/tmp"
[[email protected] ~]# ansible store -m copy -a "src=nfs-utils-1.3.0-0.33.el7.x86_64.rpm dest=/tmp"
[[email protected] ~]# ansible store -m shell -a "rpm -Uvh /tmp/libtirpc-0.2.4-0.8.el7.x86_64.rpm"
[[email protected] ~]# ansible store -m shell -a "rpm -Uvh /tmp/libtirpc-devel-0.2.4-0.8.el7.x86_64.rpm"
[[email protected] ~]# ansible store -m shell -a "rpm -Uvh /tmp/nfs-utils-1.3.0-0.33.el7.x86_64.rpm"
本文出自 “xiong” 博客,請務必保留此出處http://xiong51.blog.51cto.com/5239058/1942319
ansible安裝drbd+nfs+keepalived
