nginx+tomcat負載均衡
實驗環境:
nginx-server:192.168.20.194
tomcatweb01:192.168.20.150
tomcatweb02:192.168.20.163
#####################################################################
nginx-server:
[[email protected] ~]# yum install -y pcre-devel zlib-devel
[[email protected] ~]# tar zxvf nginx-1.6.0.tar.gz -C /usr/src
[[email protected] ~]# cd /usr/src/nginx-1.6.0/
[[email protected] nginx-1.6.0]# ./configure --prefix=/usr/local/nginx --user=nginx --group=nginx --with-http_stub_status_module
[[email protected] nginx-1.6.0]# make && make install
[[email protected] nginx-1.6.0]# ln -s /usr/local/nginx/sbin/nginx /usr/local/sbin/
[[email protected] nginx-1.6.0]# useradd -M -s /sbin/nologin ngin
[[email protected] nginx-1.6.0]# nginx -t
nginx: the configuration file /usr/local/nginx/conf/nginx.conf syntax is ok
nginx: configuration file /usr/local/nginx/conf/nginx.conf test is successful
[[email protected] nginx-1.6.0]# vim /etc/init.d/nginx
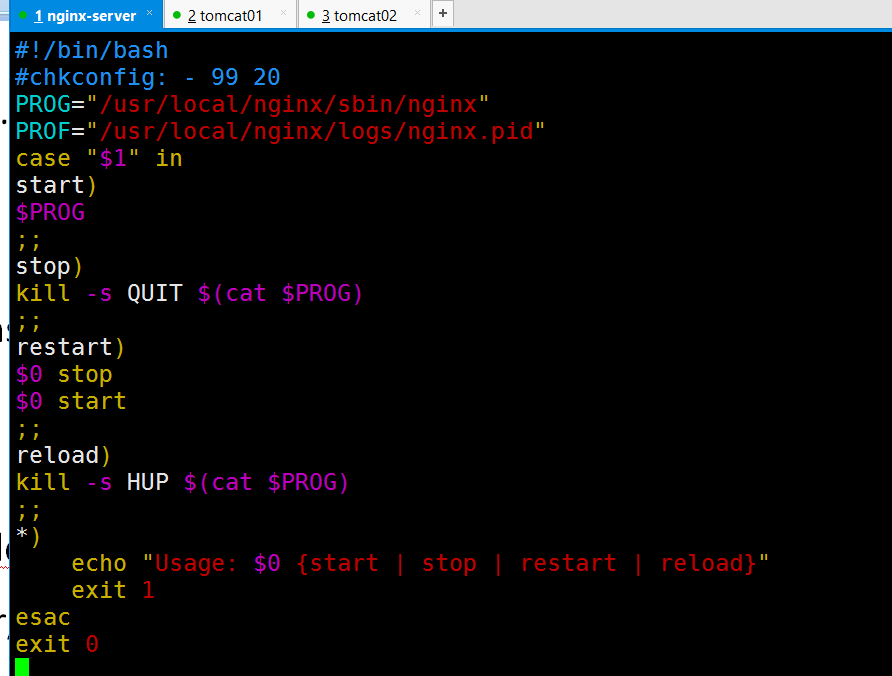
[[email protected] nginx-1.6.0]# chmod +x /etc/init.d/nginx
[[email protected] nginx-1.6.0]# /etc/init.d/nginx start
[[email protected] nginx-1.6.0]# netstat -anput | grep nginx
tcp 0 0 0.0.0.0:80 0.0.0.0:* LISTEN 9899/nginx: master
############################nginxweb平臺部署完成###############################################
tomcat-web平臺
[[email protected] ~]# tar zxvf jdk-7u65-linux-x64.gz -C /usr/src/
[[email protected] ~]# cd /usr/src/
[[email protected] src]# mv jdk1.7.0_65/ /usr/local/java
[[email protected] src]# which java
/usr/bin/java
[[email protected] src]# ln -s /usr/local/java/bin/* /usr/bin/
[[email protected] src]# vim /etc/profile.d/java.sh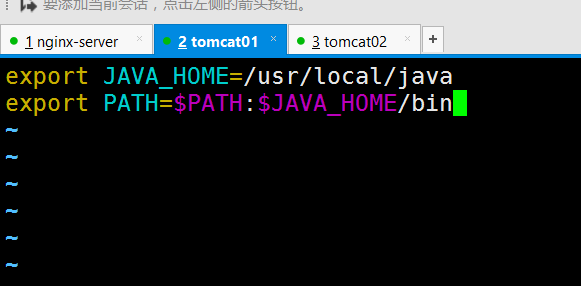
[[email protected] src]# source /etc/profile.d/java.sh
[[email protected] src]# echo $PATH
/usr/lib64/qt-3.3/bin:/usr/local/sbin:/usr/local/bin:/sbin:/bin:/usr/sbin:/usr/bin:/root/bin:/usr/local/java/bin
[[email protected] src]# vim /etc/profile.d/java.sh
You have new mail in /var/spool/mail/root
[[email protected] src]# source /etc/profile.d/java.sh
[[email protected] src]# echo $PATH
/usr/lib64/qt-3.3/bin:/usr/local/sbin:/usr/local/bin:/sbin:/bin:/usr/sbin:/usr/bin:/root/bin:/usr/local/java/bin
[[email protected] src]# java -version
java version "1.7.0_65"
Java(TM) SE Runtime Environment (build 1.7.0_65-b17)
Java HotSpot(TM) 64-Bit Server VM (build 24.65-b04, mixed mode)
java環境部署完成,接下來安裝配置tomcat
[[email protected] ~]# tar zxvf apache-tomcat-7.0.54.tar.gz -C /usr/src
[[email protected] ~]# cd /usr/src/
[[email protected] src]# mv apache-tomcat-7.0.54/ /usr/local/tomcat
[[email protected] src]# /usr/local/tomcat/bin/startup.sh
[[email protected] ~]# cd /usr/src/
[[email protected] src]# mv apache-tomcat-7.0.54/ /usr/local/tomcat
[[email protected] src]# /usr/local/tomcat/bin/startup.sh
[[email protected] src]# netstat -anput | grep 8080
tcp 0 0 :::8080 :::* LISTEN 27993/java
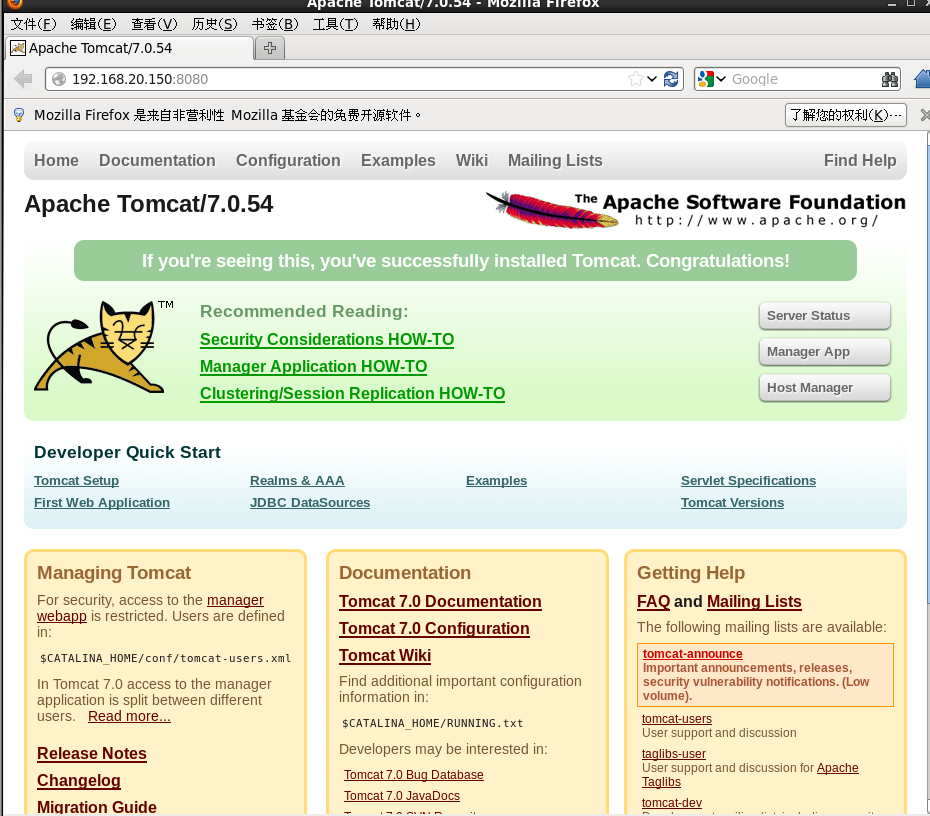
驗證tomcat是否正常訪問firefox http://192.168.20.150:8080
[[email protected] ~]# mkdir /web/xiaoyu -p
[[email protected] ~]# vim /web/xiaoyu/index.jsp

[[email protected] ~]# vim /usr/local/tomcat/conf/server.xml

[[email protected] ~]# elinks 192.168.20.150:8080 #由此我們tomcat01web頁面可以正常運行

########################tomcatweb01服務部署完成############################################
tomcatweb02服務(第二臺tomcat服務步驟是完全一樣的 ,為了便於區別,僅僅是更改了網頁內容)
準備java環境---
[[email protected] ~]# tar zxvf jdk-7u65-linux-x64.gz -C /usr/src/
[[email protected] ~]# cd /usr/src/
[[email protected] src]# mv jdk1.7.0_65/ /usr/local/java
[email protected] src]# ln -s /usr/local/java/bin/* /usr/bin/
[[email protected] src]# vim /etc/profile.d/java.sh
export JAVA_HOME=/usr/local/java
export PATH=$PATH:$JAVA_HOME/bin
[[email protected] src]# source /etc/profile.d/java.sh
[[email protected] src]# echo $PATH
/usr/local/sbin:/usr/local/bin:/sbin:/bin:/usr/sbin:/usr/bin:/root/bin:/usr/local/java/bin
[[email protected] src]# java -version
java version "1.7.0_65"
Java(TM) SE Runtime Environment (build 1.7.0_65-b17)
Java HotSpot(TM) 64-Bit Server VM (build 24.65-b04, mixed mode)
安裝tomcatweb02
[email protected] ~]# tar zxvf apache-tomcat-7.0.54.tar.gz -C /usr/src/
[[email protected] ~]# cd /usr/src/
[[email protected] src]# mv apache-tomcat-7.0.54/ /usr/local/tomcat
[[email protected] src]# /usr/local/tomcat/bin/startup.sh
Using CATALINA_BASE: /usr/local/tomcat
Using CATALINA_HOME: /usr/local/tomcat
Using CATALINA_TMPDIR: /usr/local/tomcat/temp
Using JRE_HOME: /usr/local/java
Using CLASSPATH: /usr/local/tomcat/bin/bootstrap.jar:/usr/local/tomcat/bin/tomcat-juli.jar
Tomcat started.
[[email protected] src]# netstat -anput | grep 8080
tcp 0 0 :::8080 :::* LISTEN 20632/java
[[email protected] ~]# vim /web/xiaoyu/index.jsp
<%@ page language="java" import="java.util.*" pageEncoding="UTF-8"%>
<html>
<head>
<title>JSP test2 pge</title>
</head>
<body>
<% out.println(“ This is are tomcat website ;http://xiaoyu.test2.com");%>
</body>
</html>

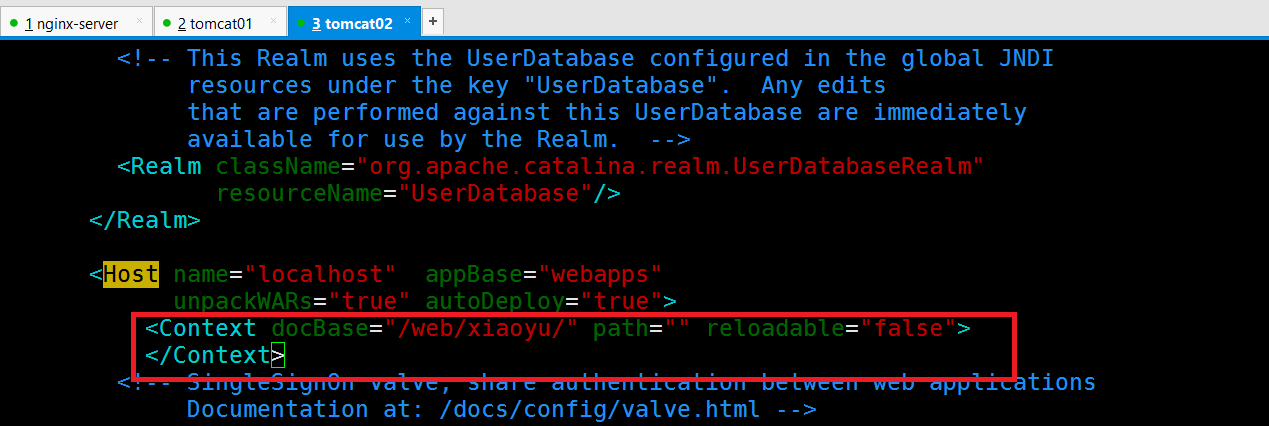
[email protected] ~]# vim /usr/local/tomcat/conf/server.xml
tomcatweb01網站頁面驗證
[[email protected] ~]# elinks 192.168.20.163:8080

######################################################以上步驟,nginx,以及兩臺tomcat網站已經搭建完成########################################################
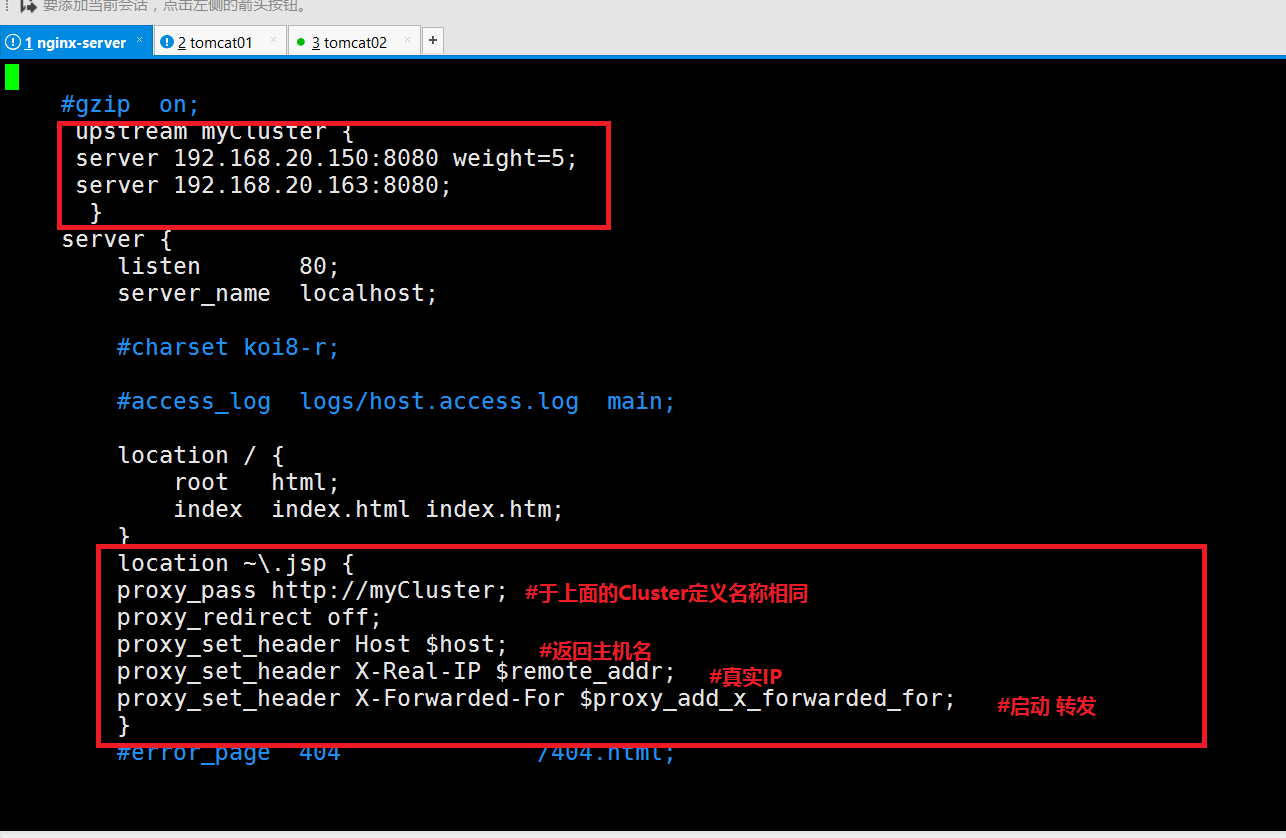
接下來我們需要讓nginx代理兩臺tomcat網站,並實現負載均衡
[[email protected] ~]# vim /usr/local/nginx/conf/nginx.conf
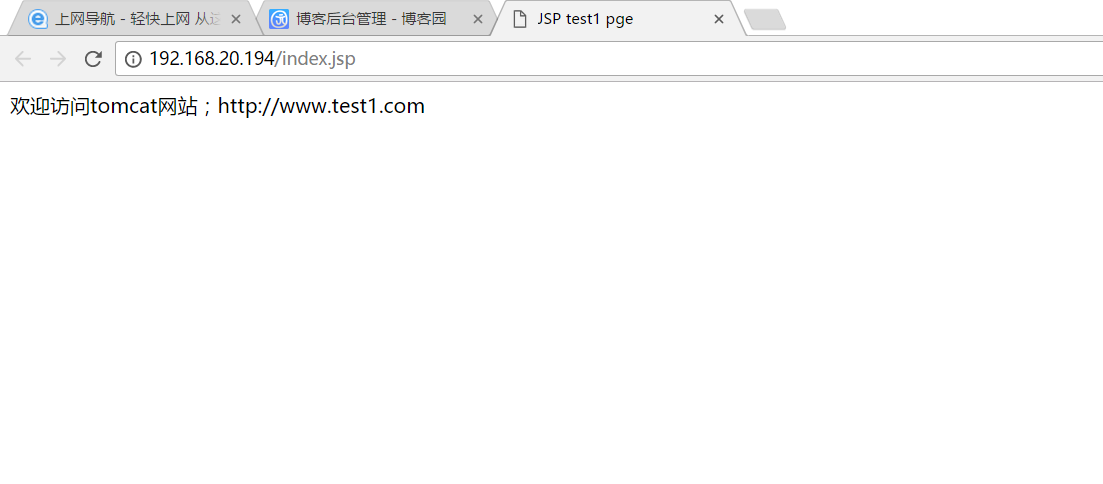
#############################################驗證:打開本地瀏覽器輸入nginx自己的IP地址,反復刷新,即可出現另外兩臺tomcat頁面,即實現負載####################
http://192.168.20.194/index.jsp

nginx+tomcat負載均衡
