Apache Shiro學習----配置(與SpringMVC集成)
阿新 • • 發佈:2017-07-26
async 匹配 過濾 -i fig hit http struct 找到
1.web.xml文件中配置
<!--將shiro的配置文件交給Spring監聽器初始化-->
<context-param>
<param-name>contextConfigLocation</param-name>
<param-value>classpath:spring.xml,classpath:spring-shiro-web.xml</param-value>
</context-param>
<!-- shiro配置 開始 --> <!-- shiro filter的名字是shiroFilter,那麽在shiro的配置文件中要有一個名字為shiroFilter的bean-->
<filter>
<filter-name>shiroFilter</filter-name>
<filter-class>org.springframework.web.filter.DelegatingFilterProxy</filter-class>
<async-supported>true</async-supported>
<init-param>
<param-name>targetFilterLifecycle</param-name>
<param-value>true</param-value>
</init-param>
</filter>
<filter-mapping>
<filter-name>shiroFilter</filter-name>
<url-pattern>/*</url-pattern>
</filter-mapping>
<!-- shiro配置 結束 -->
由於項目通過Spring管理,因此所有的配置原則上都是交給Spring。DelegatingFilterProxy的功能是通知Spring將所有的Filter交給ShiroFilter管理。
2.在classpath路徑下配置spring-shiro-web.xml文件
<beans xmlns="http://www.springframework.org/schema/beans"
xmlns:xsi="http://www.w3.org/2001/XMLSchema-instance" xmlns:p="http://www.springframework.org/schema/p"
xmlns:context ="http://www.springframework.org/schema/context"
xmlns:mvc="http://www.springframework.org/schema/mvc"
xsi:schemaLocation="http://www.springframework.org/schema/beans
http://www.springframework.org/schema/beans/spring-beans-3.1.xsd
http://www.springframework.org/schema/context
http://www.springframework.org/schema/context/spring-context-3.1.xsd
http://www.springframework.org/schema/mvc
http://www.springframework.org/schema/mvc/spring-mvc-4.0.xsd">
<!-- 緩存管理器 使用Ehcache實現 -->
<bean id="cacheManager" class="org.apache.shiro.cache.ehcache.EhCacheManager">
<property name="cacheManagerConfigFile" value="classpath:ehcache.xml" />
</bean>
<!-- 憑證匹配器 -->
<bean id="credentialsMatcher" class="utils.RetryLimitHashedCredentialsMatcher">
<constructor-arg ref="cacheManager" />
<property name="hashAlgorithmName" value="md5" />
<property name="hashIterations" value="2" />
<property name="storedCredentialsHexEncoded" value="true" />
</bean>
<!-- Realm實現 -->
<bean id="userRealm" class="utils.UserRealm">
<property name="credentialsMatcher" ref="credentialsMatcher" />
</bean>
<!-- 安全管理器 -->
<bean id="securityManager" class="org.apache.shiro.web.mgt.DefaultWebSecurityManager">
<property name="realm" ref="userRealm" />
</bean>
<!-- Shiro的Web過濾器 -->
<bean id="shiroFilter" class="org.apache.shiro.spring.web.ShiroFilterFactoryBean">
<property name="securityManager" ref="securityManager" />
<property name="loginUrl" value="/" />
<property name="unauthorizedUrl" value="/" />
<property name="filterChainDefinitions">
<value>
/authc/admin = roles[admin]
/authc/** = authc
/** = anon
</value>
</property>
</bean>
<bean id="lifecycleBeanPostProcessor" class="org.apache.shiro.spring.LifecycleBeanPostProcessor" />
</beans>
需要註意filterChainDefinitions過濾器中對於路徑的配置是有順序的,當找到匹配的條目之後容器不會再繼續尋找。因此帶有通配符的路徑要放在後面。
3.Shiro內置過濾器說明 (Shiro Filter的執行順序:自上而下,從左到右” 即可。)
通常可分為三組:
1)身份驗證相關的 -------authc,anon,authcBasic,logout,user
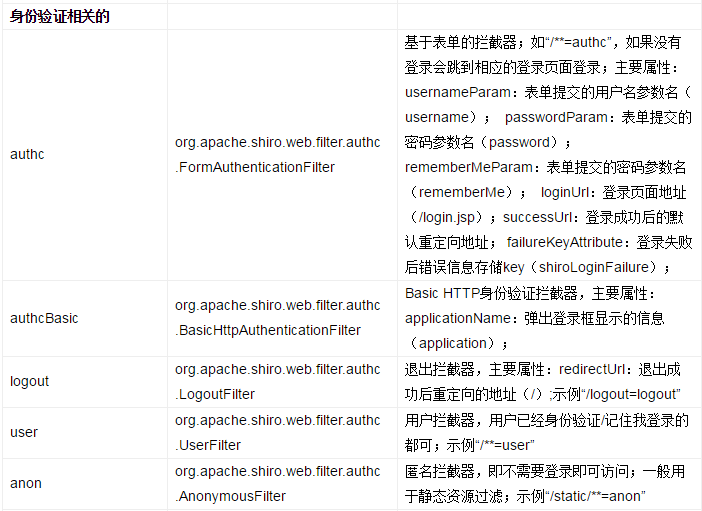
註意user和authc不同:當應用開啟了rememberMe時,用戶下次訪問時可以是一個user,但絕不會是authc,因為authc是需要重新認證的
2)授權相關的 ---- perms,port,rest,roles,ssl
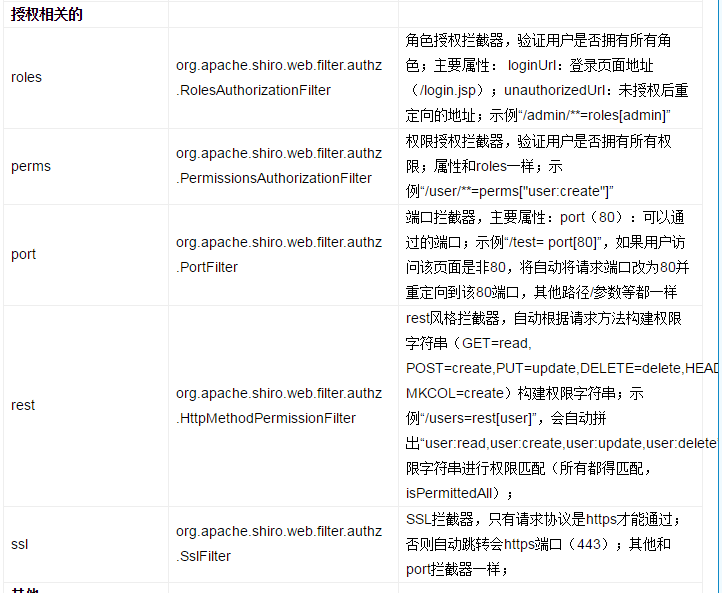
3)其他 ---noSessionCreation
Apache Shiro學習----配置(與SpringMVC集成)